EBF User Guide
Supported Operating Systems
Debian 11
Ubuntu 20.04.2/22.04
Supported Web Browsers
Google Chrome (Version: 132.0.6834.83)
Microsoft Edge (Version: 132.0.2957.115)
NOTE The EBF software has been tested and is supported on the above set of web browsers. It may or may not function as intended with untested or unsupported browsers. While we strive to ensure broad compatibility, the performance and behavior of the software cannot be guaranteed on browsers that have not been explicitly tested or are outside of our supported list. For optimal performance, please use one of the recommended browsers.
Quick Start Guide
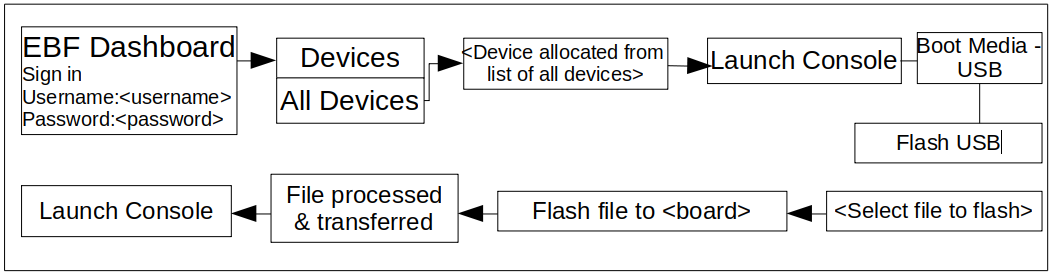
Device allocation
To access the device’s web console, the device must be allocated to the user first.
Port Forwarding
Device Static IP
Power control features
There are three power control features to change the power state of the device.
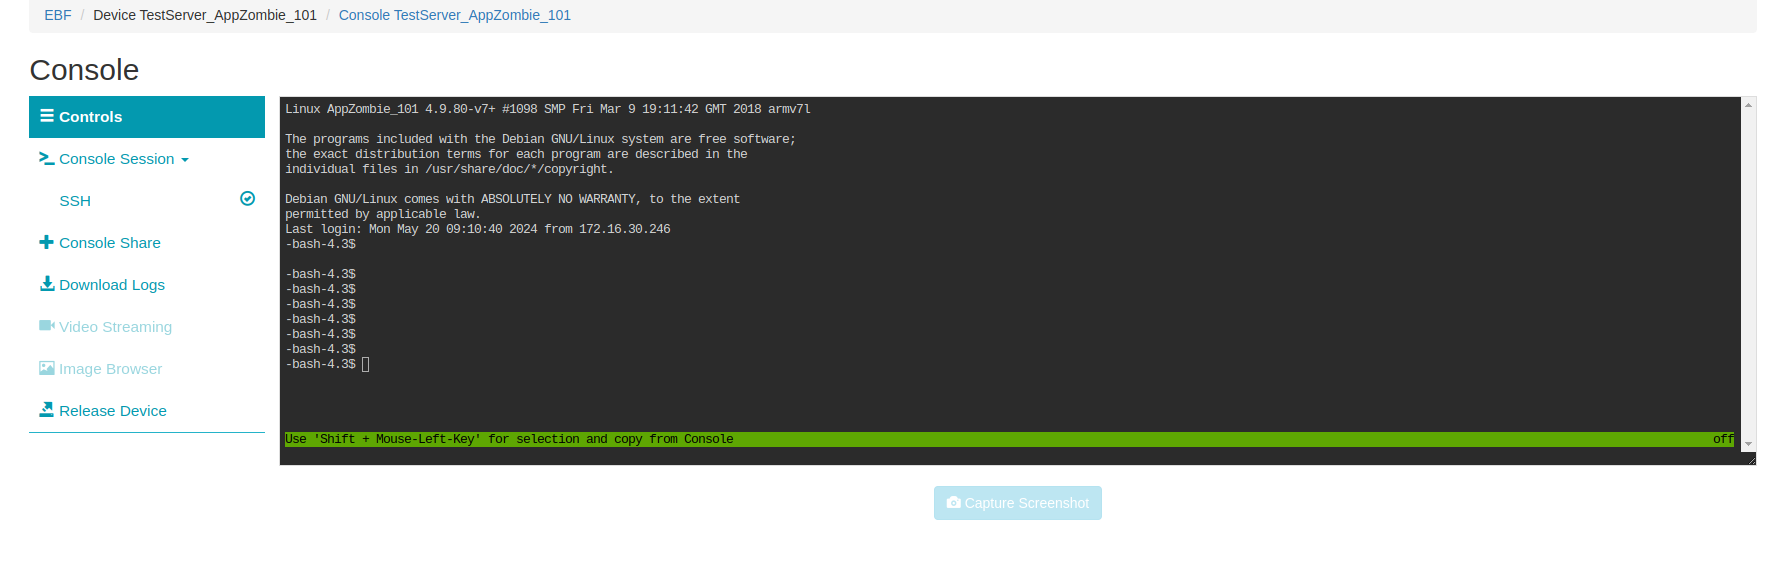
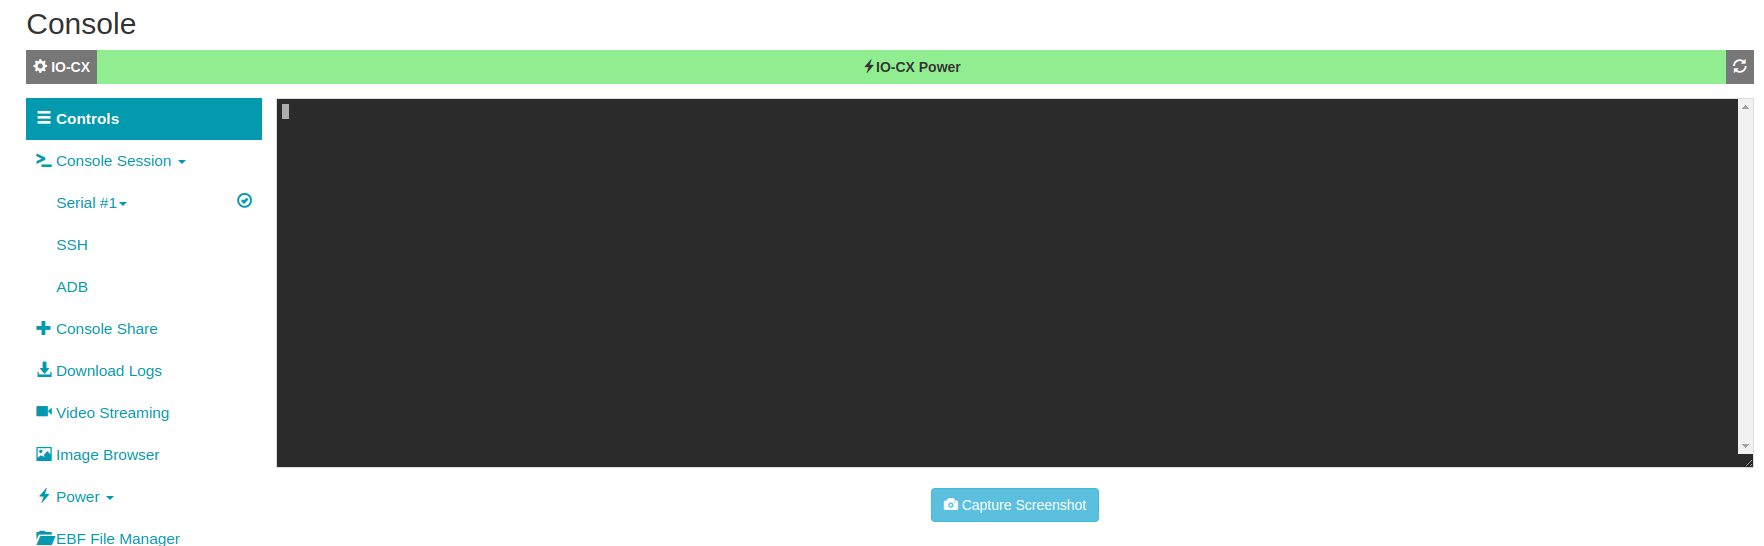
Access web console
After device allocation to user, web console session must be accessed.
Download console Logs
Console Sharing
Hotplugs
Netboot
Once web console session is accessed, the device needs to be booted up for testing and other processes.
SD card boot
USB boot
Video Streaming

Capture Screenshot

Device release
The user must release the device after use.
How to allocate Device available on EBF server
Following are the steps to allocate board to the user available on the EBF server:
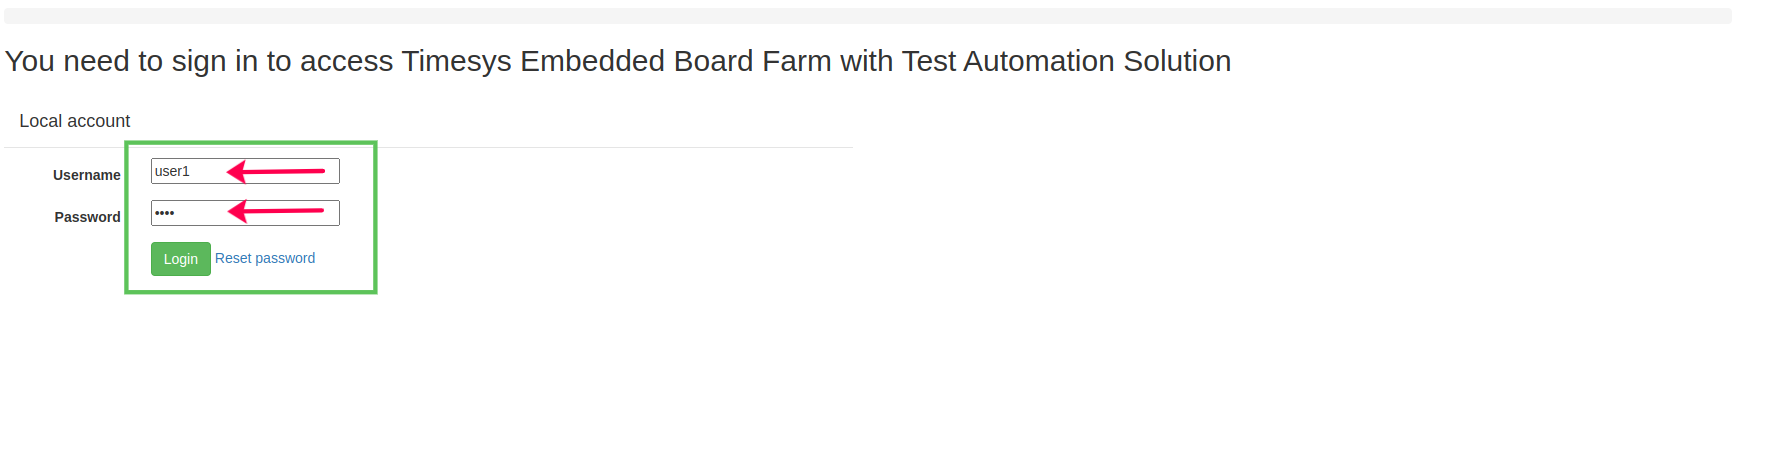
1 Login to the EBF homepage/Dashboard through a web browser with credentials.
Username : <username>
Password : <password>
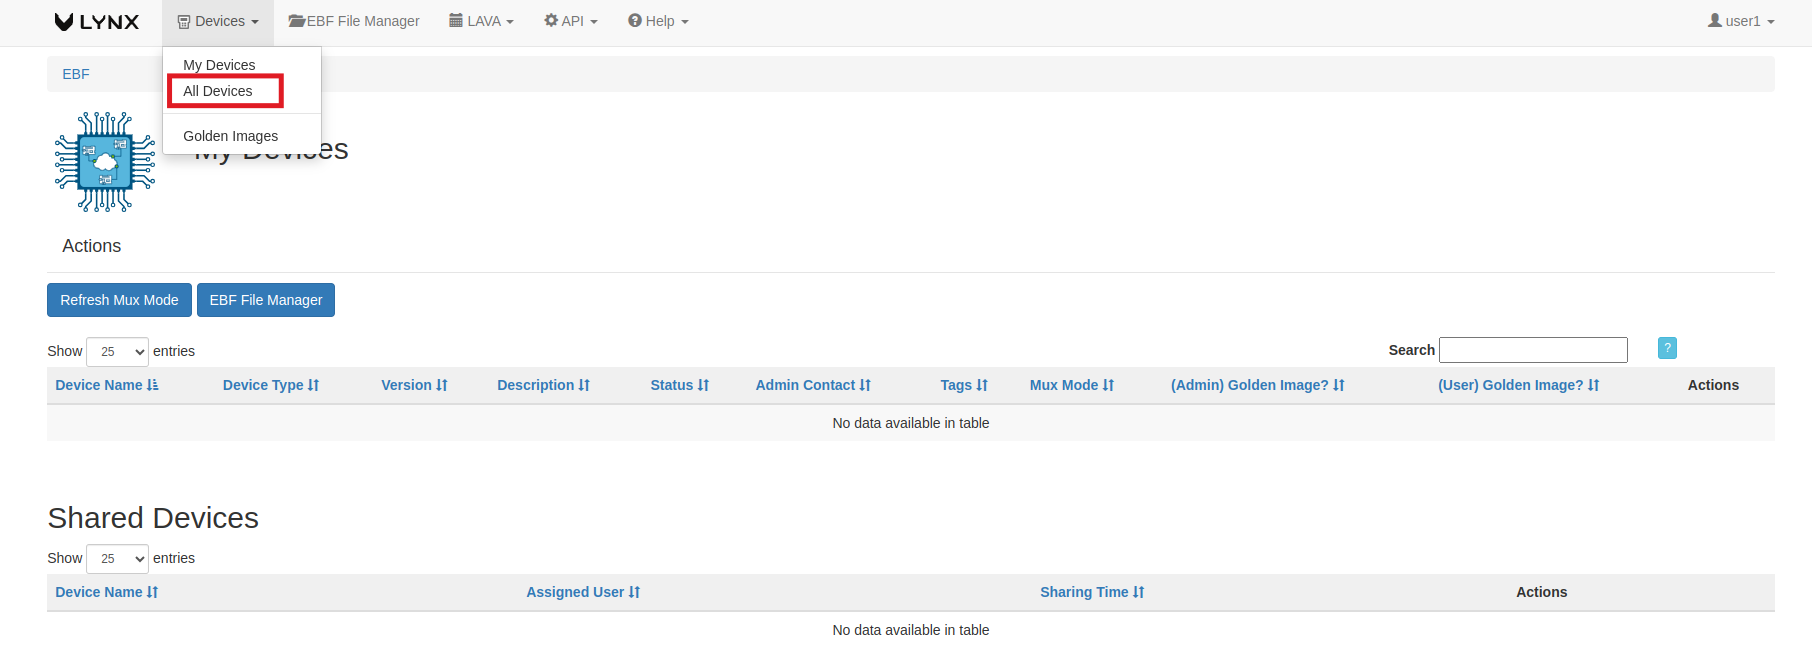
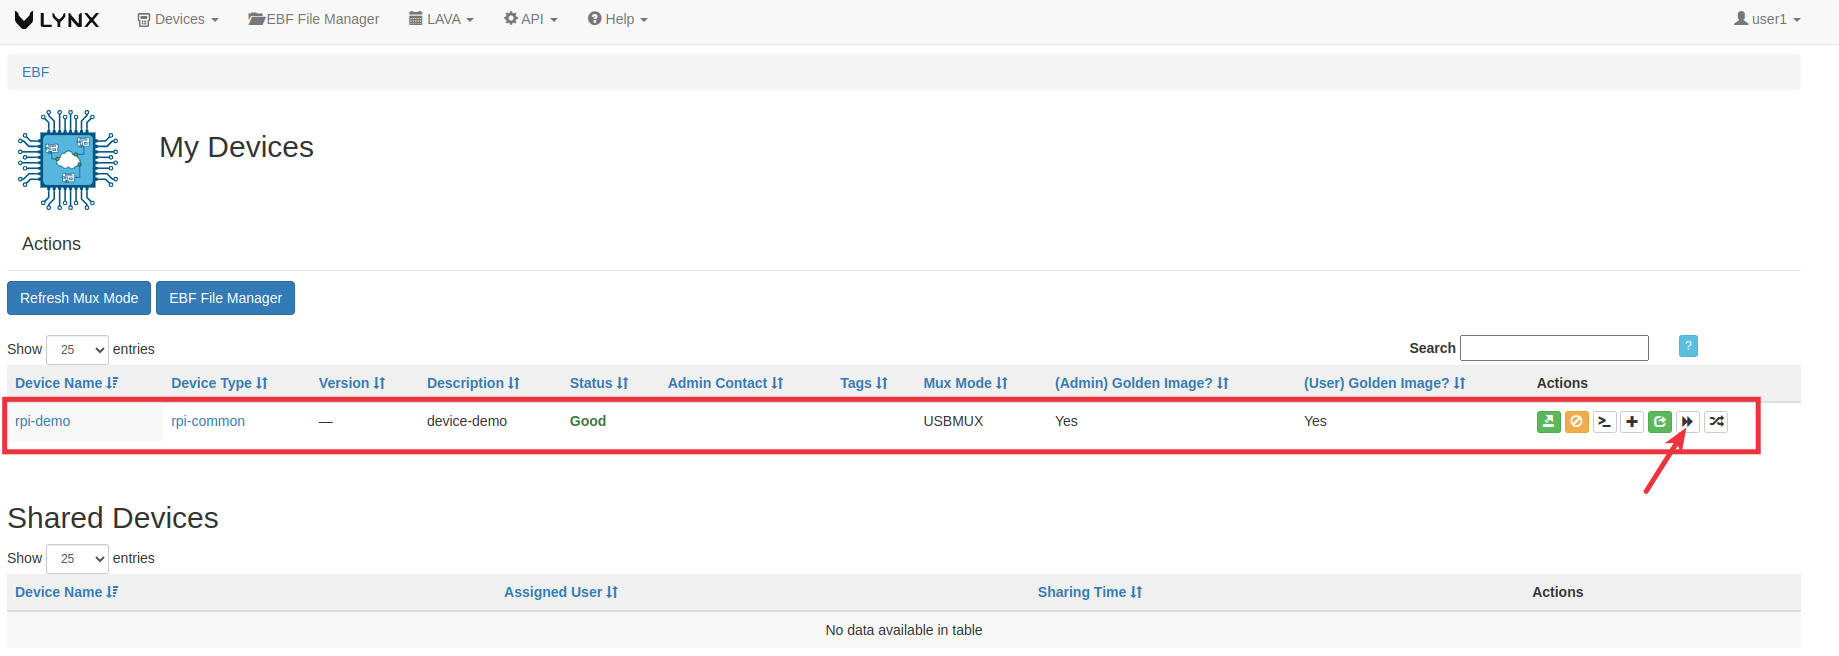
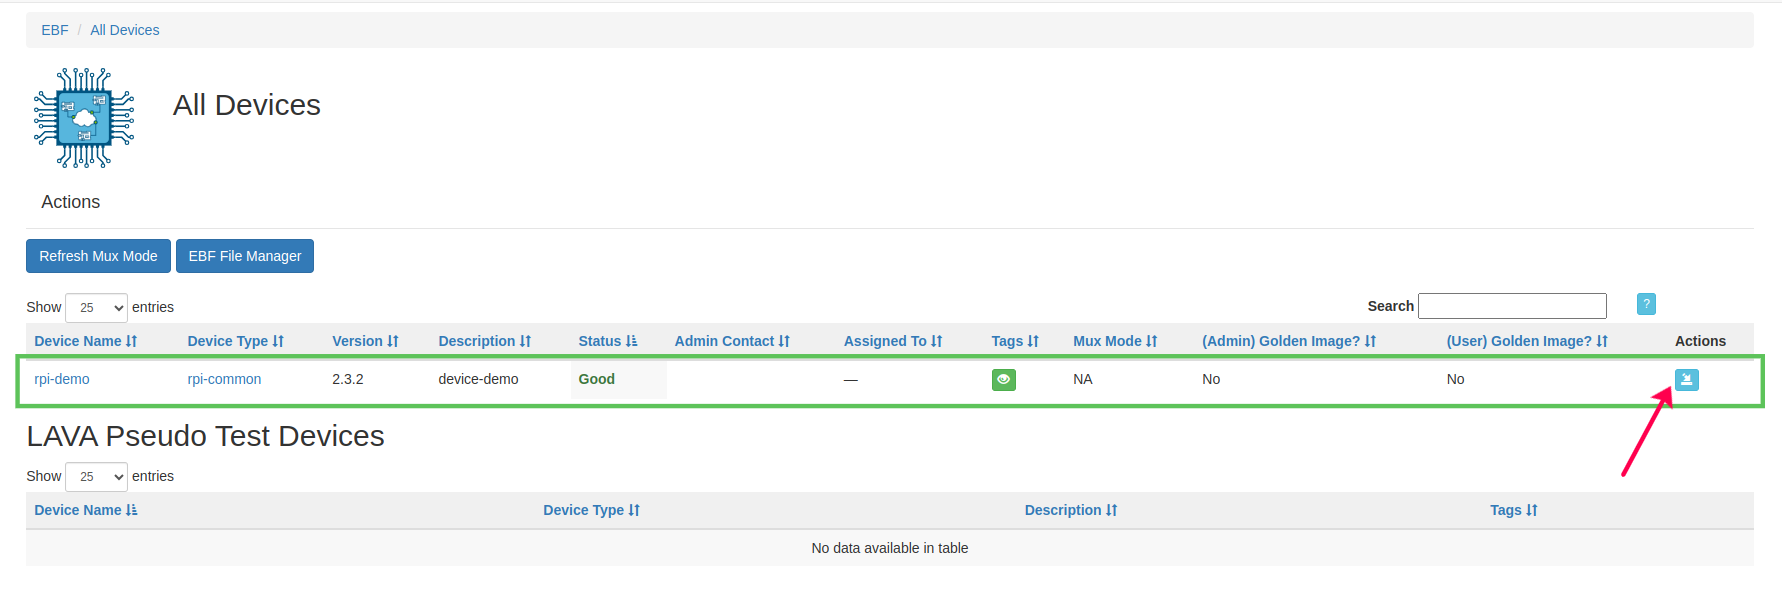
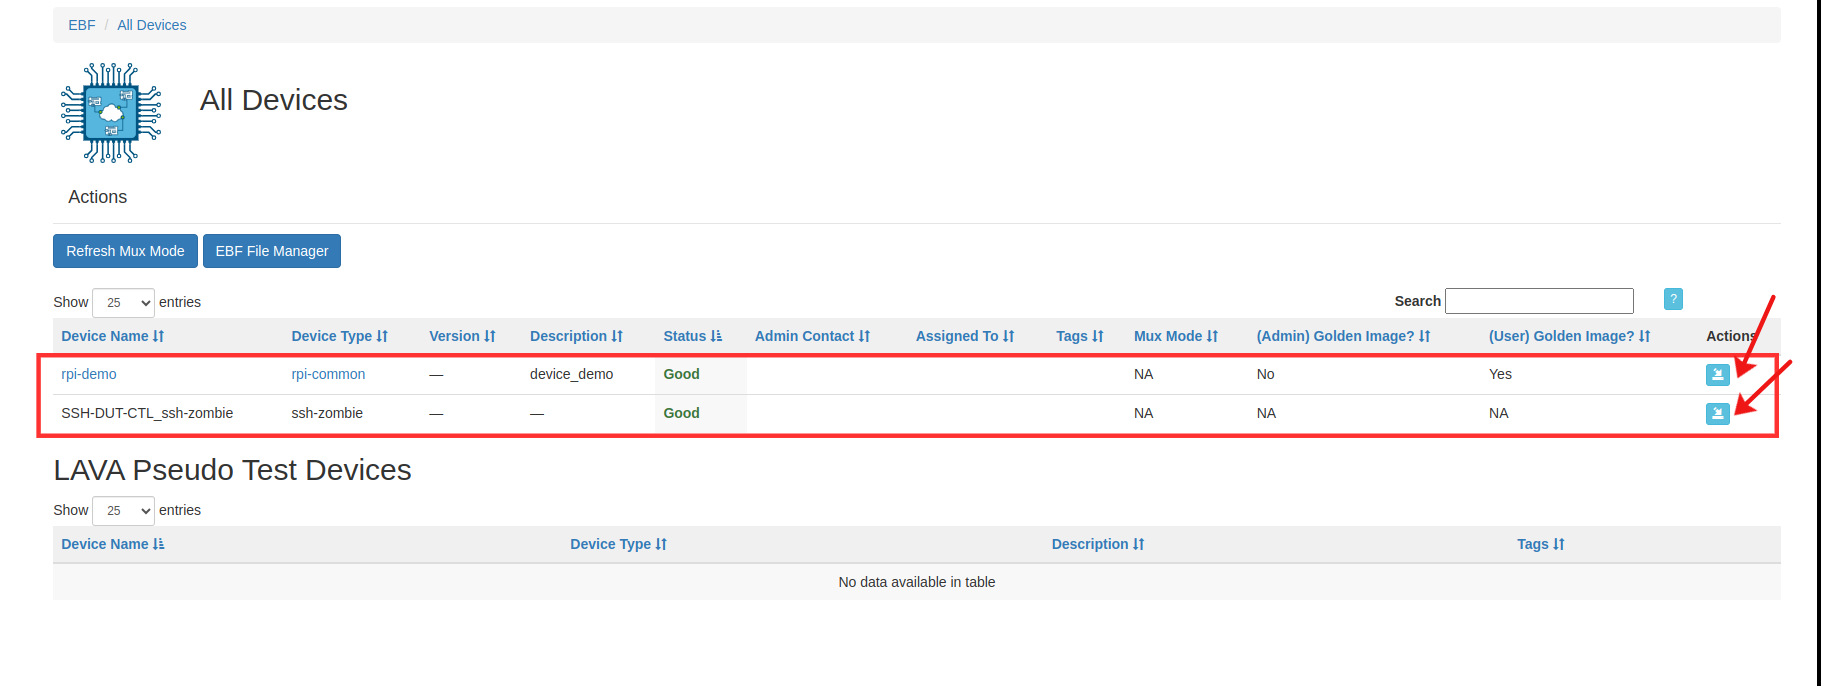
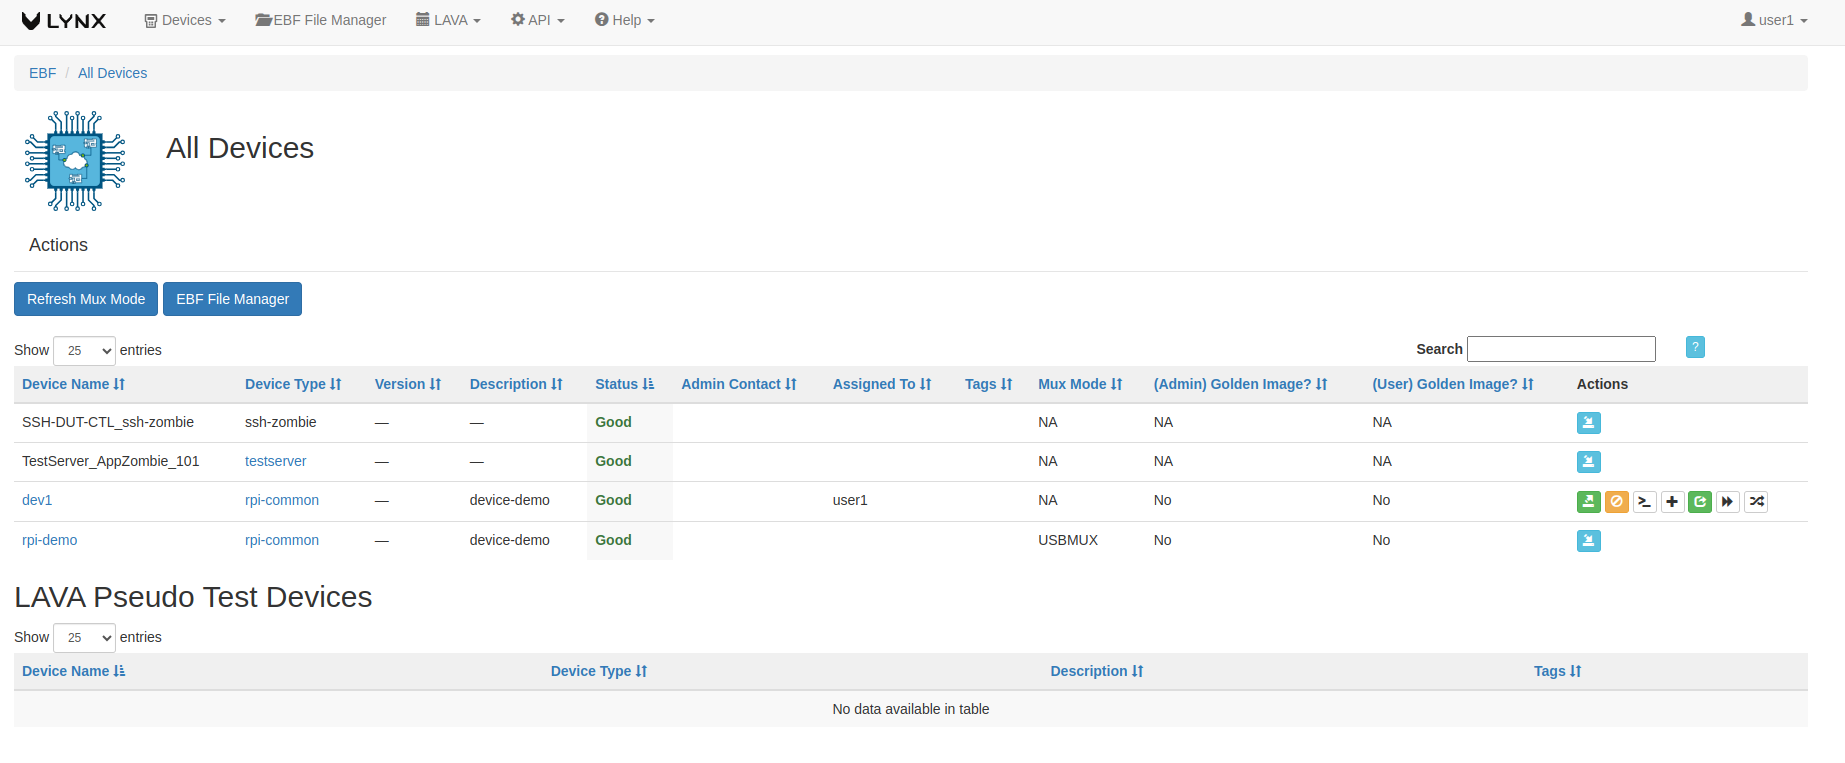
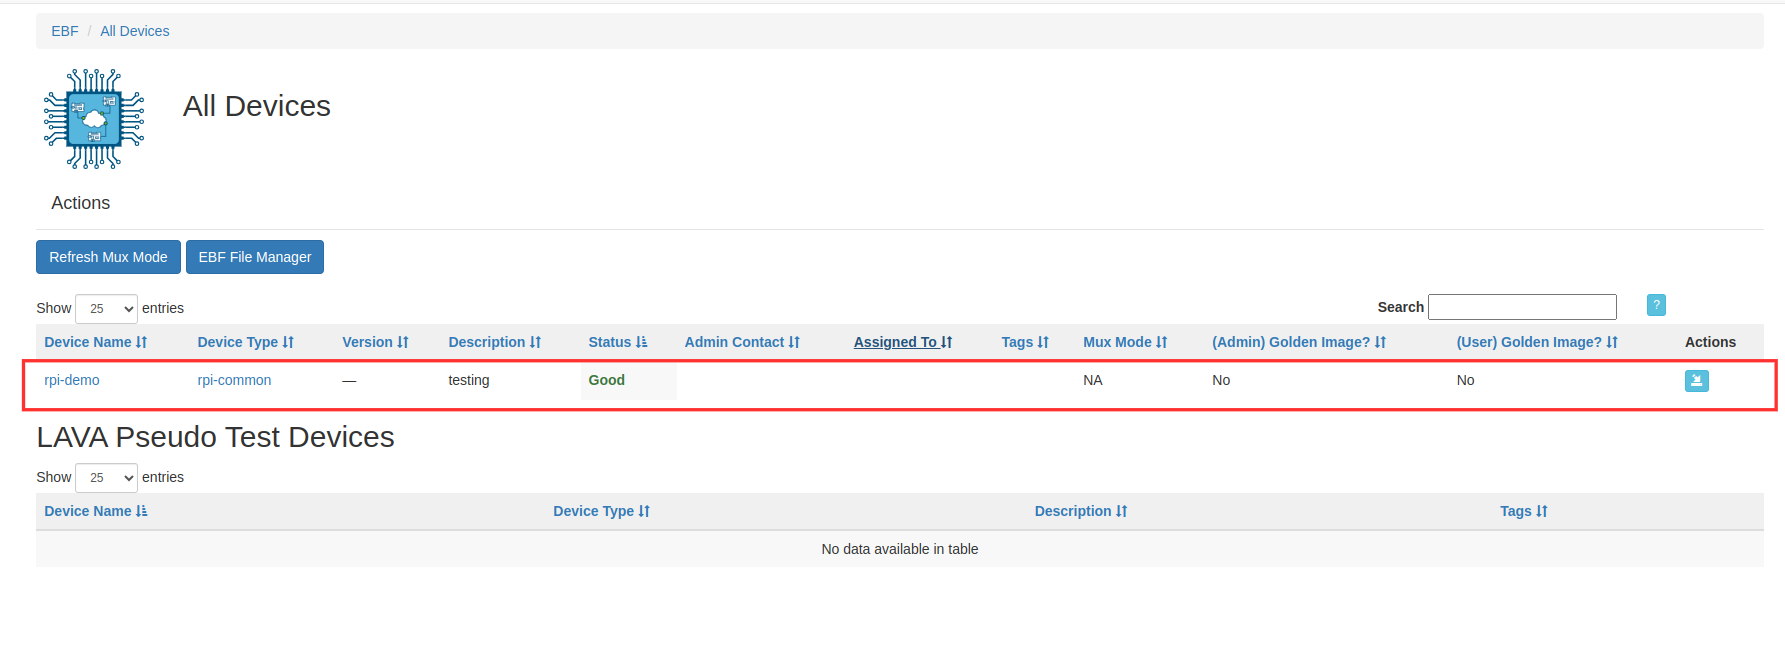
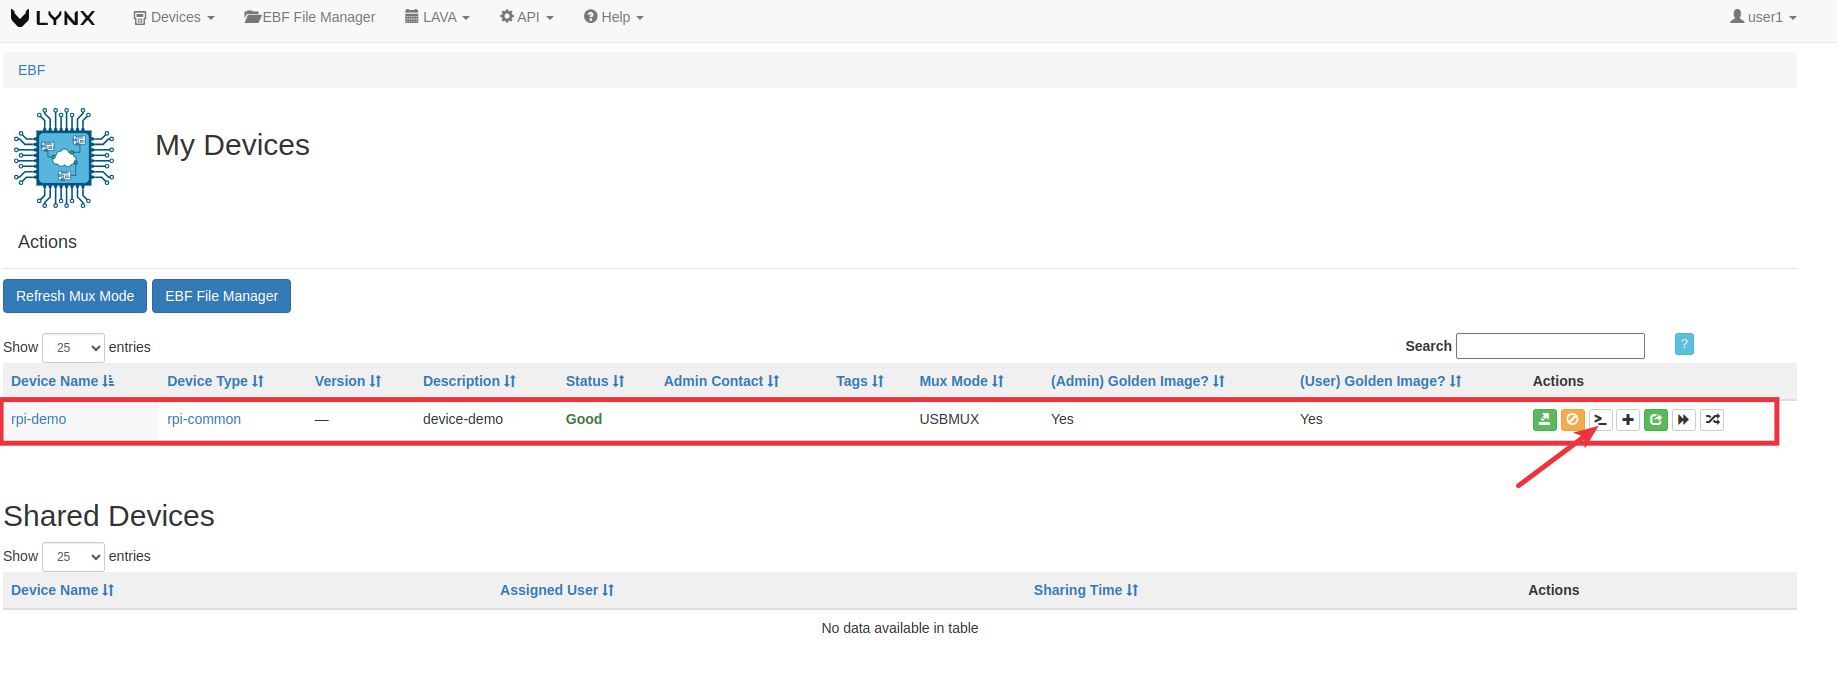
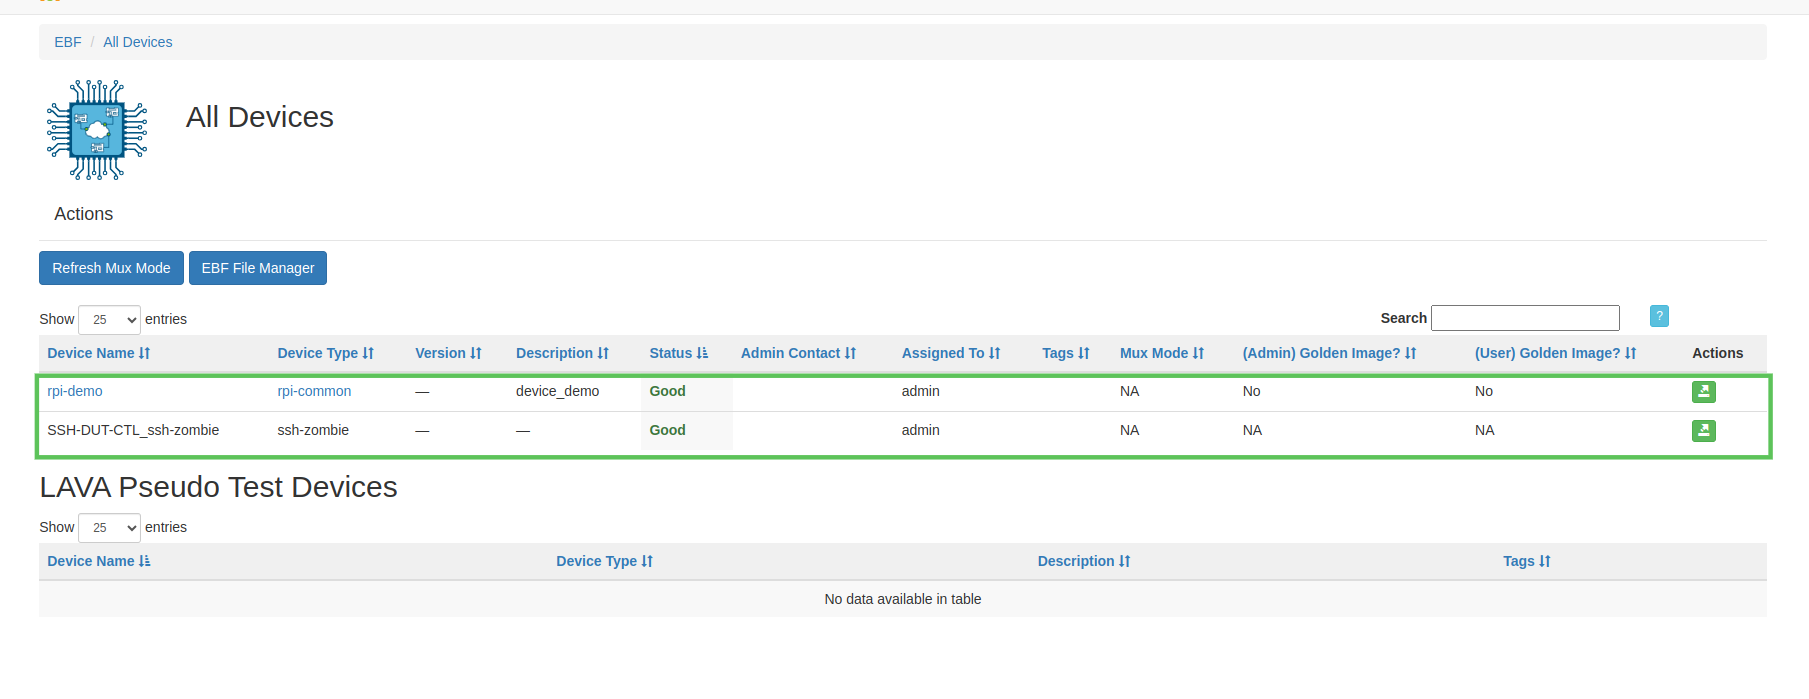
2 EBF Dashboard will appear on the screen. Select the All Devices option from the Devices drop-down list.
3 All Devices page will appear on the screen with the list of all devices on the EBF server. Here both devices are available and could be allocated to any user for use.
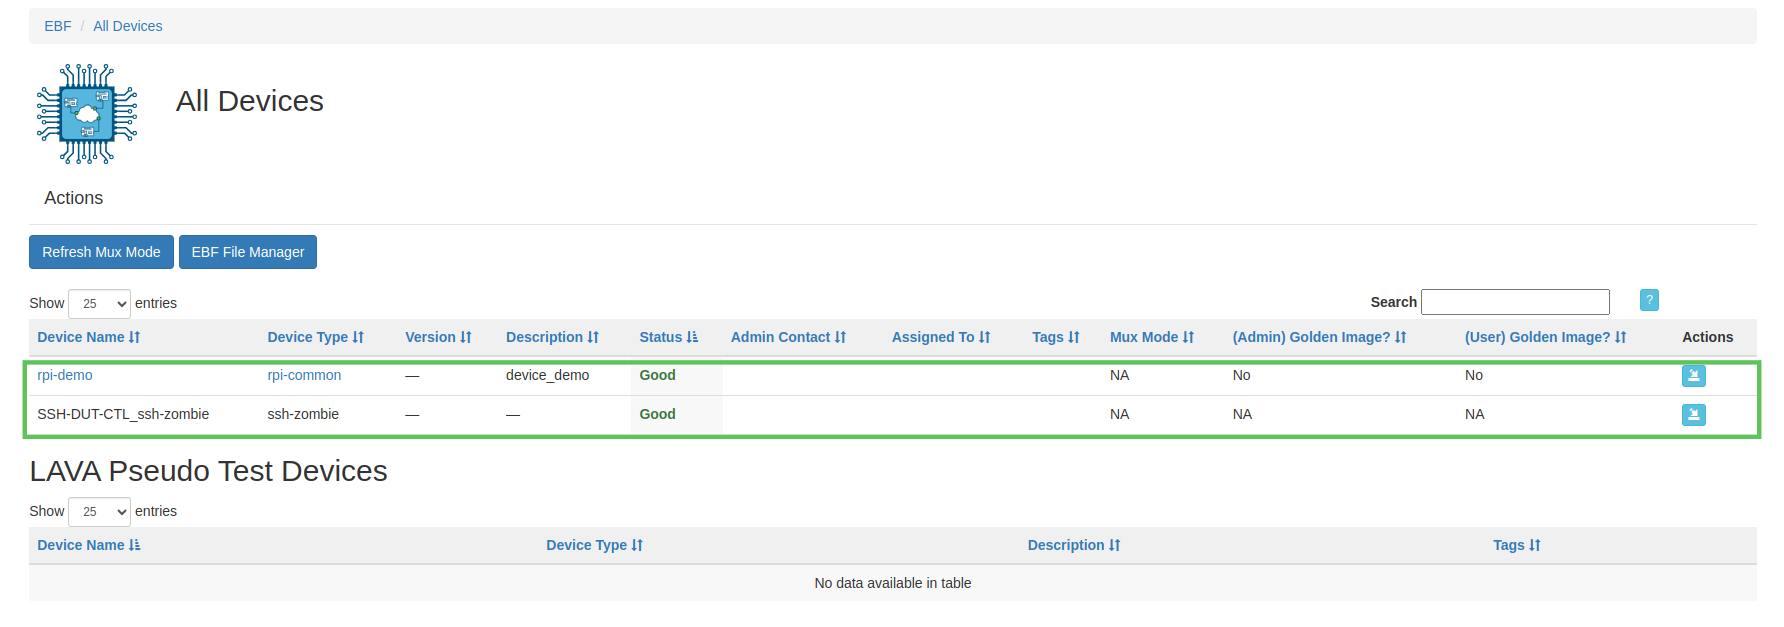
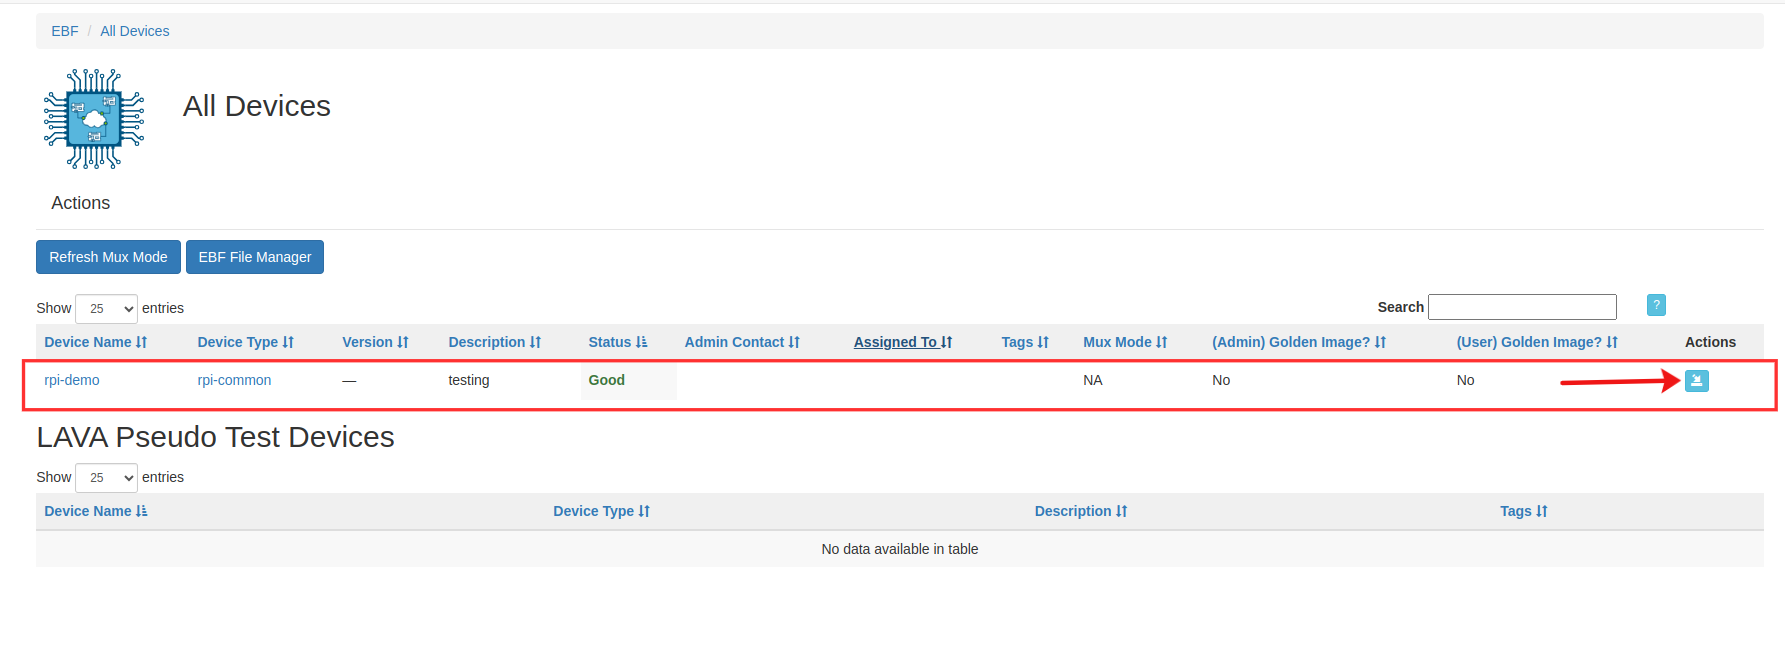
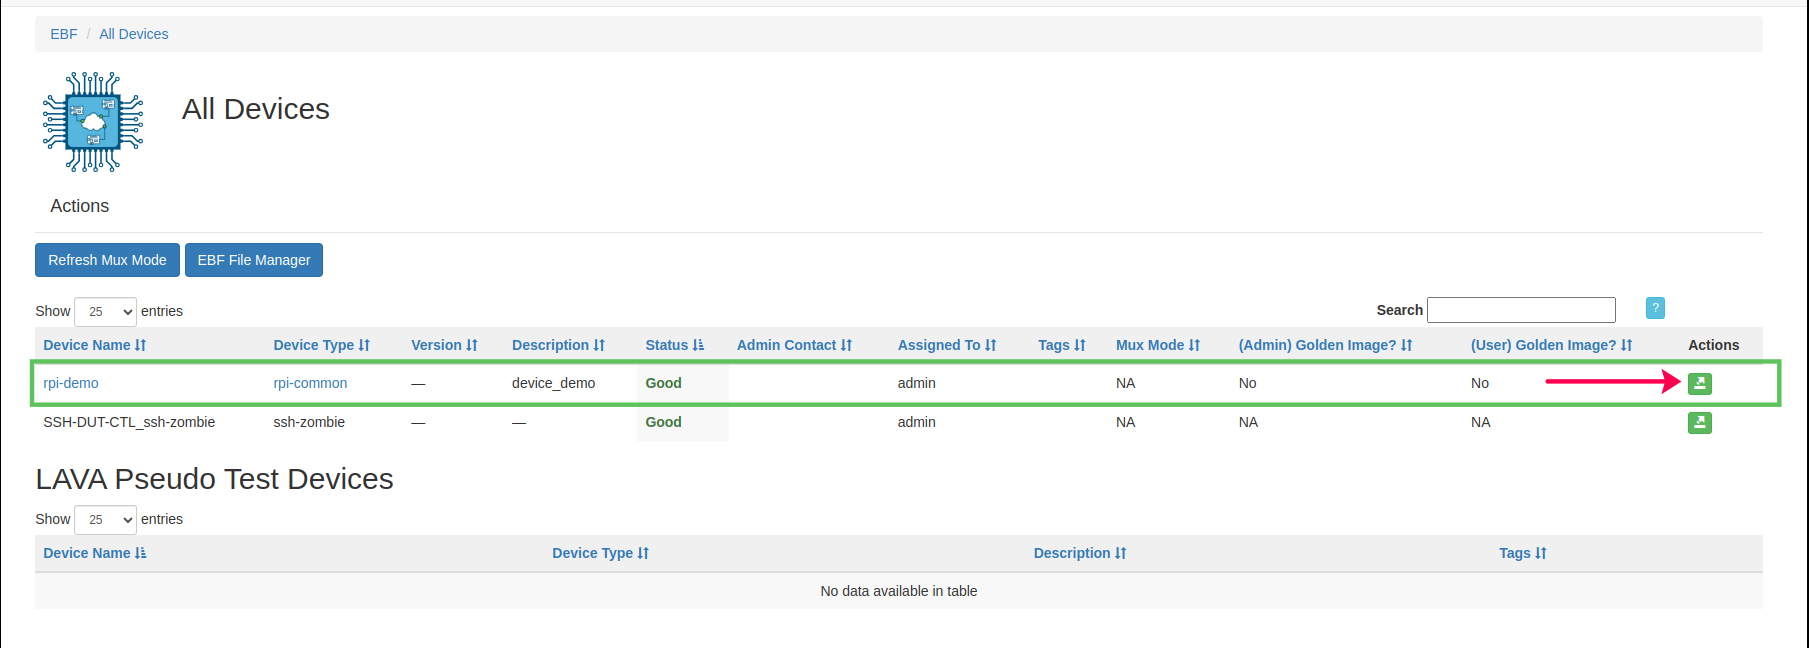
4 Click on the assign button corresponding to the device that the user wants to allocate for work. Once clicked, the device is allocated to the user for use.
Example: Here User1 is the user to whom device rpi-demo is allocated for use.

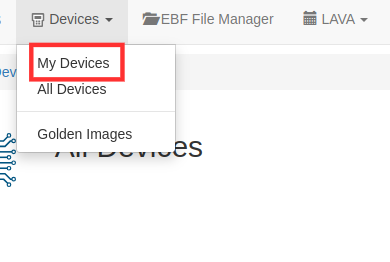
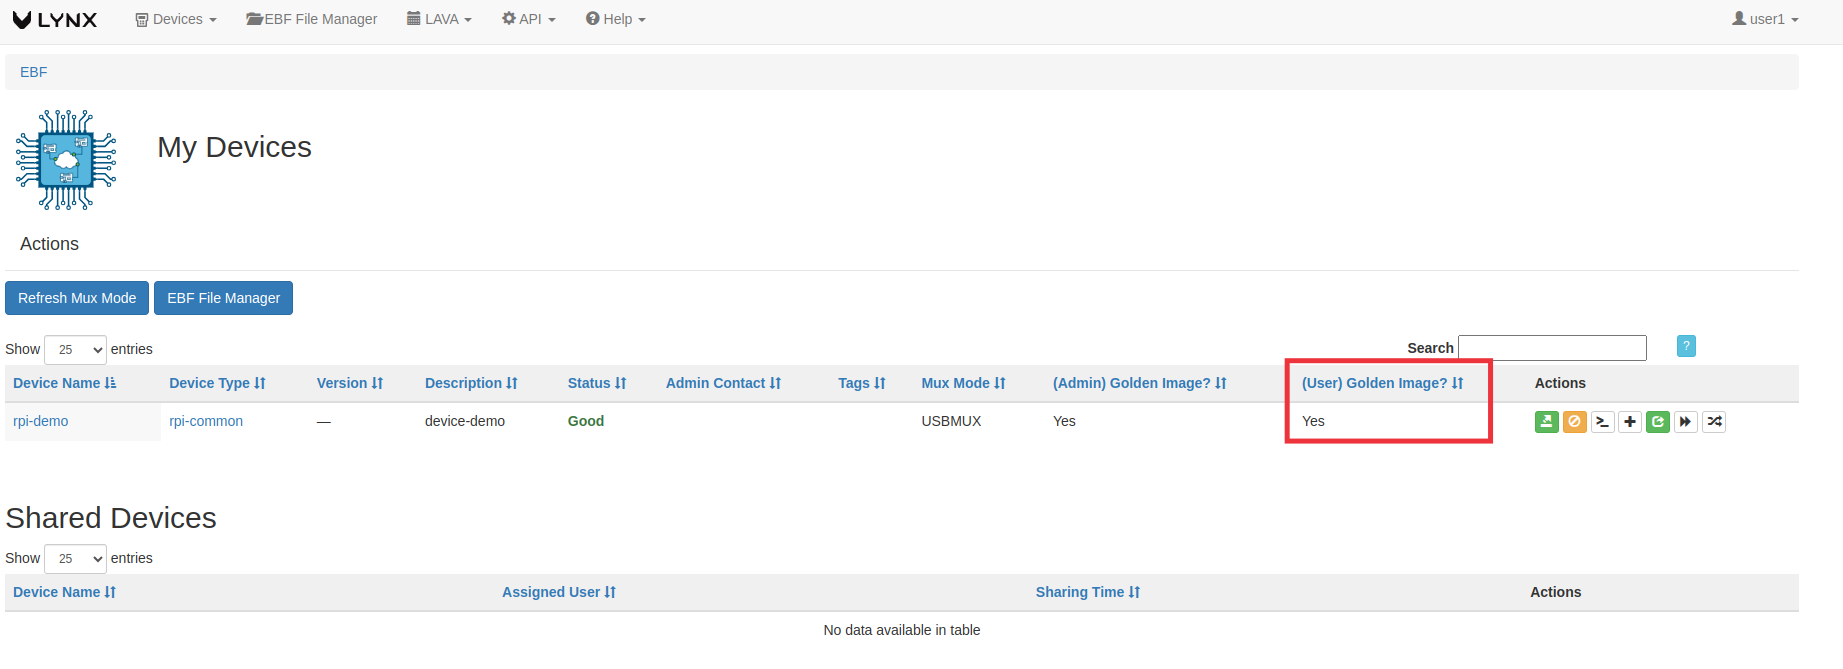
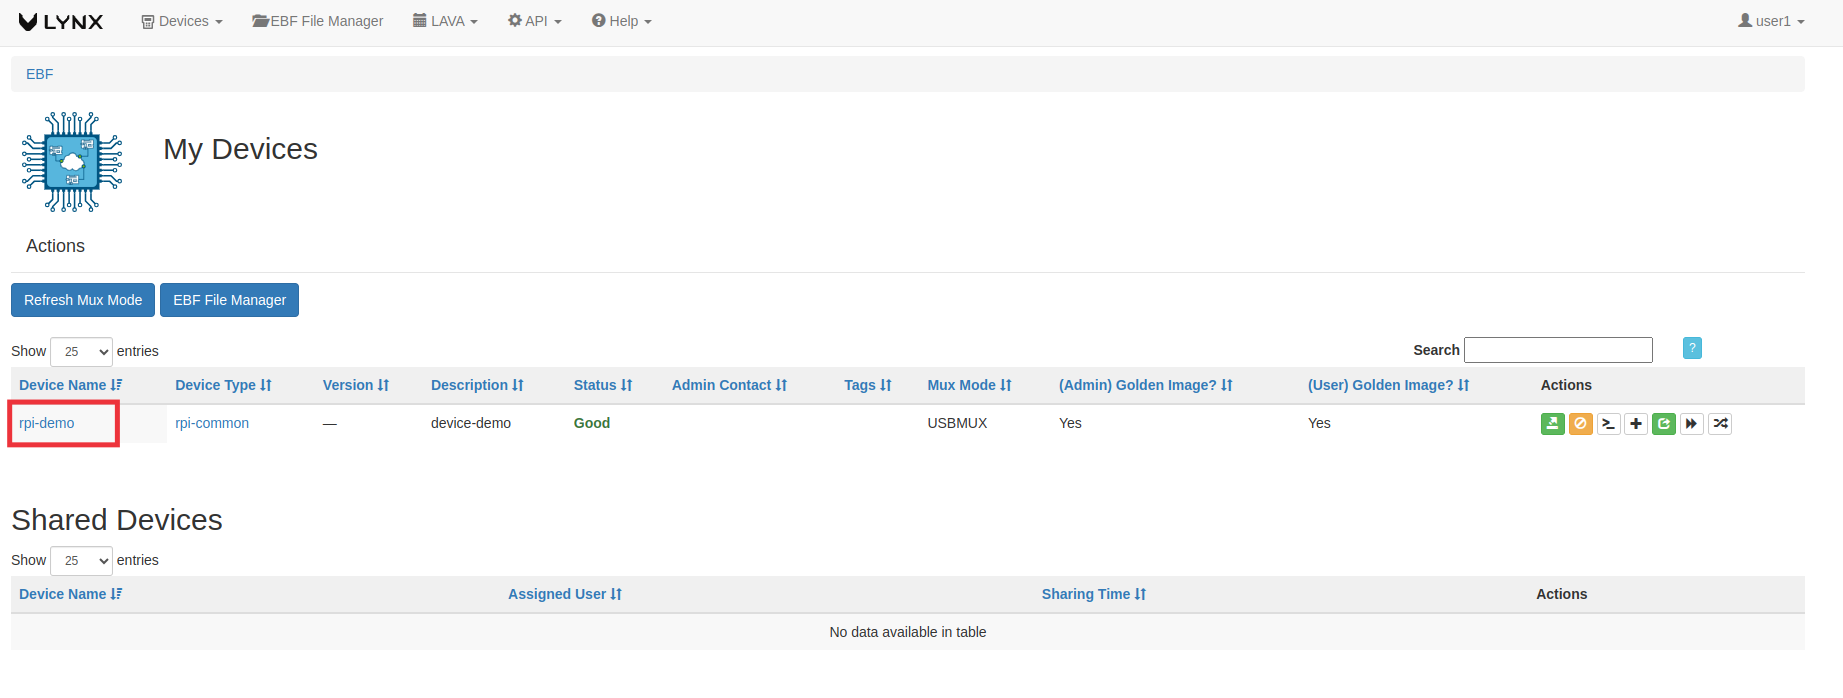
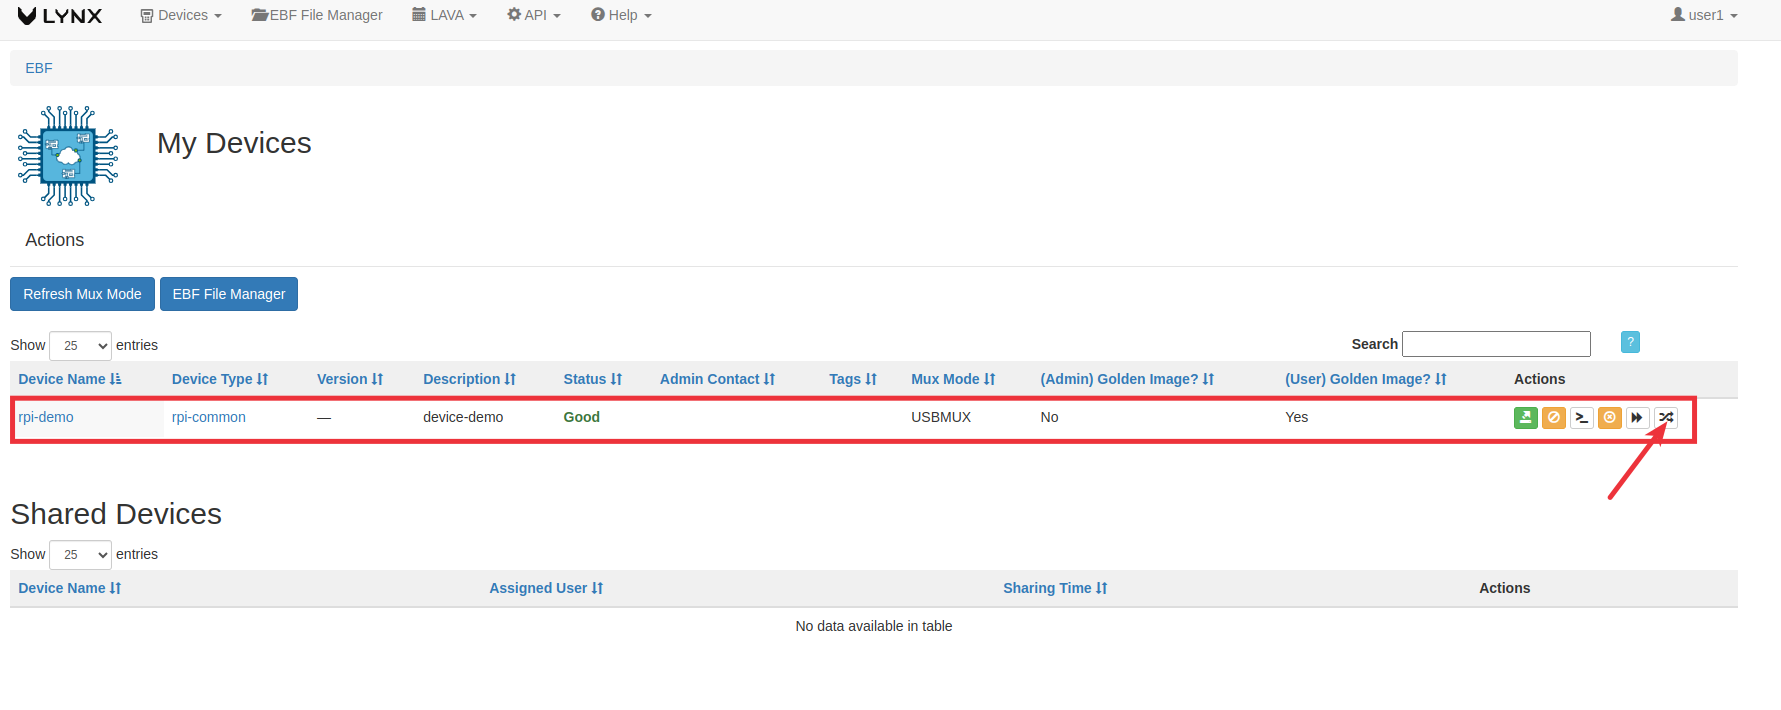
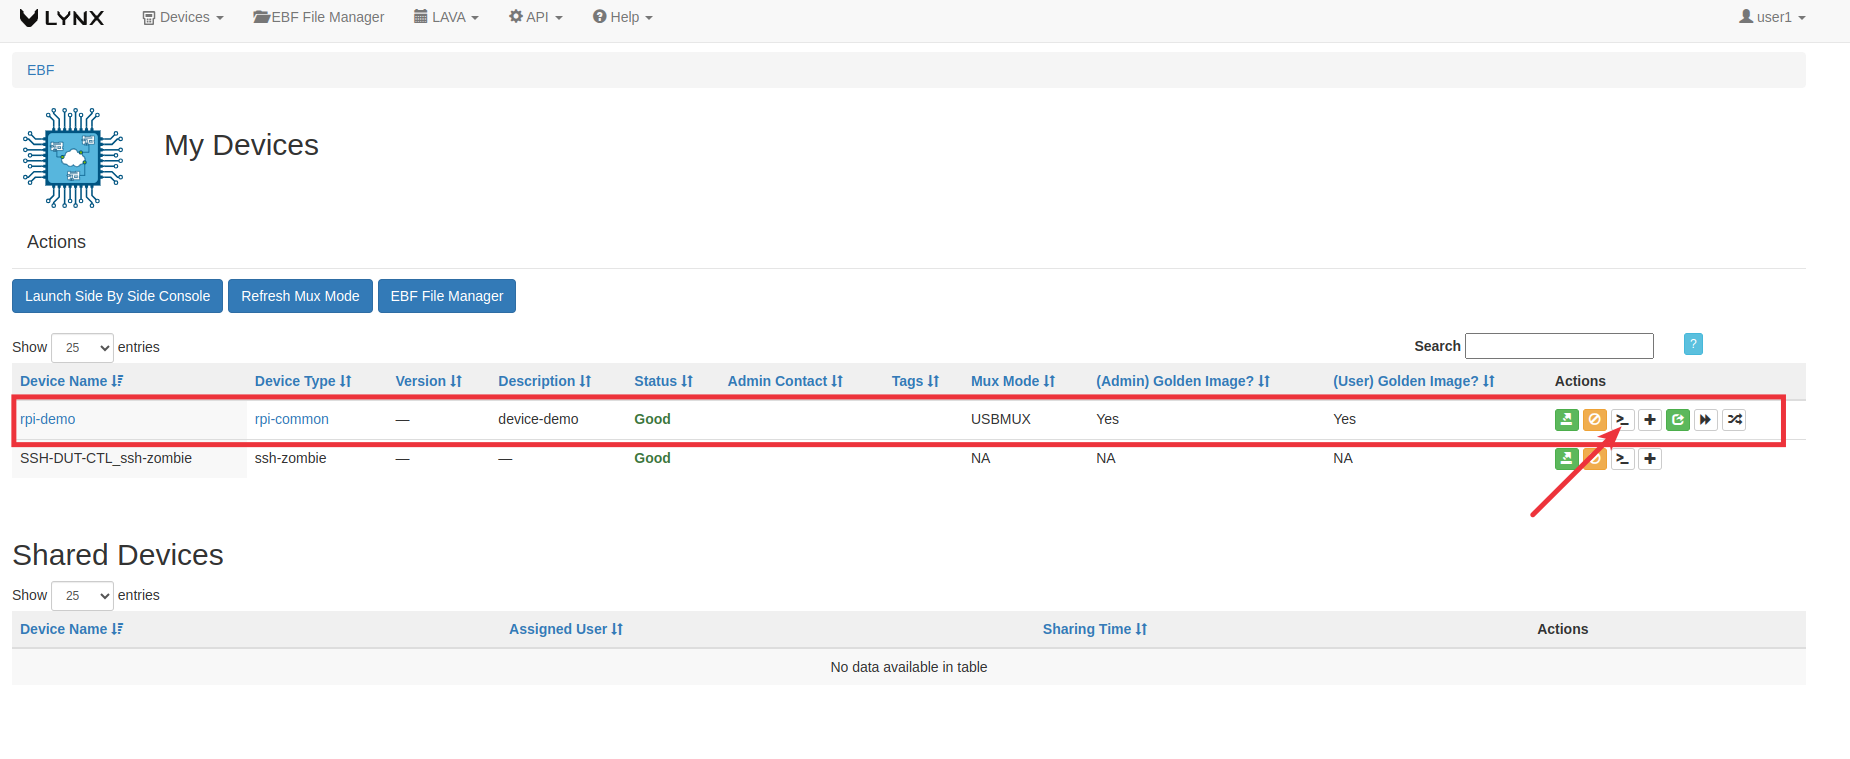
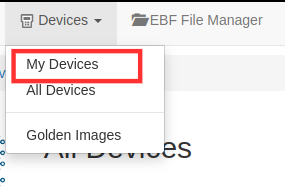
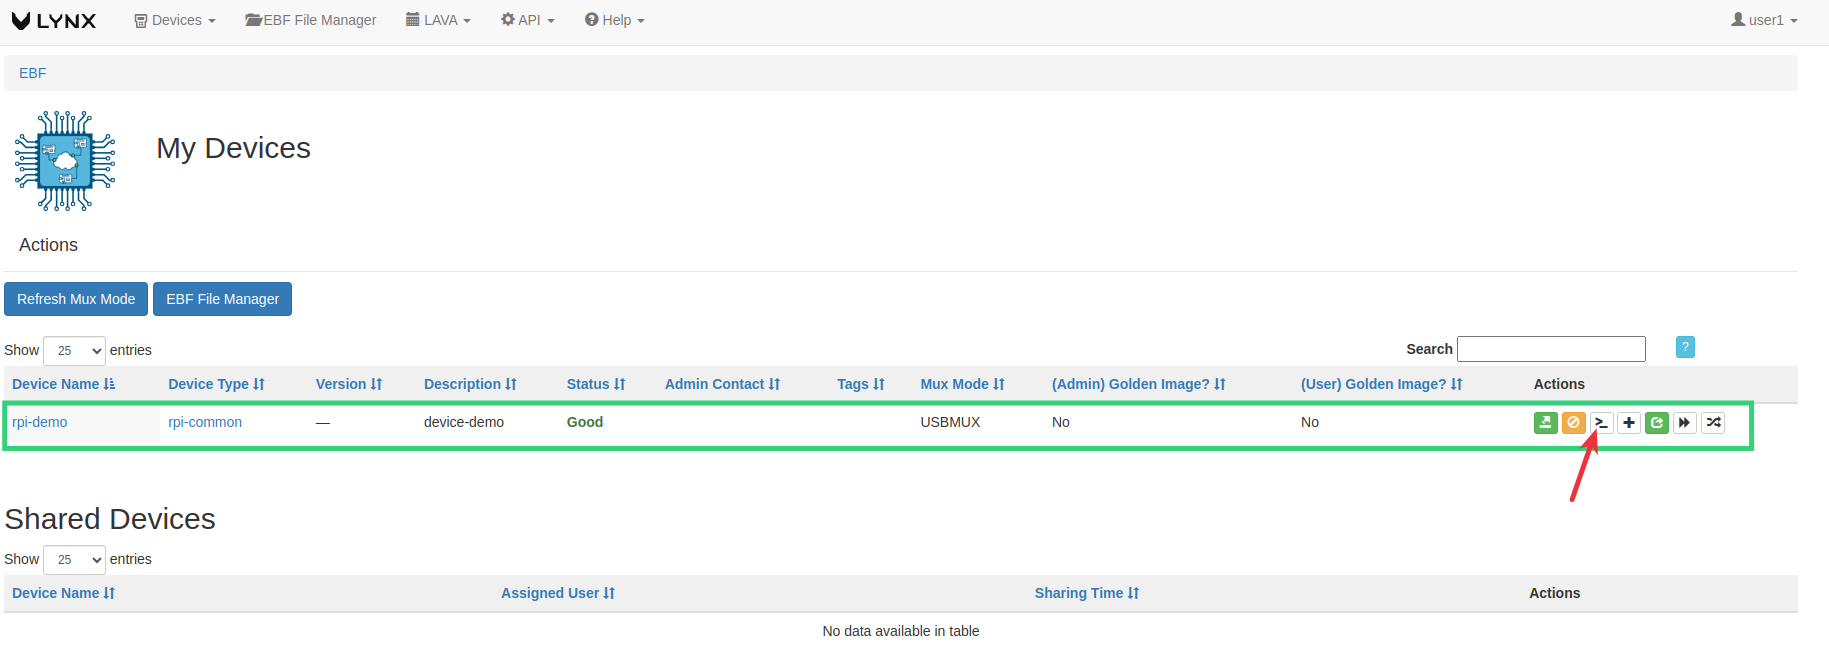
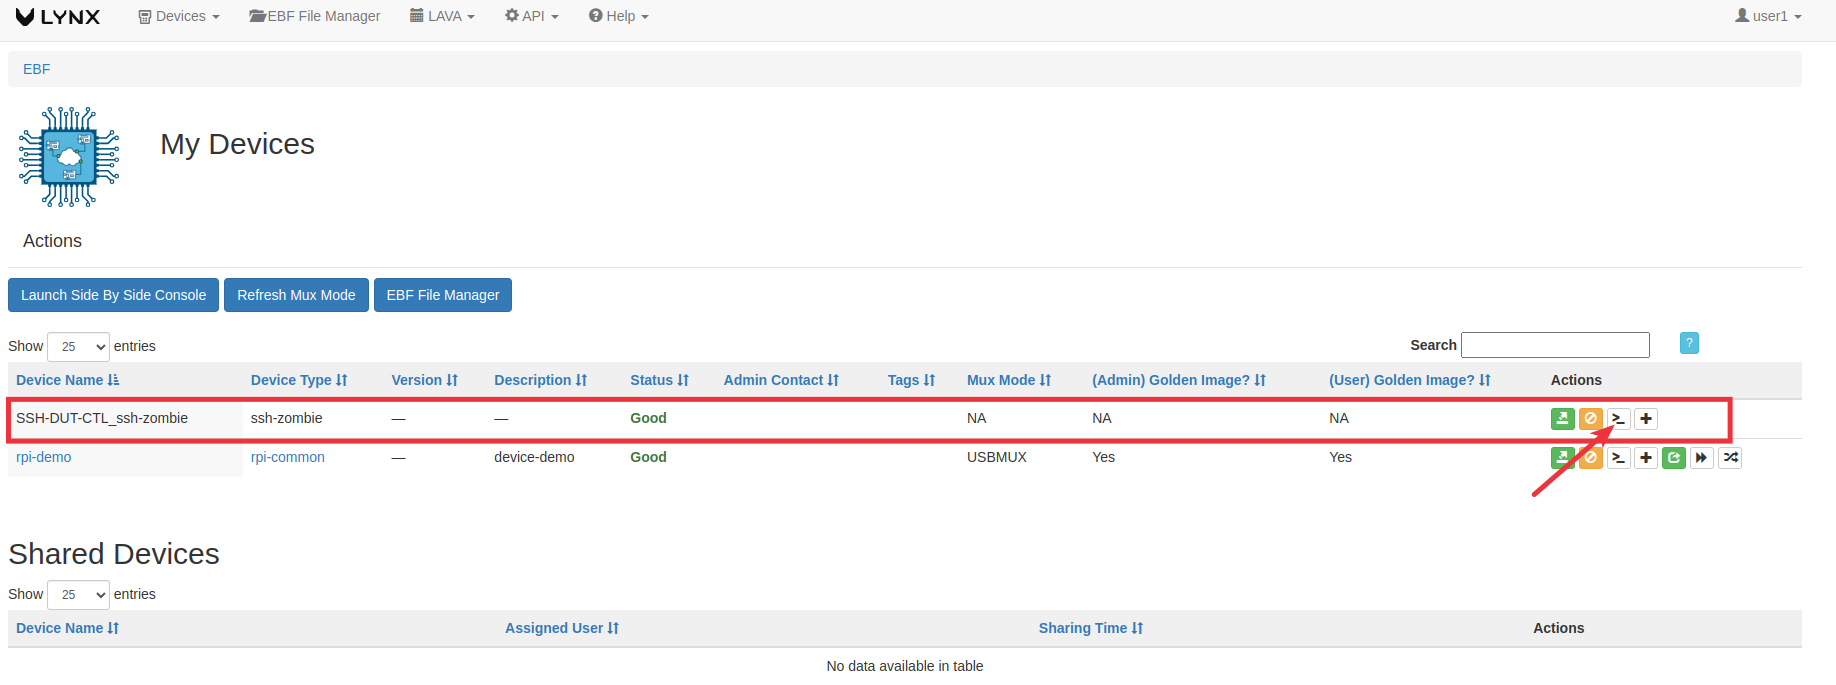
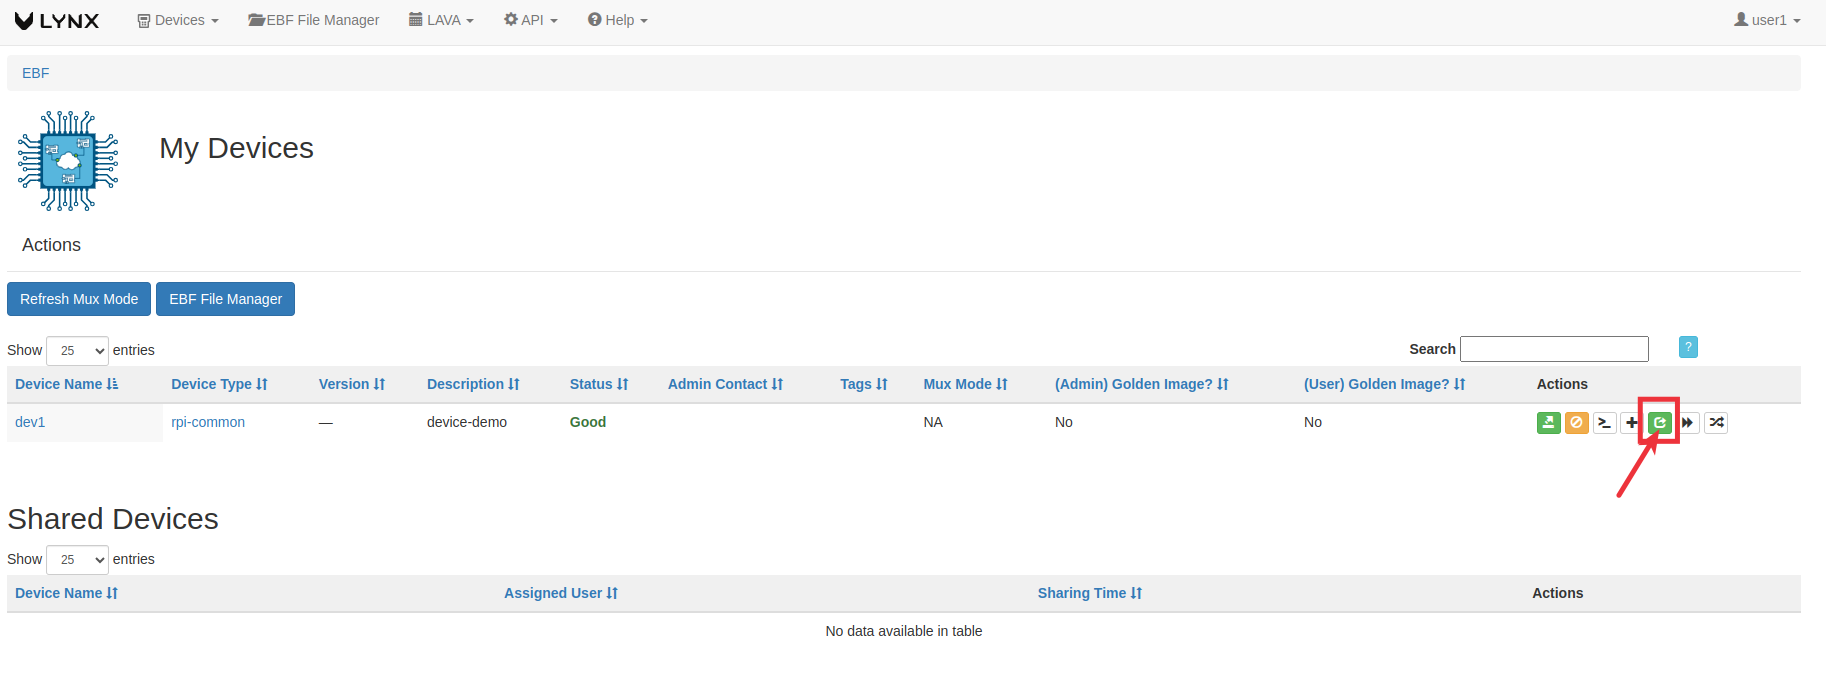
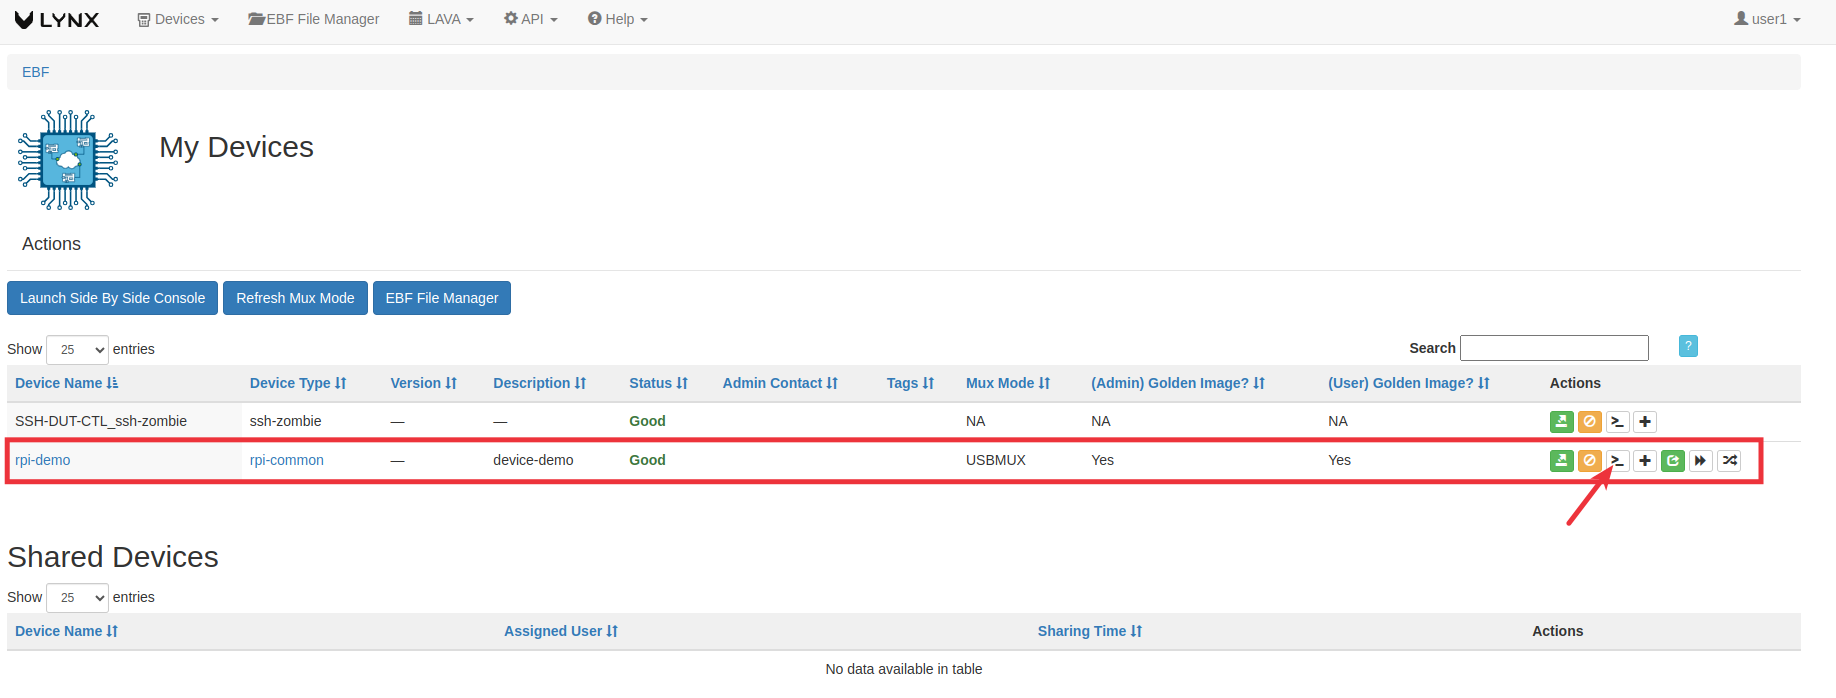
5 Also, the logged in user can view the list of all devices that are allocated to him/her by clicking on My Devices option under the Devices link on the EBF Homepage as shown in the image below:
How to add Golden Images(User Controlled)
Many a time EBF Users may leave the board in a state where it is no longer in usable state for a new user who assigns the board. In order to avoid it, EBF software should bring the board back to a pristine state before a new user can access it.
Following are the steps to add Golden Images to the EBF Server:
1 Login to the EBF homepage/Dashboard through a web browser with credentials.
Username : <username>
Password : <password>
2 This would open up the EBF Dashboard.
3 First Allocate the device to yourself. user_guide.html#how-to-allocate-device-available-on-ebf-server
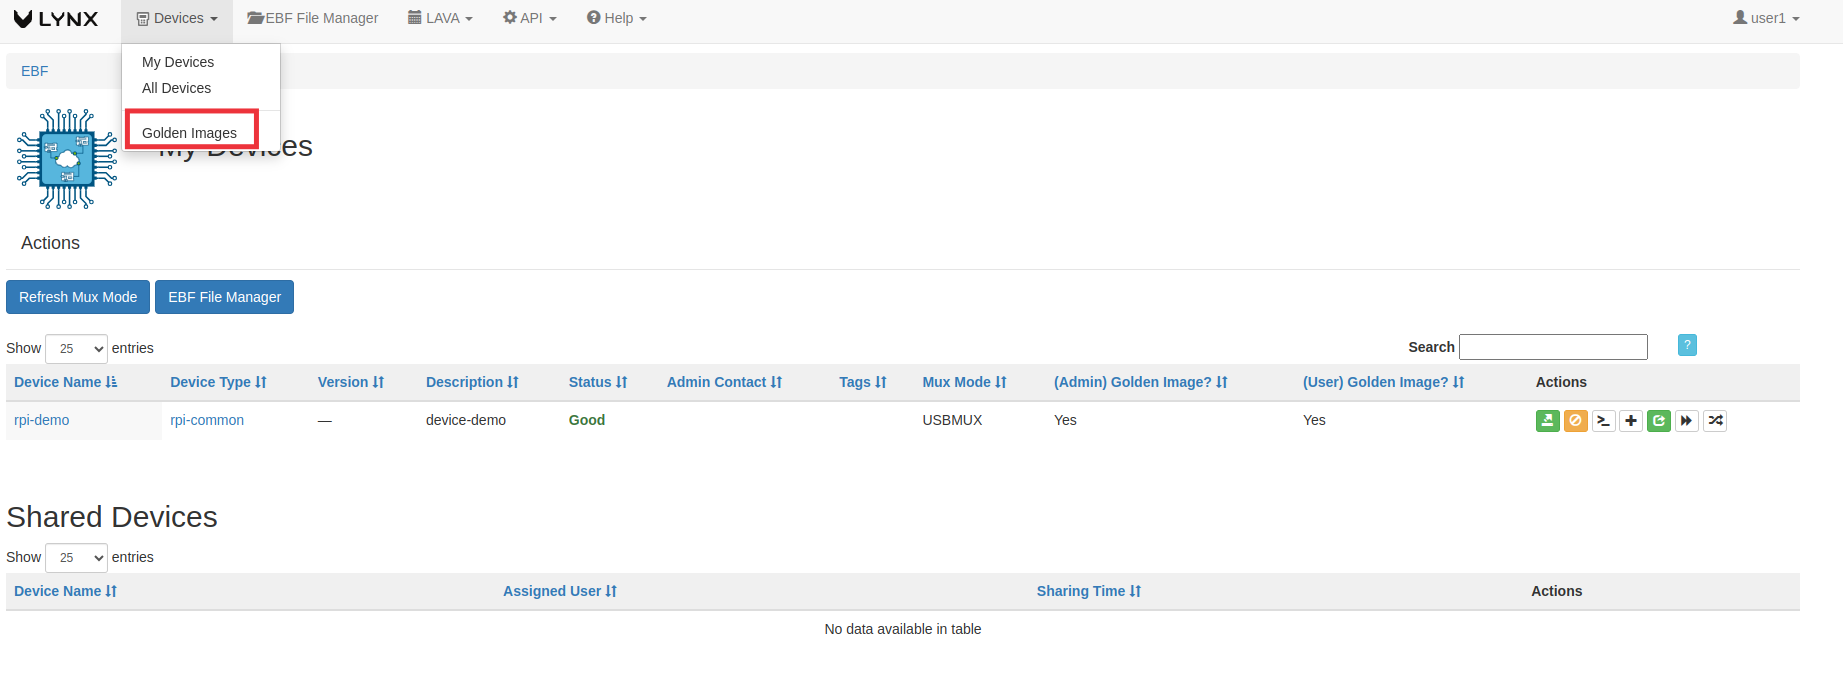
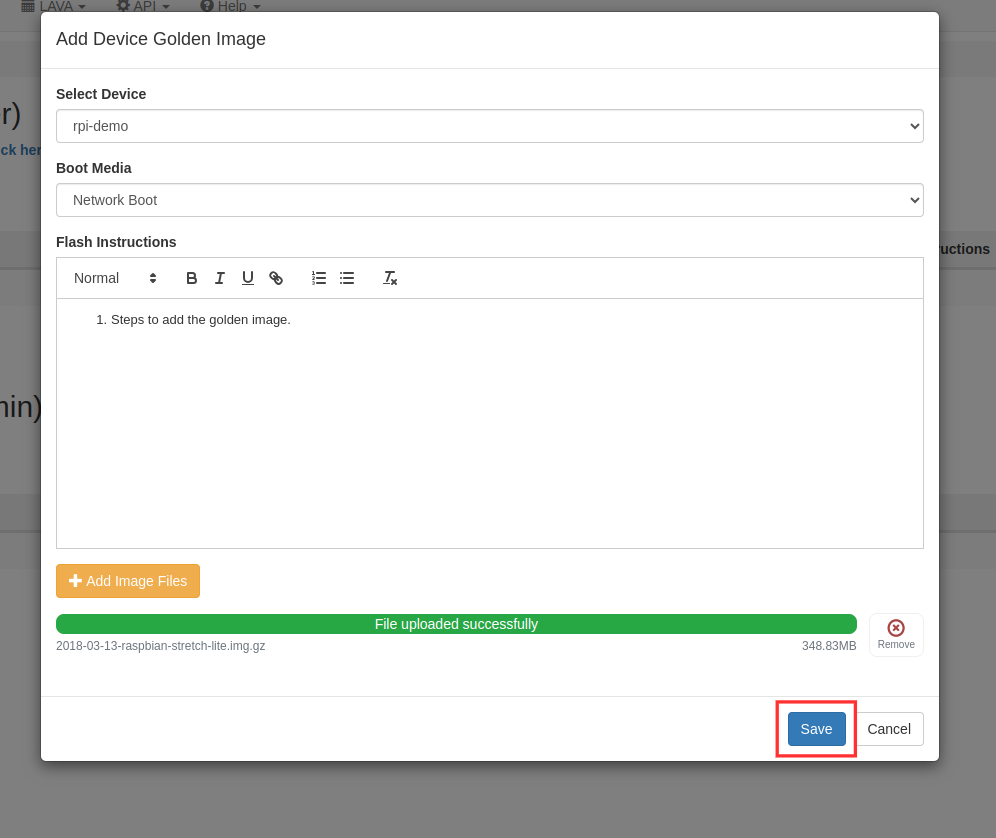
4 Go to Devices -> Golden Images Select the Golden Image option from the menu.
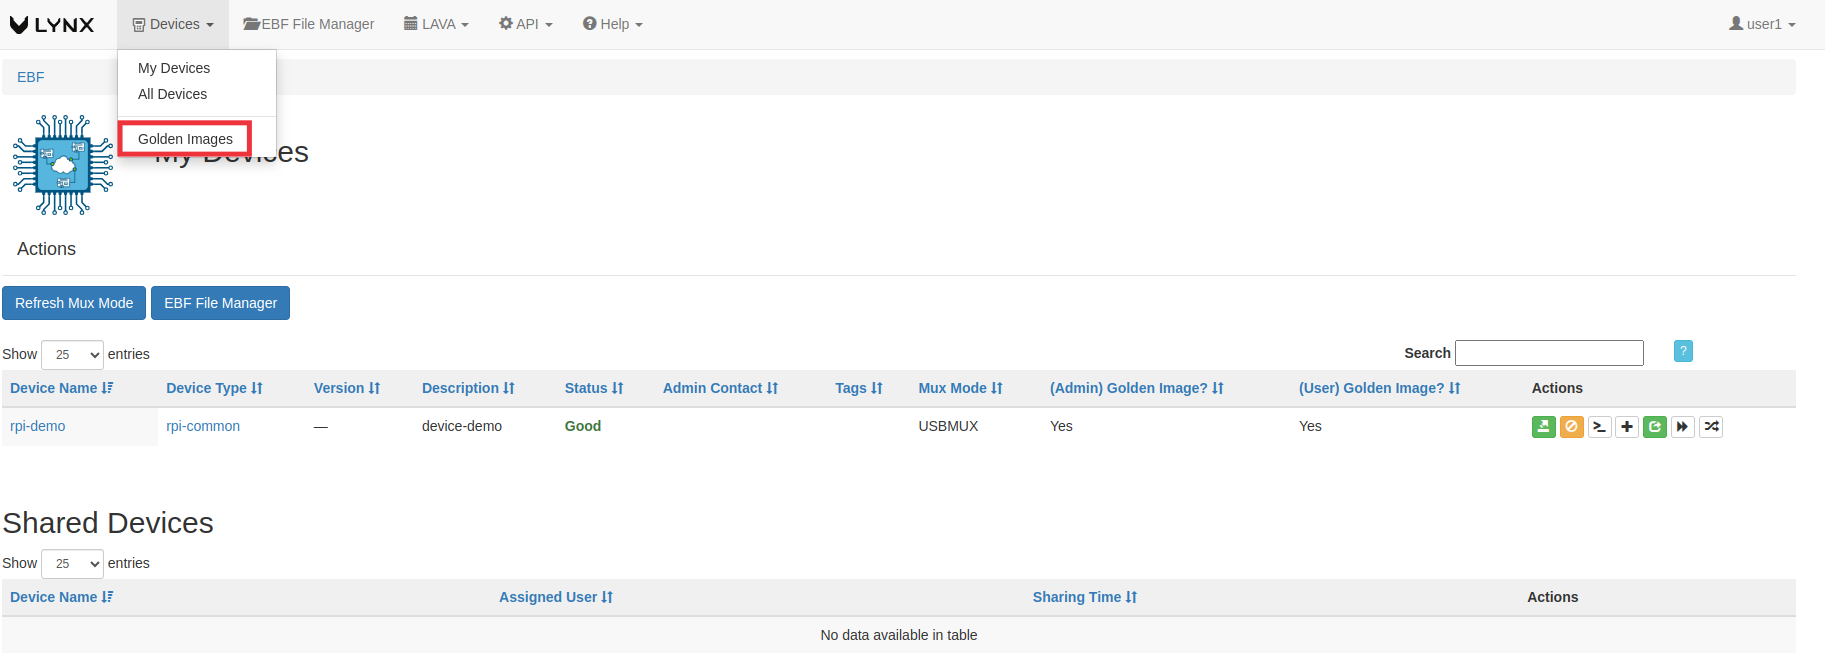
5 After selecting the golden image option, you will see the golden image dashboard.
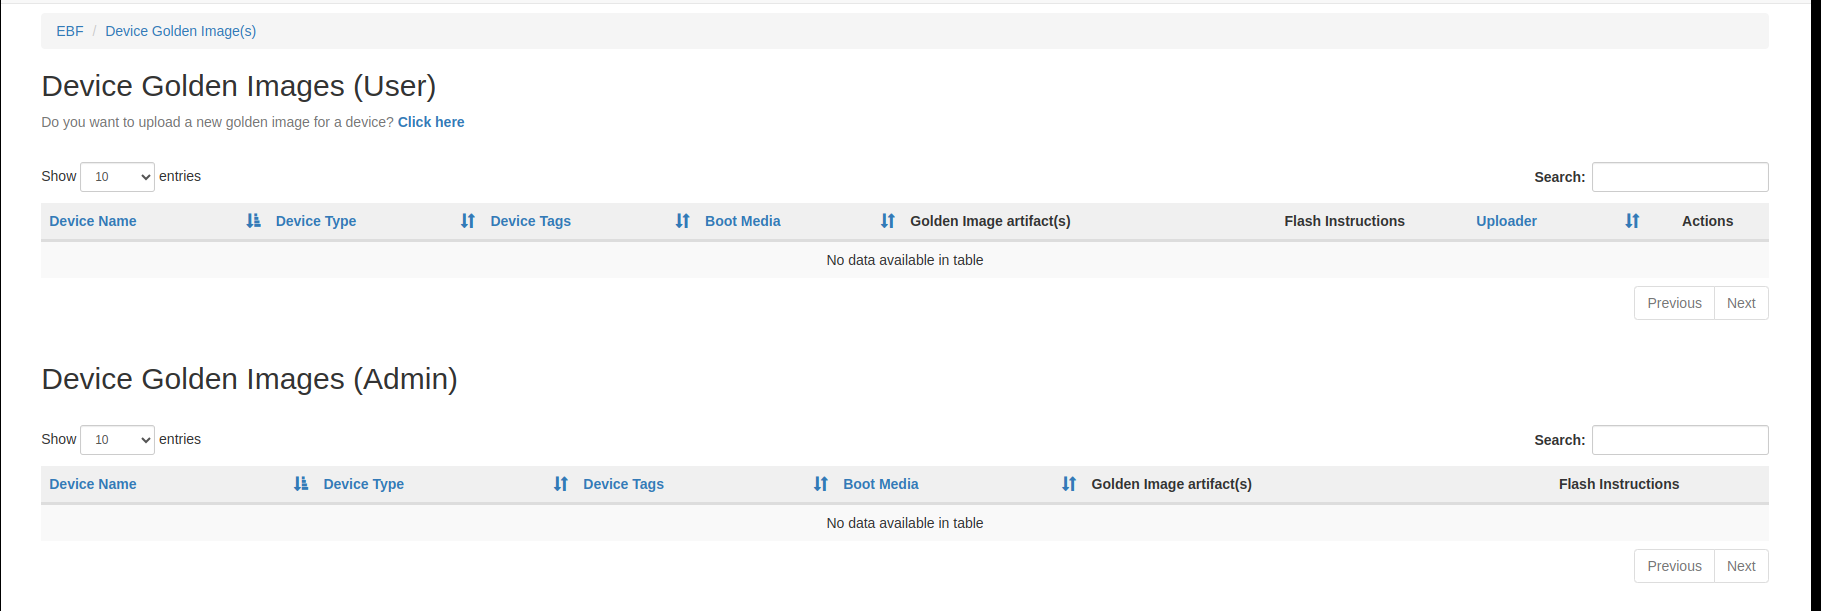
6 Click on the option Click here.

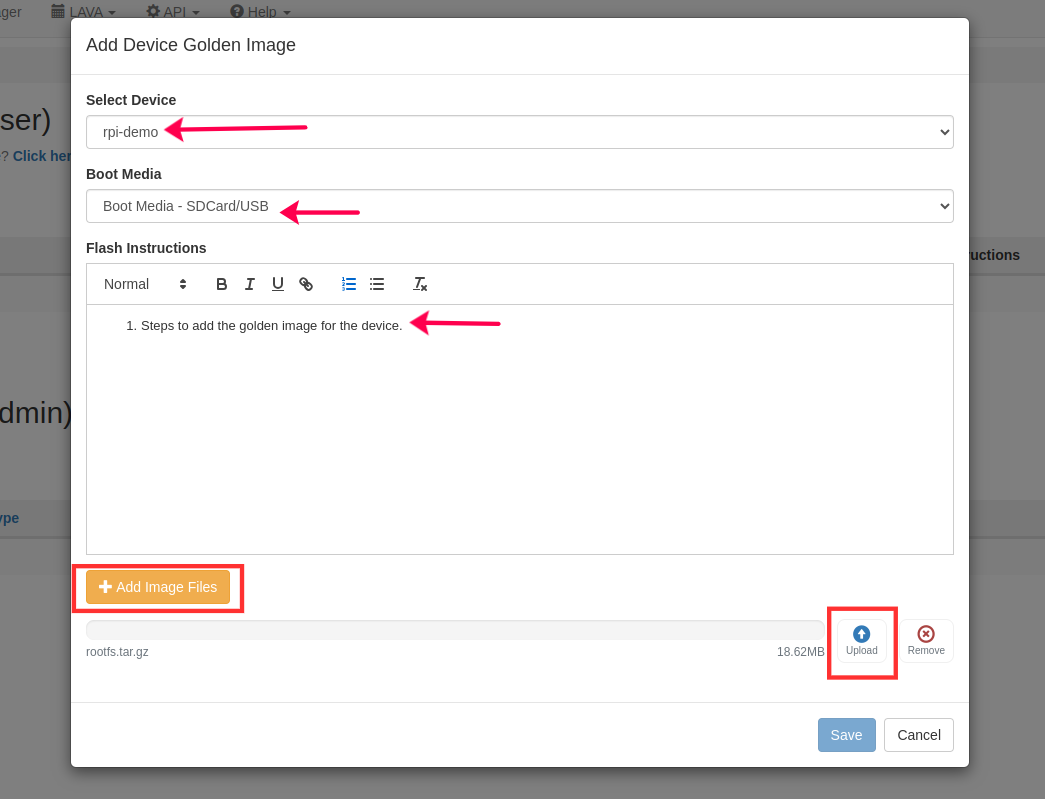
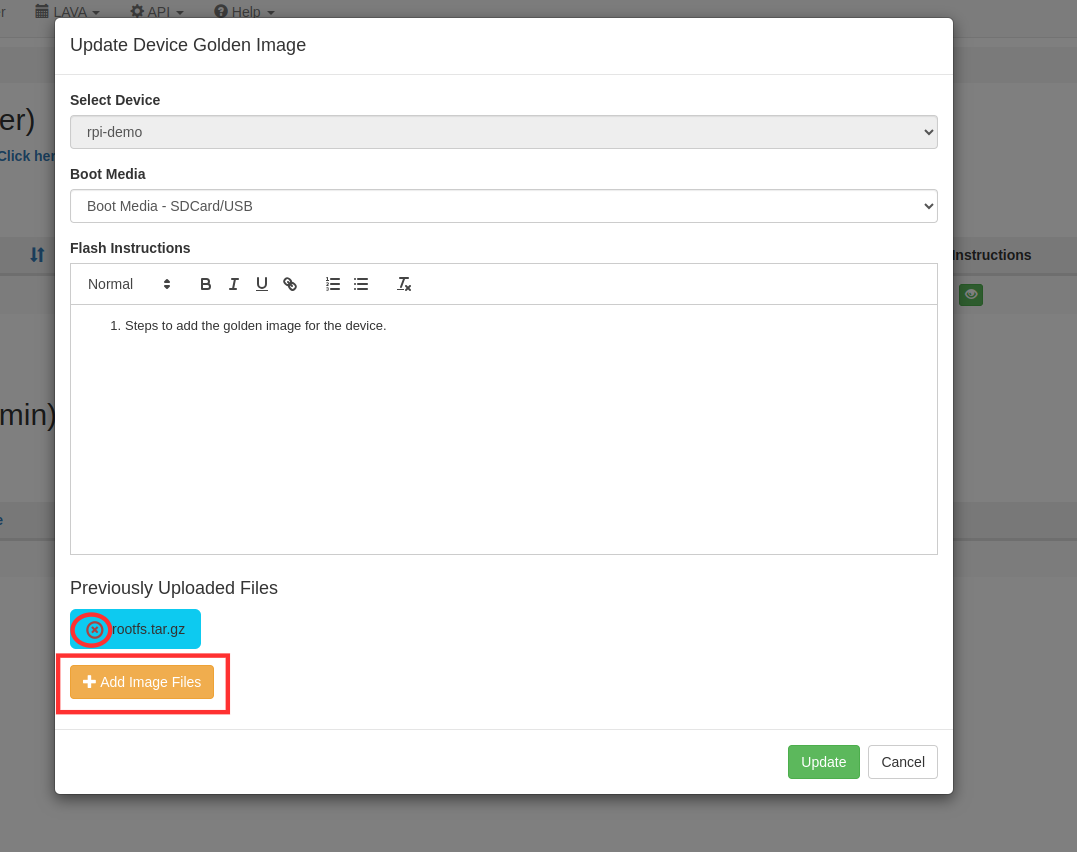
From the Select device drop-down and choose the device on which you want to add the golden image.
Select the boot media, SD-Card/USB Boot or Network Boot.
Add the flash instructions, which is optional.
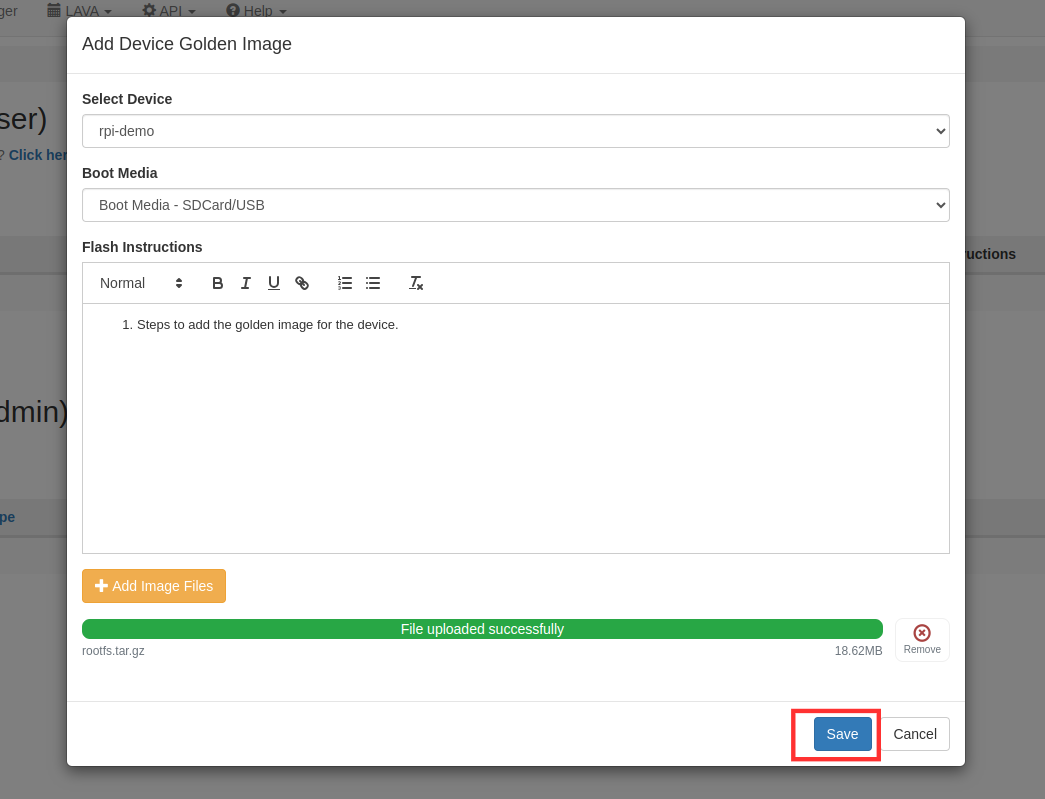
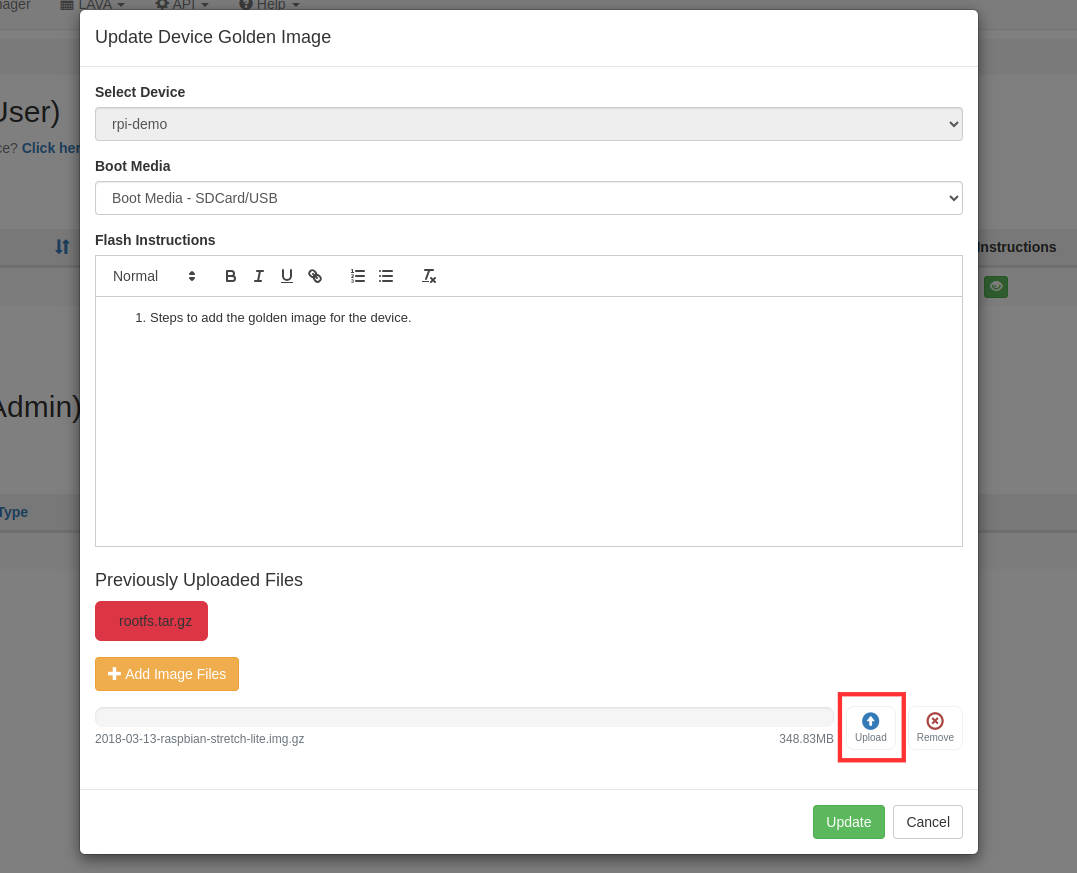
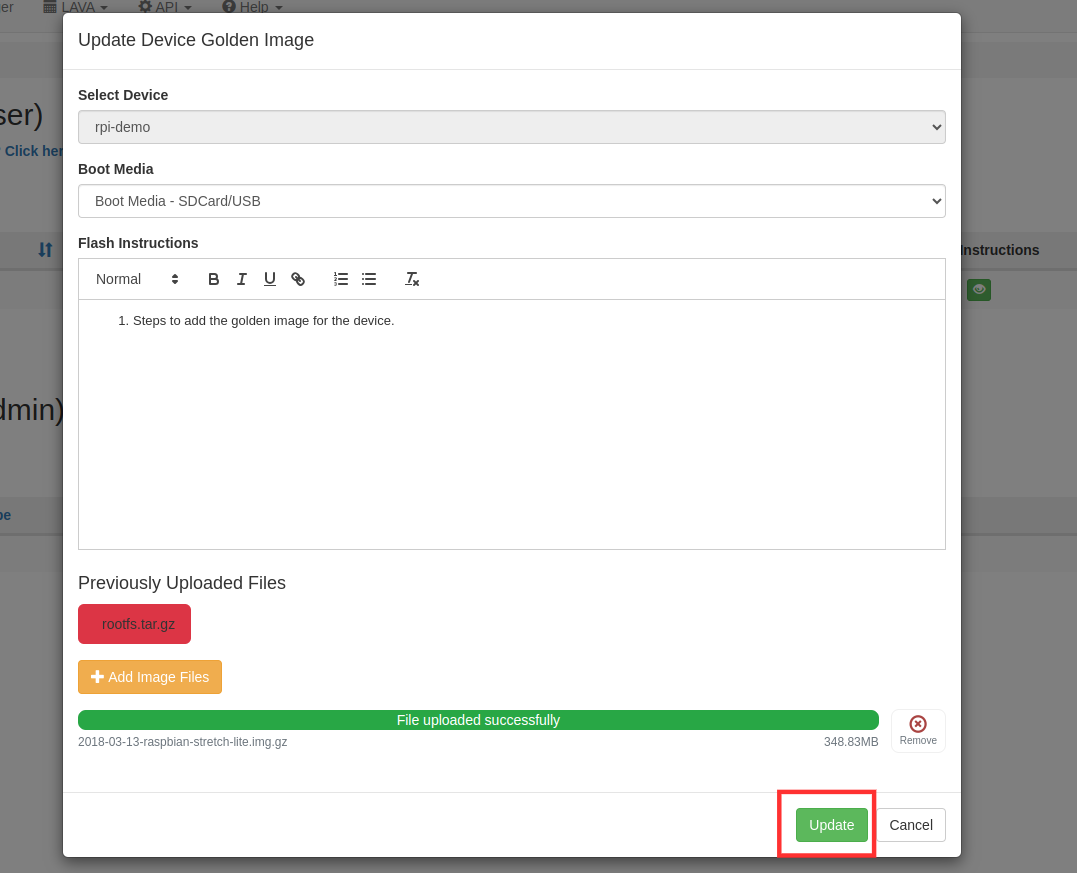
Click on +Add Image files which you want to add for the device. After selecting the image, click on the Upload option to upload the file.
After uploading the file, click on the save button.
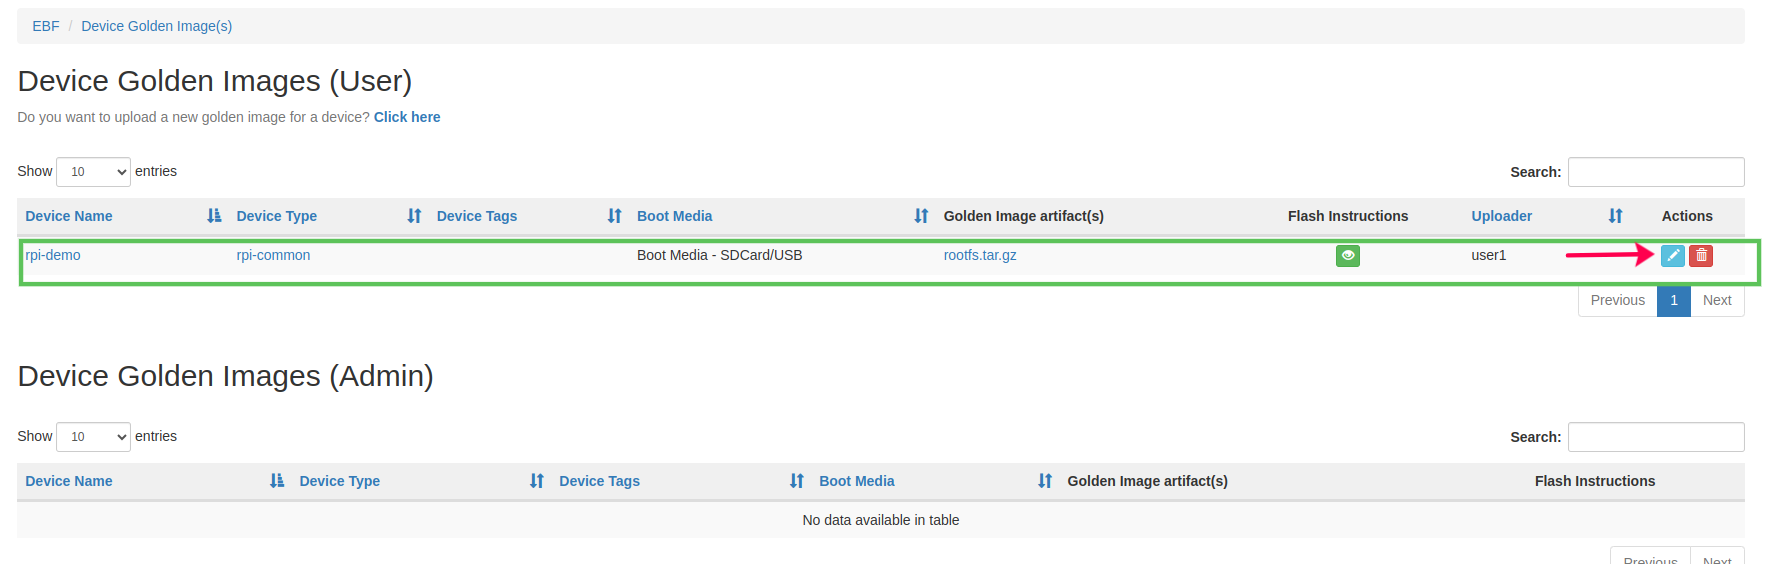
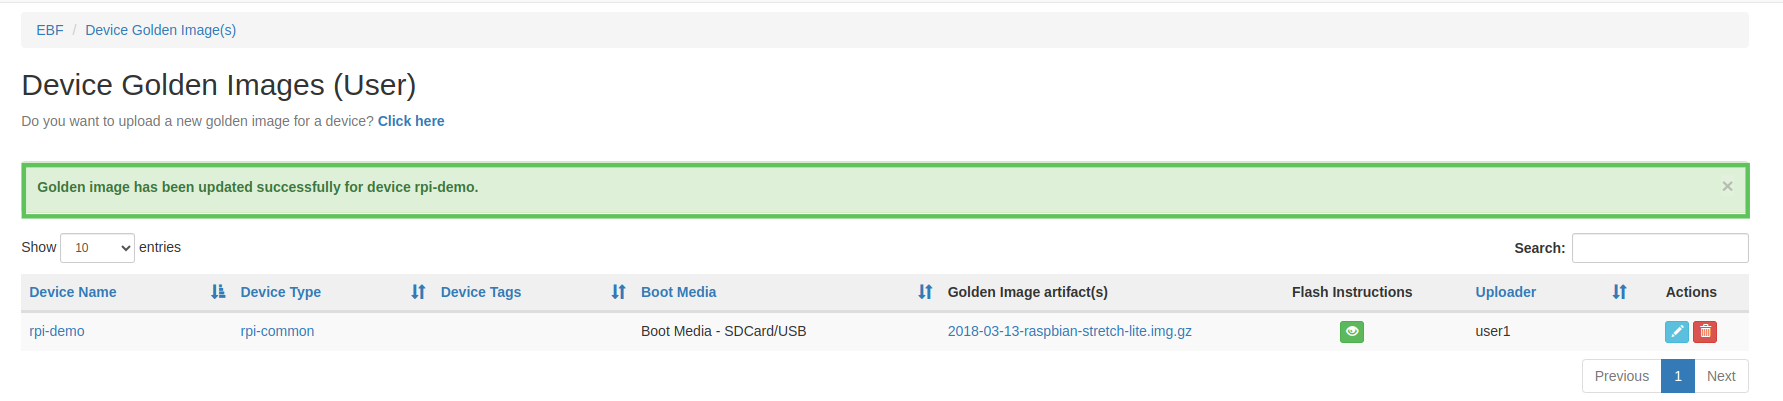
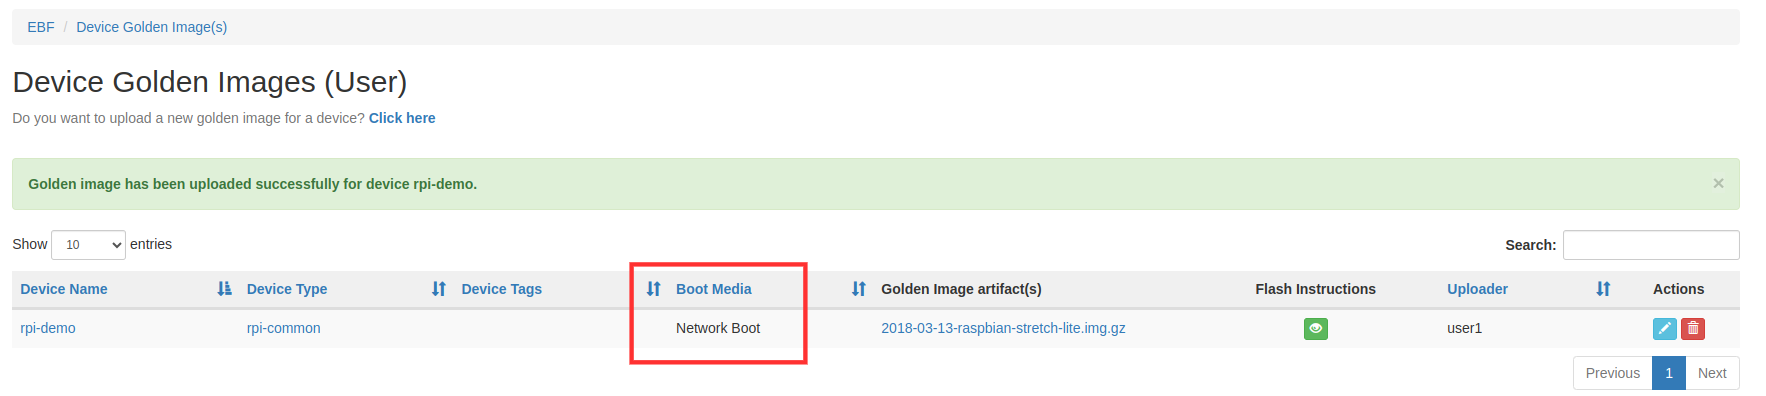
After successfully uploading the golden image, details regarding the image and the name of the user will appear under Device Golden Images(user) Dashboard.
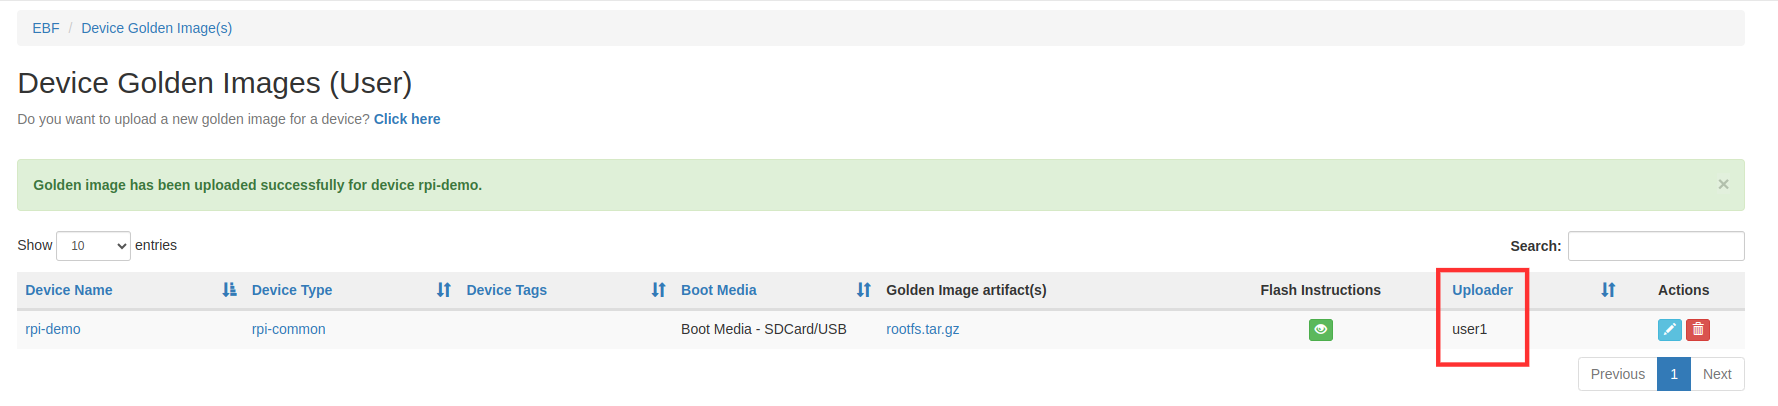
7 If the golden image is successfully uploaded for the respective device, then Yes will be visible under the (User)Golden Image column on All Devices and MyDevices pages.
Go to Devices -> All Devices

Go to Devices -> My Devices
How to edit Golden Images(User Controlled)
Following are the steps to edit Golden Images on EBF Server:
1 Login to the EBF homepage/Dashboard through a web browser with credentials.
Username : <username>
Password : <password>
2 This would open up EBF Dashboard.
3 Select Golden Images option from the Devices drop-down.
4 Golden Image Dashboard would open up.

5 Click on the edit option, of the respective device of which you have uploaded the golden image.
6 Enter the details you want to change regarding the golden image.
Select the device if you want to change the device
Select the boot-media, SD-Card/USB Boot or Network Boot.
Add/Edit the flash instructions.
If you want to remove the Previously uploaded files, click on the ‘cross sign’ and then Click on +Add Image to upload the new image.
After selecting the image, click on Upload button to upload the file.
After successfully uploading the file, click on the update option.
Following message will appear on the screen on successful updation of the golden image.
How to use port forwarding
EBF provides the port forwarding feature in which you can forward any port of your DUT(Connected to the Zombie private network) to your Zombie(Connected to the corporate network). With this feature, you can access any port of your DUT from a corporate network. e.g. ssh, telnet, etc. Please follow the below steps for port forwarding.
1 Go to Devices -> All Devices and see the list of all available devices.
2 Select the >> Port Forwarding button of the device whose port you want to forward or you can see the Port Forwarding feature on the device configuration page.
OR
1 Go to Devices -> All Devices and see the list of all available devices.
2 Now click on the device name whose port you want to forward.
3 Now click on the port forward button.
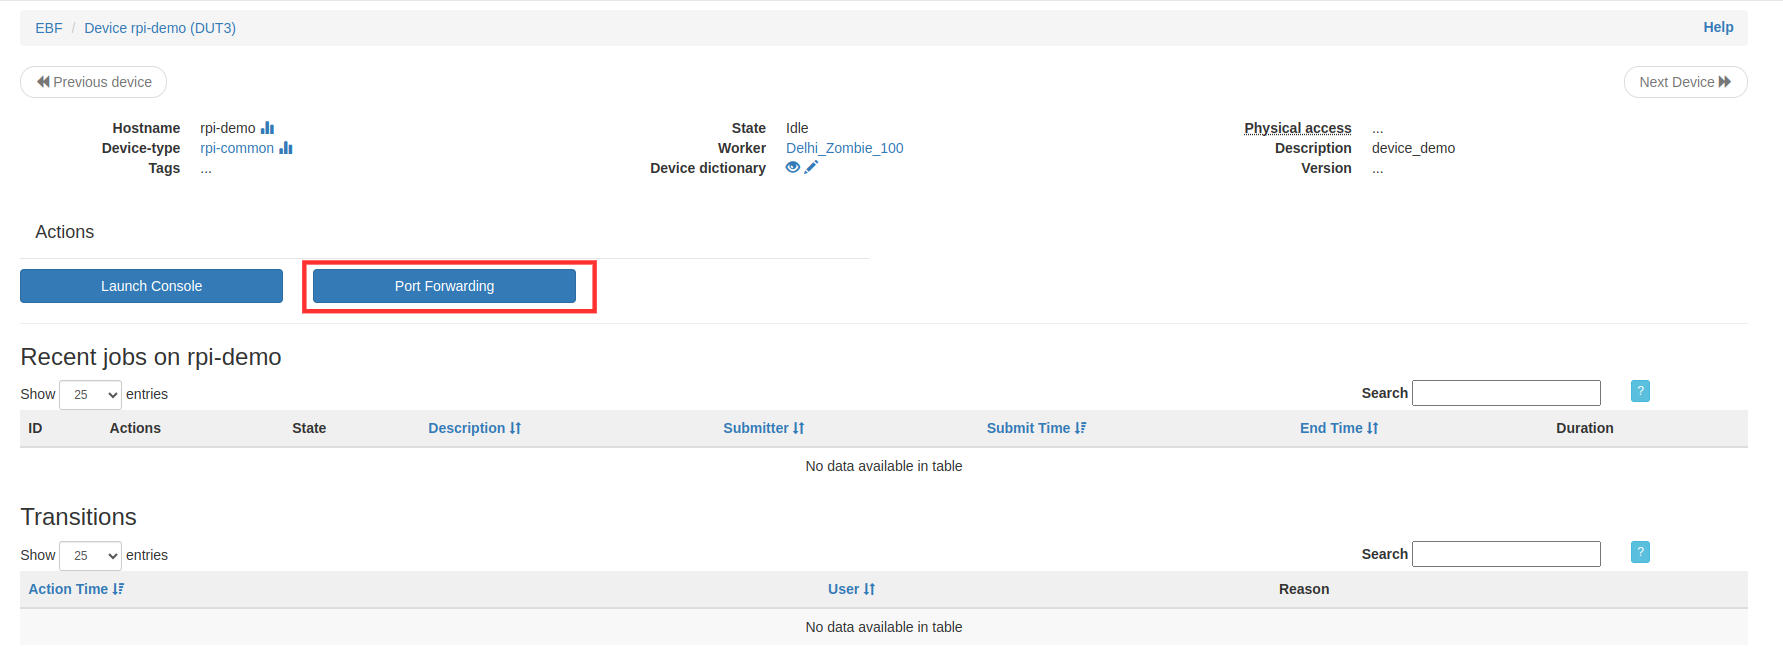
4 After clicking on any of the above-given options, you will see the Device Port Forwarding screen. Here you have to provide the following details for port forwarding.
Device IP address: This is the IP address assigned to your device.
Device Port: This is the port of the Device that you want to access using an external/corporate network.
Protocol: Select Communication protocol TCP/UDP/SCTP.
Zombie Port: This is the Zombie port exposed to the external network.
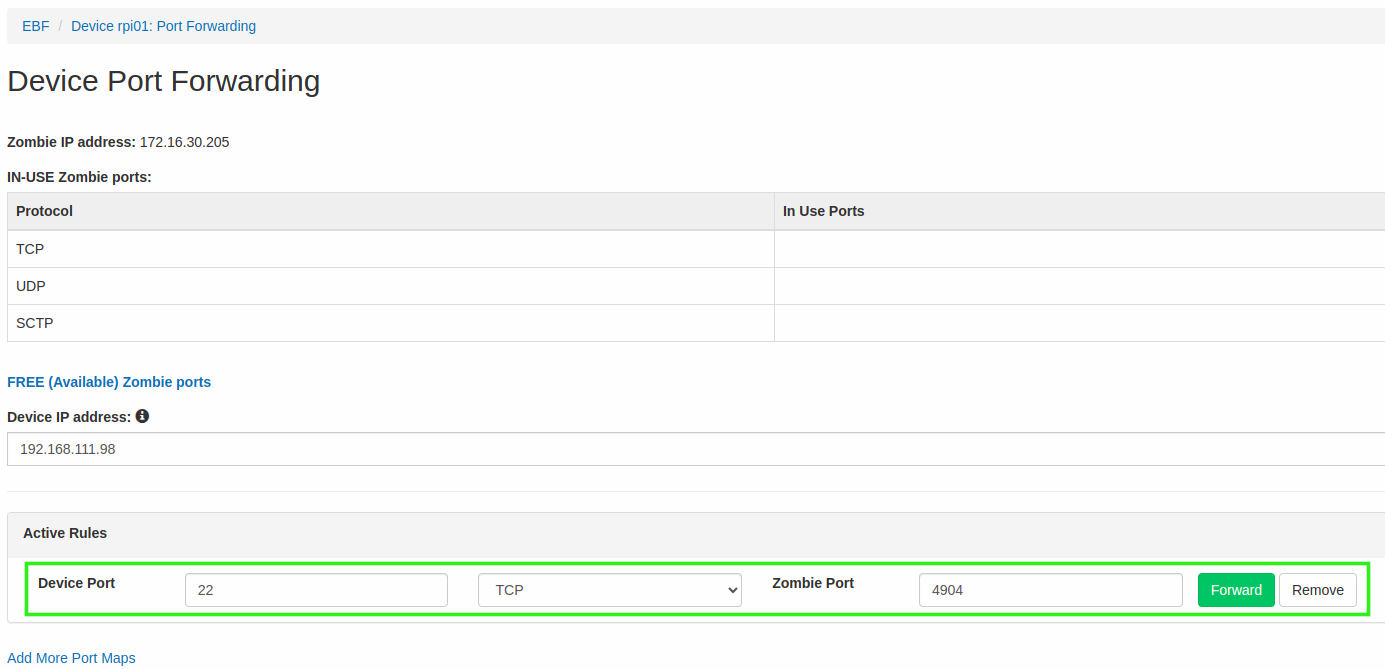
Afterward, click on the Forward button. Once the rule is successfully applied, you can access the DUT (port 22) using the Zombie IP (172.16.30.100) and Port (1491).
5 If the Zombie port is available, your DUT port will be forwarded to it. Also, the ports will become non-editable, followed by the ‘Remove’ button as shown in the image below.
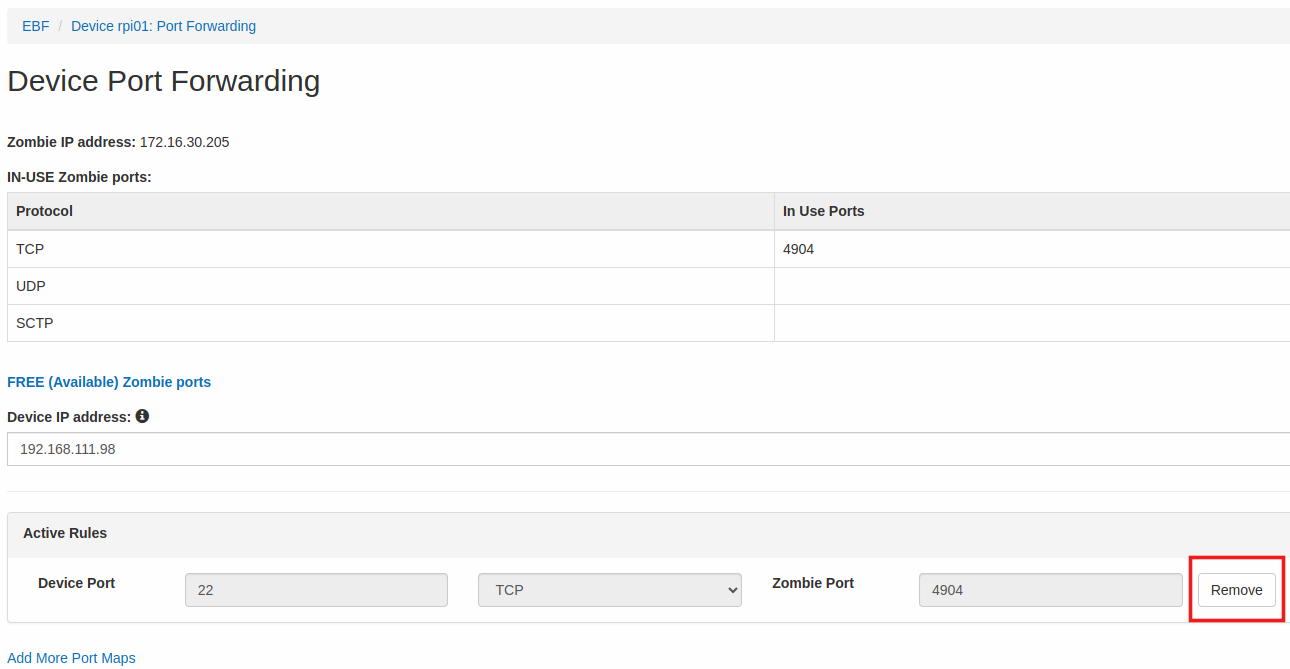
6 Whenever you access the Device Port Forwarding screen, you can view the current port forwarding details of the DUT and remove any forwarded ports.
How to set static IP address for Device
EBF provides functionality where a user can set a device’s static IP address based on its MAC address connected to Zombie private LAN. Here are the IP address ranges available for users to select a free IP address.
Dynamic Address Pool 192.168.111.3 to 192.168.111.150 (Dynamic Address Pool is for addresses assigned using the DHCP and includes any “static addresses” assignment based on MAC).
Static Address Pool 192.168.111.3 to 192.168.111.150 (Static Address Pool is for user-managed static addresses outside the visibility of Zombie (non-DHCP). The Zombie does not manage this pool, and the user is expected to set the IP addresses on the target device side and ensure there are no conflicts.)
Please follow the below steps to assign a static IP address to a device.
Go to Devices -> My Devices and see the list of devices.
Select the Static IP address button of the device to whom you want to assign a static IP address.
You have to provide the following details for Static IP address Assignment.
Device MAC: This is the MAC address of the device.
Device IP address: This is the IP address you want to assign.
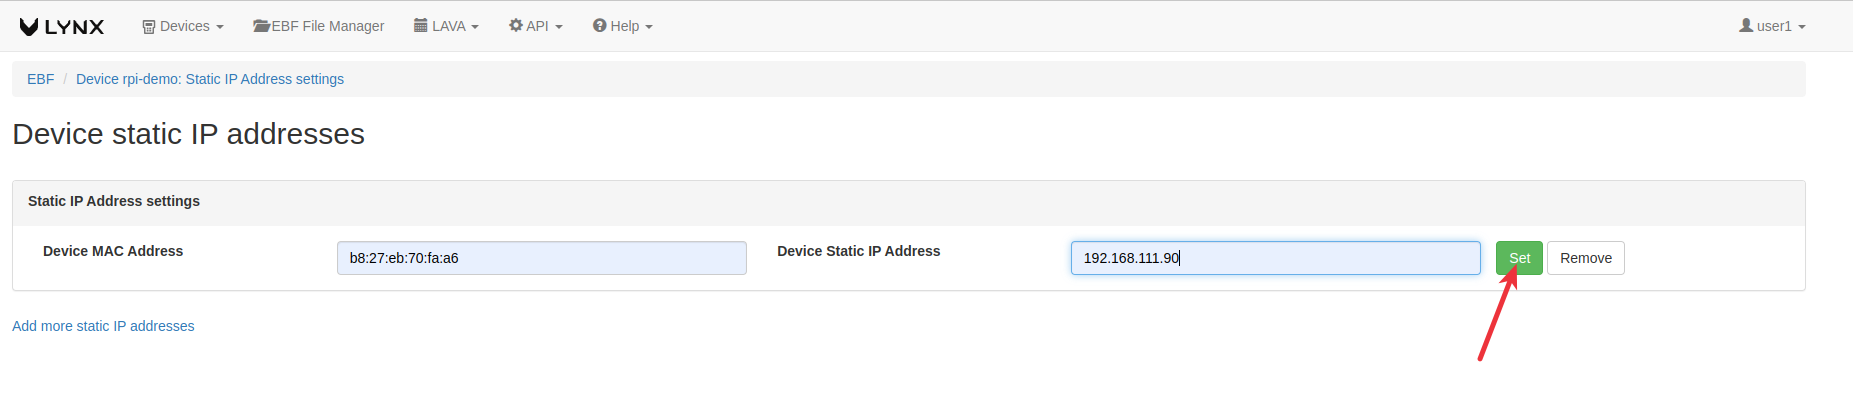
If an IP address is available, it will be assigned to your device. Consequently, the rule becomes non-editable, and a ‘Remove’ button will appear as shown in the image below.
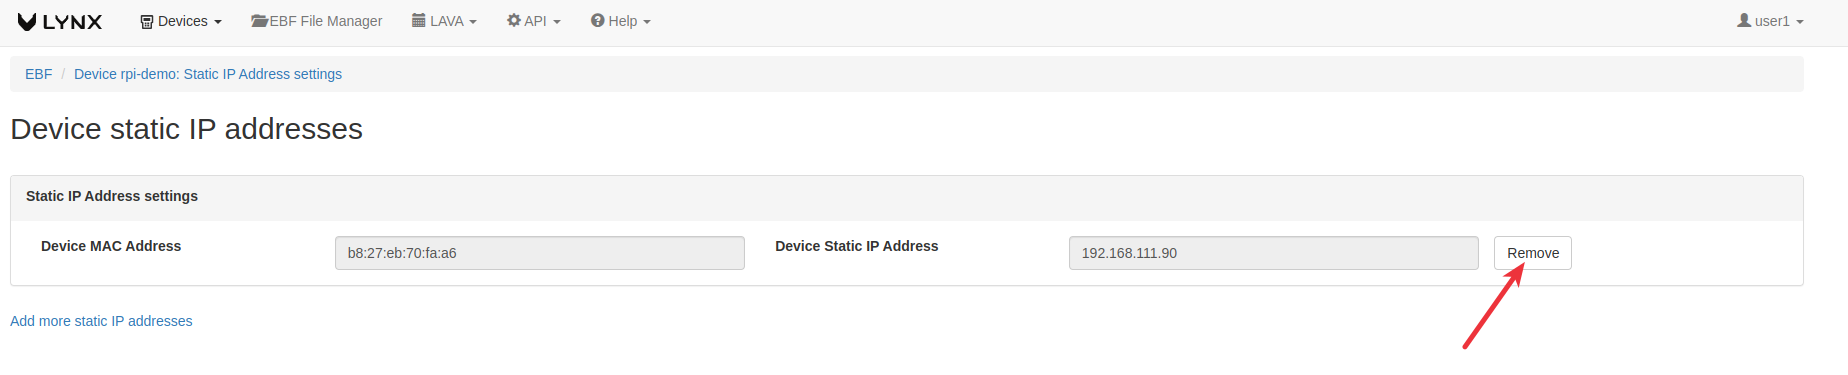
When you access the Static IP Address screen, you can view the current static IP addresses set for the device. You can also remove any static IP address by clicking the Remove button.
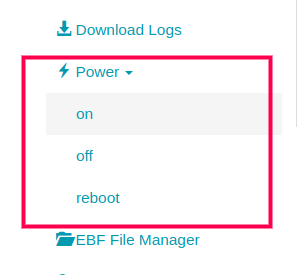
Power Control
Through EBF Server, users can control the power state of the device connected to any Zombie.
There are three power switch options available:
Power On
Power Off
Reboot
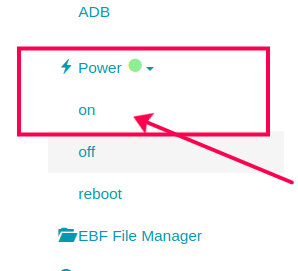
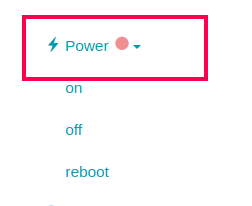
These options are available on the device’s web console screen: Once the user clicks on the Power On/Power Off/Reboot button, the power state of the board changes, and the color symbol is displayed on the screen.
Power On Confirmation:
When the color adjacent to the Power label is Green, it means the Power is ON.
Power Off Confirmation:
When the color adjacent to the Power label is Red, it means the Power is OFF.
Reboot Confirmation:
When the color of the Power label switches from Red to Green, irrespective of the current color, it means the reboot is successful.
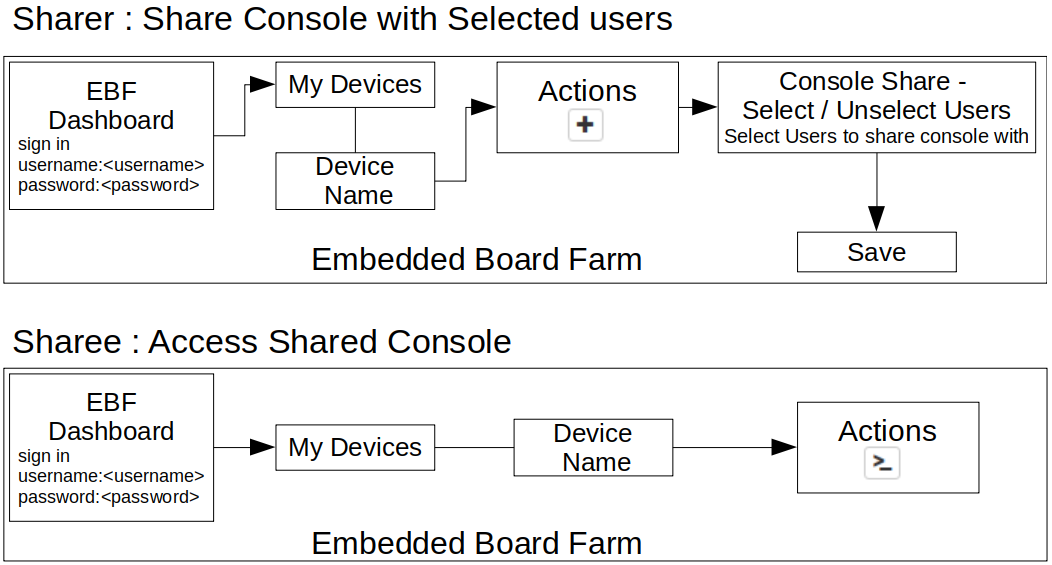
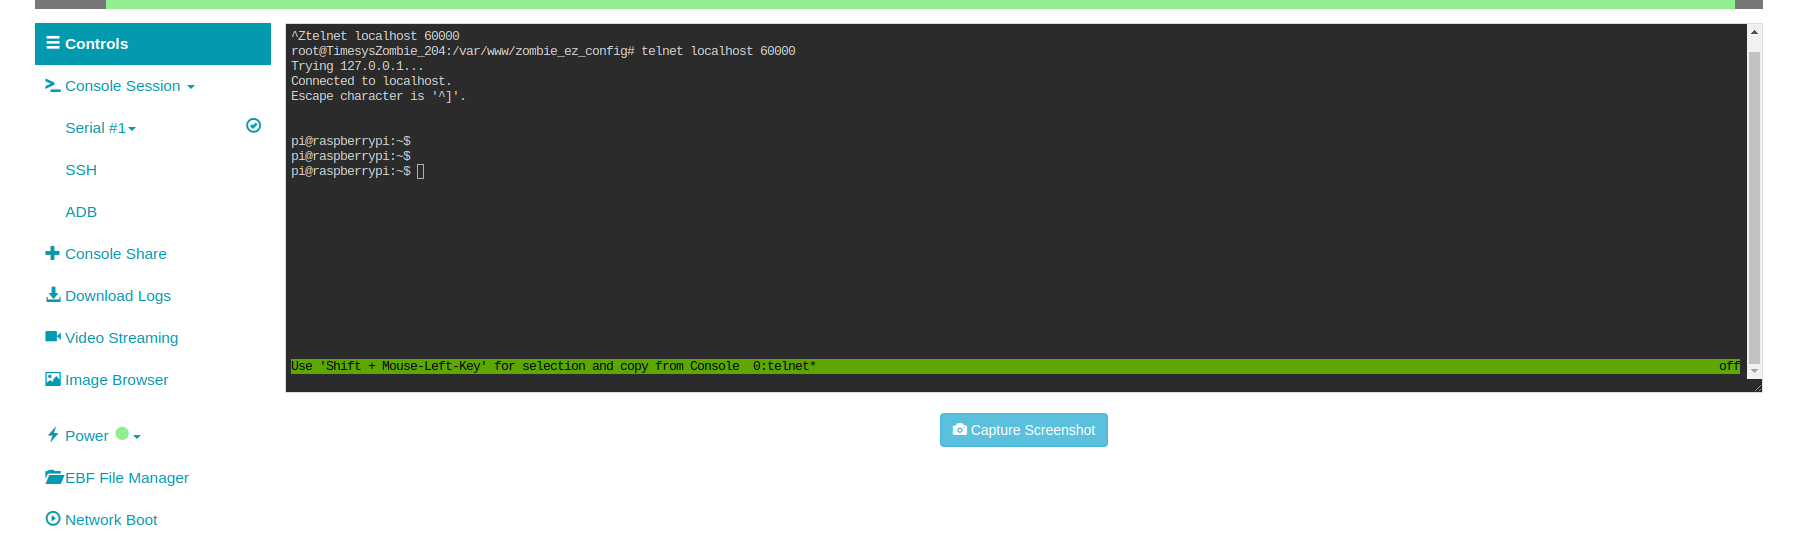
How to access a device’s Web Console
Serial Console
Following are the steps to access a serial web console:
1 Login to the EBF homepage/Dashboard through a web browser with credentials.
Username : <username>
Password : <password>
2 Select the All Devices option from the Devices drop-down list.
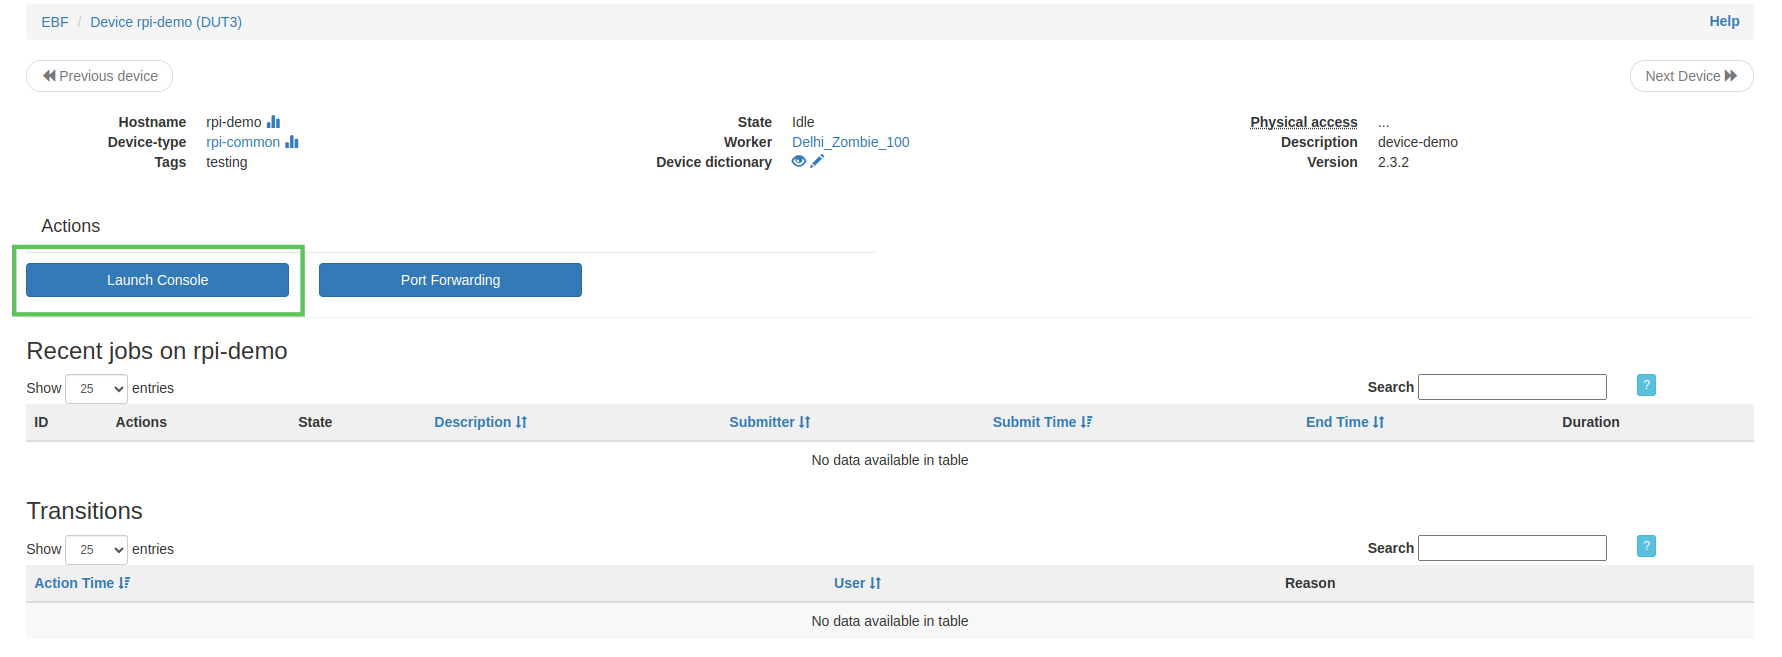
3 Click on the assign button corresponding to the device selected (rpi-demo is taken as a reference here) to allocate the device to the user.
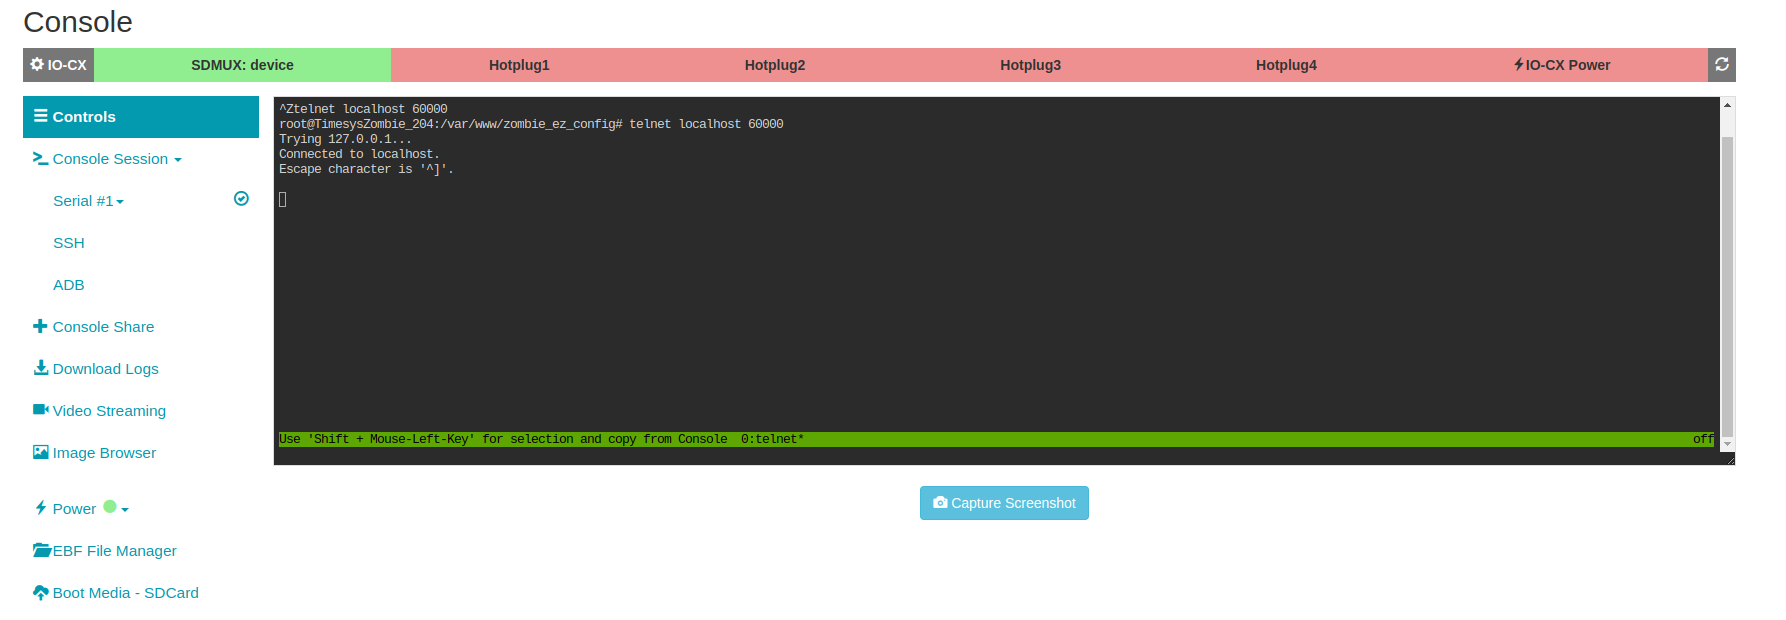
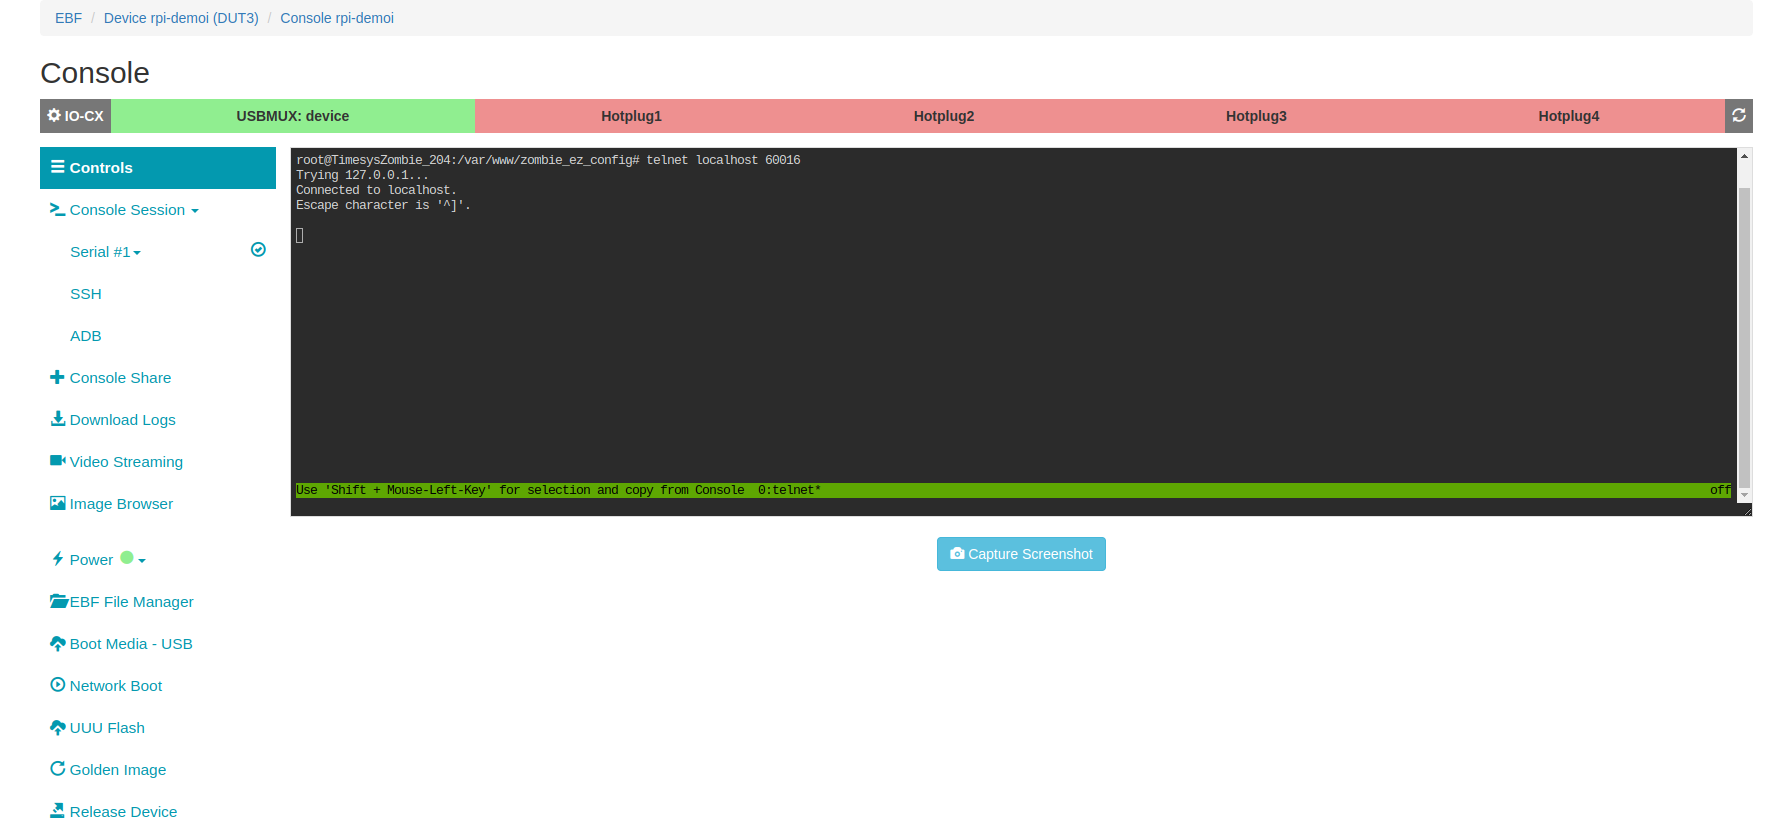
4 Click on the Launch Console button to go to Device’s console page.
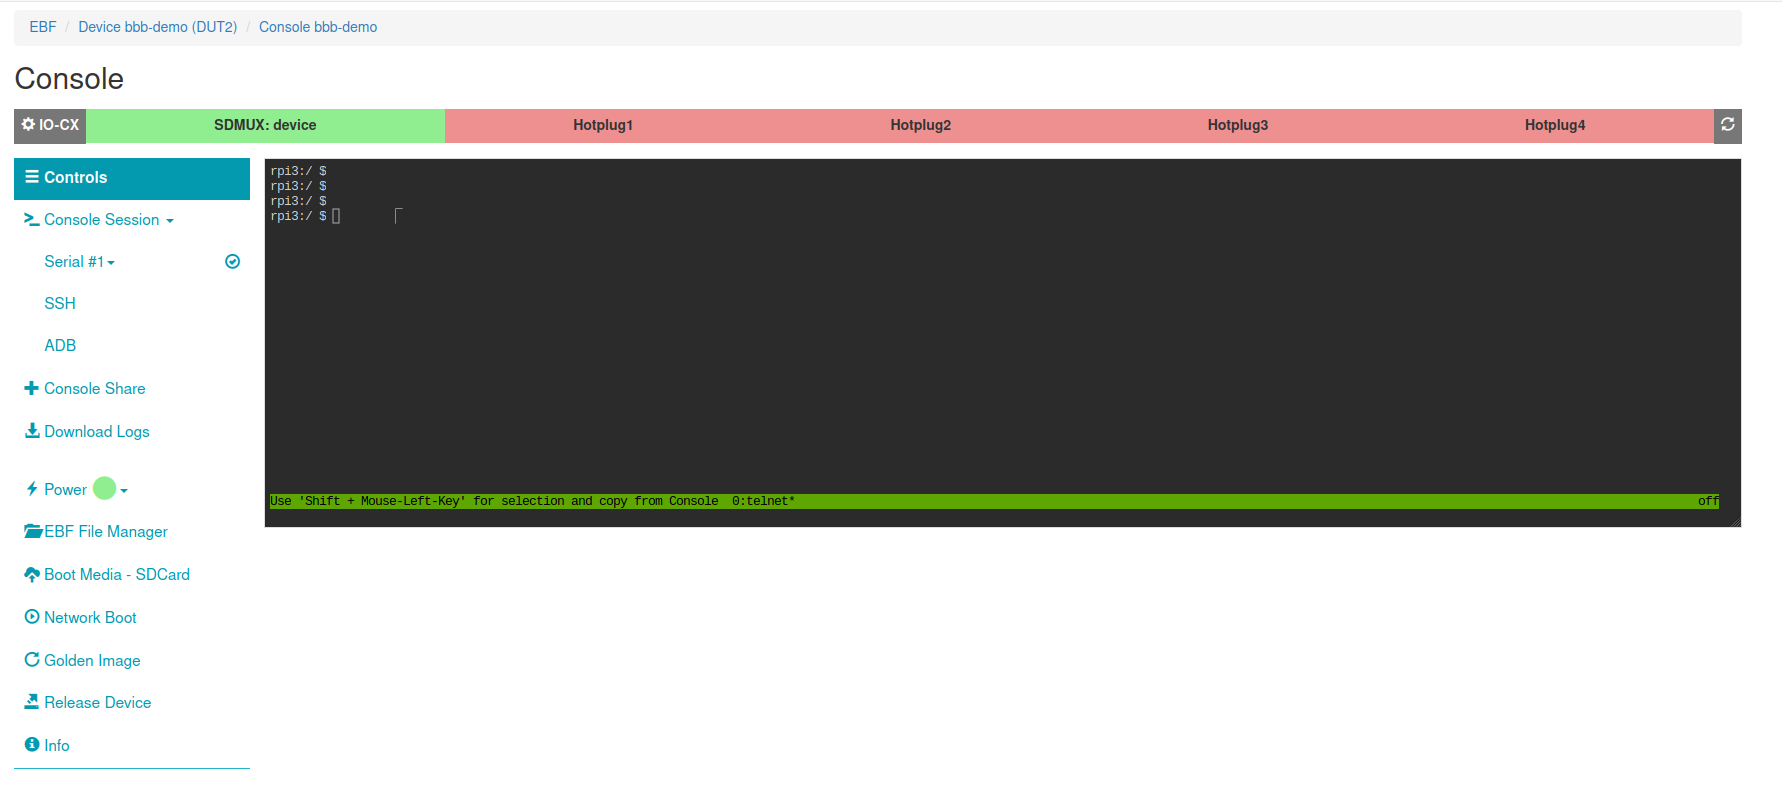
5 The following window will appear after selecting the Launch Console option.
NOTE: The following screen is visible with the IO-CX control panel when the IO-CX control panel is connected.
OR
Click on hostname (rpi-demo is taken as reference),
and on the next page, select the Launch Console option.
The following window will appear after selecting the Launch Console option.
SSH Console
Following are the steps to access the SSH web console:
1 Login to the EBF homepage/Dashboard through a web browser with credentials.
Username : <username>
Password : <password>
2 After login, first you have to forward your DUT ssh port to any port of Zombie. Refer user_guide.html#how-to-use-port-forwarding for more details on port forwarding.
3 Select the My Devices option from the Devices drop-down list.
4 You can launch the console of the target device.
5 The following window will appear after selecting the Launch Console option.
NOTE: The following screen is visible with the IO-CX control panel when the IO-CX control panel is connected.
6 Now you need to click on the SSH option.
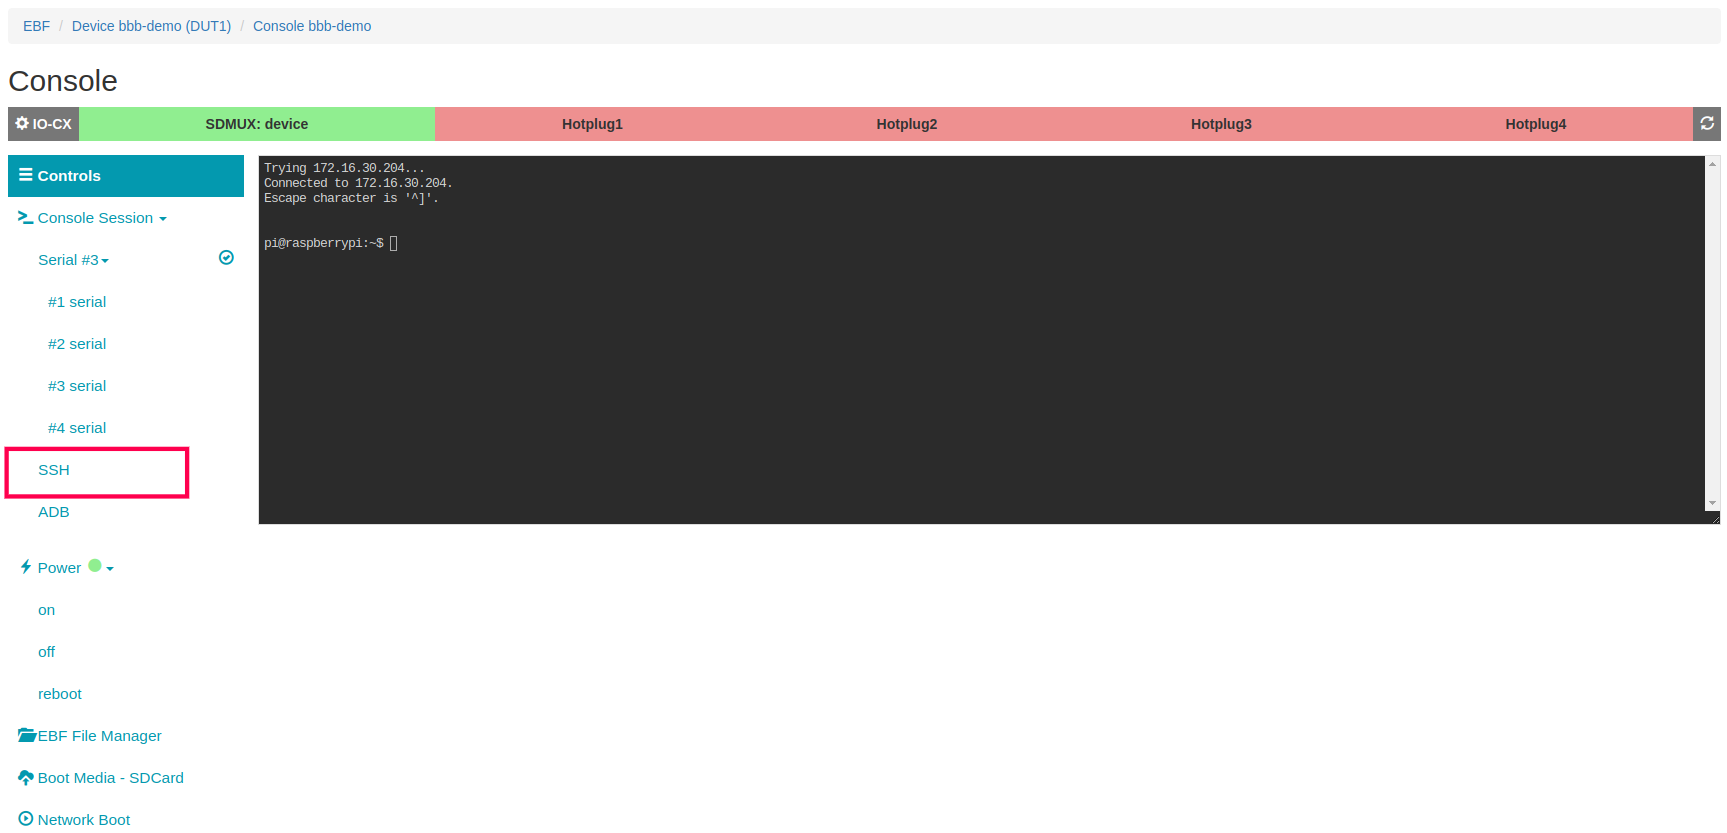
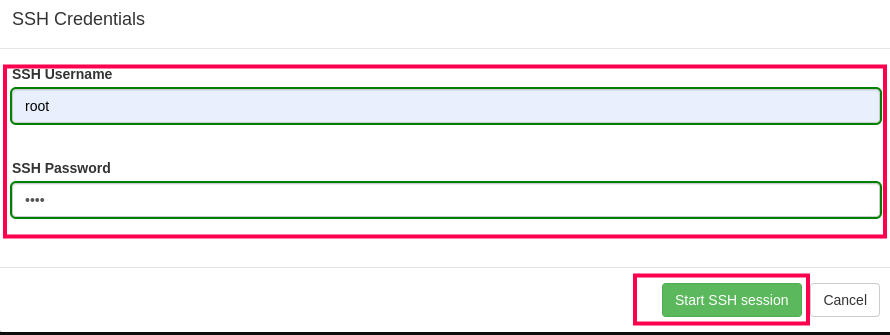
7 Then you can add the SSH username and SSH Password on the popup as highlighted in the image below. After that click on the Start SSH session button.
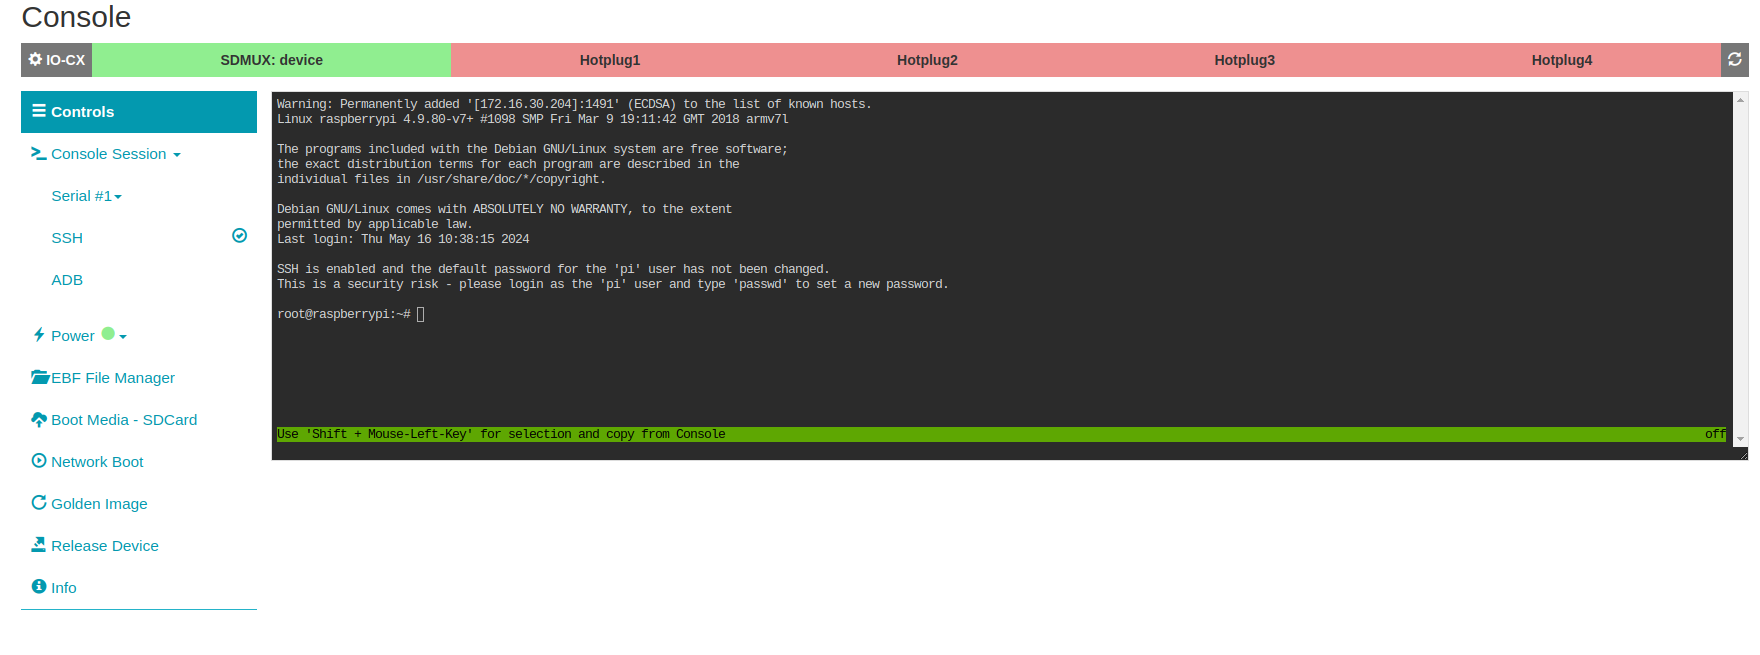
8 Now you can access the ssh console.
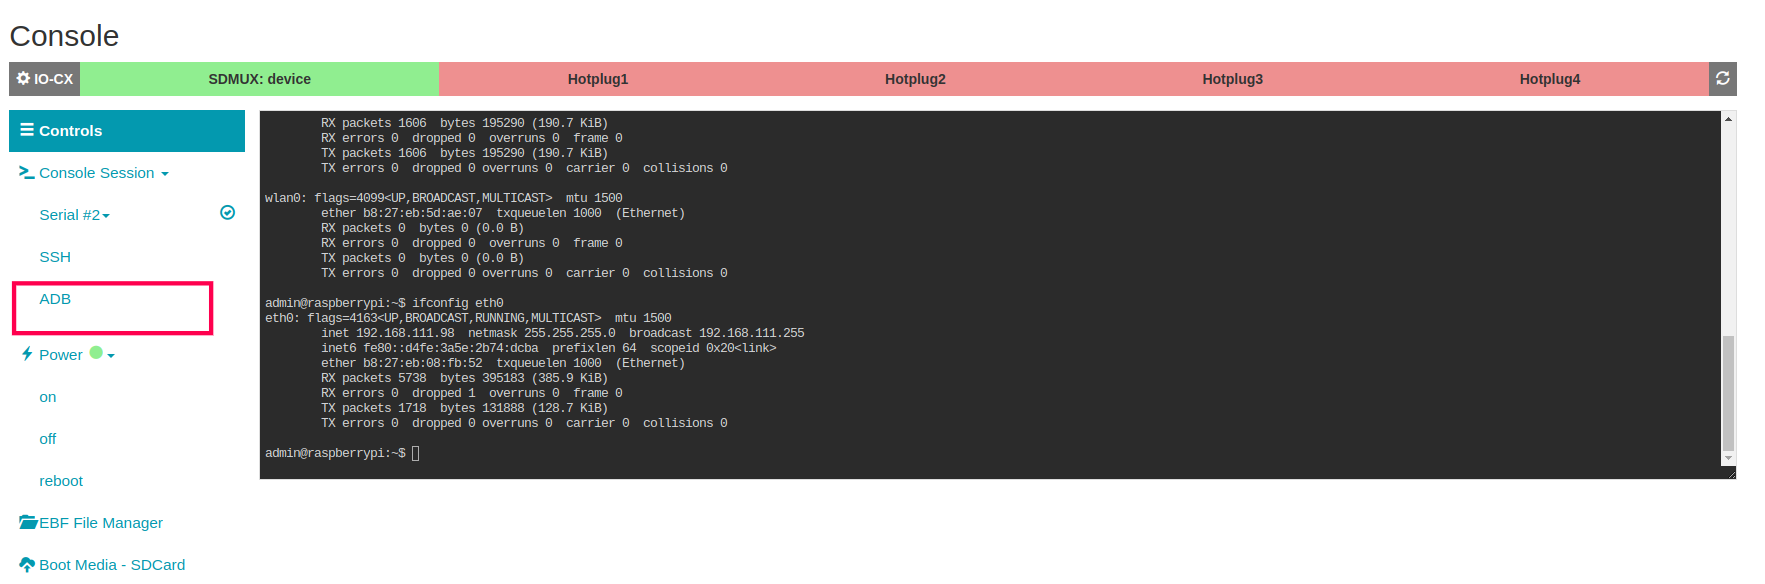
ADB Console
Following are the steps to access ADB Console:
1 Login to the EBF homepage/Dashboard through a web browser with credentials.
Username : <username>
Password : <password>
2 Select the My Devices option from the Devices drop-down list.
3 Now You can launch the console of the target device.
4 The following window will appear after selecting the Launch Console option.
NOTE: The following screen is visible with the IO-CX control panel when the IO-CX control panel is connected.
5 Find the device IP address connected to the zombie network.
6 Now click on the ADB option available in the left panel.
7 The following popup appears on the screen enter the device IP connected to the zombie network.
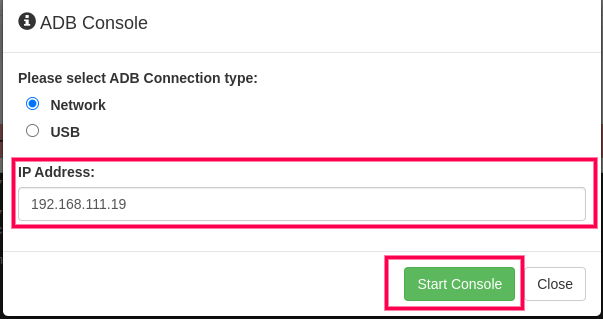
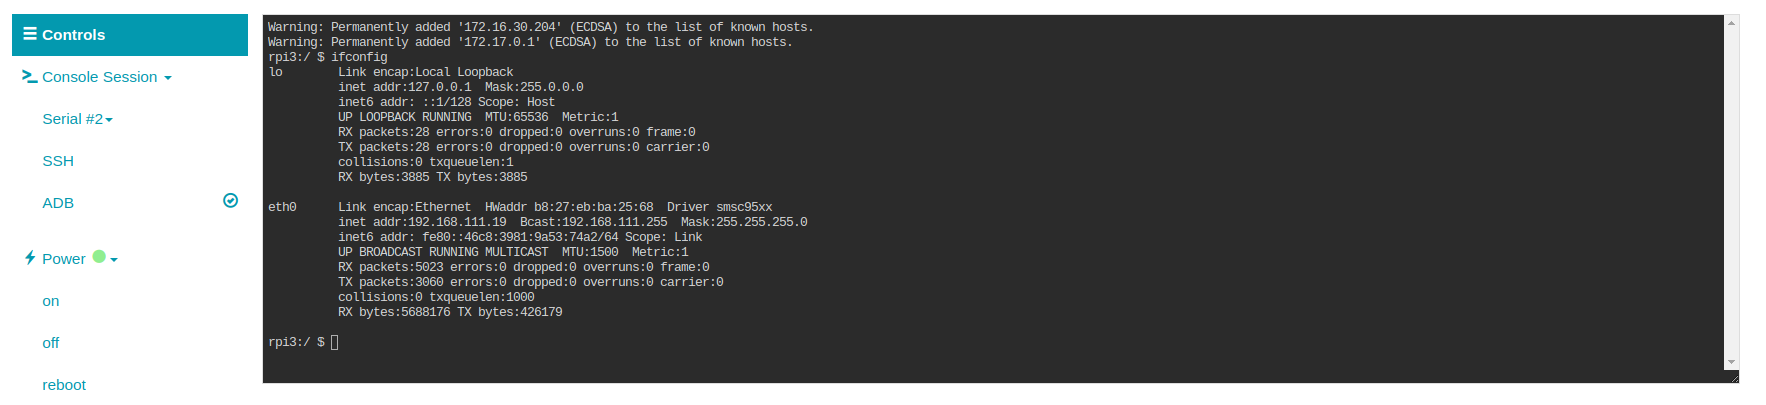
8 After a successful connection you can access adb console.
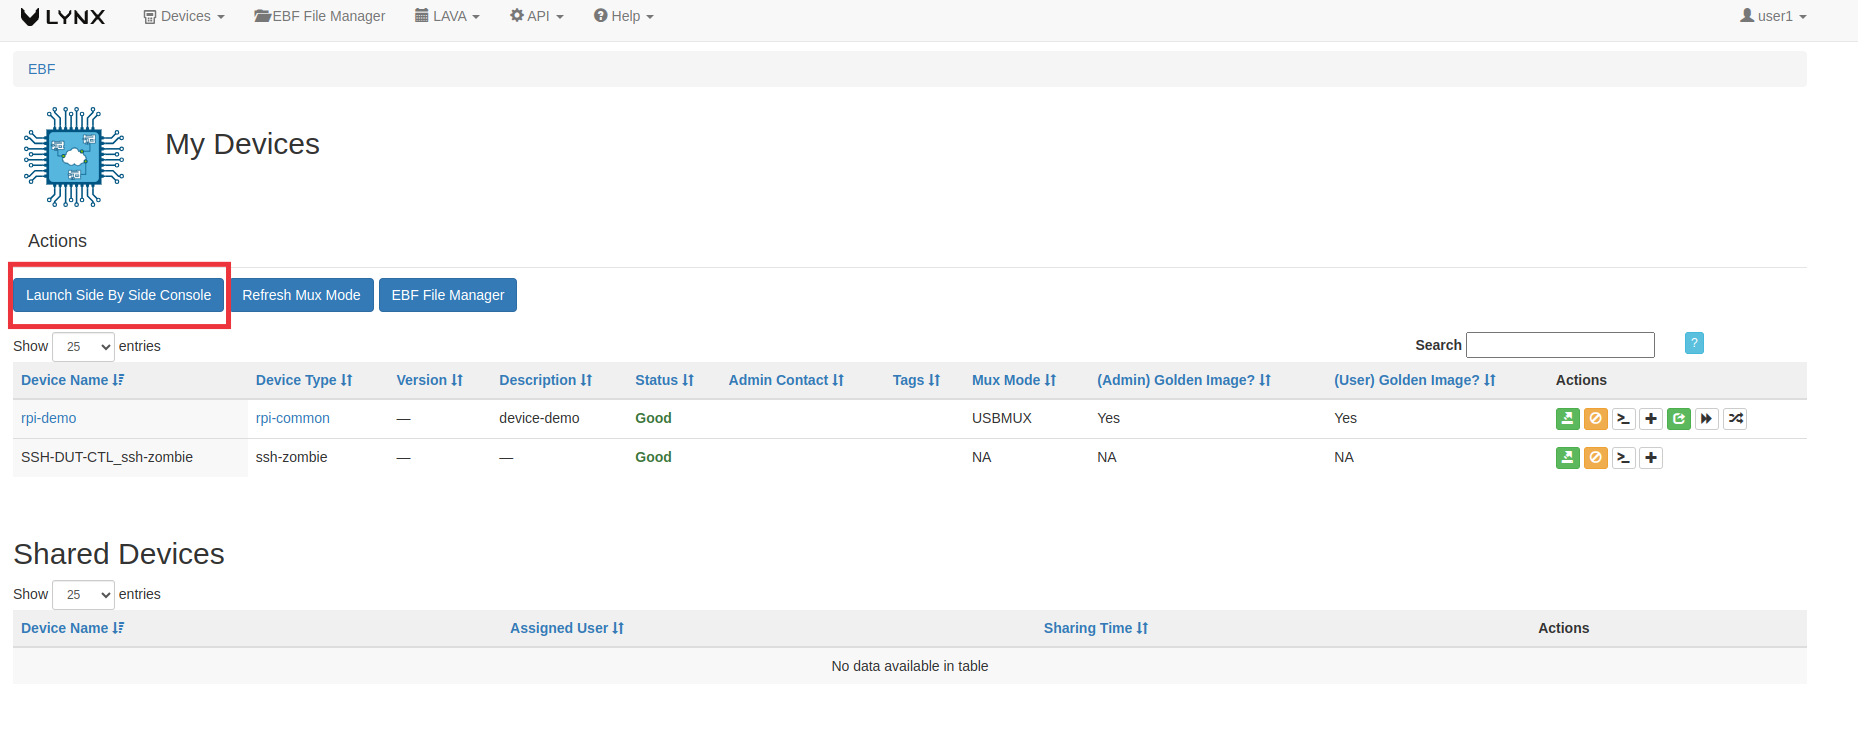
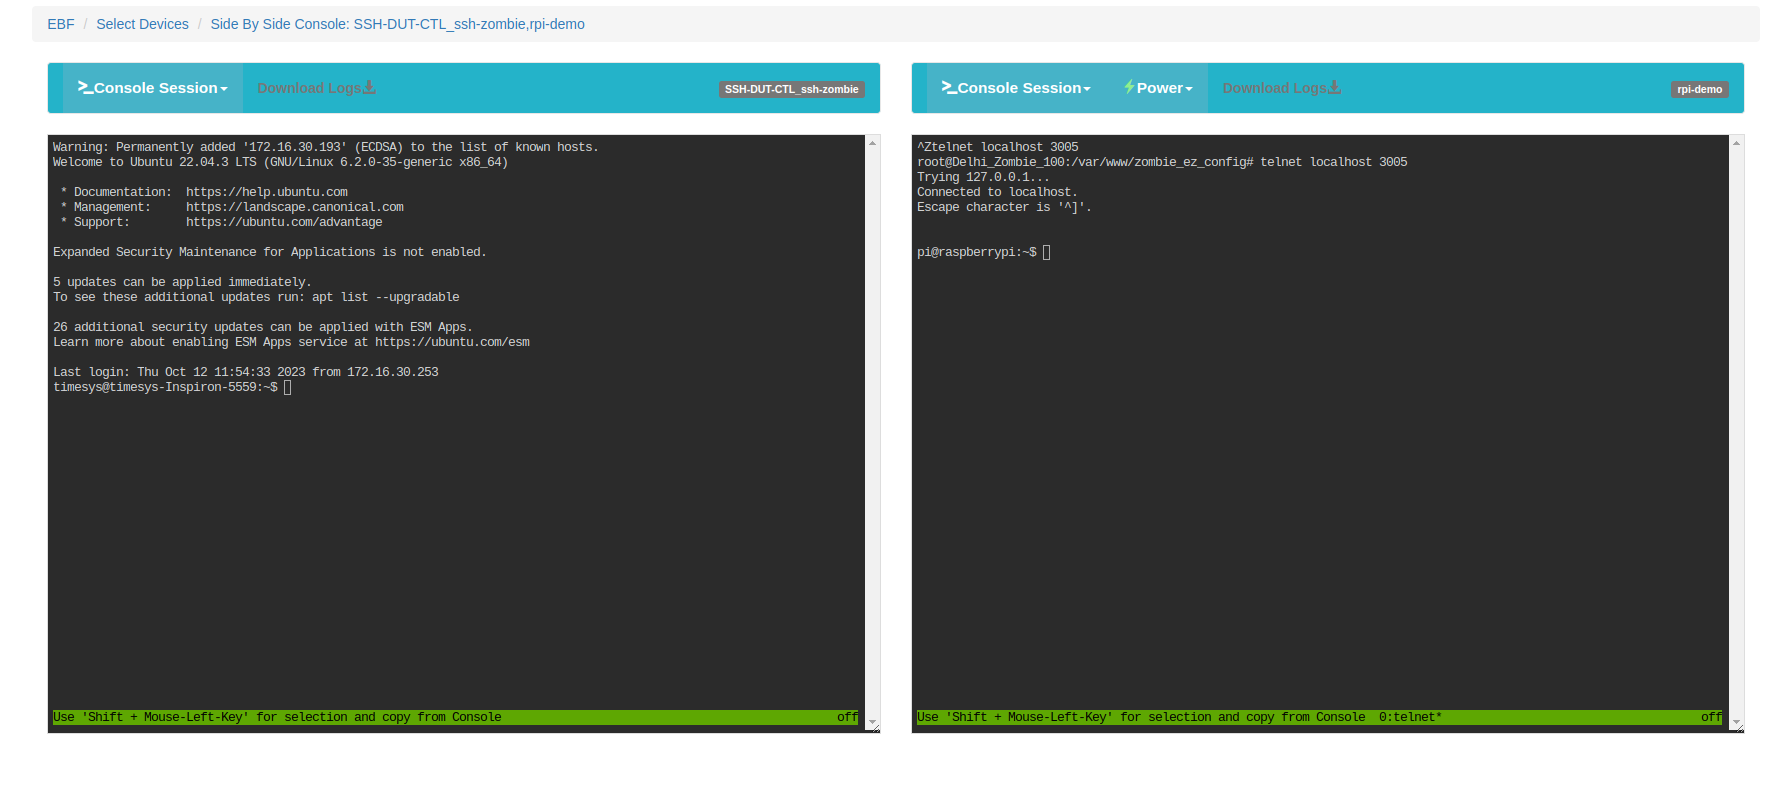
Side by Side Console of two devices
Following are the steps to launch the console of two devices simultaneously:
1 Login to the EBF homepage/Dashboard through a web browser with credentials.
Username : <username>
Password : <password>
2 Select All Devices option from Devices drop down list.
3 Click on assign icon corresponding to the devices selected (rpi-demo and SSH-DUT-CTL_ssh-zombie is taken as reference here) to allocate devices to the user.
4 Click on Launch Side By Side Console button.
5 Select Device_1 and Device_2 from the drop down list of assigned devices.

6 The following window will appear after selecting the Device_2.
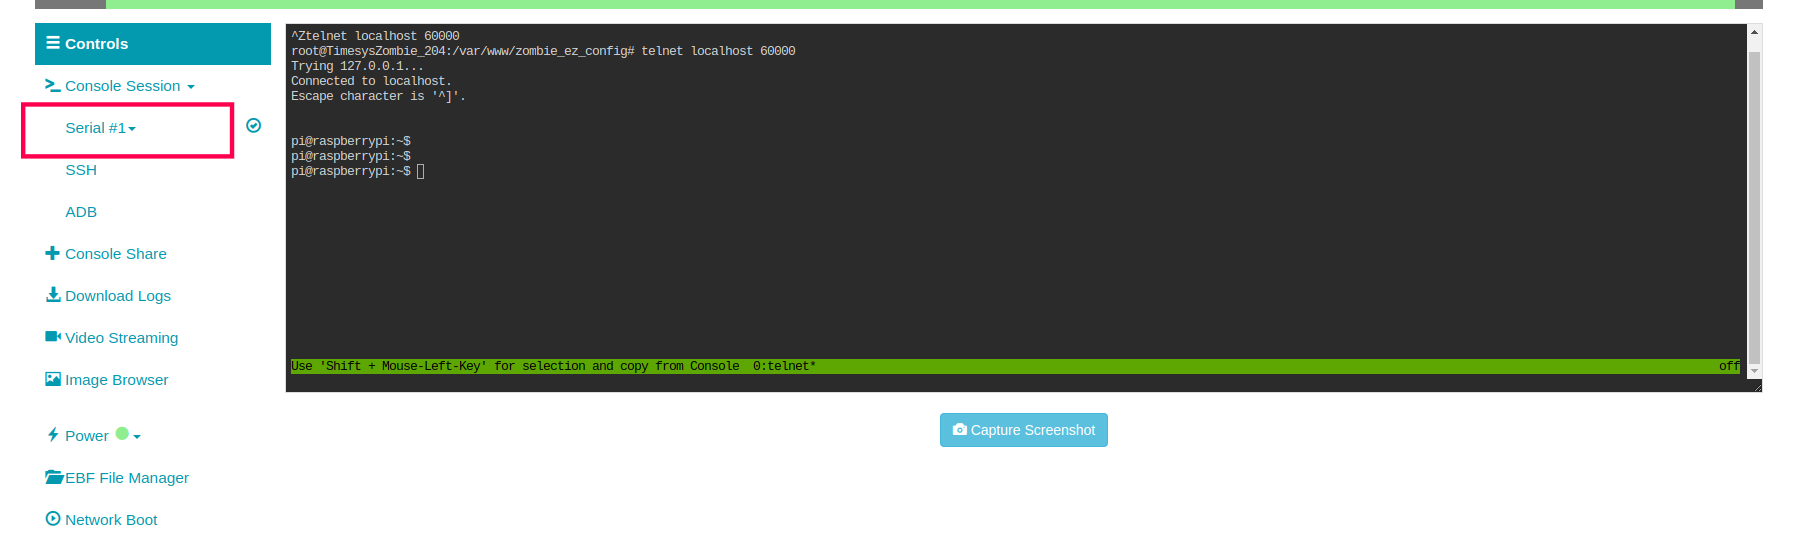
How to access device serial console over telnet
From EBF UI
Prerequisite: Device Console sharing should be disabled by admin.
Following are the steps to access a serial console over telnet:
1 Launch the console of the target device, by clicking on the Launch Console button.
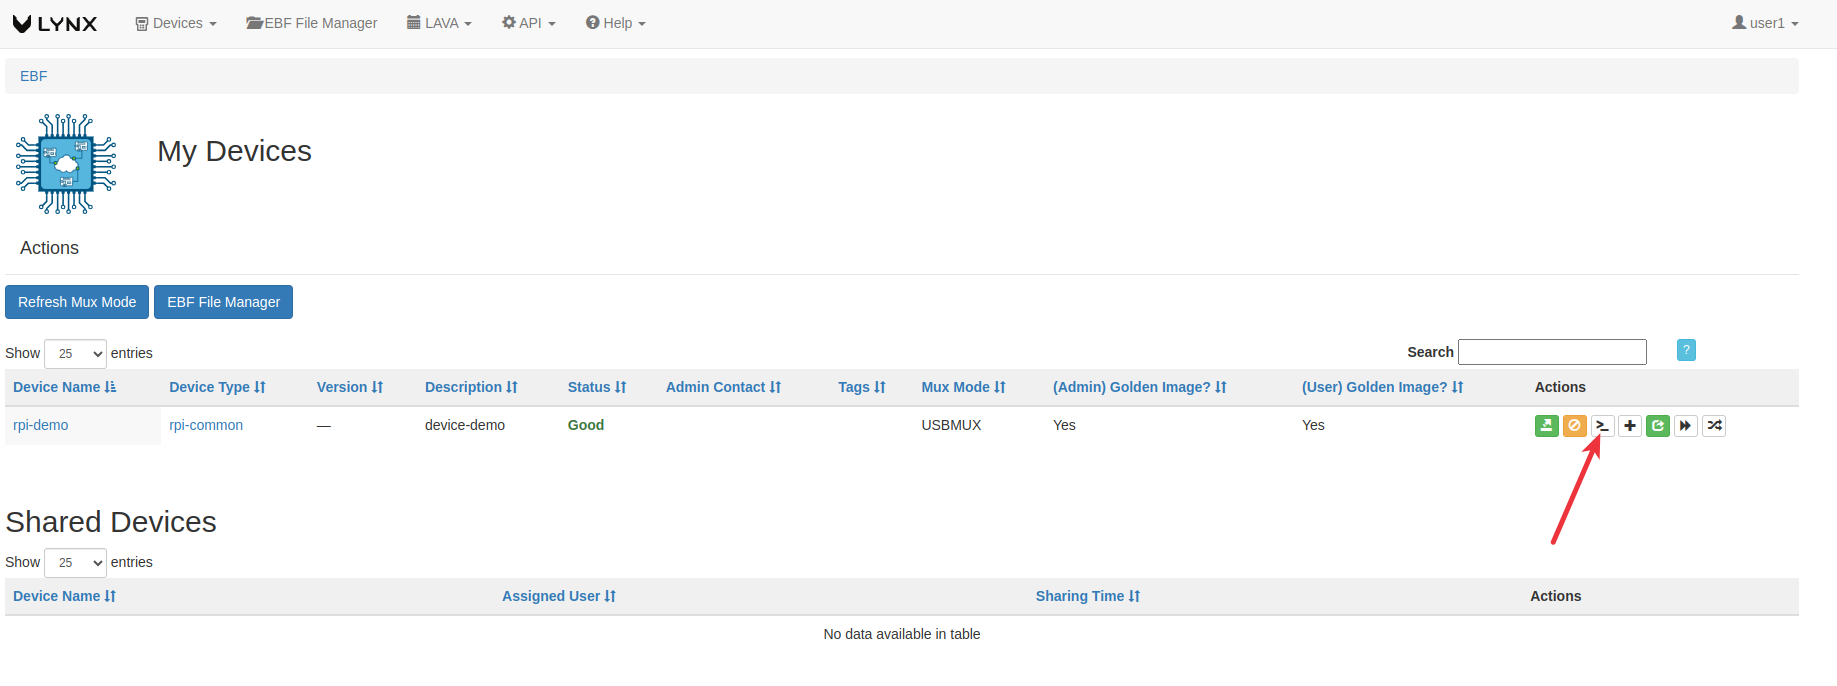
2 Click on the Info option from the left panel to view the device information.
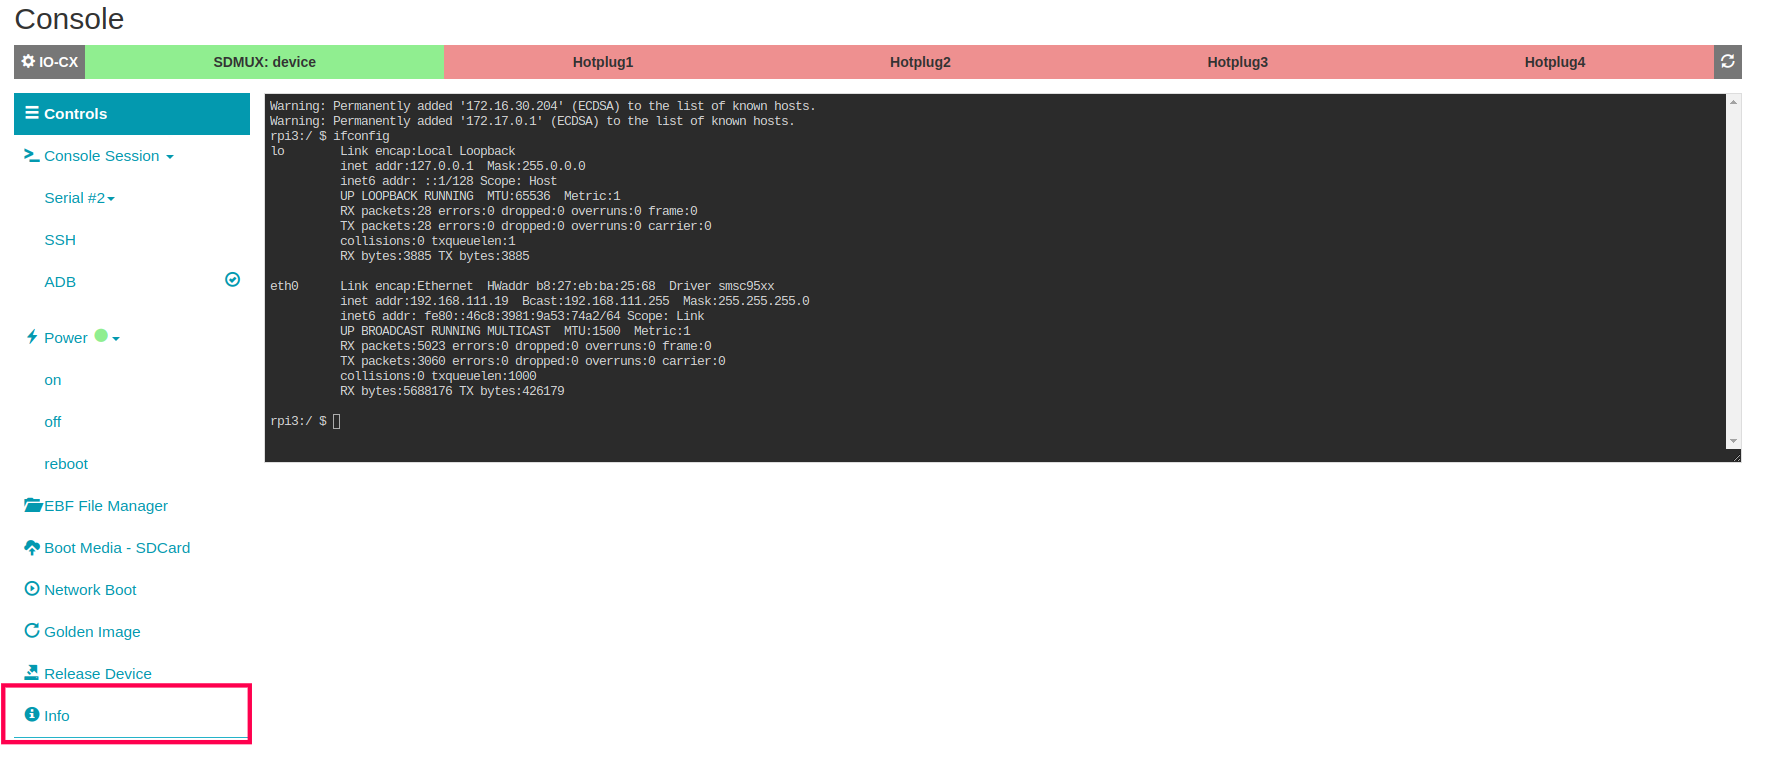
3 Device information is visible on the screen.
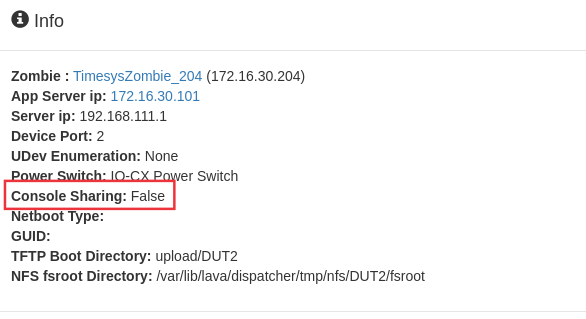
4 If you see Console Sharing False, it means you are accessing serial console over telnet.
From EBF-CLI
Prerequisite: Device Console sharing should be disabled by admin.
Following are the steps to access a serial console over telnet:
1 Device for which you want to access serial console over telnet should be assigned to you. Confirm by running ebf mydevices.
ebf  mydevices

rpi-demo
2 Confirm console sharing is disabled for the device by running ebf <device name> info.
ebf rpi-demo info

        ************************
        *  Device Information  *
        ************************

 Hostname:                 rpi-demo
 Device Status:            Good
 Device Port:              2
 Number Of Consoles        1
 IOCX Status:              false
 Force Release Allowed:    true
 Console Sharing           Disabled
 Tags:                     tag1 tag2
 Zombie Name:              Zombie_204
 Zombie IP:                172.16.30.204
 ZOMBIE_URL:               http://172.16.30.204/
 Power Switch:             IO-CX Power Switch
 Power Switch Port:        null
 Power Switch Commands:    on off reboot status
 TFTP DIR:                 upload/DUT2
 NFS DIR:                  /var/lib/lava/dispatcher/tmp/nfs/DUT2/tmp
 NETBoot Type:             uefi
 GUID:                     00:be:43:67:52:ce
 Image:
3 Get the telnet port information of the Device’s serial consoles by running ebf <device name> serial list.
ebf rpi-demo serial list

Number of Consoles: 1
serial0:   172.16.30.204:60008
This device has only one serial console, the above information shows the telnet url of the device.
4 You can now access the serial console over telnet from any machine that support telnet.
telnet <Zombie-IP> <TELNET-PORT>

telnet 172.16.30.204 60008
How to view Device information
Following are the steps to view the device information:
1 Launch the console of the target device, by clicking on the Launch Console button.
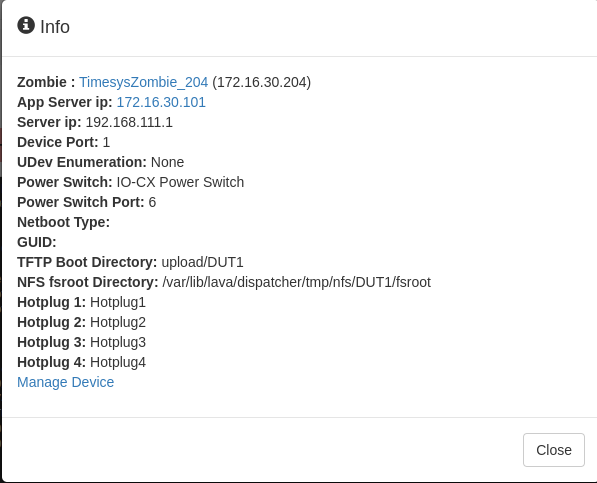
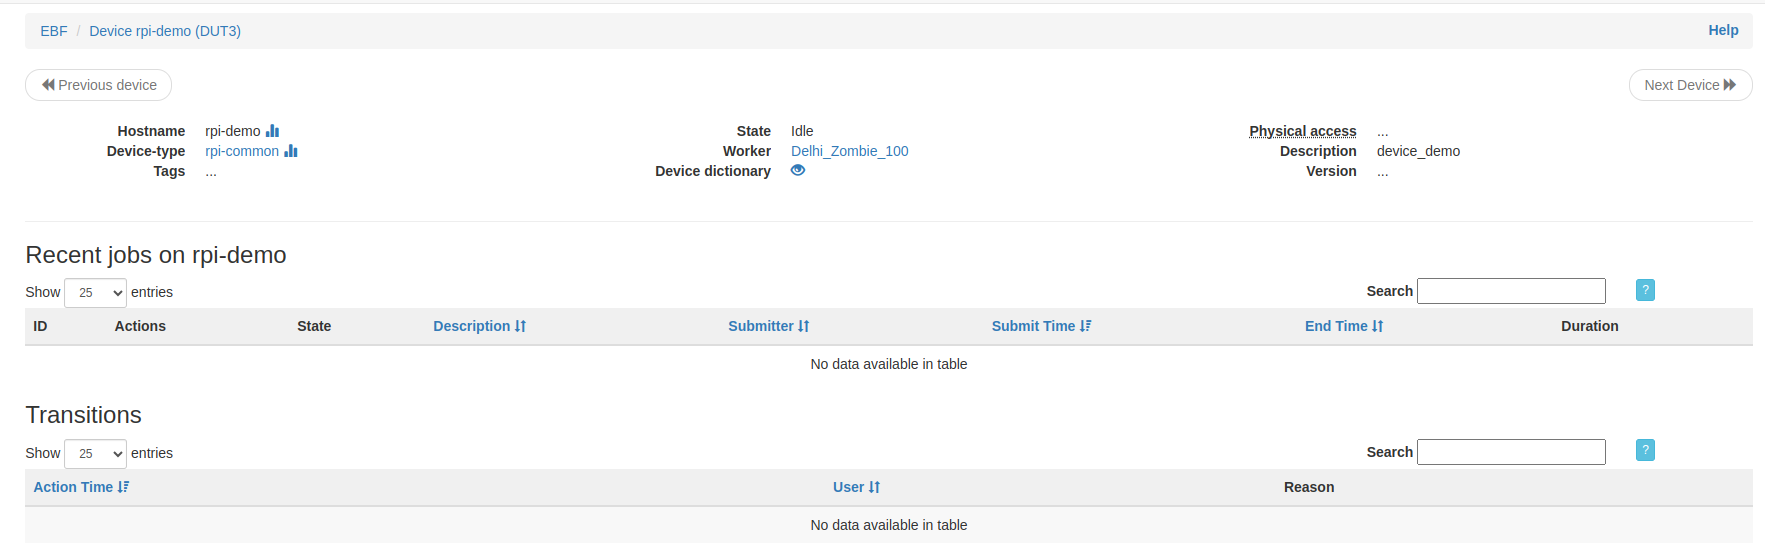
2 Click on the Info option from the left panel to view the device information.
3 Device information is visible on the screen.
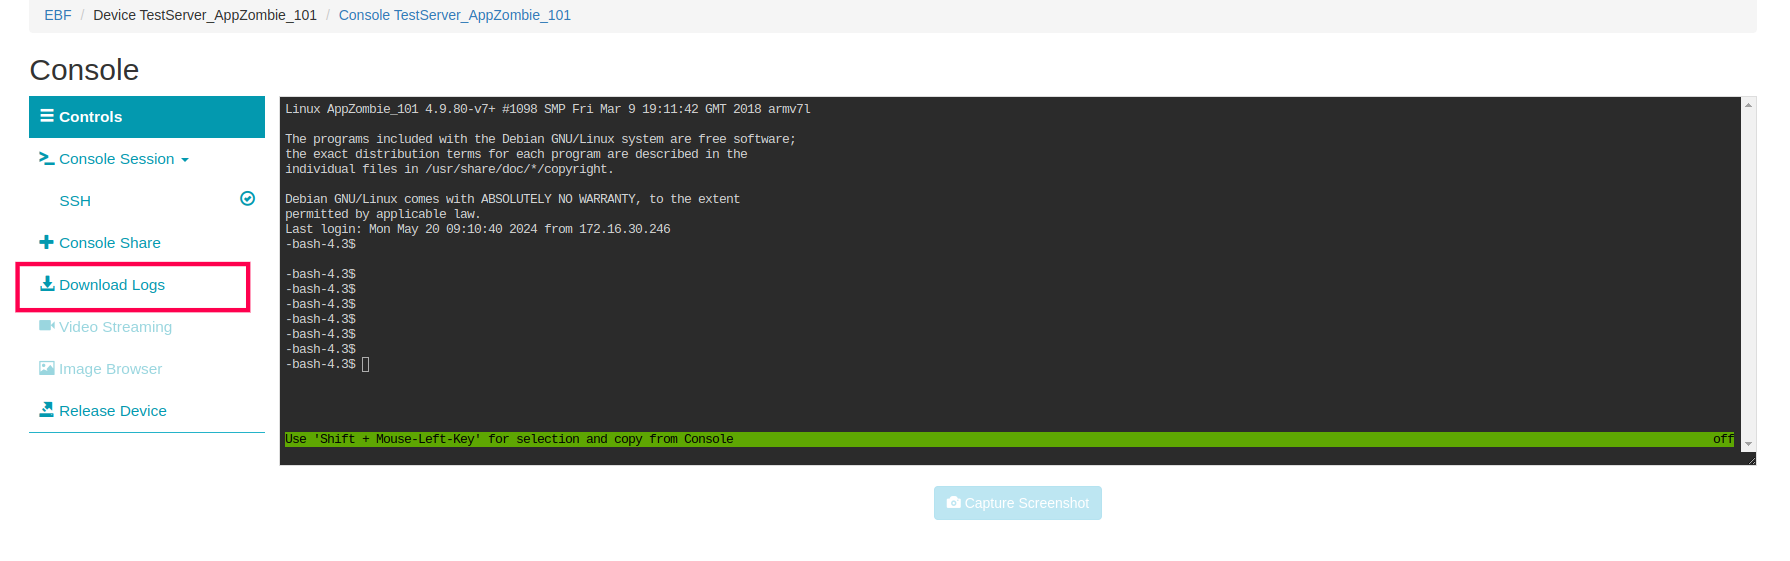
Download Console Logs
Following are the steps to access download Console Logs:
1 Login to the EBF homepage/Dashboard through a web browser with credentials.
Username : <username>
Password : <password>
2 Select the My Devices option from the Devices drop-down list.
3 Launch the console of the target device, by clicking on the Launch Console button.

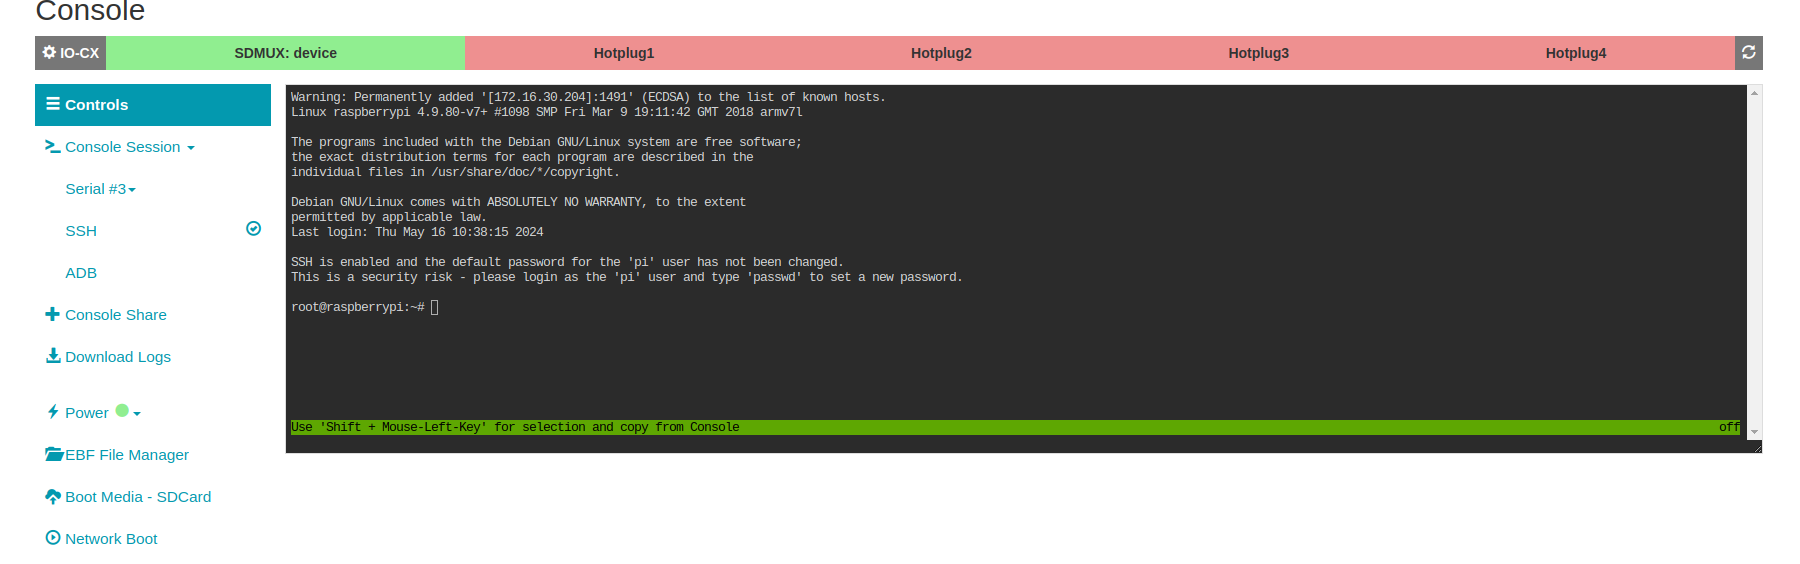
4 The following window will appear after selecting the Launch Console option.
NOTE: The following screen is visible with the IO-CX control panel when the IO-CX control panel is connected.
5 In order to capture console logs you can perform some command or you can reboot the device to capture fresh logs.
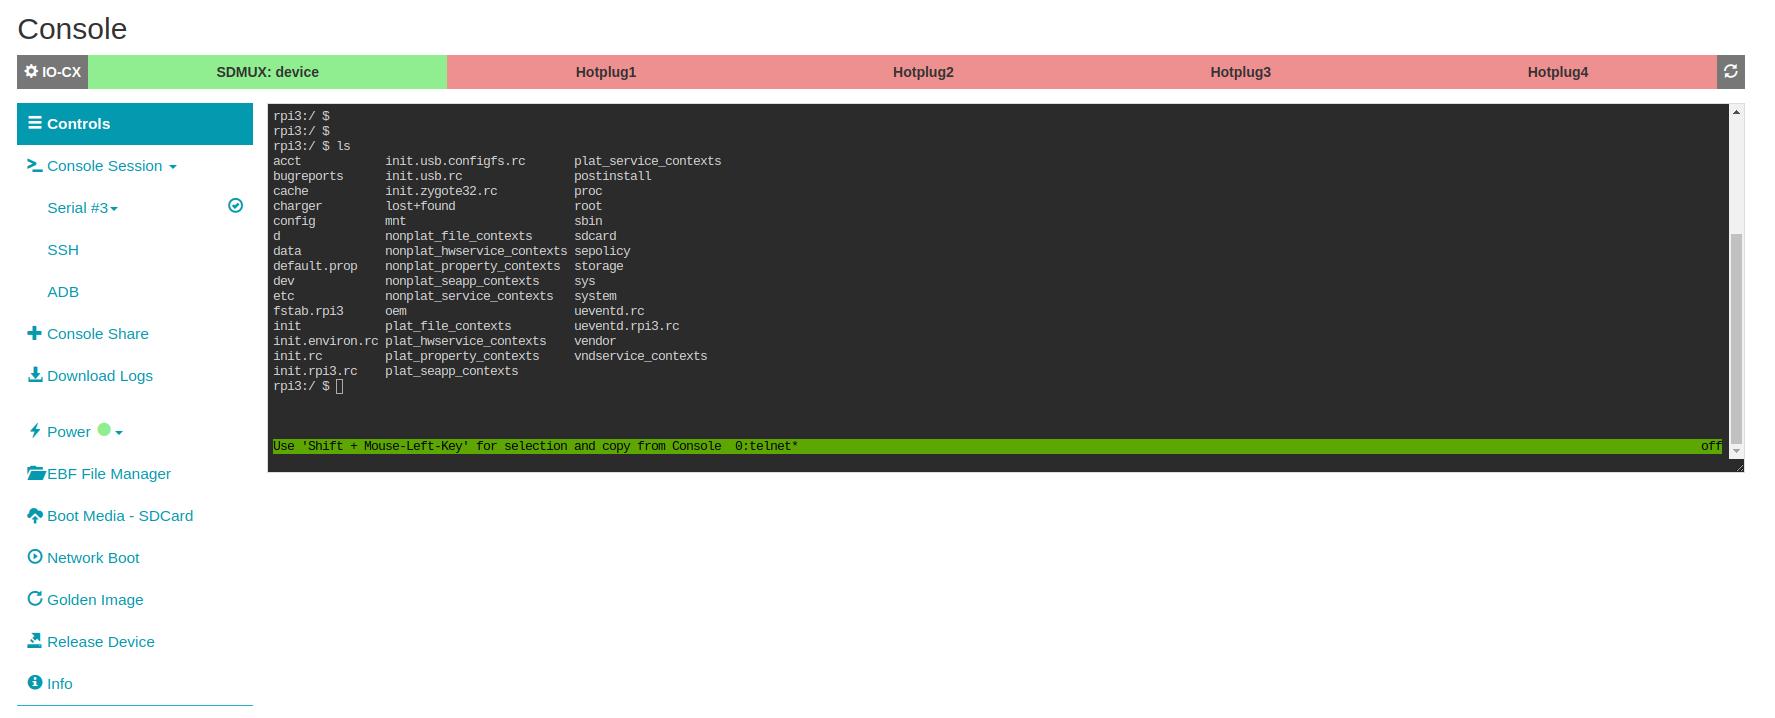
6 Now you need to click on the Download Logs option.
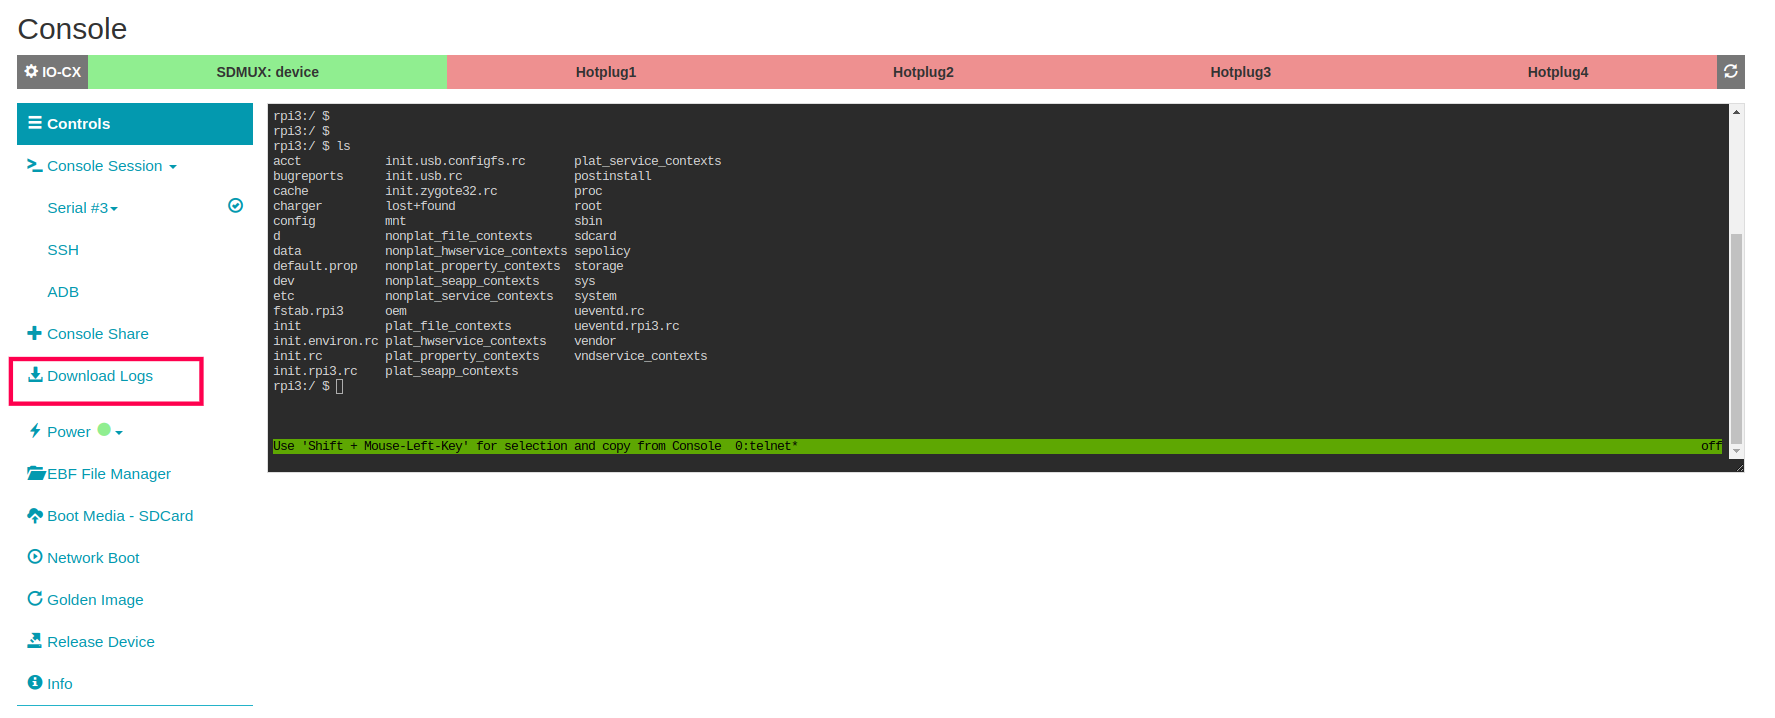
7 You will be able to see the Download Logs file in the downloaded folder.
Download Console Logs for SSH Device
Following are the steps to Download the Console Logs for the SSH Device
Go to Devices -> ‘My Devices’
1 Launch the Console of the SSH Device.
2 Console page would open up.
3 Click on the ‘Download Logs’ button to download the logs.
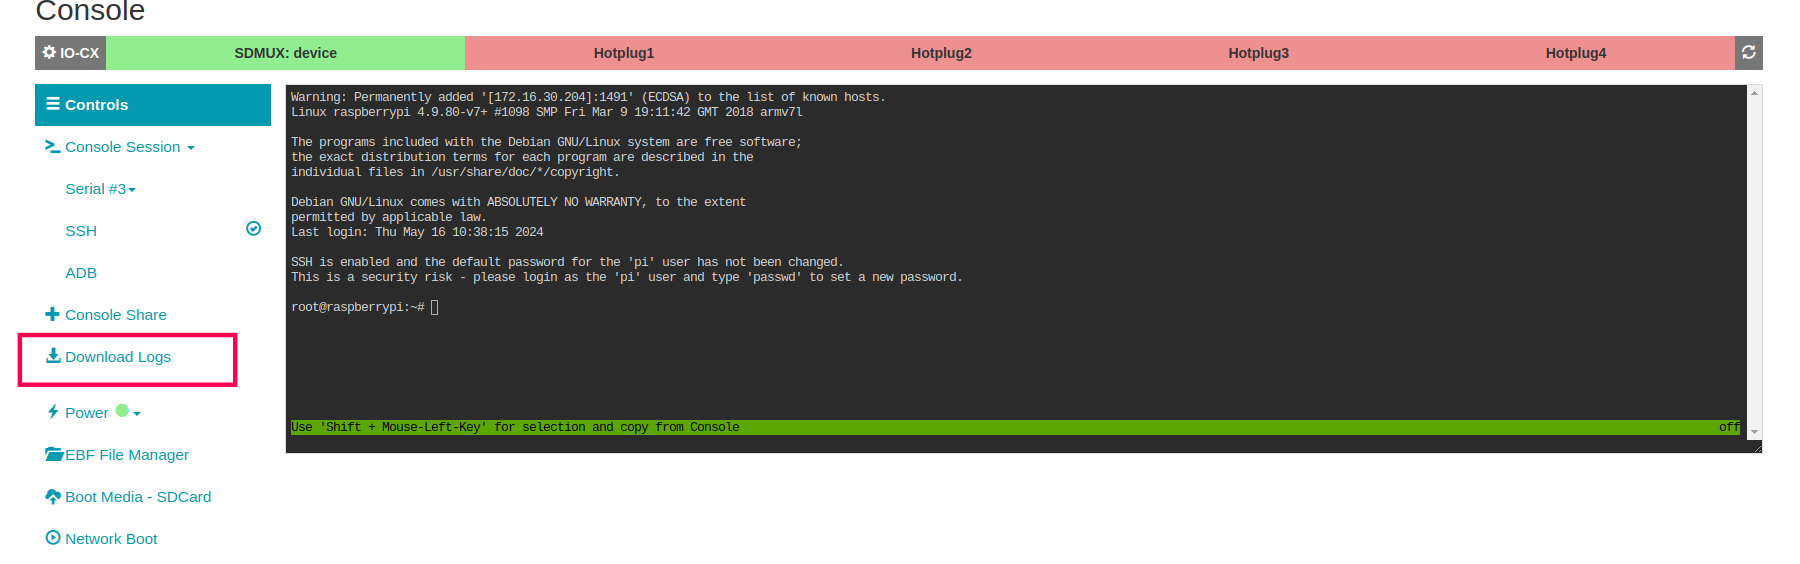
4 Console logs will start download on your system.
Download Console Logs for Test server device
1 Launch the console of the Test Server Device.
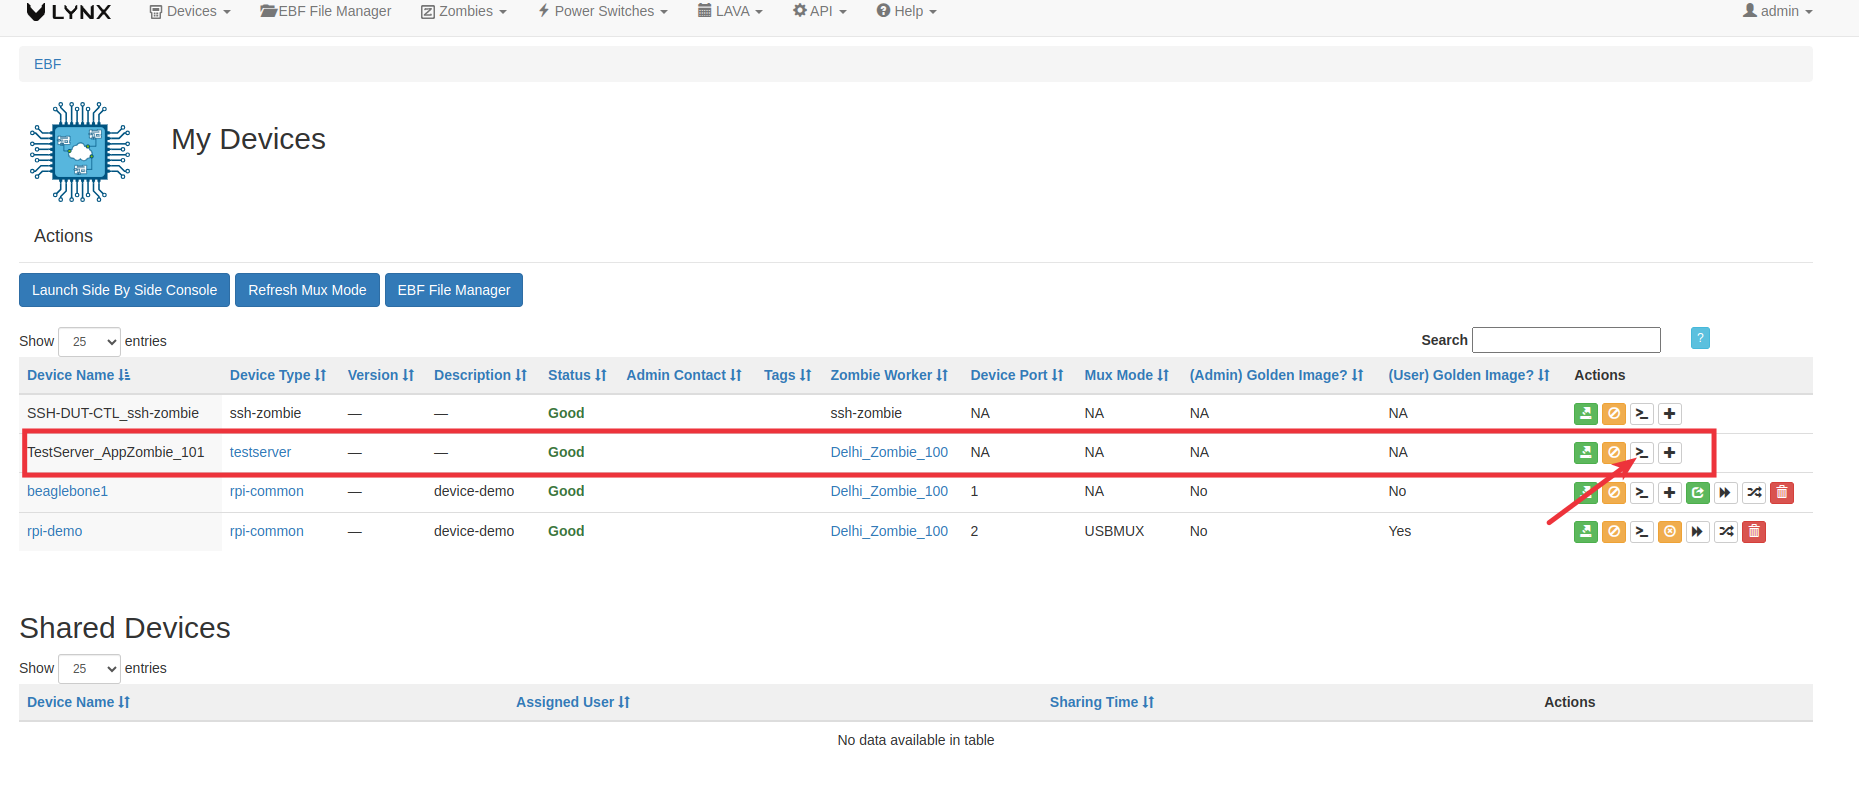
2 Console page would open up.
3 Click on the Download logs button from the left panel.
4 Console logs will start downloading on your system.
Download Golden Image from Console page
Following are the steps to download Golden image from console page.
1 Login to the EBF homepage/Dashboard through a web browser with credentials.
Username : <username>
Password : <password>
2 First you have to add the golden image of the device. Refer user_guide.html#how-to-add-golden-images-user-controlled to add the golden image of the device.
3 Select the My Devices option from the Devices drop-down list.
4 You can launch the console of the target device.

5 The following window will appear after selecting the Launch Console option.
NOTE: The following screen is visible with the IO-CX control panel when the IO-CX control panel is connected.
6 Select the Golden Image option from the console page.
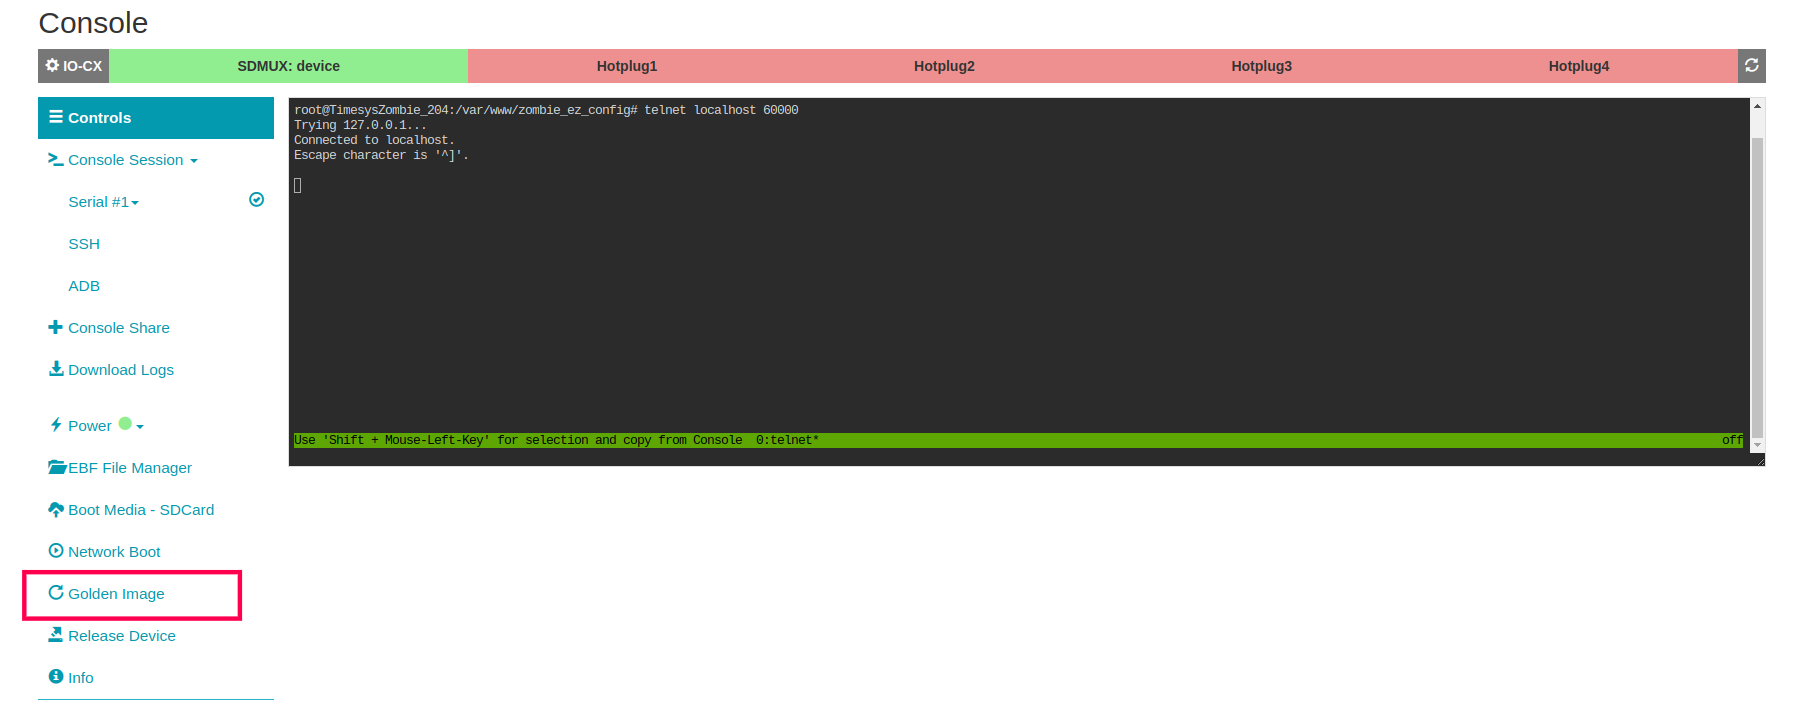
7 After selecting the Golden image option from the console page, following dashboard will appear on the screen.

8 Select the golden image you want to download from the dashboard. After clicking on the image, it will start downloading on your system.

EBF File Manager On Console Page
Following are the steps to access EBF File Manager on Console Page:
1 Login to the EBF homepage/Dashboard through a web browser with credentials.
Username : <username>
Password : <password>
2 Select the My Devices option from the Devices drop-down list.
3 You can launch the console of the target device.
4 The following window will appear after selecting the Launch Console option.
NOTE: The following screen is visible with the IO-CX control panel when the IO-CX control panel is connected.
5 On the device console page click on EBF file manager from the left panel.
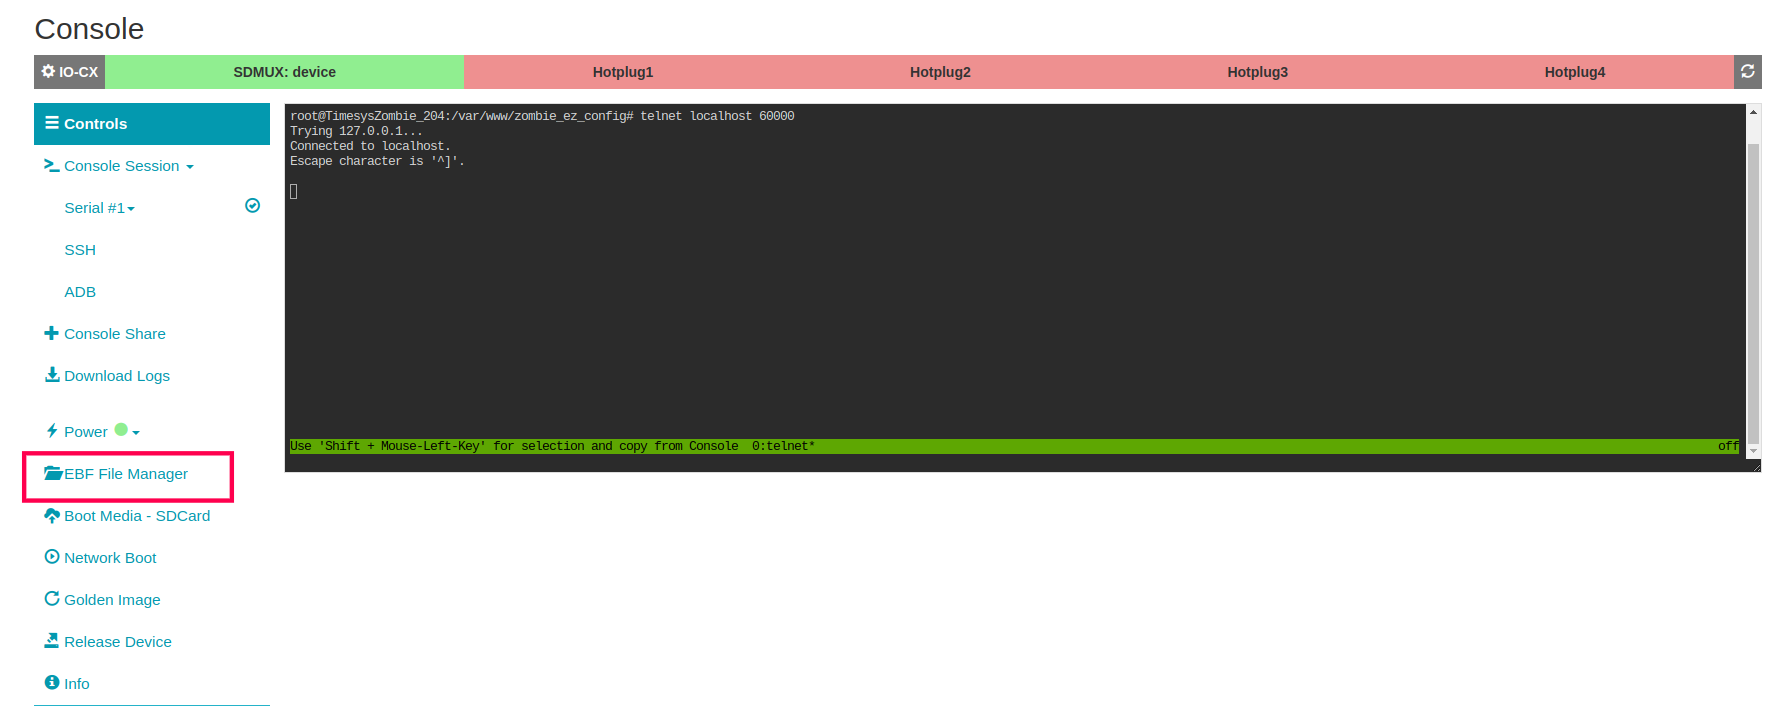
6 EBF file manager page will appear on the screen. you can upload and download files on EBF server also you can create a new folder.
How to Enable Disable Console Sharing
Following are the steps to enable/disable device console sharing.
1 Login to the EBF homepage/Dashboard through a web browser with credentials.
Username: <Username>
Password: <Password>
2 My Devices page will appear on the screen.

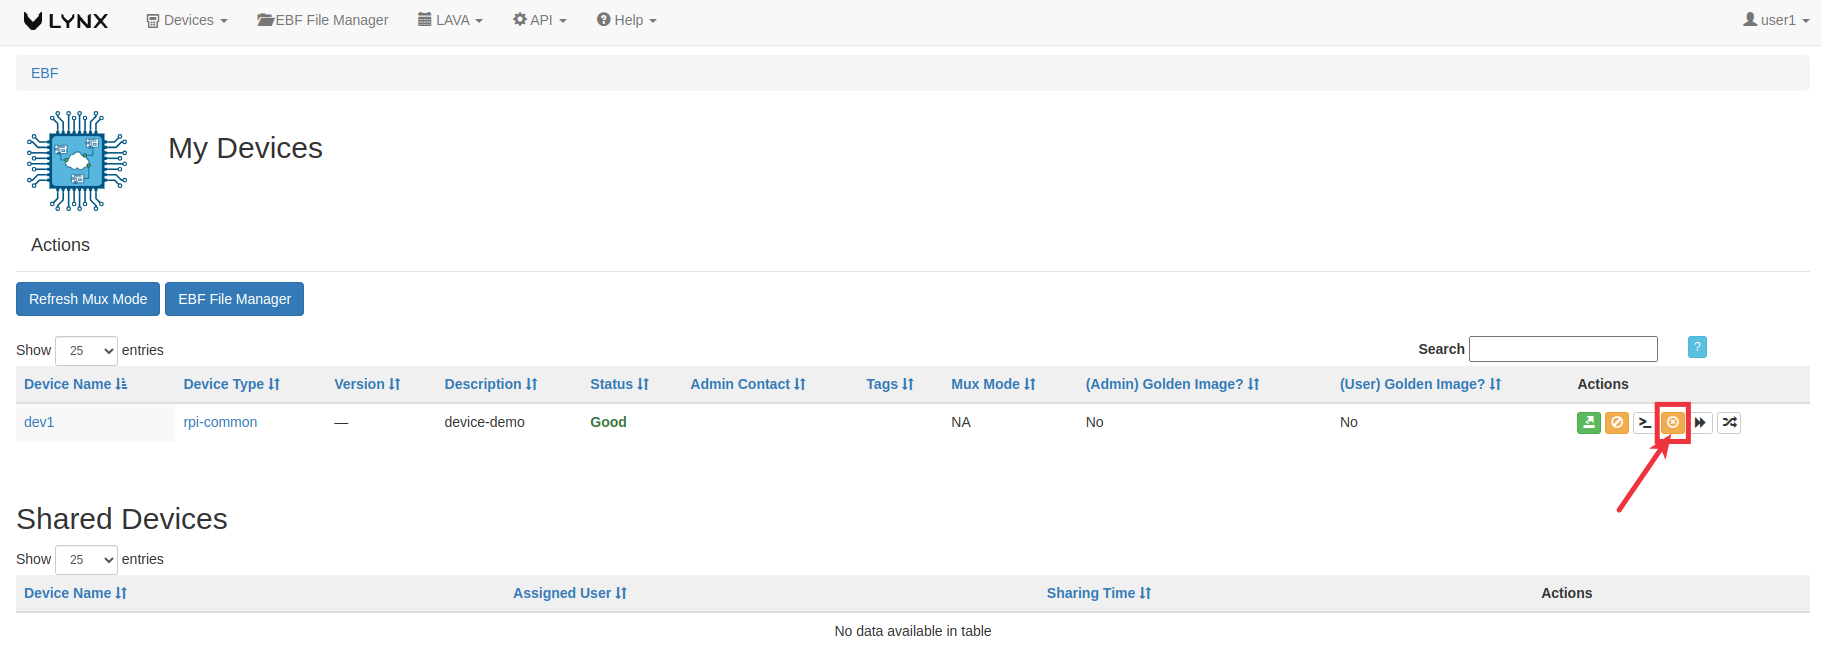
3 To determine whether console sharing is enabled or disabled, look at the console sharing control button. If the button is green and displays a sharing symbol, it means that console sharing is enabled. Conversely, if the button is orange and shows a block symbol, console sharing is disabled.
4 To disable console sharing for a device, click the console sharing button.
5 To enable console sharing for a device, click the console sharing button.
How to perform Console Sharing
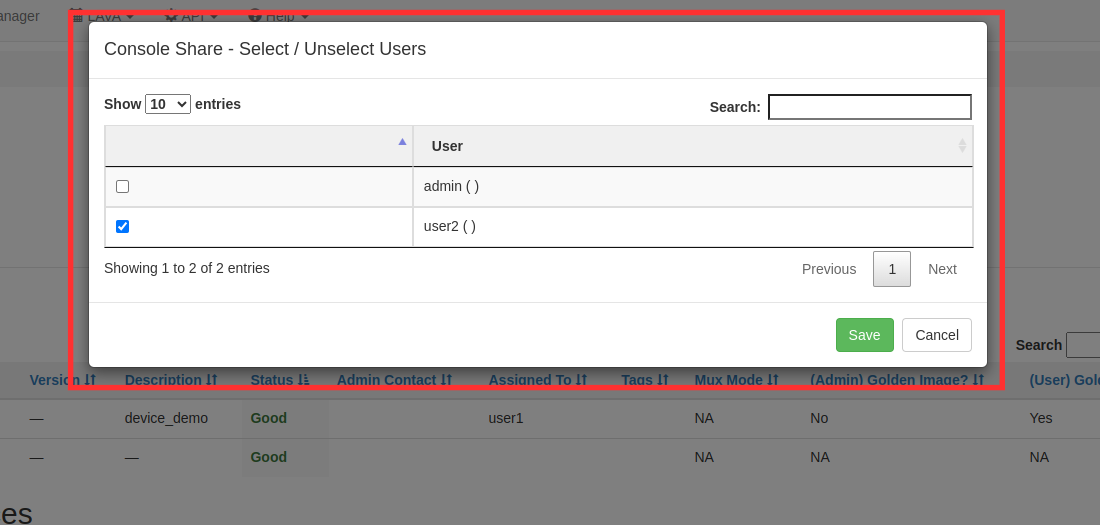
To perform console sharing both users who are sharing the device console and users with whom the console is shared must belong to the same group. EBF Server admin users can assign/revoke groups of EBF users.
In this example, there are two different users’ names as user1 and user2.
Following are the steps to share the Device console.
1 Login to EBF server through a web browser using user1 credentials.
Username: <Username>
Password: <Password>
2 Go to Devices -> All Devices.

3 All Devices page will appear on the screen.
4 Now click on share console icon from an action column of the device.

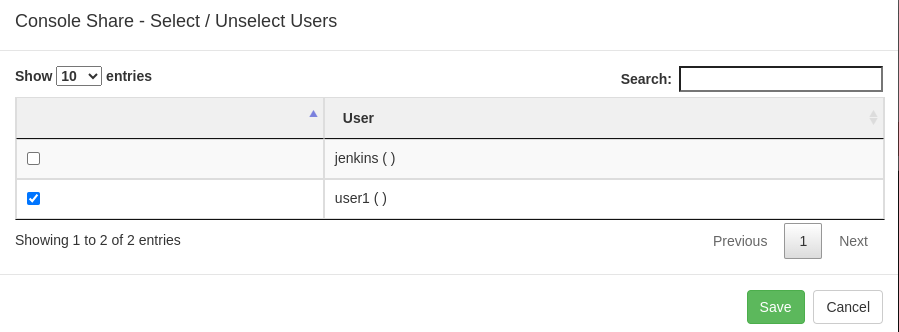
5 On the next popup, select a user with whom you want to share the device console and save.
Login with shared user
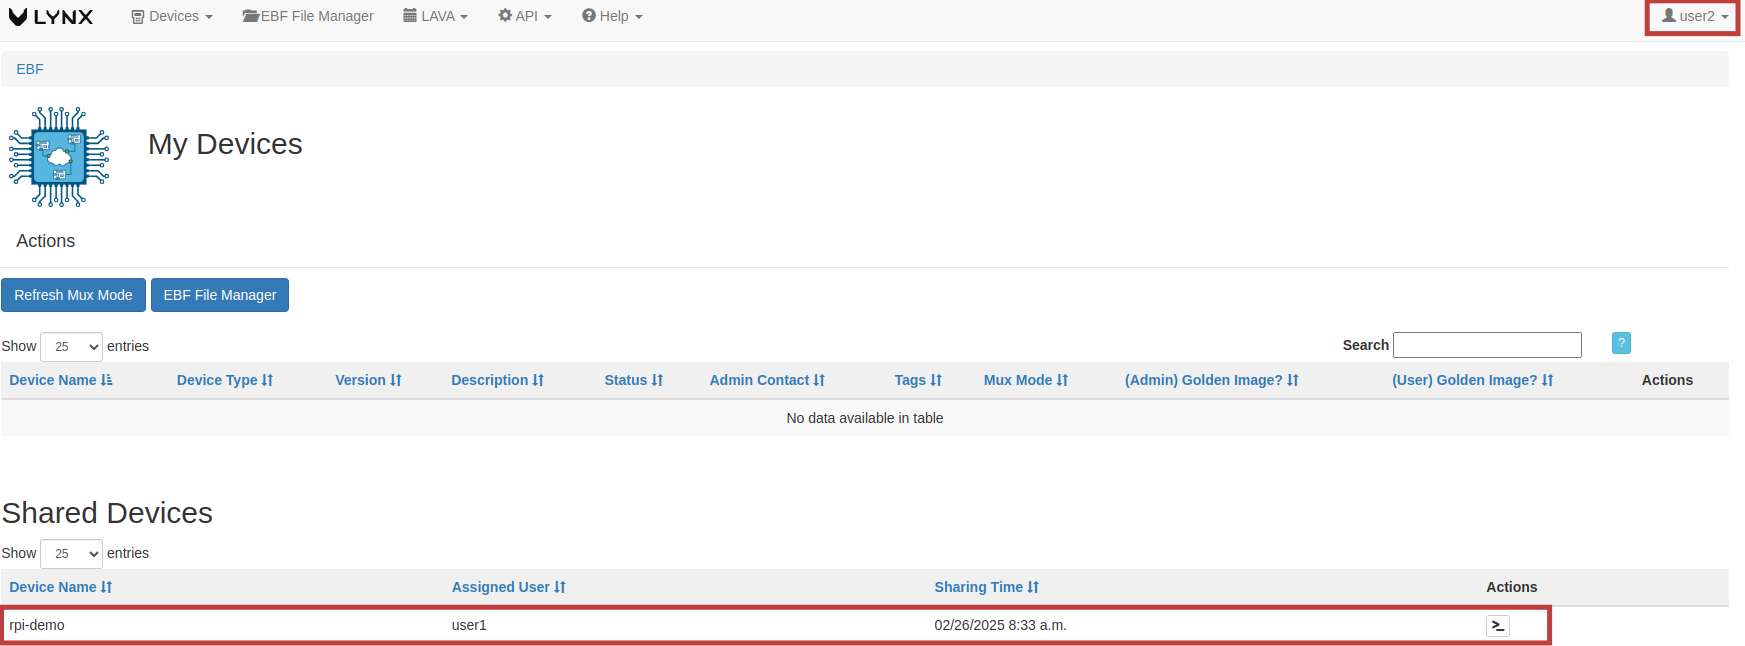
1 Login to EBF server through a web browser using user2 credentials.
Username: <Username>
Password: <Password>
2 on the next page, you can find the login user name on the top of the screen also you are able to see the shared device name on the screen.
3 Launch device console for User2.
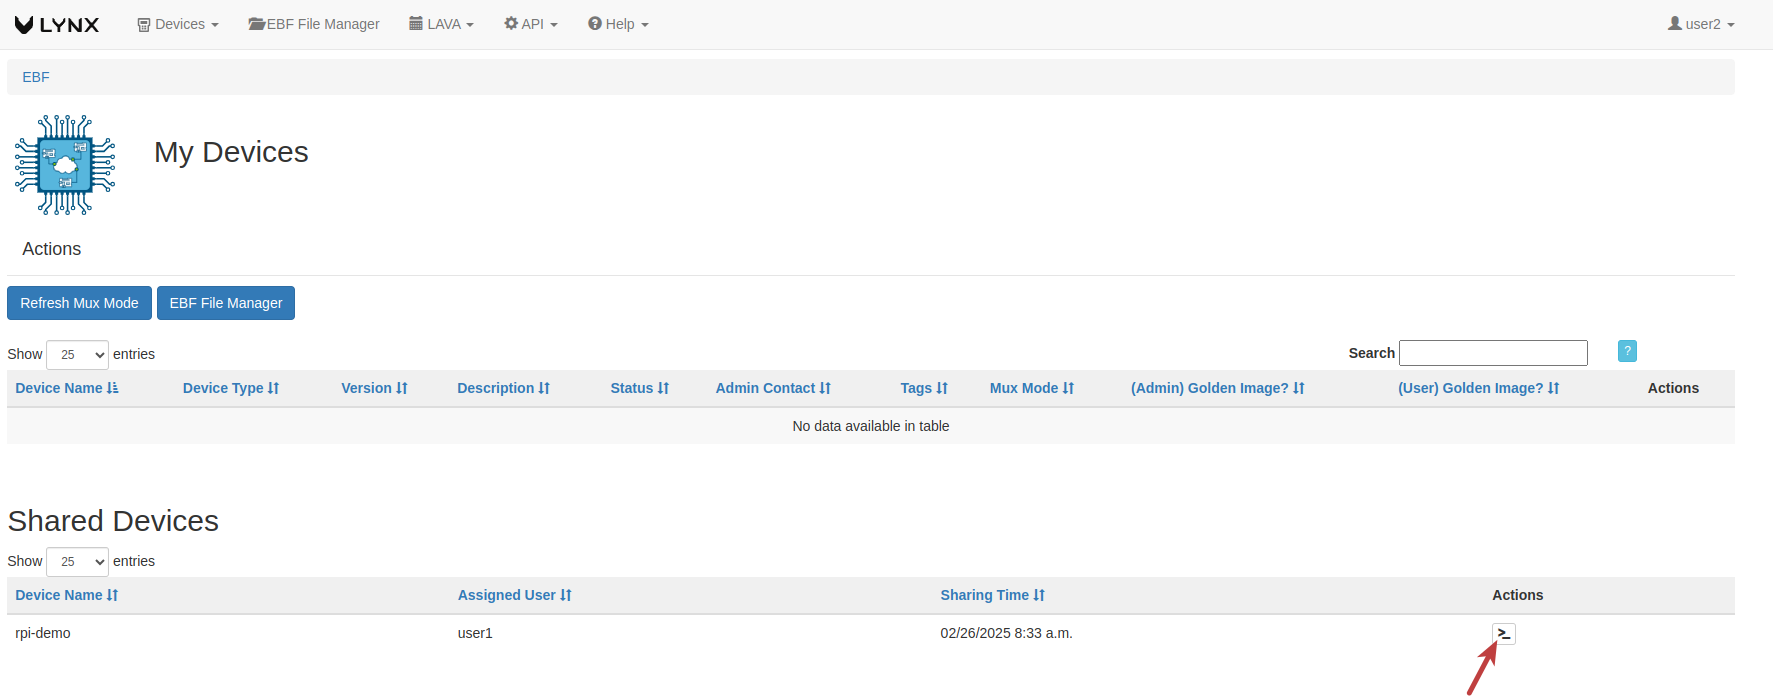
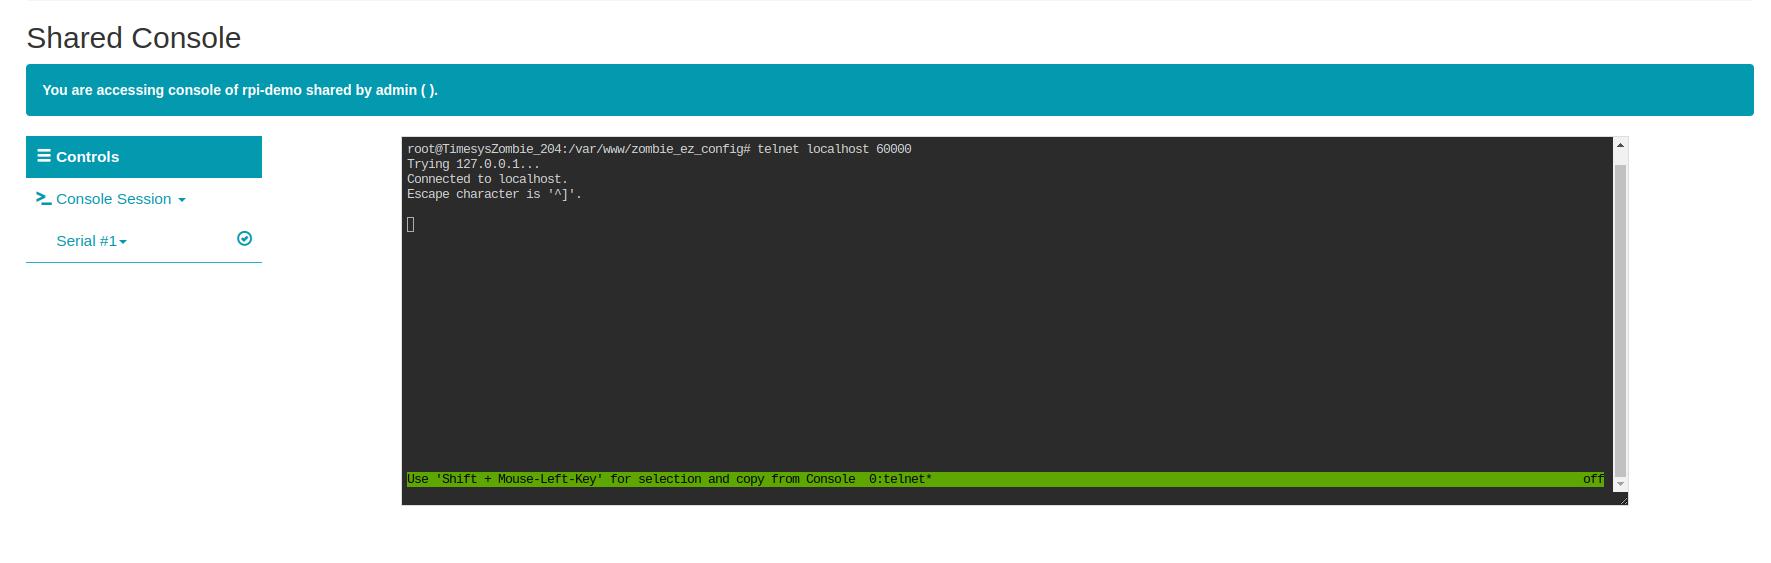
4 On the next screen you can see the shared console.
How to perform Console Sharing From Device Console Page
To perform console sharing both users who are sharing the device console and users with whom the console is shared must belong to the same group. EBF Server admin users can assign/revoke groups of EBF users.
In this example, there are two different users names as user1 and user2.
Following are the steps to share the Device console.
1 Login to the EBF homepage/Dashboard through a web browser with credentials.
Username: <Username>
Password: <Password>
2 Go to Devices -> All Devices
3 All Devices page will appear on the screen.
4 Now click on Launch console icon from an action column of the device.
5 Console page should be appear on the screen click on share console option.
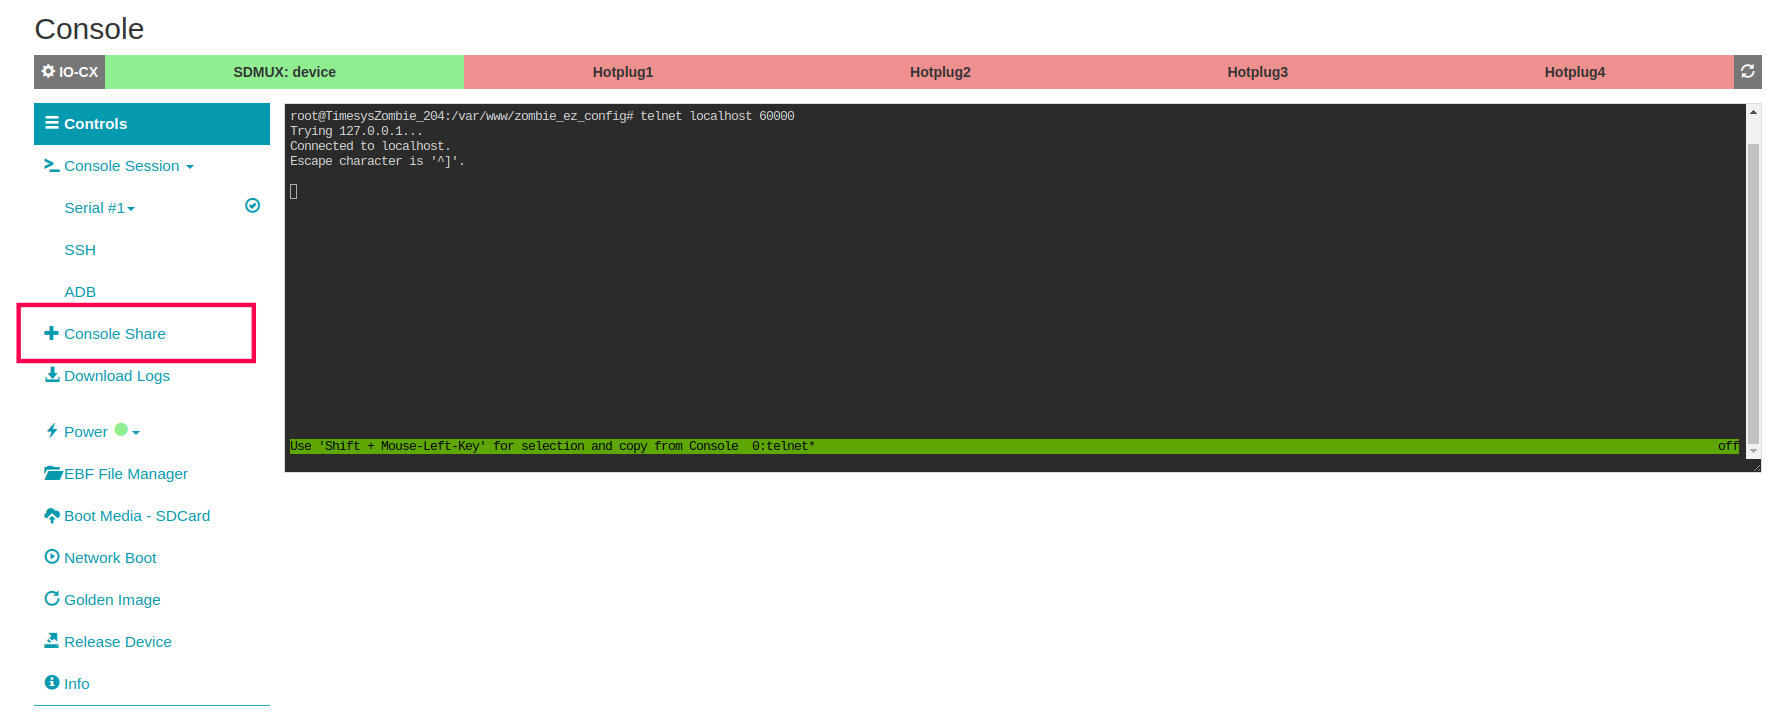
6 On the next popup, select a user with whom you want to share the device console and save.
Login with shared user
1 Login to EBF server through a web browser using Demo user1 credentials.
Username: <Username>
Password: <Password>
2 on the next page, you can find the login user name on the top of the screen also you are able to see the shared device name on the screen.
3 Launch device console for Demo user1.
4 On the next screen you can see the shared console.
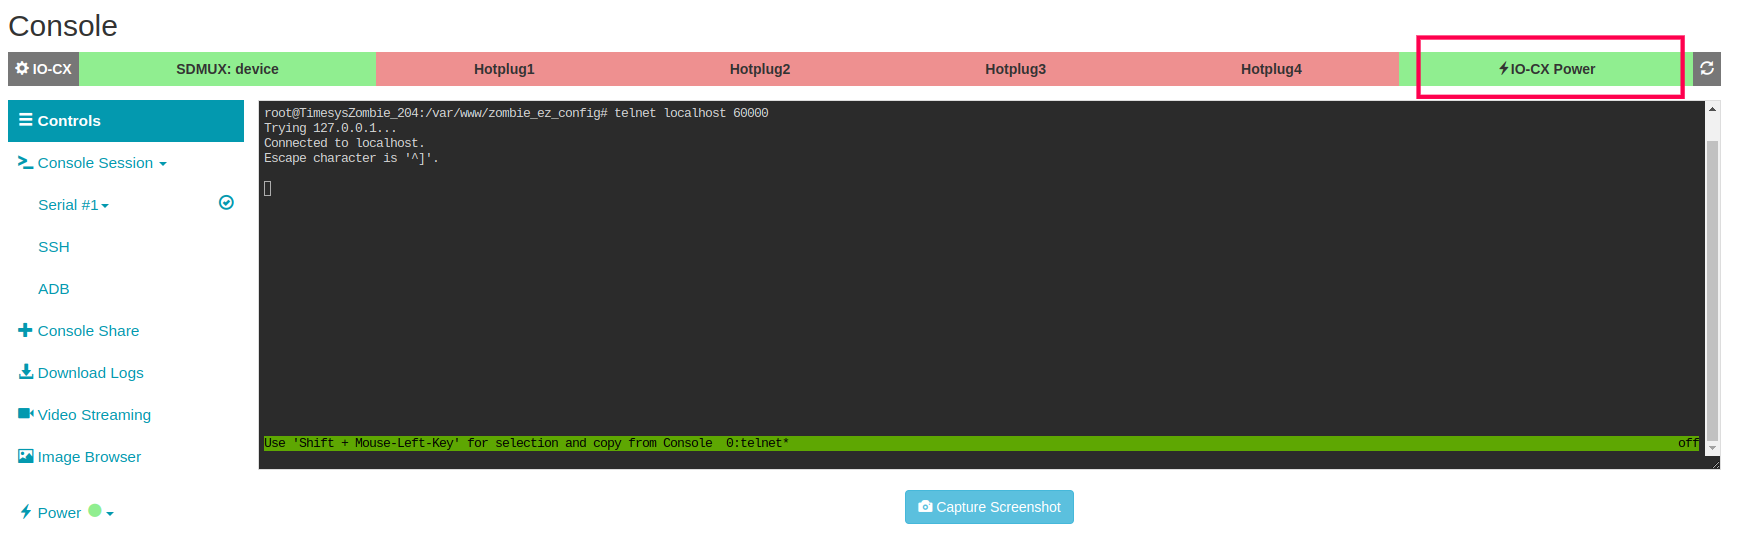
How to Power Control IOCX from the Console Page
Following are the steps to Power control IOCX from the console page.
1 Login to the EBF homepage/Dashboard through a web browser with credentials.
Username : <username>
Password : <password>
2 Select the My Devices option from the Devices drop-down list.
3 You can launch the console of the target device.
4 On the device console page, IO-CX Power Control button is visible on the console.
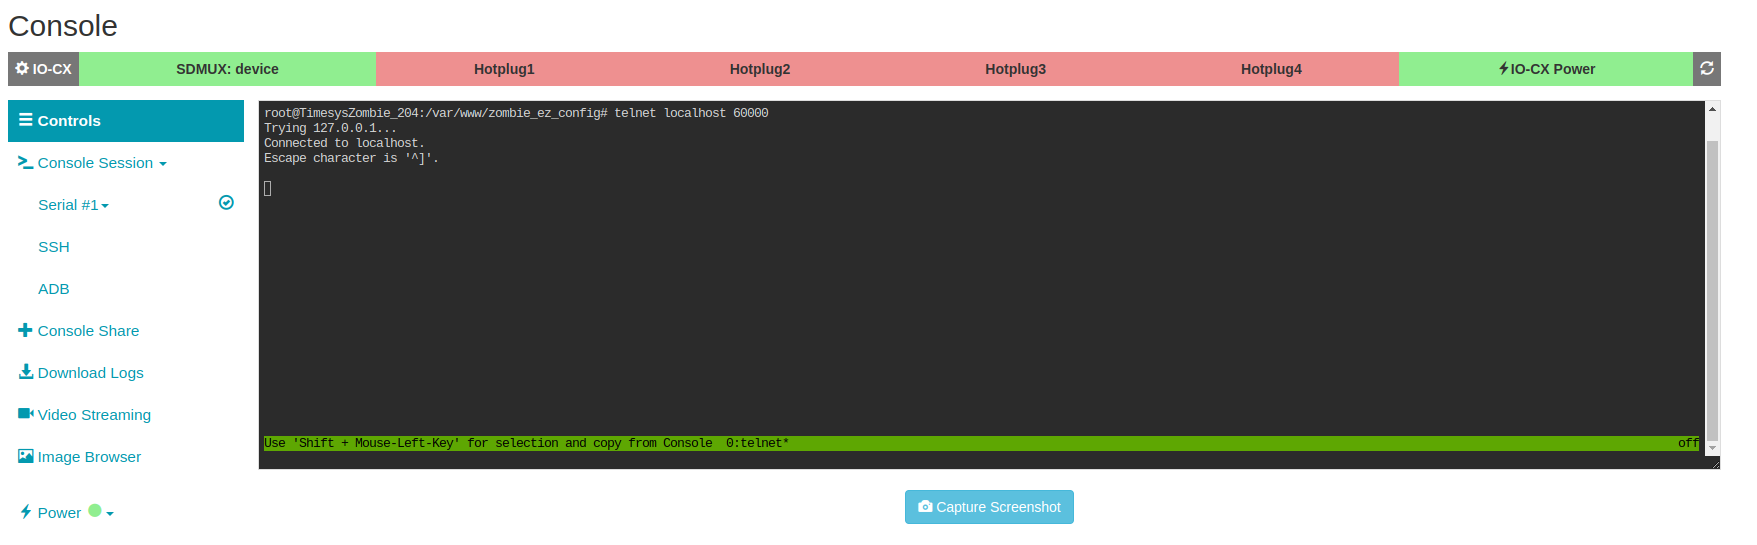
5 Click on the IO-CX button to power OFF the IO-CX

6 Click on the IO-CX button to power ON the IO-CX
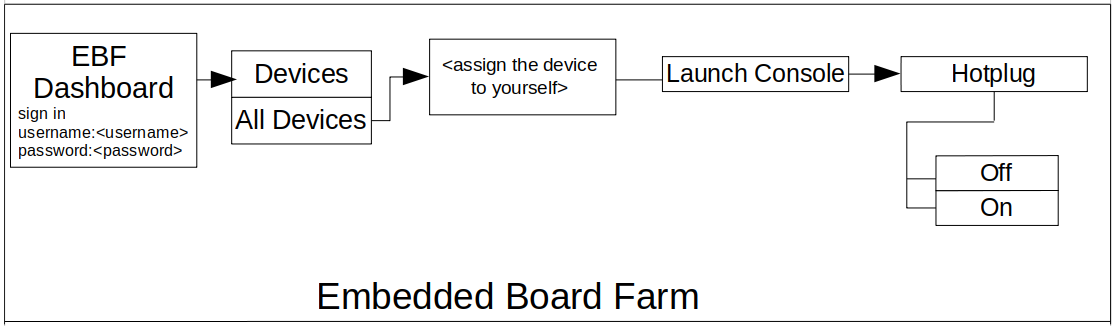
How to use Hotplugs
The following are the steps to access Hot Plug:
1 Login to the EBF homepage/Dashboard through a web browser with credentials.
Username : <username>
Password : <password>
2 This would open the EBF home page. Select the ‘All Devices’ option from the ‘Devices’ drop-down list.
3 The hostname(here, rpi-demo is taken as reference) is selected from the ‘All Devices’ list.
4 Click on the Assign button of the selected device (here, rpi-demo is taken as reference) to allocate the device to the user.
5 Select the Launch console tag adjacent to the action tag to Launch the Console page.

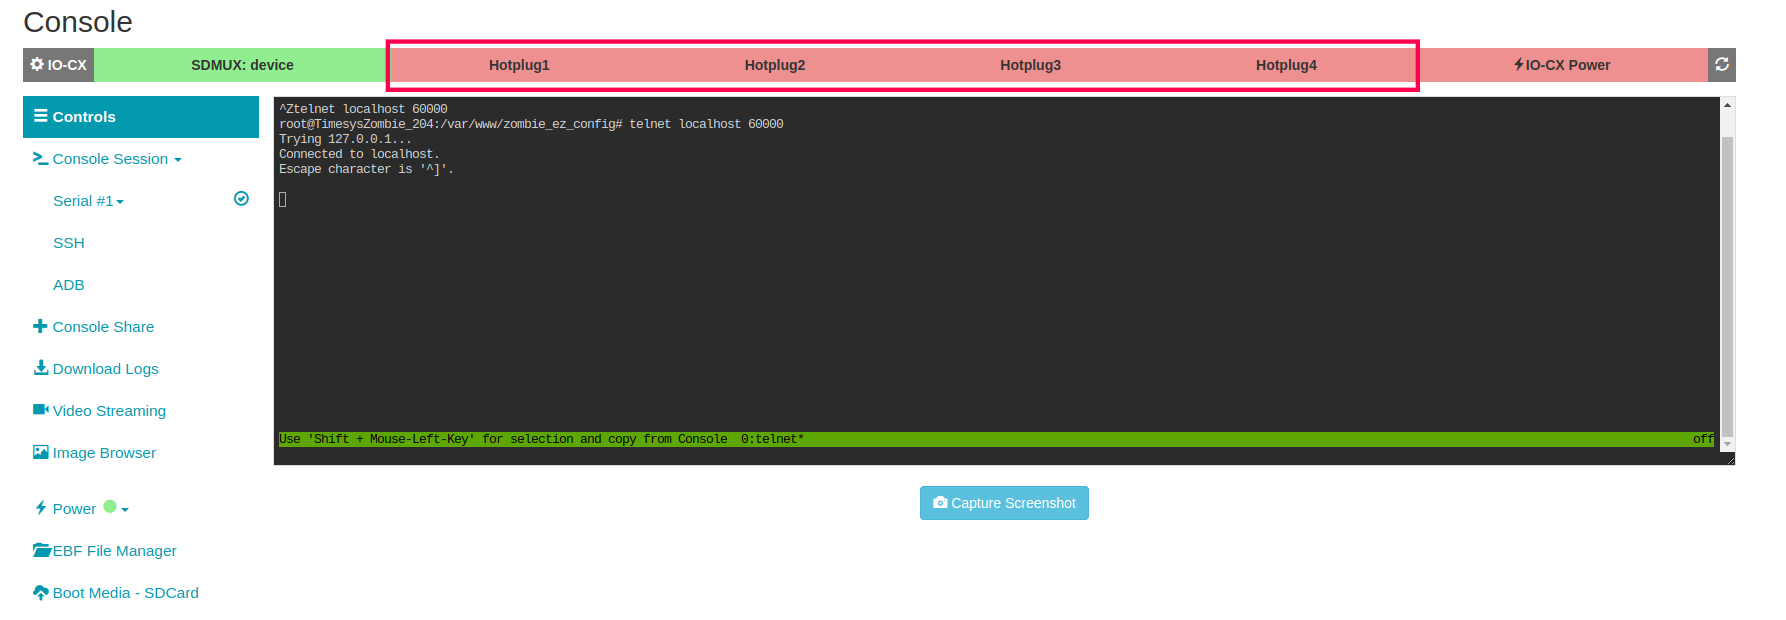
6 The following window will appear on the screen if the IO-CX board is connected.
NOTE: If the IO-CX board is not connected, then the following screen appears, and the user cannot access Hot-plug functionality.
7 There are four Hot plugs available on the console, namely Hot Plug 1, Hot Plug 2, Hot Plug 3, and Hot Plug 4. All the Hot plugs are disabled as shown below:
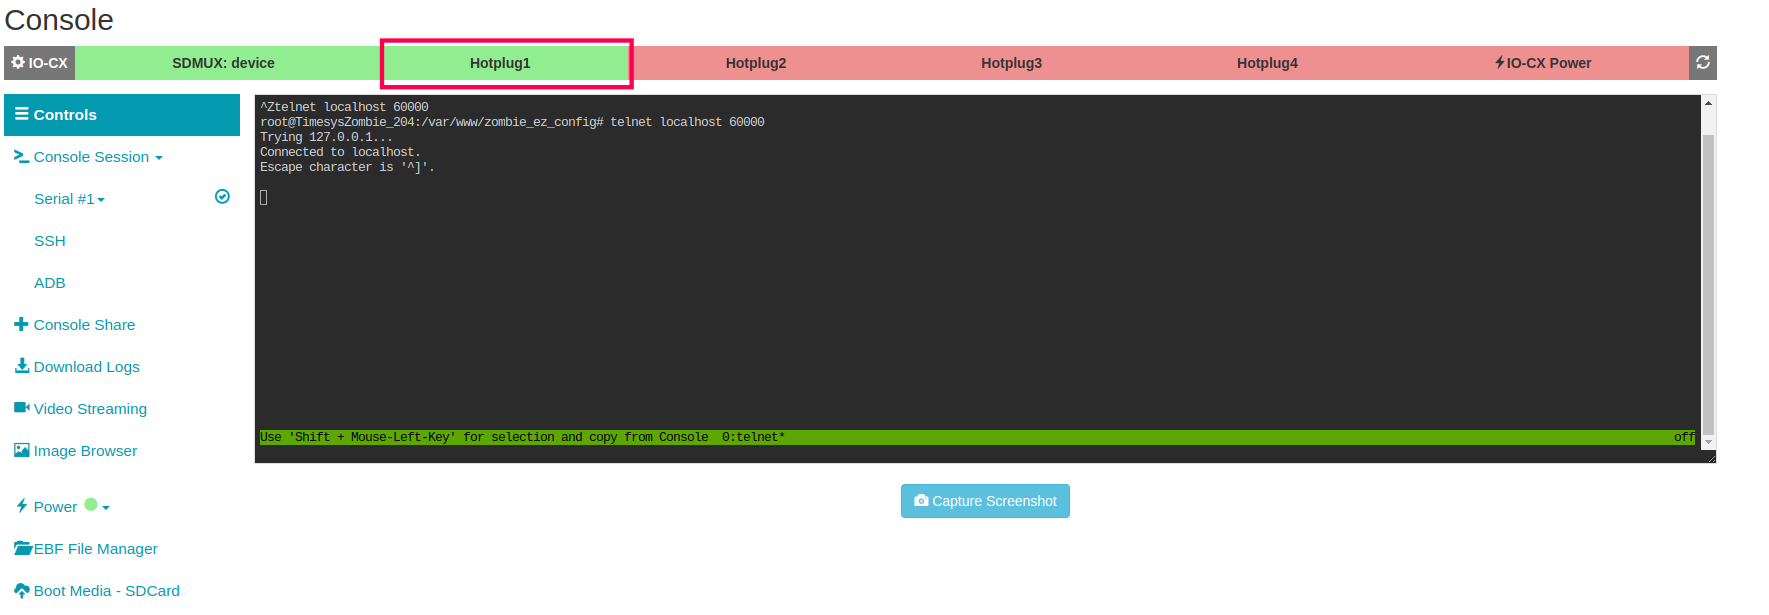
8 Select the Hot Plug button to toggle the state of Hotplug, i.e., Hot-plug turns on
Example Setup for USB hotplugging
For testing USB hotplugging, you require certain hardware and software installed in your BSP.
Hardware Requirements
1 One USB drive
2 One Male to Male USB cable
Software Requirements
1 lsusb command in BSP
2 curl or wget tool installed in BSP
Hardware connections
1 Needs to find out the device ID of the USB drive you are going to use for hotplug testing(use the lsusb command for finding the device ID).
2 Connect a USB drive to any side of the USB hotplug port.
3 Connect a USB Male-To-Male cable between the other side of the USB hotplug and the USB port of the DUT.
After completing the hardware setup, use the following steps to test hotplug.
1 Create a User-defined-tests from EBF UI and paste the below sample script in it.
If you don’t know how to create a user-defined-tests please follow this “Link”: tas_user_guide.html
Sample USB Hotplg Testing script:
#!/bin/bash

EBF_TAS_IP=$1
BOARD_NAME=$2
HOTPLUG=$3
DEVICE_ID=$4

######## main() ###########
wget http://$EBF_TAS_IP/api/$BOARD_NAME/hotplug/$HOTPLUG/on/ > /dev/null 2>&1
lsusb|grep $DEVICE_ID
sleep 5
if [ $? -ne 0 ]; then
echo ""
echo "[FAIL] Couldn't ON the HotPlug port $HOTPLUG, please check the hardware connection and parameters"
wget http://$EBF_TAS_IP/api/$BOARD_NAME/hotplug/$HOTPLUG/off/ > /dev/null 2>&1
exit
else
echo ""
echo "*** Successfully ON the Hotplug physical port $HOTPLUG ***"
fi

wget http://$EBF_TAS_IP/api/$BOARD_NAME/hotplug/$HOTPLUG/off/ > /dev/null 2>&1
lsusb|grep $DEVICE_ID
sleep 5
if [ $? -ne 0 ]; then
echo ""
echo "*** Successfully OFF the Hotplug port $HOTPLUG ***"
else
echo "[FAIL] Couldn't off the HotPlug port $HOTPLUG"
wget http://$EBF_TAS_IP/api/$BOARD_NAME/hotplug/$HOTPLUG/off/ > /dev/null 2>&1
exit
fi

wget http://$EBF_TAS_IP/api/$BOARD_NAME/hotplug/$HOTPLUG/on/ > /dev/null 2>&1
lsusb|grep $DEVICE_ID
sleep 5
if [ $? -ne 0 ]; then
echo ""
echo "[FAIL] Couldn't ON the HotPlug port $HOTPLUG"
wget http://$EBF_TAS_IP/api/$BOARD_NAME/hotplug/$HOTPLUG/off/ > /dev/null 2>&1
exit
else
echo "*** [PASS] Successfully ON/OFF the Hotplug port $HOTPLUG ***"
fi

wget http://$EBF_TAS_IP/api/$BOARD_NAME/hotplug/$HOTPLUG/off/ > /dev/null 2>&1
1 This script requires four mandatory parameters listed below.
EBF IP Address.
Device name in EBF on which you want to test USB hotplug.
Hotplug the number of IO-CX boxes (1 or 2) on which the USB device is connected.
Device ID of the USB drive you are going to use for hotplugging testing.
Example Setup for Ethernet hotplugging
For testing Ethernet hotplugging, you require certain hardware and software installed in your BSP.
Hardware Requirements
1 Two Ethernet cables.
2 Two Ethernet ports on the device you want to test.
Software Requirements
1 ping command in BSP.
2 curl or wget tool installed in BSP.
Hardware connections
1 Connect the first Ethernet cable between any Ethernet port of the Zombie private network and one of the Ethernet hotplug ports.
2 Connect the second Ethernet cable between the second Ethernet port of the DUT and the second Ethernet port of the IO-CX hotplug.
After completing the hardware setup, use the following steps to test hotplug.
1 Create a User-defined-tests from EBF UI and paste the below sample script in it.
If you don’t know how to create a user-defined-tests please follow this “link”: tas_user_guide.html
Sample Ethernet Hotplug Testing script:
#!/bin/bash

EBF_TAS_IP=$1
BOARD_NAME=$2
HOTPLUG=$3
INTERFACE=$4

######## main() ###########
wget http://$EBF_TAS_IP/api/$BOARD_NAME/hotplug/$HOTPLUG/on/ > /dev/null 2>&1
sleep 20
ping -I $INTERFACE -c5 $EBF_TAS_IP
if [ $? -ne 0 ]; then
echo ""
echo "[FAIL] Couldn't ON the HotPlug port $HOTPLUG, please check the hardware connection and parameters"
wget http://$EBF_TAS_IP/api/$BOARD_NAME/hotplug/$HOTPLUG/off/ > /dev/null 2>&1
exit
else
echo ""
echo "*** Successfully ON the Hotplug port $HOTPLUG ***"
fi

**API Calls**

wget http://$EBF_TAS_IP/api/$BOARD_NAME/hotplug/$HOTPLUG/off/ > /dev/null 2>&1
sleep 5
ping -I $INTERFACE -c5 $EBF_TAS_IP
if [ $? -ne 0 ]; then
echo ""
echo "*** Successfully OFF the Hotplug port $HOTPLUG ***"
else
echo "[FAIL] Couldn't off the HotPlug port $HOTPLUG"
wget http://$EBF_TAS_IP/api/$BOARD_NAME/hotplug/$HOTPLUG/off/ > /dev/null 2>&1
exit
fi

wget http://$EBF_TAS_IP/api/$BOARD_NAME/hotplug/$HOTPLUG/on/ > /dev/null 2>&1
sleep 20
ping -I $INTERFACE -c5 $EBF_TAS_IP
if [ $? -ne 0 ]; then
echo ""
echo "[FAIL] Couldn't ON the HotPlug port $HOTPLUG"
wget http://$EBF_TAS_IP/api/$BOARD_NAME/hotplug/$HOTPLUG/off/ > /dev/null 2>&1
exit
else
echo "*** [PASS] Successfully ON/OFF the Hotplug port $HOTPLUG ***"
fi

wget http://$EBF_TAS_IP/api/$BOARD_NAME/hotplug/$HOTPLUG/off/ > /dev/null 2>&1
1 This script requires four mandatory parameters listed below.
EBF IP Address.
Device name in EBF on which you want to test USB hotplug.
Hotplug the number of IO-CX boxes (3 or 4) on which Ethernet cables are connected.
Name of the second Ethernet interface that you are going to use for hotplugging testing.
API Calls
Refer Hotplugs API
How to boot the device using Network Boot
Using this feature, a user can boot the DUT from a network rather than an SD card connected on SDMux.
Procedure to copy BSP Files on to Zombie
Go to the concerned device’s console and follow the steps given below to copy BSP Files. Follow these steps to Launch Console of the concerned device
Select ‘Network Boot’ option shown on the console screen.
Close the power off recommendation.

Power off the device.
Re-launch network boot from the console screen.
Network boot page will be shown on the screen.
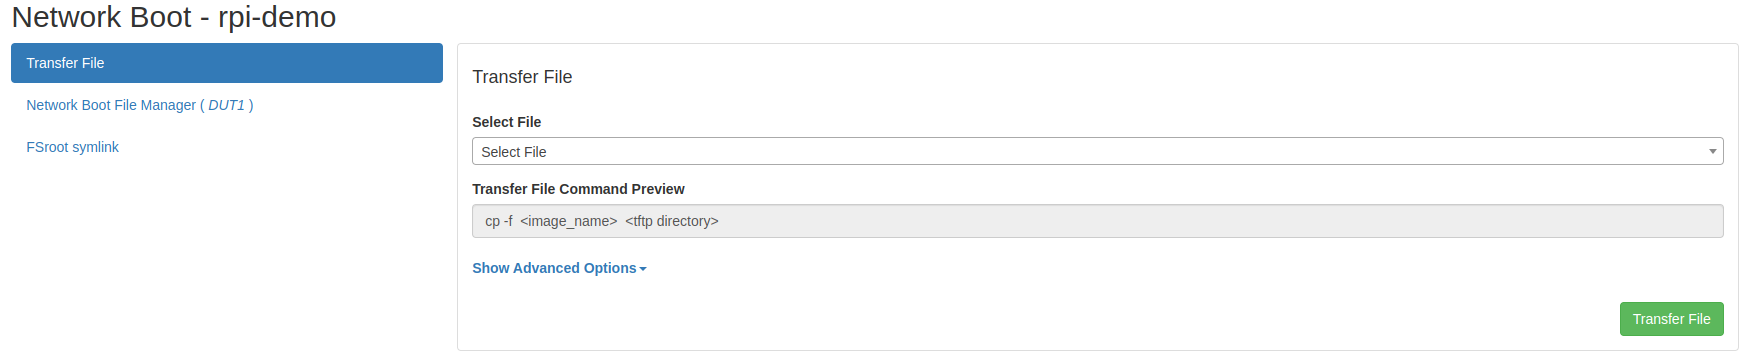
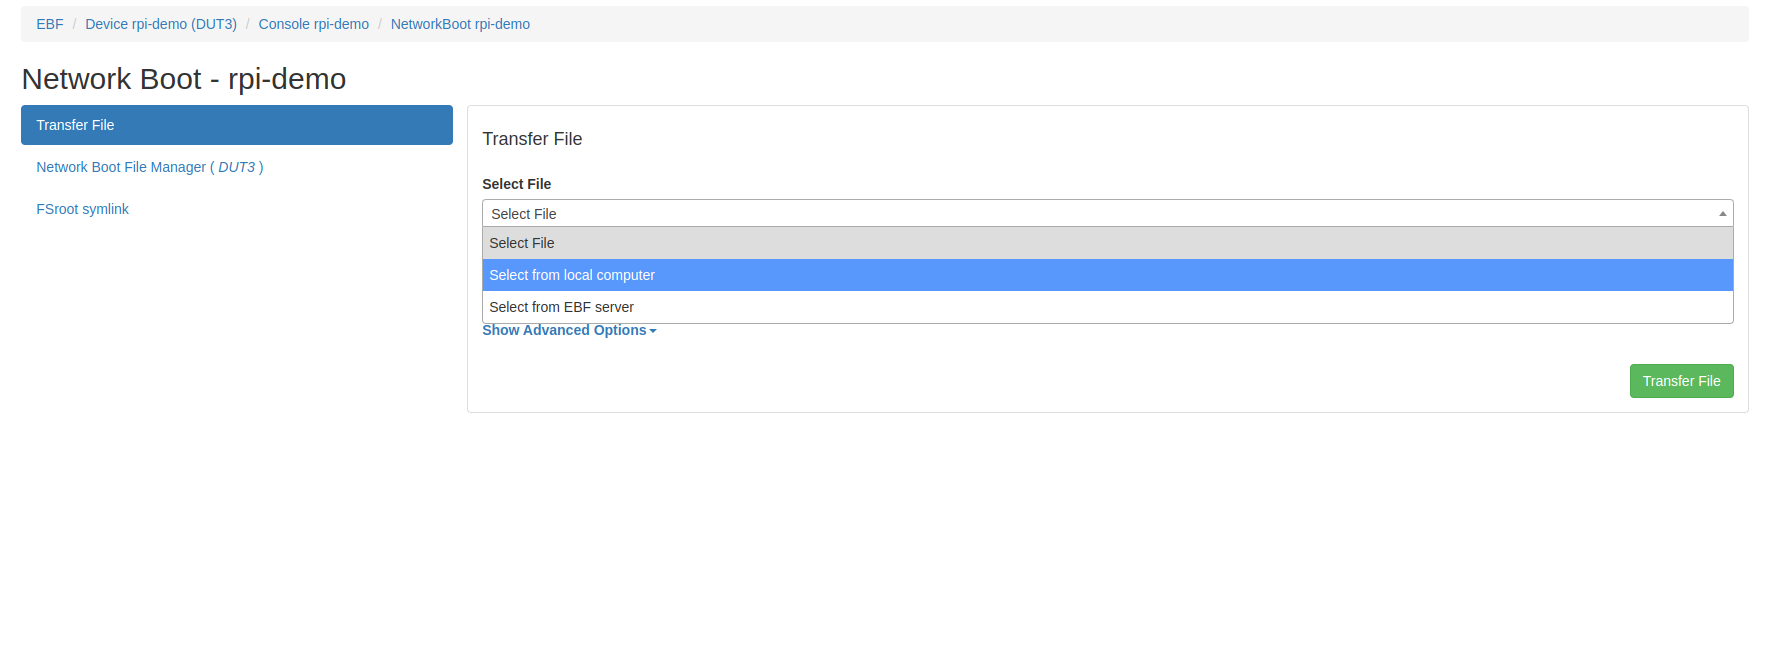
Transfer desired file need for booting DUT
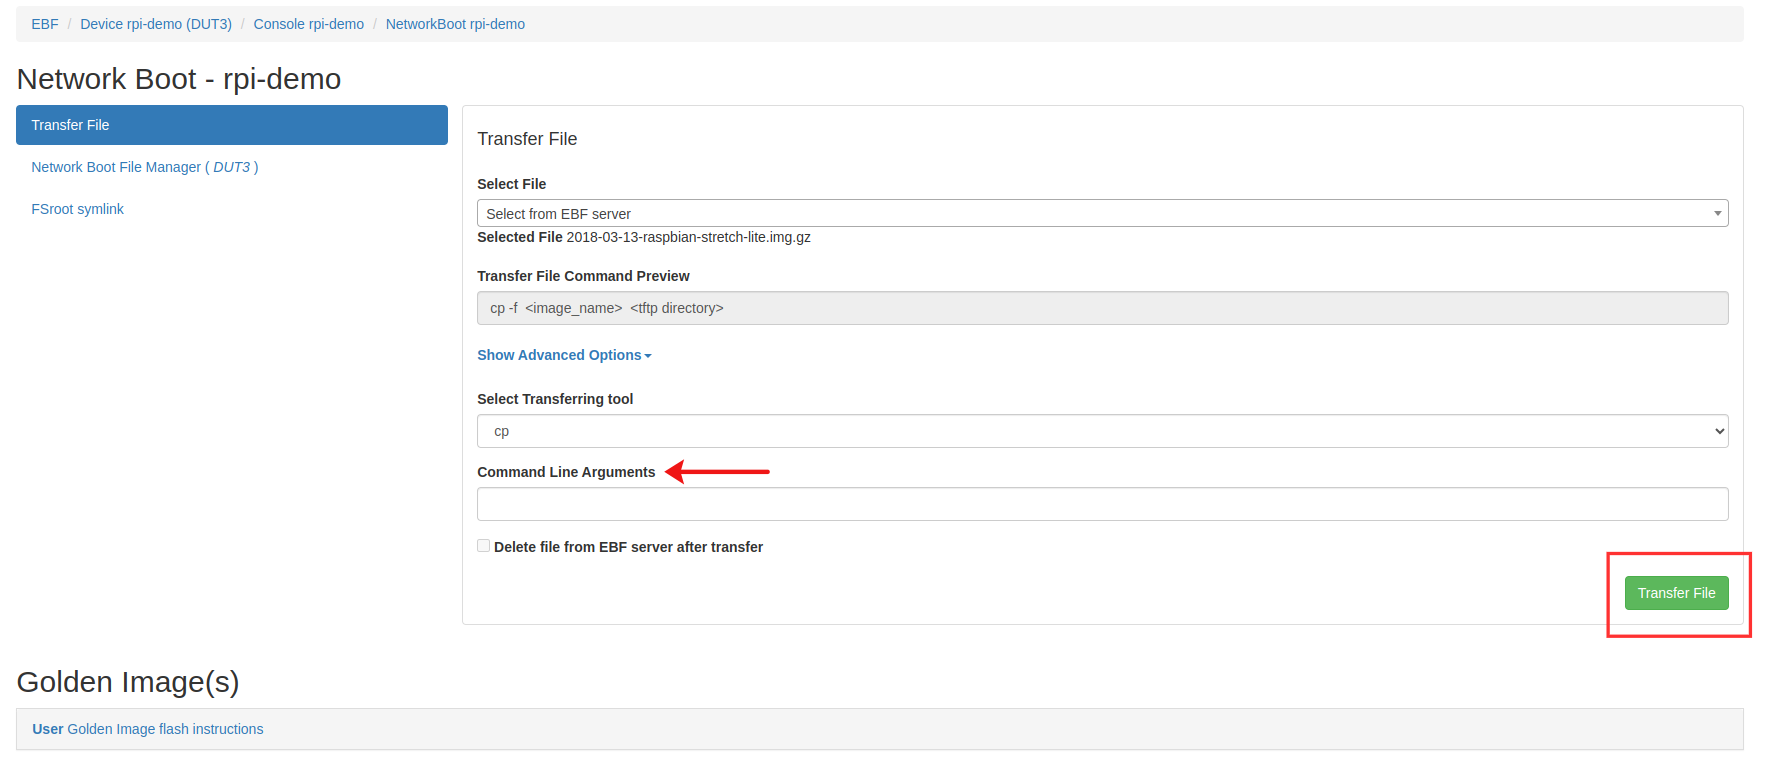
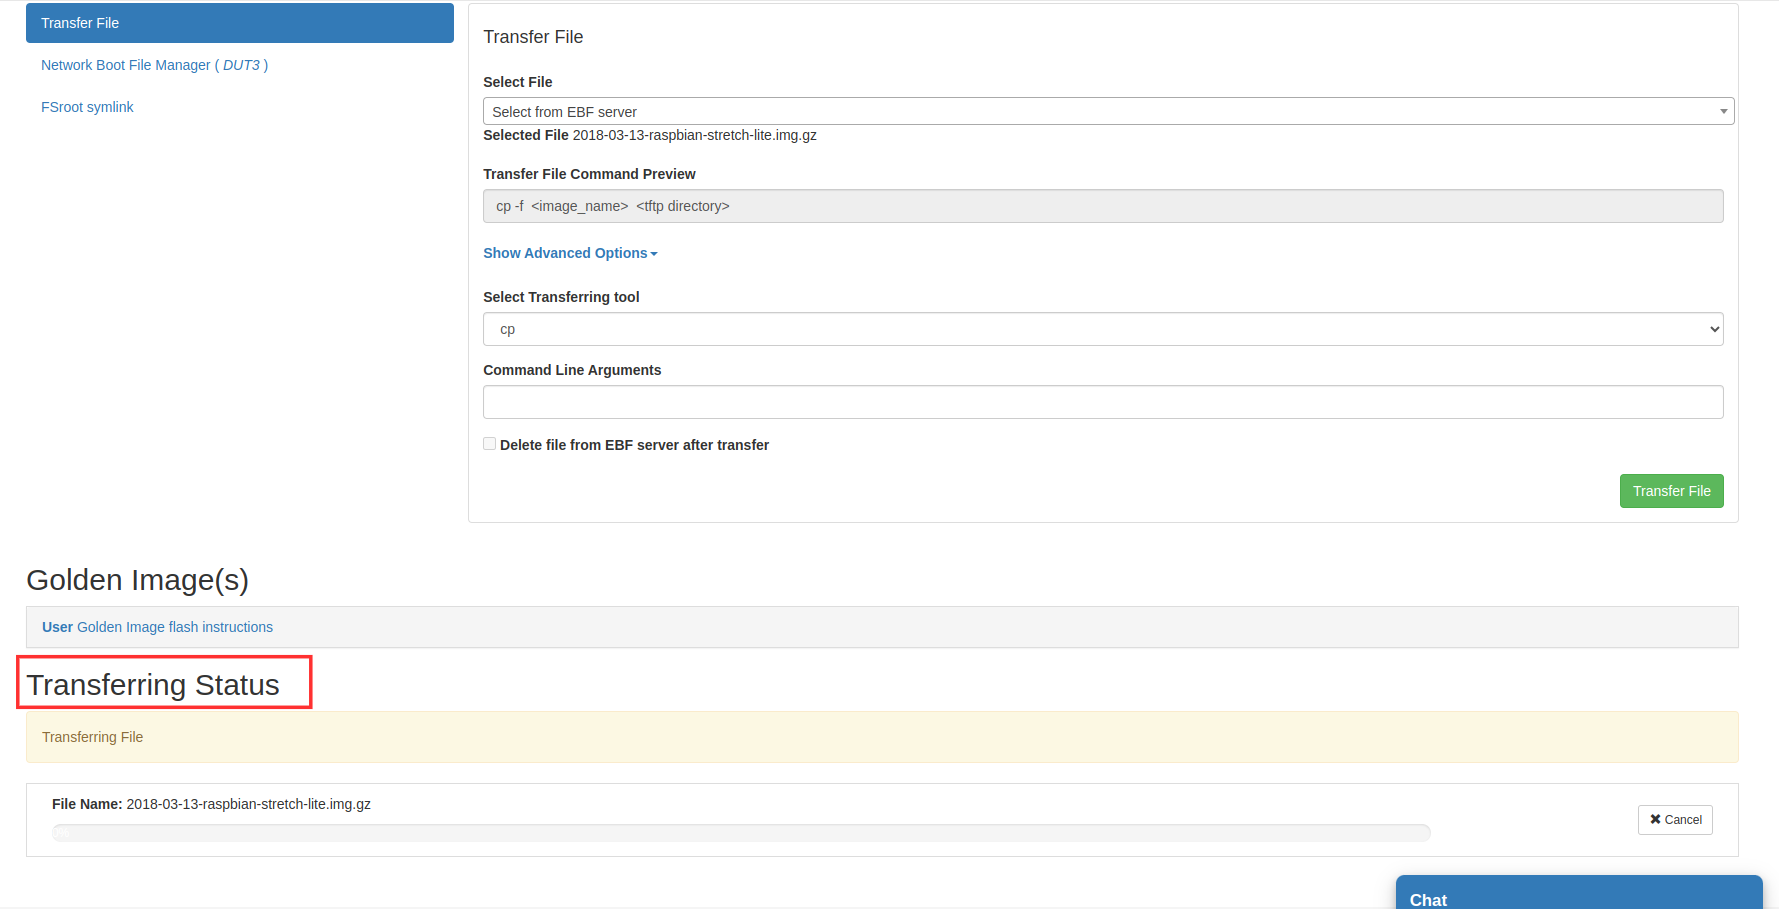
Transfer a DTB file from local computer by selecting through select file drop down after that select transferring tool and give command argument if needed, then click on the check box “Delete file from EBF server after transfer” if you want to delete the file from ebf server otherwise unchecked it finally click on transfer file.
Transfer status should appear on the screen after clicking over the transfer file.
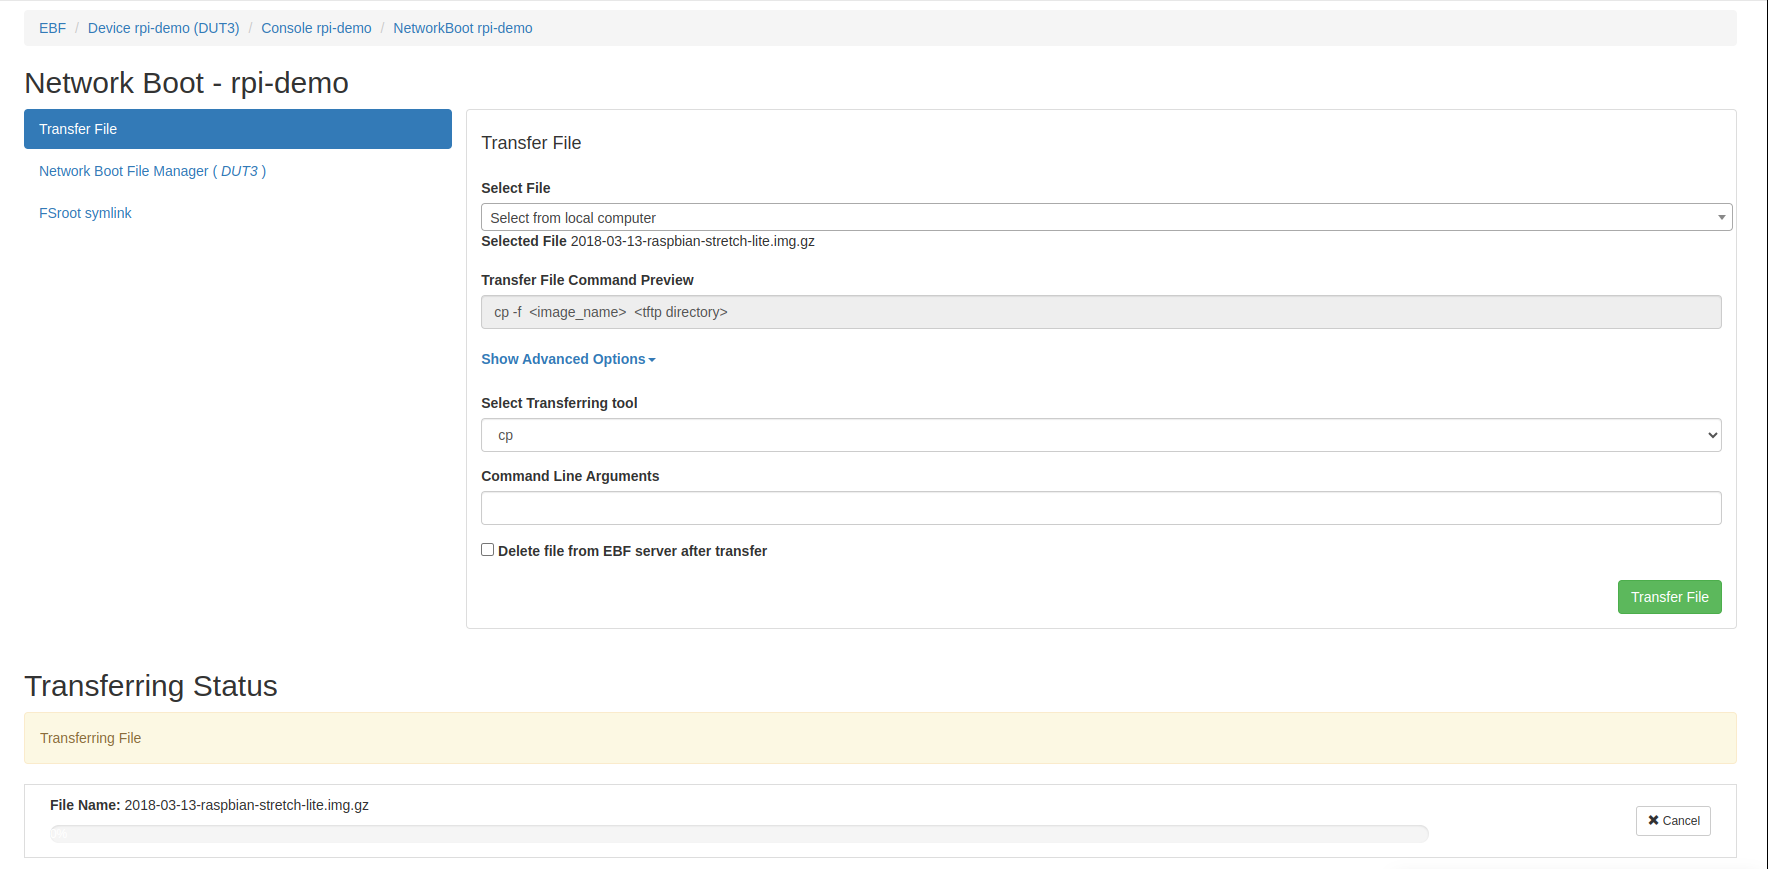
After successful image transfer, a success notification message will be shown on the screen.

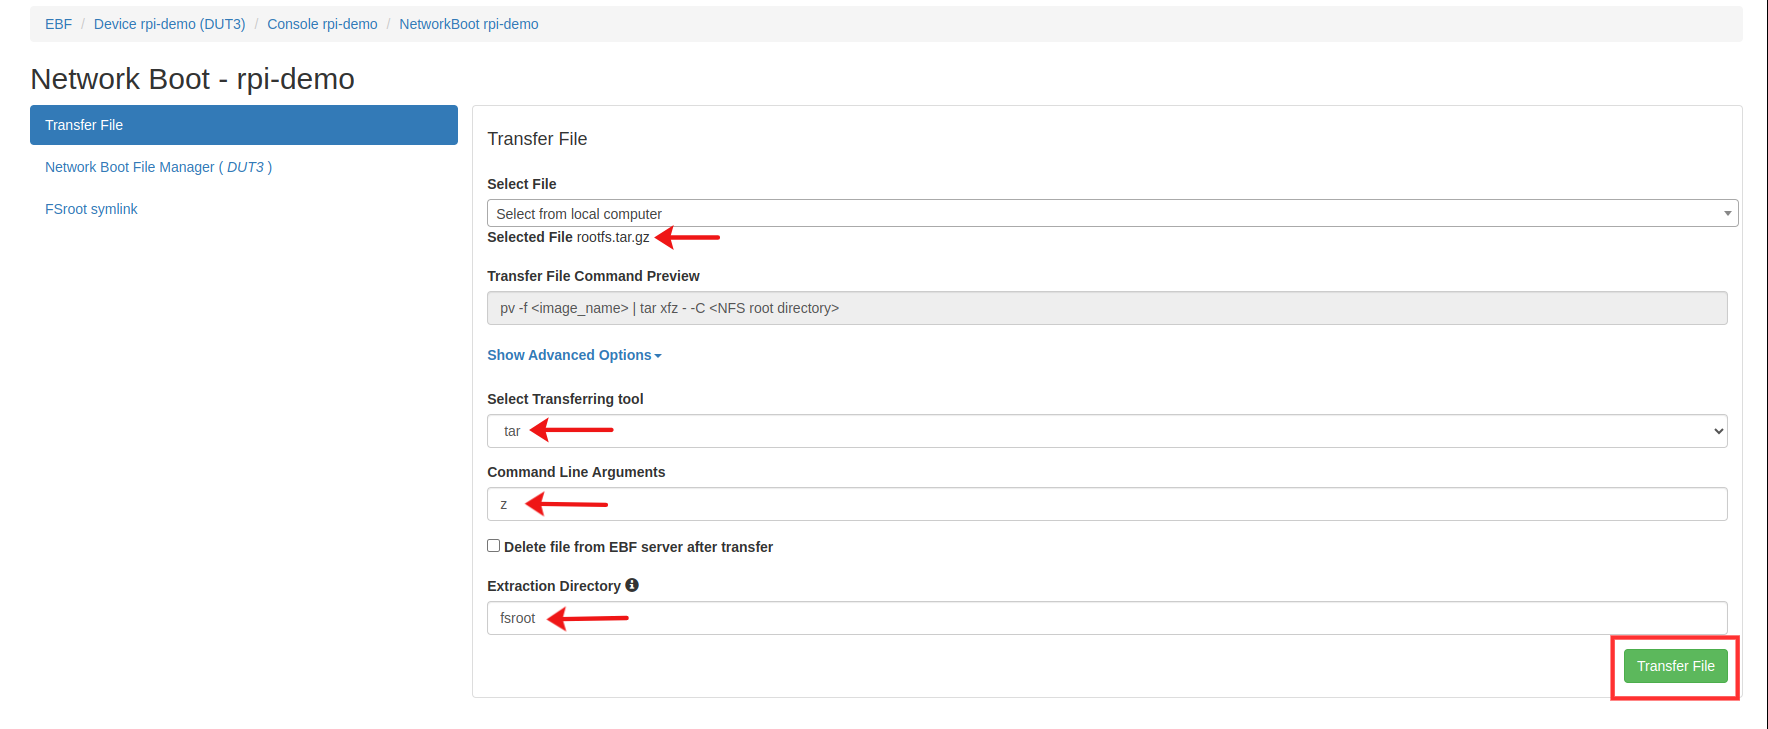
Transfer a rootfs file from local computer by selecting through select file drop down after that select transferring tool and give command argument if needed, then click on the check box “Delete file from EBF server after transfer” if you want to delete the file from ebf server otherwise unchecked and give extraction directory if you want to change extraction directory otherwise it will be extracted into fsroot directory finally click on transfer file.
Transfer status should appear on the screen after clicking over the transfer file.
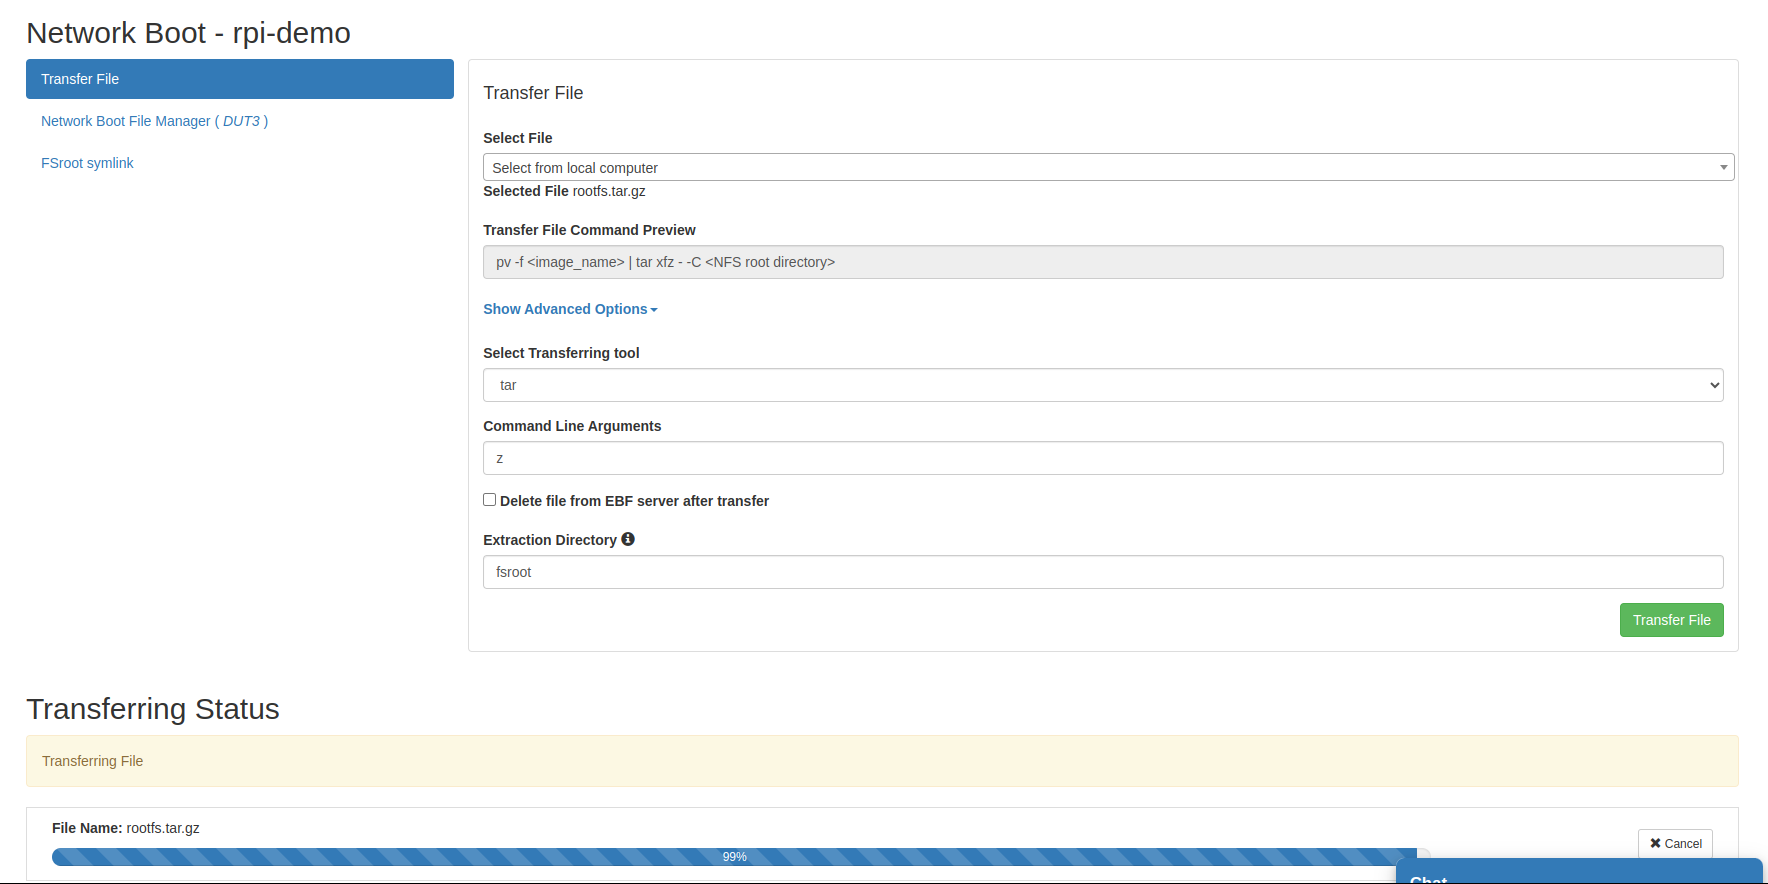
After successful image transfer, a success notification message will be shown on the screen.
Transfer a uImage file from local computer by selecting through select file drop down after that select transferring tool and give command argument if needed, then click on the check box “Delete file from EBF server after transfer” if you want to delete the file from ebf server otherwise unchecked it finally click on transfer file.
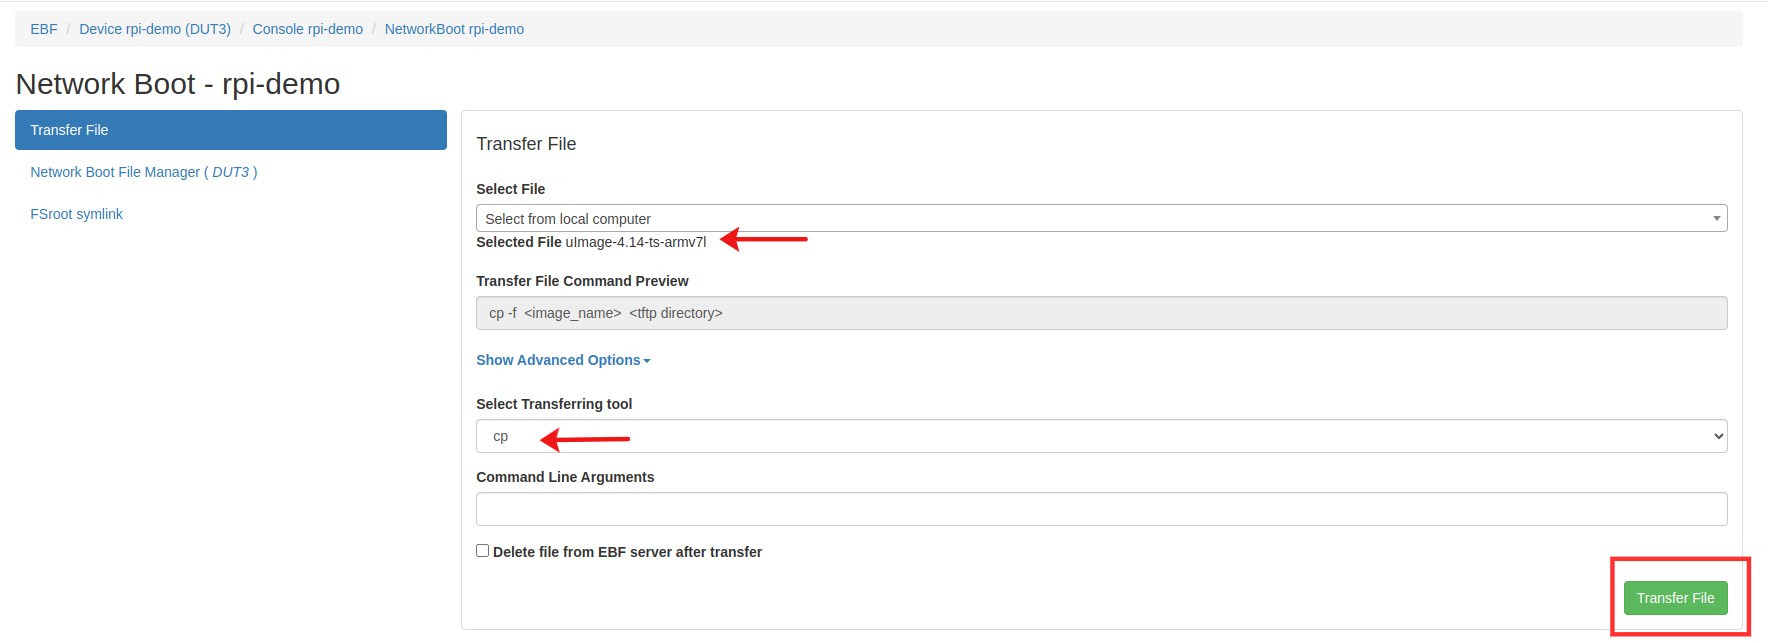
Transfer status should appear on the screen after clicking over the transfer file.
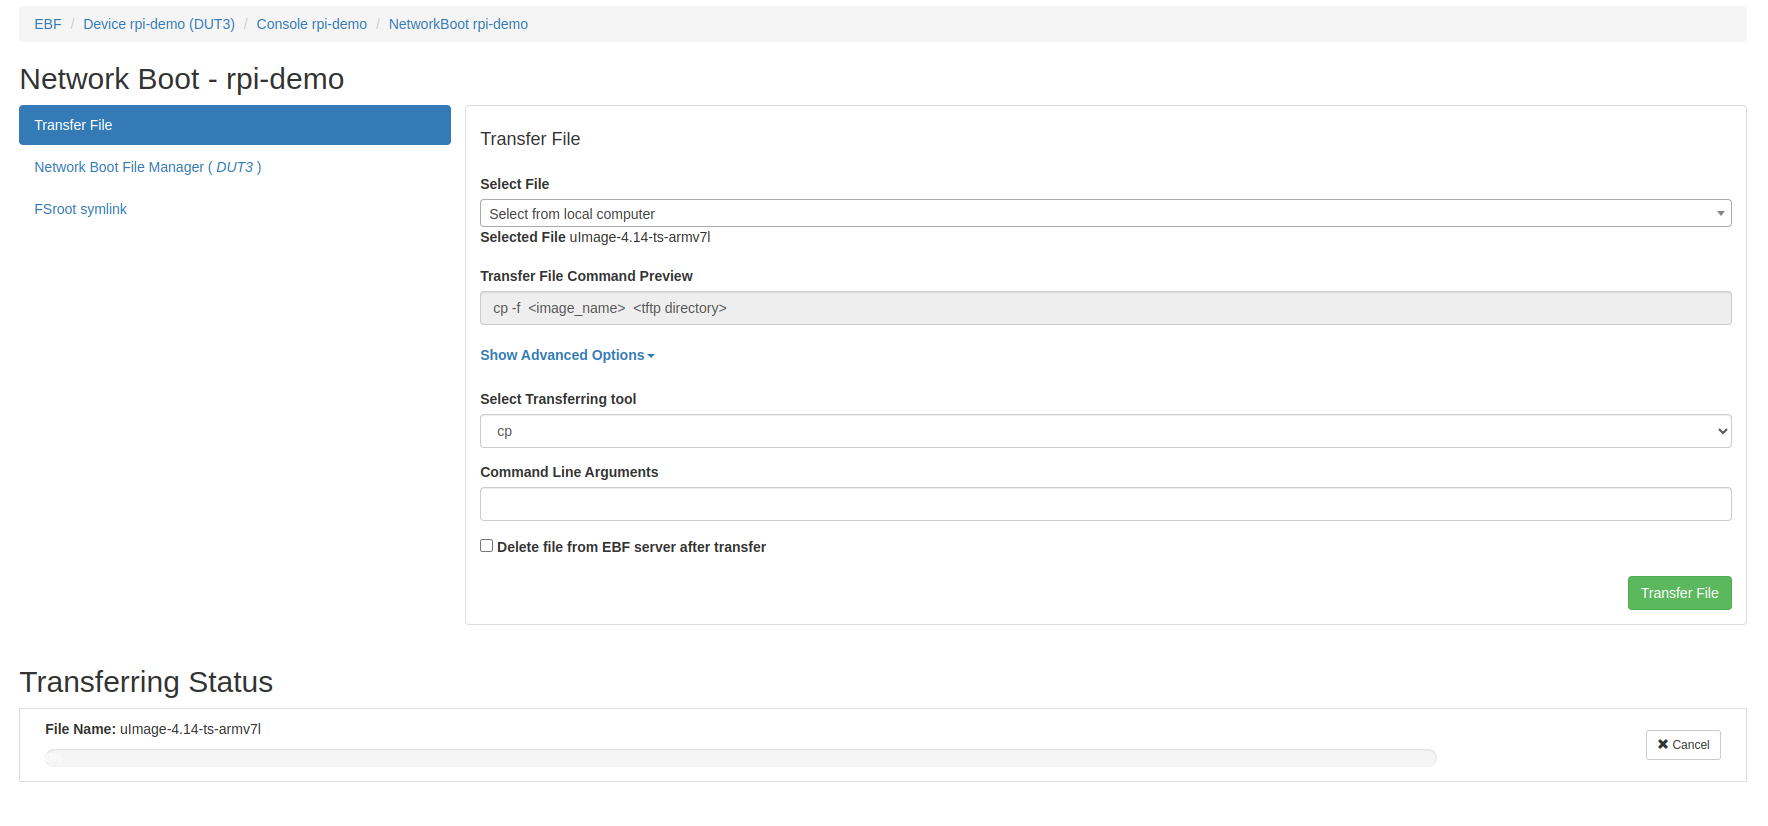
After successful image transfer, a success notification message will be shown on the screen.
View transferred image in network boot file manager
Select Network boot file manager from left panel to view the transferred file in network boot file manager list.

File manger should have all transferred image

Procedure to copy golden image on to Zombie
Please follow the below steps for adding golden images for the device. Following are the steps to add Golden Images on EBF Server:
Login to the EBF homepage/Dashboard through a web browser with credentials.
Username : <username>
Password : <password>
This would open up EBF Dashboard.
First Allocate the device to yourself. Please user_guide.html#how-to-allocate-device-available-on-ebf-server
Go to Devices -> Golden Images Select Golden Image option from the menu.
After selecting golden image option, you will see golden image dashboard.
Click on the option Click here.
From Select device drop-down and choose device on which you want to add the golden image.
Select the boot-media: Network Boot.
Add the flash instructions which is optional.
Click on +Add Image files which you want to add for the device.After selecting the image, click on Upload option to upload the file.
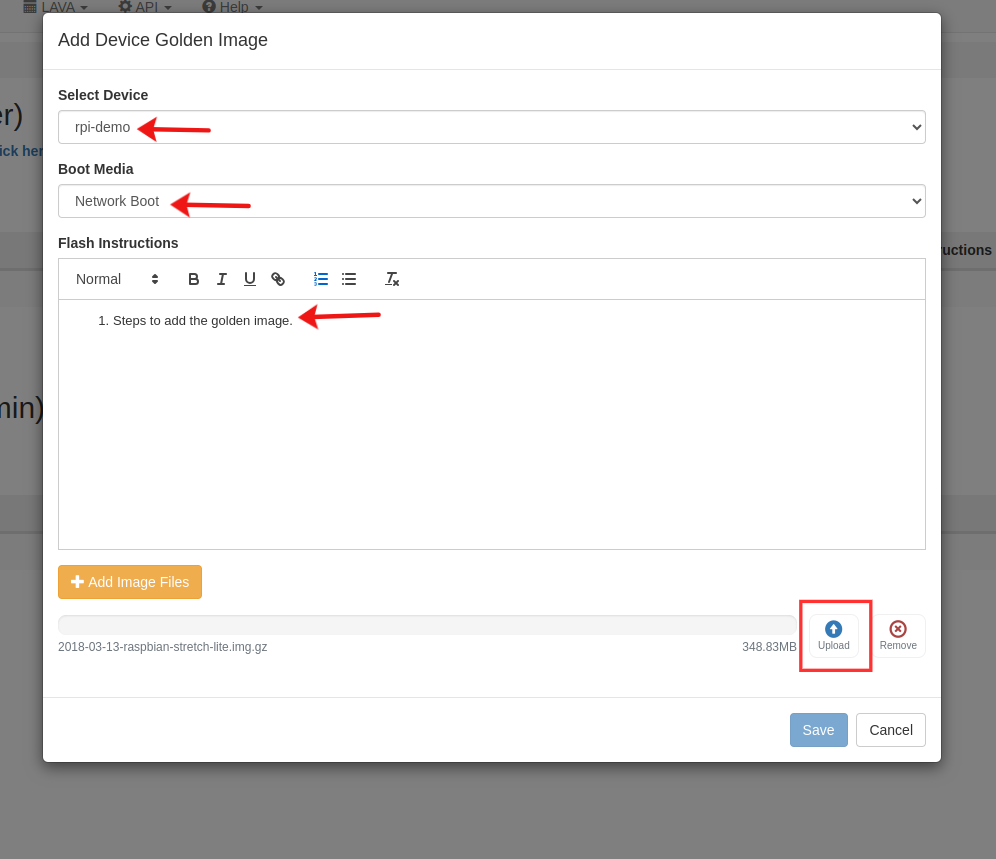
After uploading the file,click on save button.
After successfully uploading the golden image, details regarding image and Network boot will come under the Boot Media column.
Launch the console of the device. Select ‘Network Boot’ option shown on the console screen.
Close the power off recommendation.
Power off the device.
Re-launch network boot from the console screen.
Network boot page will be shown on the screen.
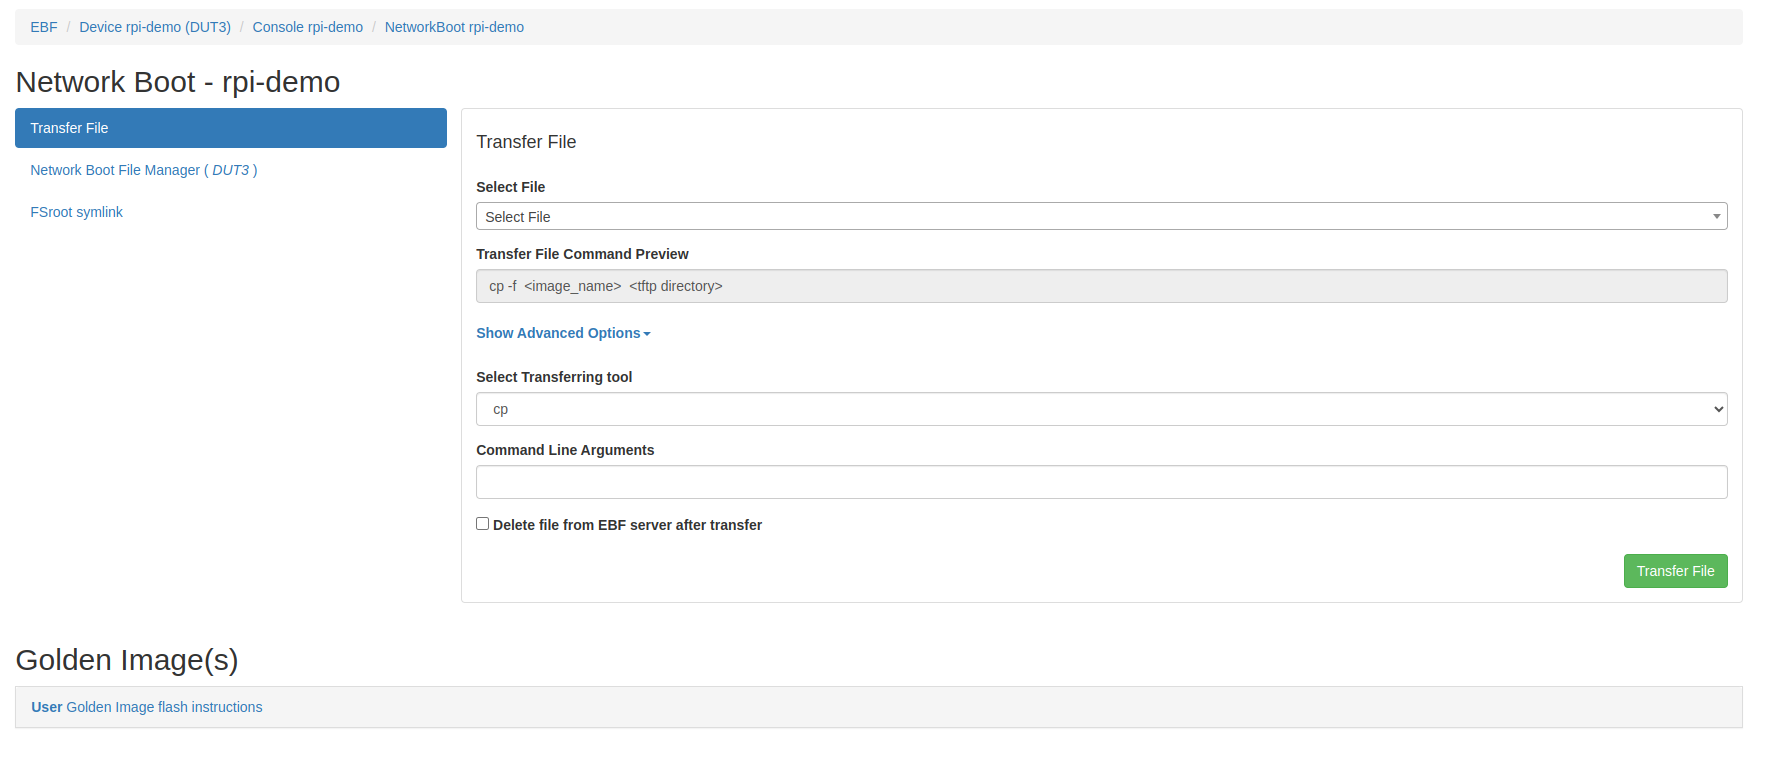
Transfer golden image for booting DUT
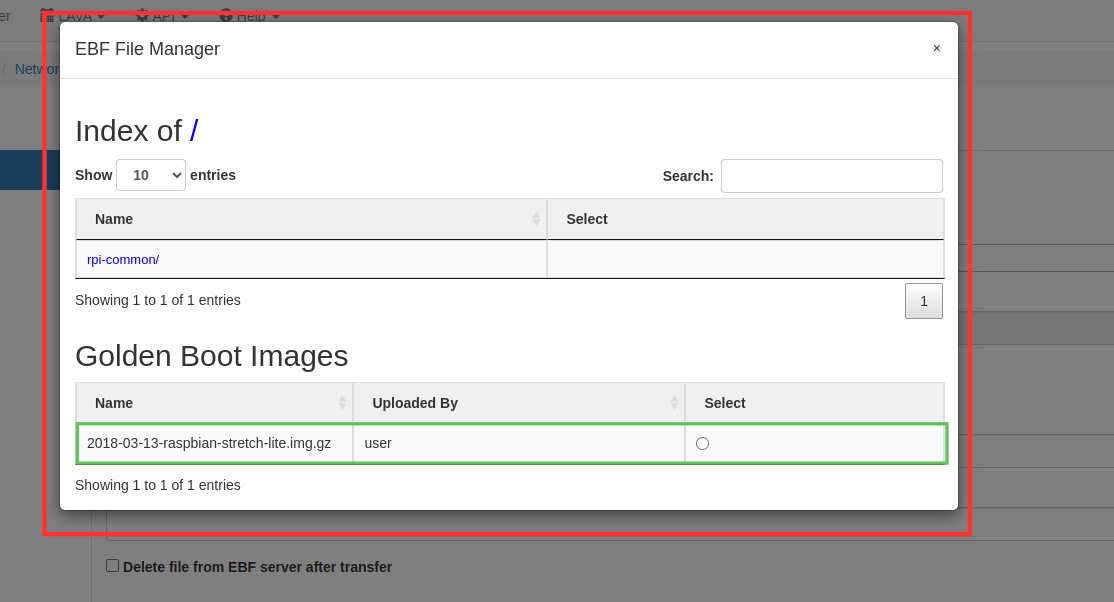
Transfer a golden image by selecting EBF server from the drop down. A pop-up will appear on the screen, select the golden image you want to transfer.
After that select transferring tool, give command argument if needed and click on Transfer file button to transfer the file.
Transfer status should appear on the screen after clicking over the transfer file.
After successful image transfer, a success notification message will be shown on the screen.

Booting DUT with New BSP
Once BSP files are copied, follow steps mentioned below to boot DUT with new BSP files.
Access device web console via EBF Server.Go to U-boot prompt of DUT as shown below.
Configure boot arguments in u-boot prompt to boot DUT from NFS rootfs of Zombie.
Execute following commands in u-boot prompt to perform this action
=> setenv serverip <Zombie IP>
=> setenv  bootargs console=<serial console>,<baud rate>  root=/dev/nfs  rw nfsroot=<Zombie IP>:<exact rootfs location>,tcp,hard,intr ip=dhcp
Example:
=> setenv  serverip 192.168.111.1
=> setenv  bootargs  console=ttyS0,115200n8 root=/dev/nfs rw nfsroot=192.168.111.1:/var/lib/lava/dispatcher/tmp/nfs/DUT4/fsroot,tcp,hard,intr ip=dhcp
NOTE:Here replace DUT4 with your DUT directory where you have copied BSP files and replace the directory name for extracted rootfs with your directory name.
Now assign automatic IP address to DUT. By executing ‘dhcp’ command on U-boot, DUT will be assigned a new IP address.
=> dhcp
Once DUT is bound with IP address, load kernel file from zombie TFTP to DUT by executing the following command:
=> tftp  0x82000000   192.168.111.1:upload/DUT4/<kernel_binary_file>
=> tftp  0x88000000 192.168.111.1:upload/DUT4/<dtb_file>
Note- Replace <kernel_binary_file> with your kernel binary file name and Kernel address could be different for your board. DUT4 should also be changed to your DUT directory where BSP files were uploaded.
Once kernel file is loaded, then similarly load DTB file . After loading DTB execute following command to boot DUT with new BSP.
=> booti <kerneladdr> - <dtbaddr>
Example: = > booti 0x82000000 - 0x88000000
Depending on Kernel image types, there are various boot options available:
Example1: If kernel image type is Image
=> booti 0x82000000 - 0x88000000
Example2: If kernel image type is uImage
=> bootm 0x82000000 - 0x88000000
Example3: If kernel image type is zImage
=> bootz 0x82000000 - 0x88000000
The device is booted through network boot and is ready for testing and for performing other processes on the device. Monitor to see Login prompt of DUT to verify that DUT successfully booted with new BSP. Verify to see changes of New BSP and perform further test functionality.
How to netboot a device using SRP
From EBF UI
Prerequisite
The admin should correctly configure the Netboot Type for the device.
GUID for the device should be properly configured.
Working images should be available.
Procedure to copy SRP Image onto Zombie
Go to the concerned device’s console and follow the steps below to copy the SRP File. Follow these steps to Launch the console of the concerned device.
Select the ‘Network Boot’ option from the console screen.
Close the power off recommendation.
Power off the device.
Re-launch the network boot from the console screen.
The network boot page will be shown on the screen.

Now upload the SRP file from your local machine to the EBF server using Select File option.

Once the upload is done you can verify the uploaded file from Network Boot File Manager option.

Now generate the BootMenu File using Generate Bootmenu option.
Select the uploaded SRP file from the Select File option and click on the Generate Bootmenu option.

The newly generated boot menu file can now be accessed through the Network Boot File Manager option.

Now you can boot your device, it will boot from the latest generated bootmenu file.
From EBF-CLI
Prerequisite
The admin should correctly configure the Netboot Type for the device.
GUID for the device should be properly configured.
Working images should be available.
Procedure to copy SRP Image onto Zombie
1 Device for which you want to upload an SRP file should be assigned to you. Confirm by running ebf mydevices.
ebf  mydevices

demo
2 Upload the SRP file to Zombie by running ebf <device name> netboot upload <SRP filepath> <Zombie Netboot Path>
ebf demo netboot upload target.srp /

Successfully 100% upload completed.
3 Now generate the bootmenu config by running ebf <device name> netboot gen-boot-menu -k <SRP filepath>
ebf demo netboot gen-boot-menu -k target.srp

boot-menu file generated successfully
4 Now you can boot your device, it will boot from the latest generated bootmenu file.
How to netboot a device using HWDL
From EBF UI
Prerequisite
The admin should correctly configure the Netboot Type for the device.
GUID for the device should be properly configured.
Working images should be available.
Procedure to copy HWDL Image onto Zombie
Go to the concerned device’s console and follow the steps below to copy the HWDL Image. Follow these steps to Launch the console of the concerned device.
Select the ‘Network Boot’ option from the console screen.
Close the power off recommendation.
Power off the device.
Re-launch the network boot from the console screen.
The network boot page will be shown on the screen.
Now upload the HWDL kernel/initrd files from your local machine to the EBF server using Select File option.

Once the upload is done you can verify the uploaded file from Network Boot File Manager option.

Now generate the BootMenu File using Generate Bootmenu option.
Select the uploaded kernel and initrd file from the Select File options and click on the Generate Bootmenu option.

The newly generated boot menu file can now be accessed through the Network Boot File Manager option.

Now you can boot your device, it will boot from the latest generated bootmenu file.
From EBF-CLI
Prerequisite
The admin should correctly configure the Netboot Type for the device.
GUID for the device should be properly configured.
Working images should be available.
Procedure to copy HWDL Image onto Zombie
1 Device for which you want to upload HWDl files should be assigned to you. Confirm by running ebf mydevices.
ebf  mydevices

demo
2 Uplaod the HWDL file to Zombie by running ebf <device name> netboot upload <kernel/initrd filepath> <Zombie Netboot Path>.
ebf demo netboot upload x86_64-generic-hwdl-kernel-2023.10.0-54867d031a /

ebf demo netboot upload x86_64-generic-hwdl-ramdisk-2023.10.0-54867d031a.img /

Successfully 100% upload completed.
3 Now generate the bootmenu by running ebf <device name> netboot gen-boot-menu -k <kernel file> -i <initrd file>.
ebf demo netboot gen-boot-menu -k x86_64-generic-hwdl-kernel-2023.10.0-54867d031a -i x86_64-generic-hwdl-ramdisk-2023.10.0-54867d031a.img

boot-menu file generated successfully
4 Now you can boot your device, it will boot from the latest generated bootmenu file.
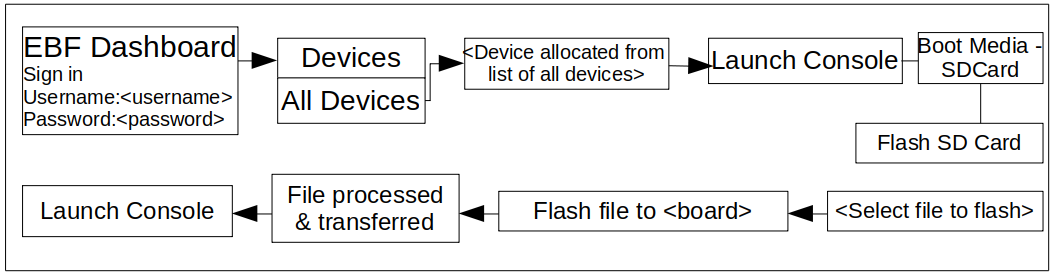
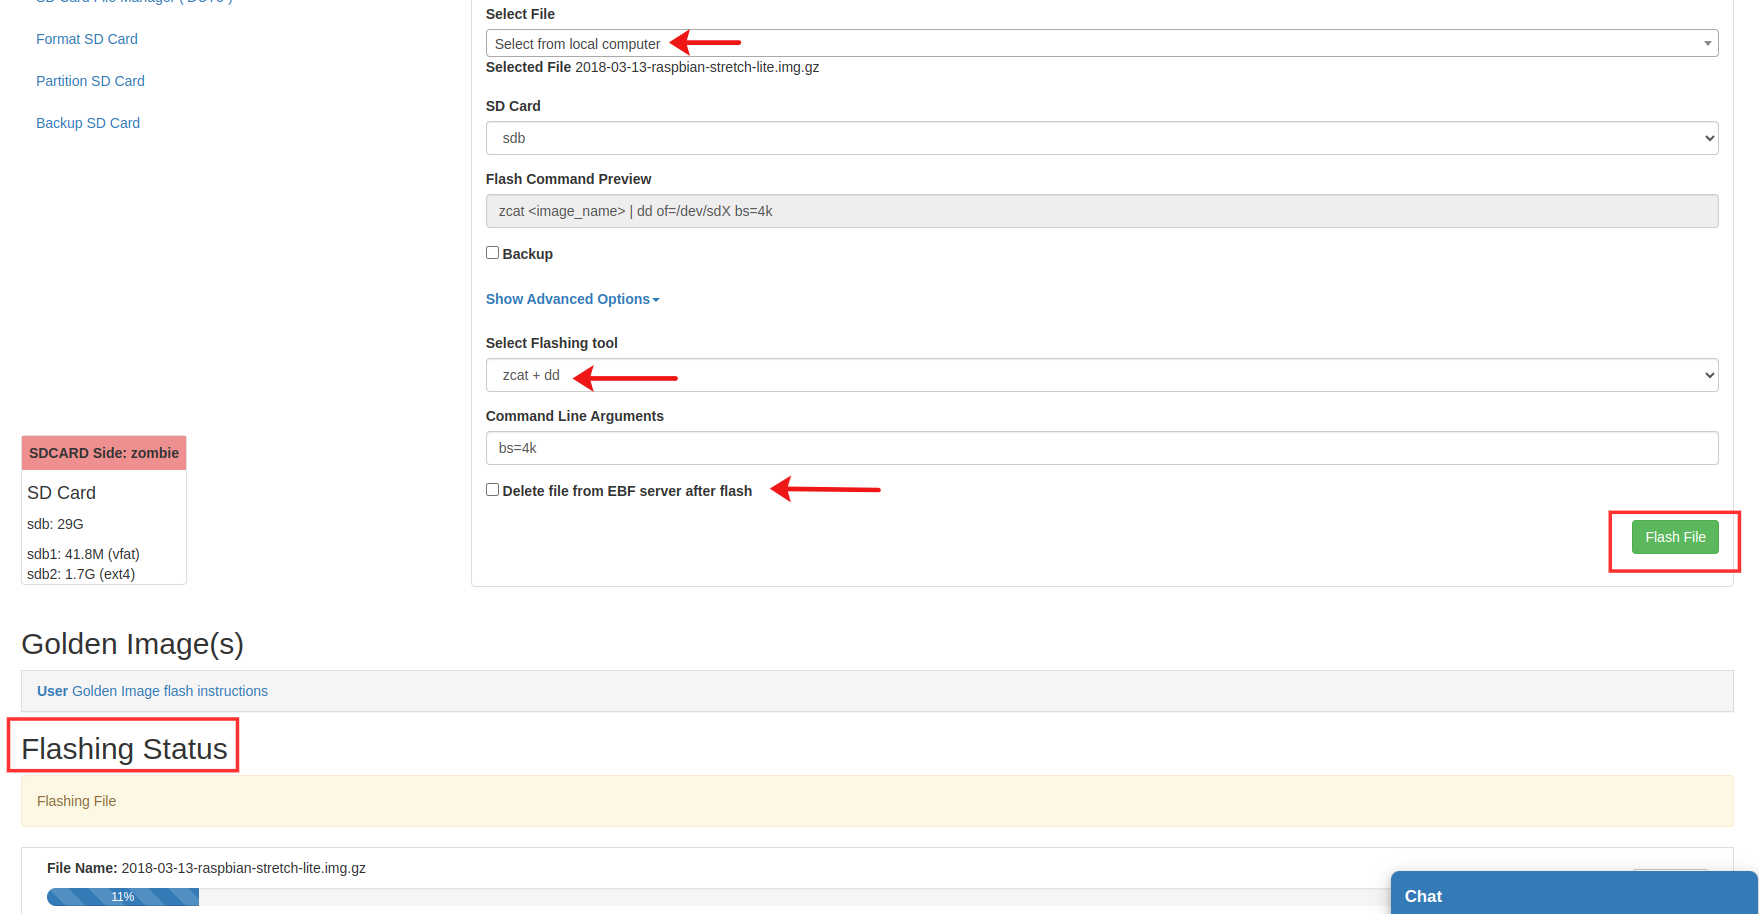
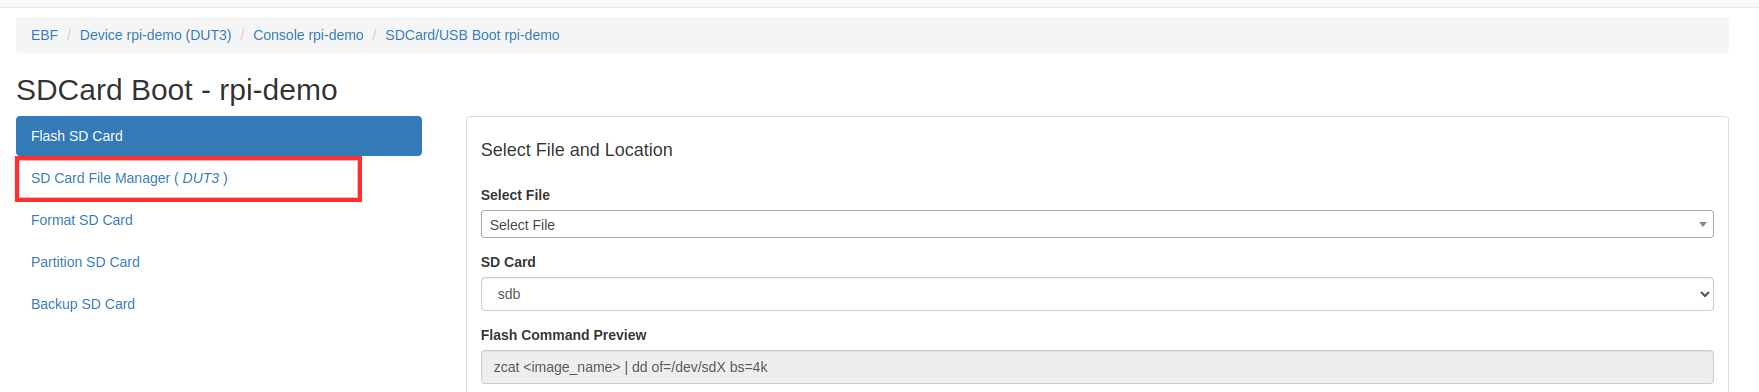
How to flash a new image to Boot Media-SD card
Following are the steps to flash a new image with the help of a boot media-SD card:
1 Login to the EBF homepage/Dashboard through a web browser with credentials.
Username : <username>
Password : <password>
2 After login successfully refer user_guide.html#how-to-access-a-device-s-web-console to perform console launch.
3 The following Web Console session will appear on the screen if the IO-CX board is connected.
NOTE: For SDCard Flash it’s mandatory to have IOCX connected to the Device. If IOCX is not connected then the following Console screen appears on the screen and the user cannot access Boot Media-SDCard functionality.
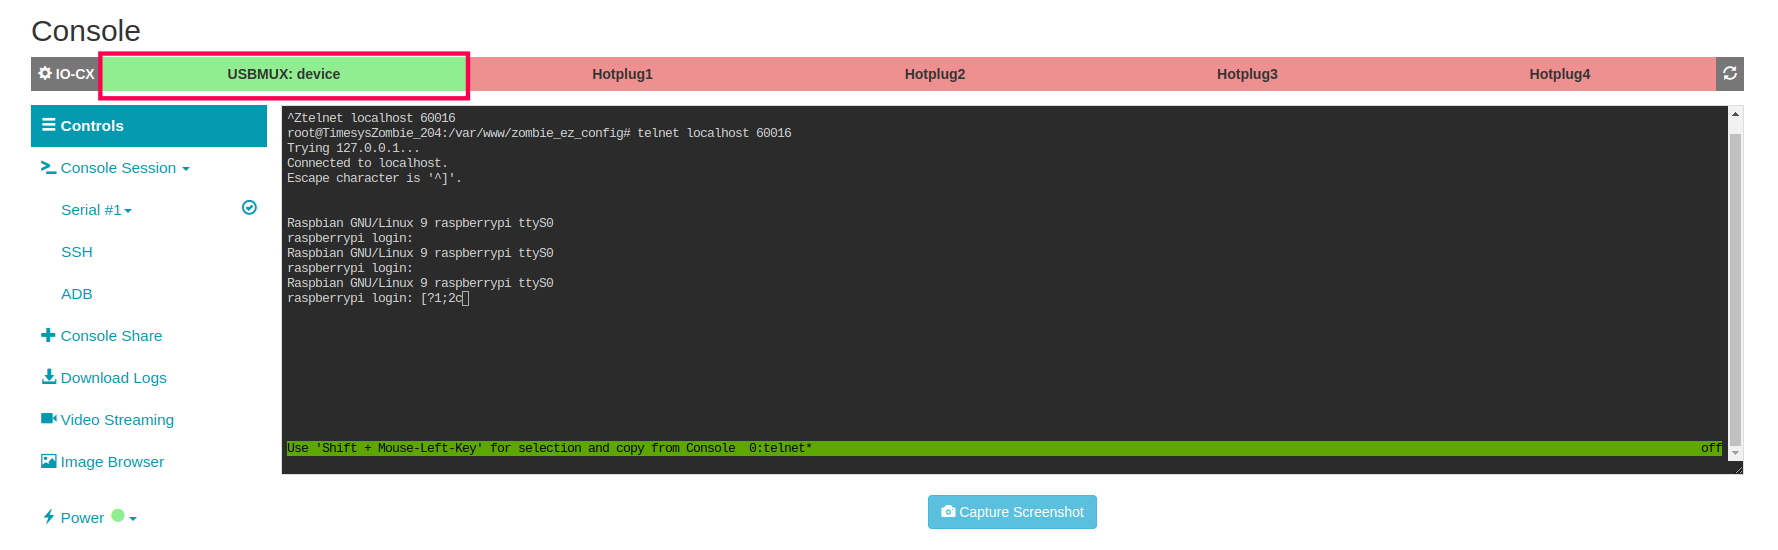
4 To upload an image on an SD card, first, turn off the power of the device(board) by clicking on the ‘OFF’ option. The ‘SDMUX: Zombie’ option will turn red as shown in the image below. Then click on the ‘boot media-SDCard’ option.

5 Now the user will be redirected to the SDCard-boot page to Flash an Image.
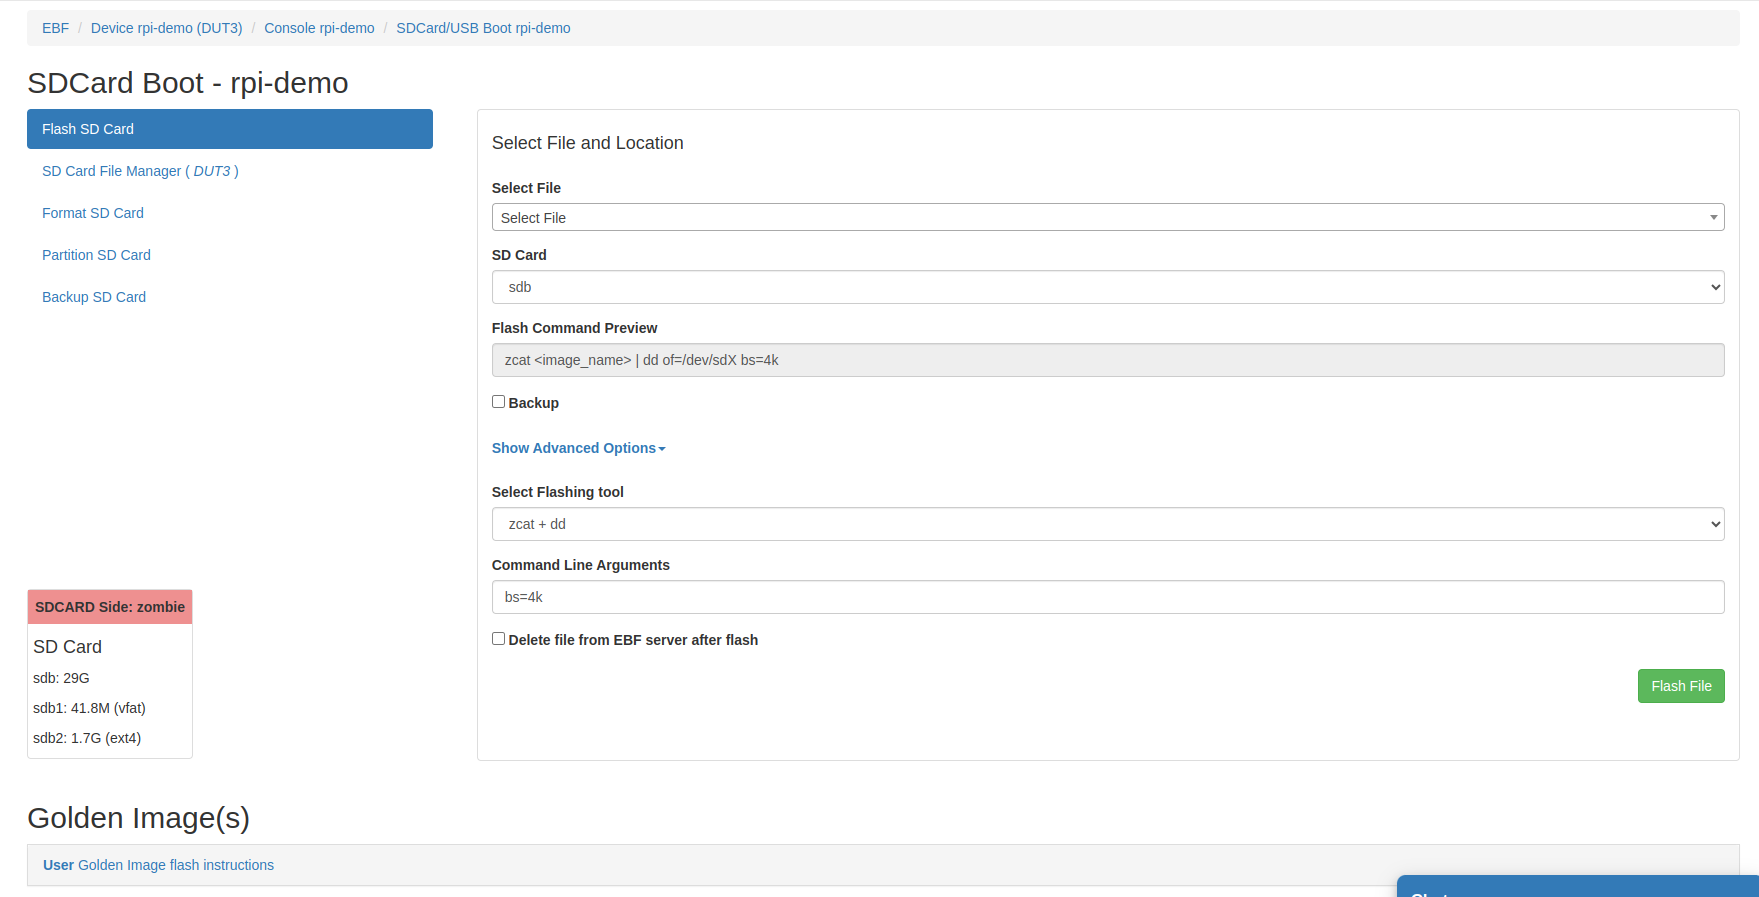
There are two ways to Flash an Image.
Select image from local Computer.
Select image from EBF server.
6 Now flash an image Selecting Image from Local Computer.
From Select file drop-down and choose “select from local computer”.
Now choose the desired file to flash into the SD card.
From the SD card drop-down menu choose the target partition.
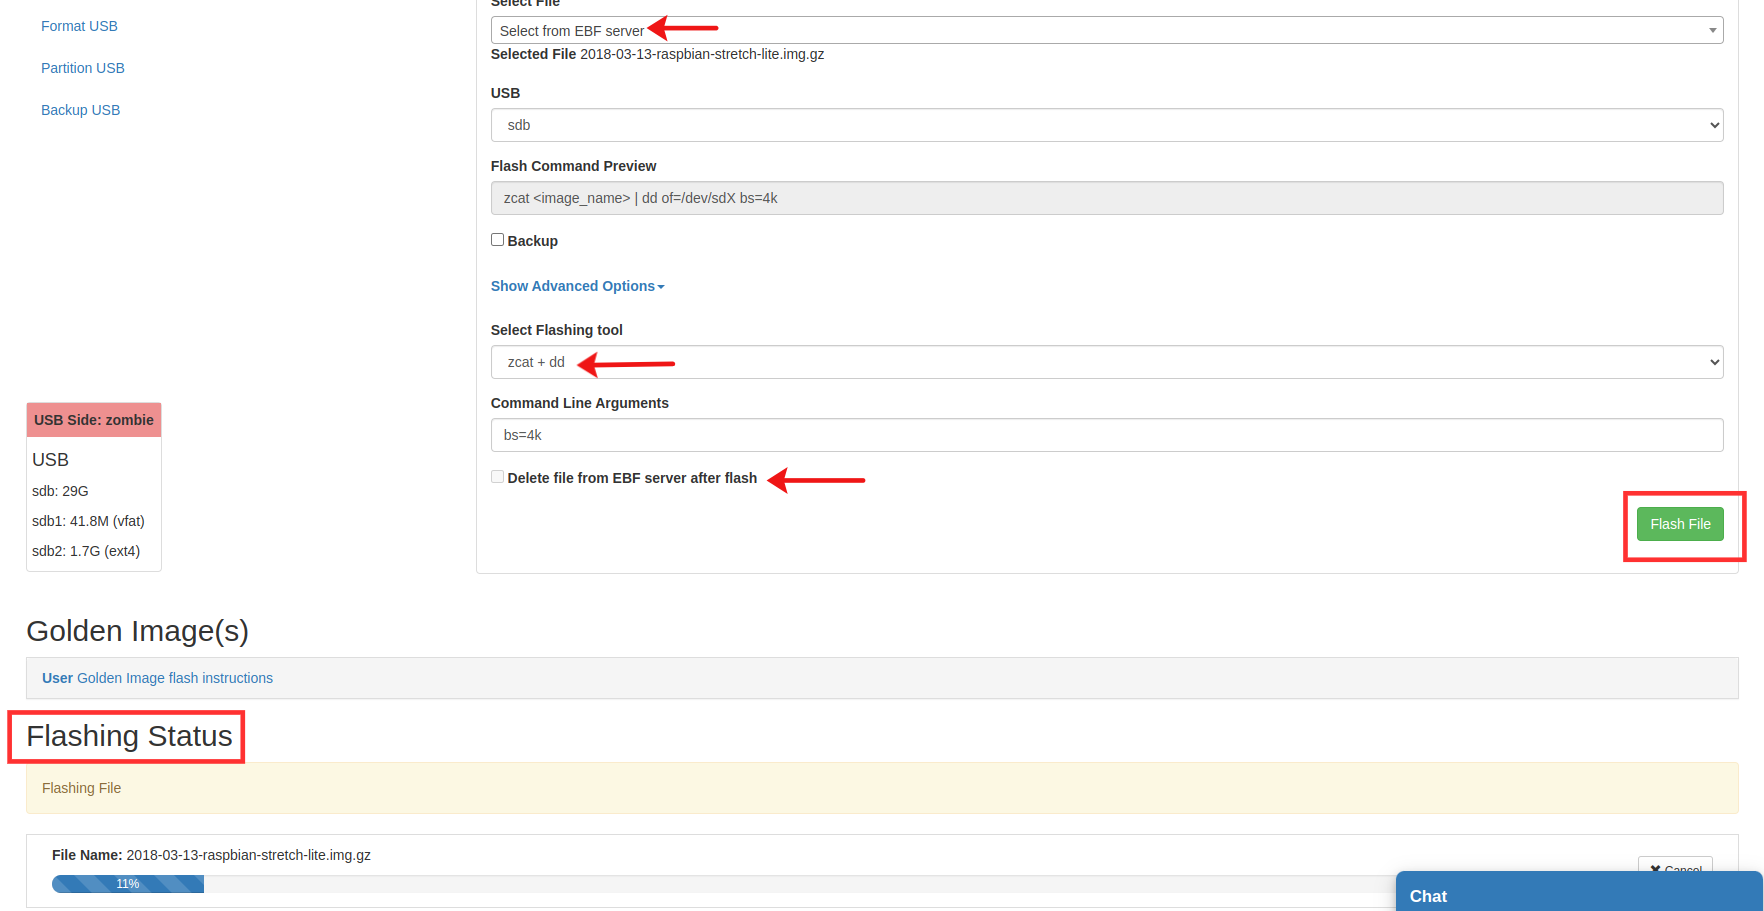
Select flashing tool as per requirement(zcat + dd/gunzip + dd/zstdcat + dd/dd/bmaptool/tar/unzip/cp). If you don’t select, it will be auto-selected according to the file extension of the chosen file.
Give command-line argument if needed.
Check the “pre-format(mkfs)” check the box if want to format the partition before flashing an image otherwise unchecked.
Check the “Delete file from EBF server after flash” check box if want to delete the file after flashing from ebf server otherwise unchecked.
Now click on the flash file button to flash the image into the SD card.
During flash the flash status of the image should be visible on the screen.
7 After successful image upload, select the Launch console button to start the Console session.
8 Now Go to SD card file manager and see the target partition where the file was flashed.
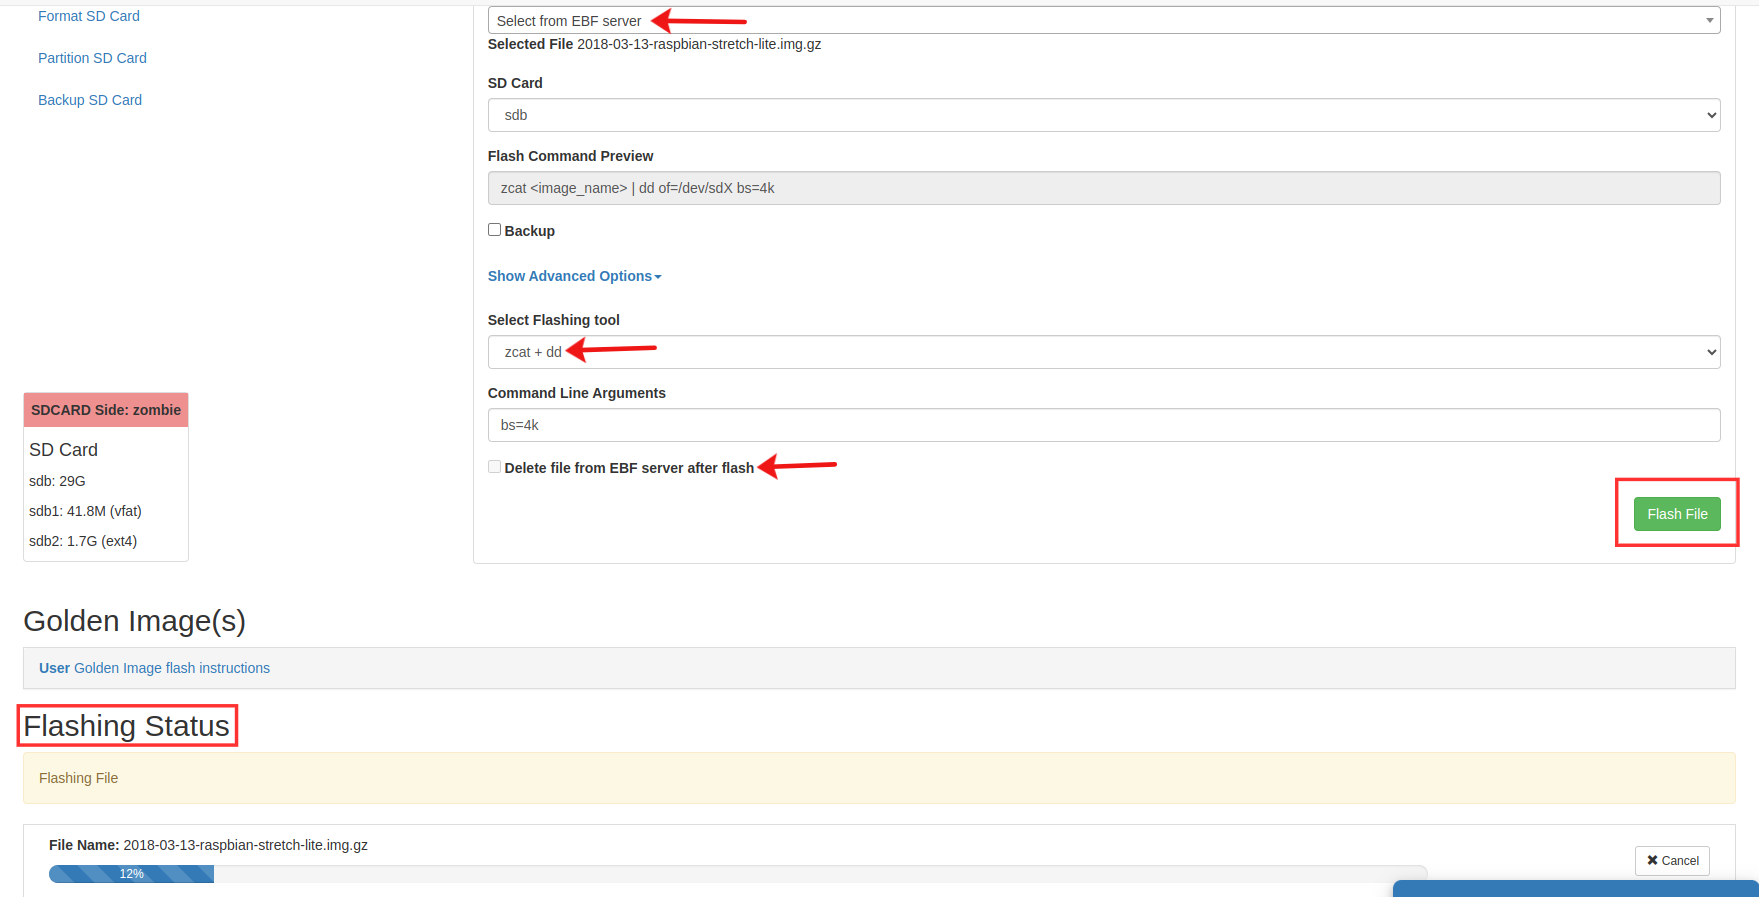
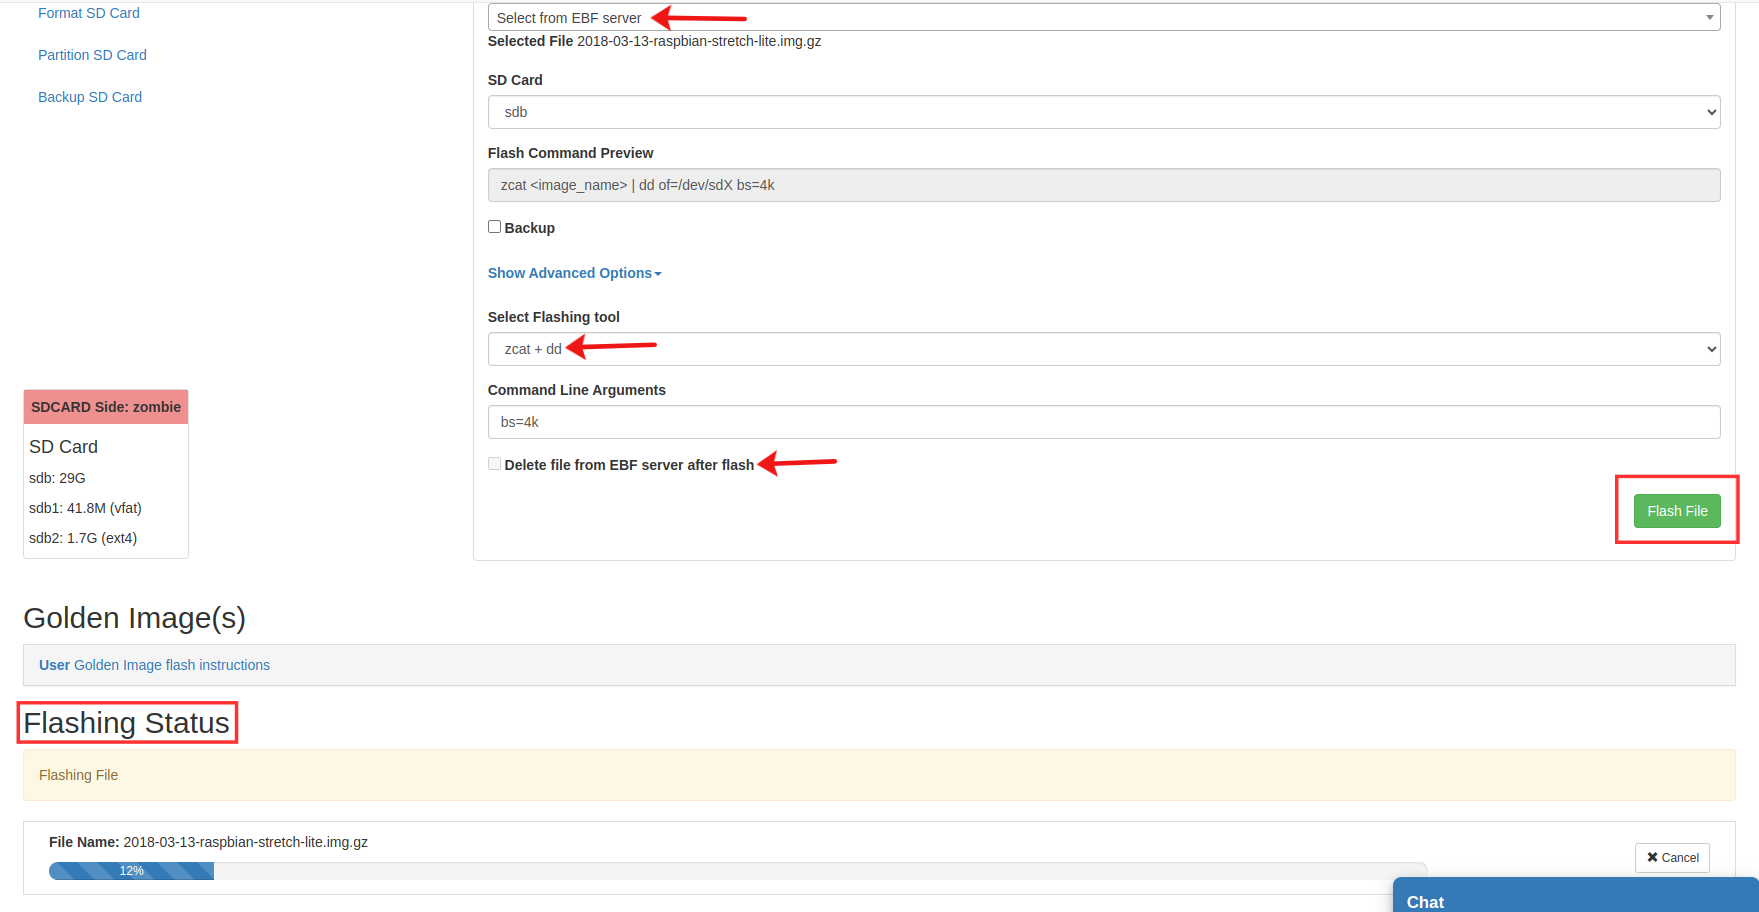
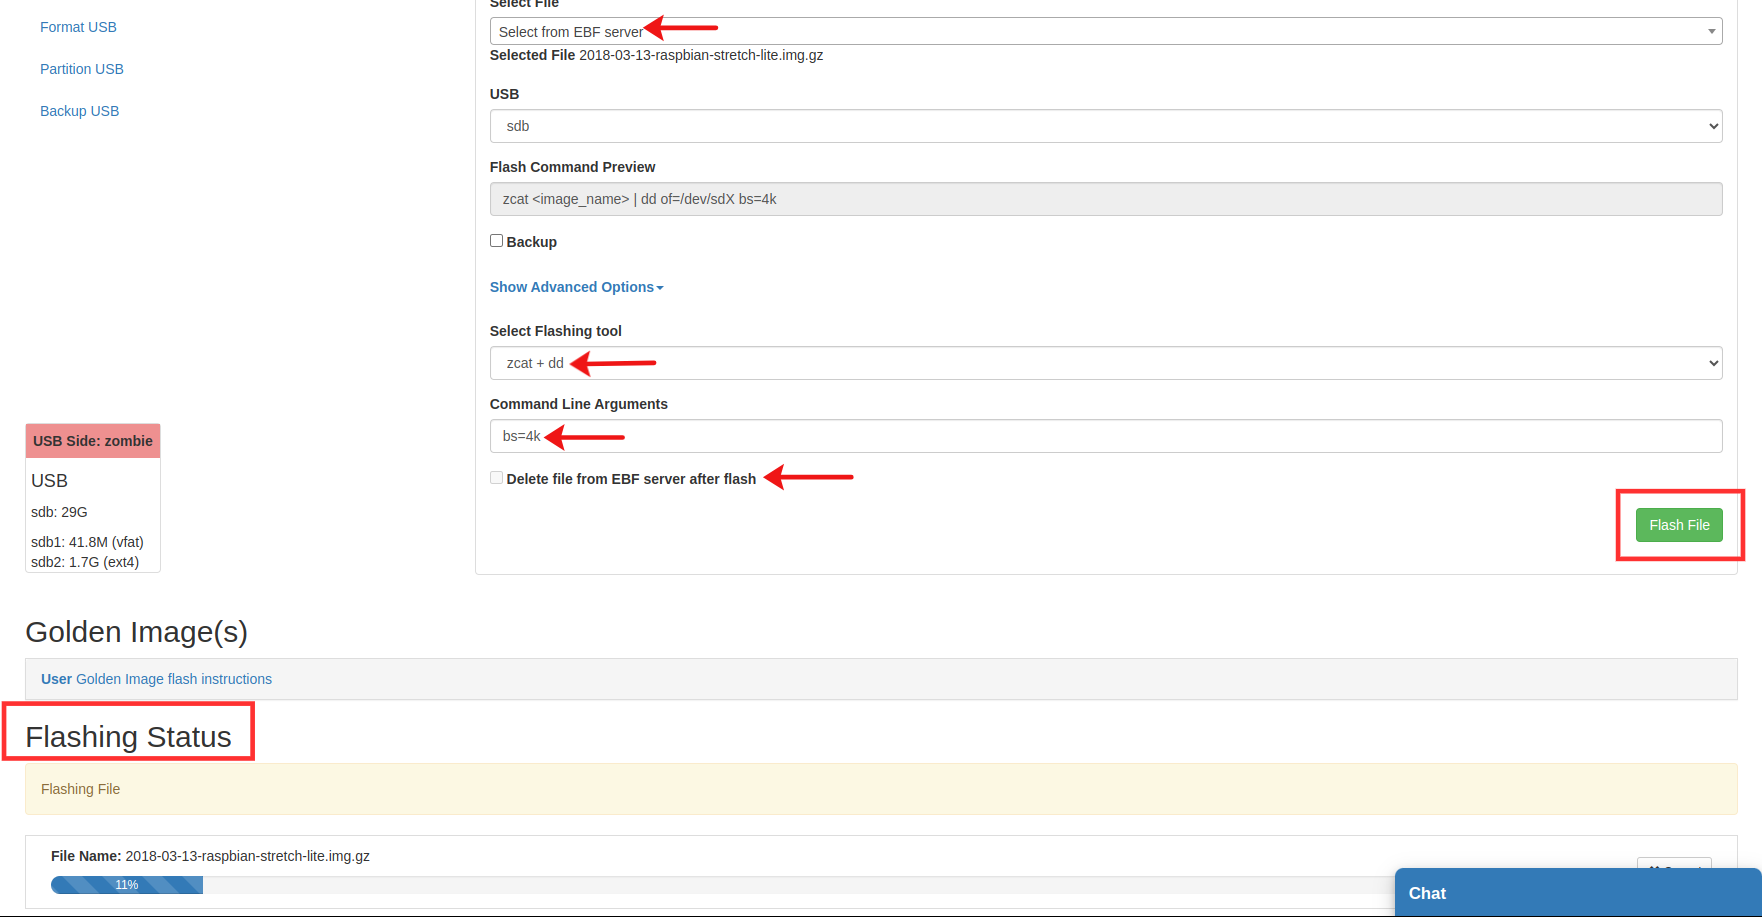
9 Now flash an image Selecting Image from EBF Server.
From Select file drop-down and choose “select from EBF Server”.
Now select the desired file to flash into the SD card.
From the SD card drop-down menu choose the target partition.
Select flashing tool as per requirement(zcat + dd/gunzip + dd/zstdcat + dd/dd/bmaptool/tar/unzip/cp). If you don’t select, it will be auto-selected according to the file extension of the chosen file.
Give command-line argument if needed.
Check the “pre-format(mkfs)” check the box if want to format the partition before flashing an image otherwise unchecked.
Check the “Delete file from EBF server after flash” check box if want to delete the file after flashing from EBF server otherwise unchecked.
Now click on the flash file button to flash the image into the SD card.
During flash the flash status of the image should be visible on the screen.
10 After successful image upload, select the Launch console button to start the Console session.
11 Now Go to the SD card file manager and see the target partition where the file was flashed.

How to Switch the SD-MUX side
Following are the steps to Switch the SD-MUX side EBF Server:
1 Login to the EBF homepage/Dashboard through a web browser with credentials.
Username : <username>
Password : <password>
2 This would open up EBF Dashboard.
3 First Allocate the device to yourself. Refer
4 Launch the console of the target device.

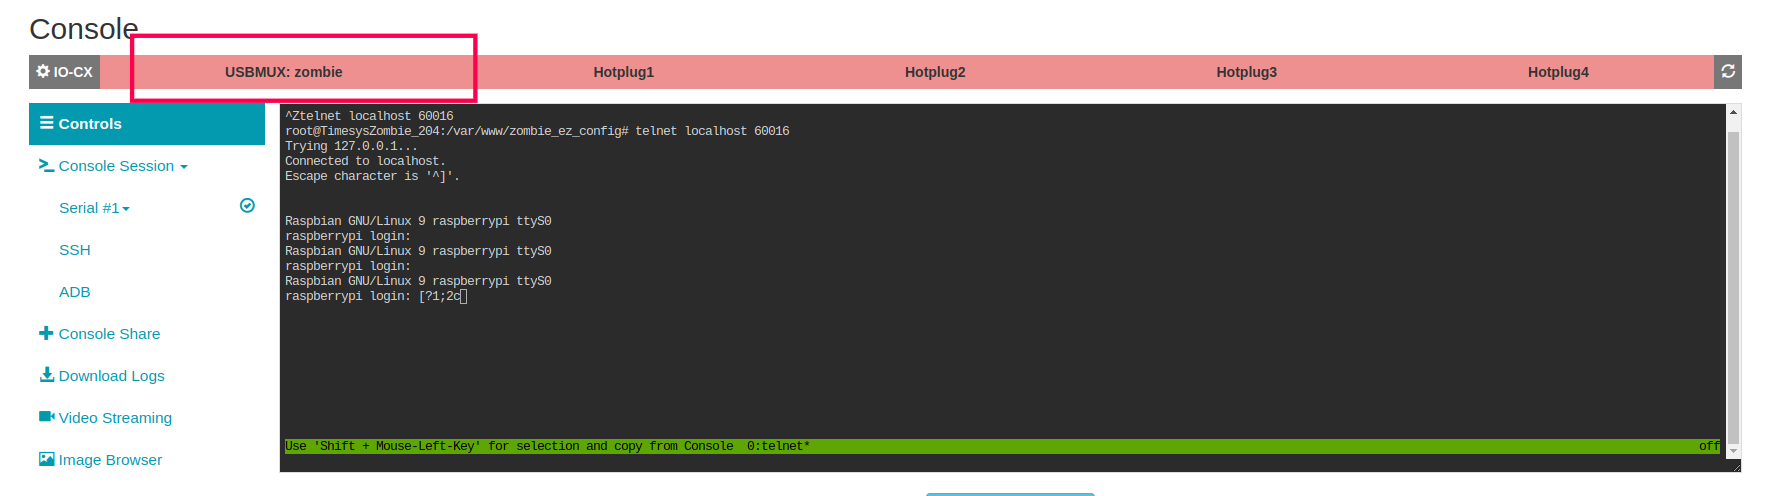
5 Click on the SDMUX:Device button to switch to the Zombie side.

6 Click on the SDMUX:Device button to switch to the SD-MUX Device side.

How to flash a golden image to Boot Media-SD card
Following are the steps to flash a golden image with the help of a boot media-SD card:
1 Login to the EBF homepage/Dashboard through a web browser with credentials.
Username : <username>
Password : <password>
2 After login successfully. Prefer link user_guide.html#how-to-add-golden-images-user-controlled to add golden image to the device.
3 After successfully adding the golden image of the device. Prefer link user_guide.html#how-to-access-a-device-s-web-console to perform console launch.
4 The following Web Console session will appear on the screen if the IO-CX board is connected.
NOTE: For SDCard Flash it’s mandatory to have IOCX connected to the Device. If IOCX is not connected then the following Console screen appears on the screen and the user cannot access Boot Media-SDCard functionality.
5 To upload an image on an SD card, first, turn off the power of the device(board) by clicking on the OFF option. The SDMUX: Zombie option will turn red as shown in the image below. Then click on the ‘boot media-SDCard’ option.
6 Now the user will be redirected to the SDCard-boot page to Flash an Image.
7 Now flash an image Selecting Image from EBF Server.
From Select file drop-down and choose select from EBF Server.
Now choose the desired file under golden boot images to flash into the SD card.
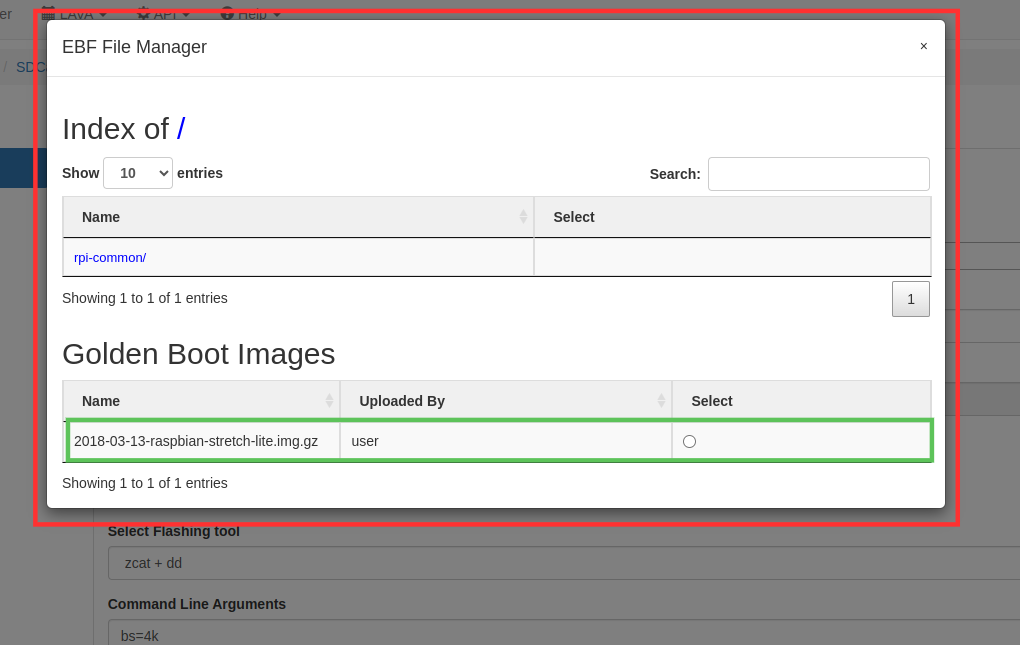
From the SD card drop-down menu choose the target partition.
Select flashing tool as per requirement(zcat + dd/gunzip + dd/zstdcat + dd/dd/bmaptool/tar/unzip/cp). If you don’t select, it will be auto-selected according to the file extension of the chosen file.
Give command-line argument if needed.
Now click on the flash file button to flash the image into the SD card.
During flash the flash status of the image should be visible on the screen.
8 After successful image upload, select the Launch console button to start the Console session.
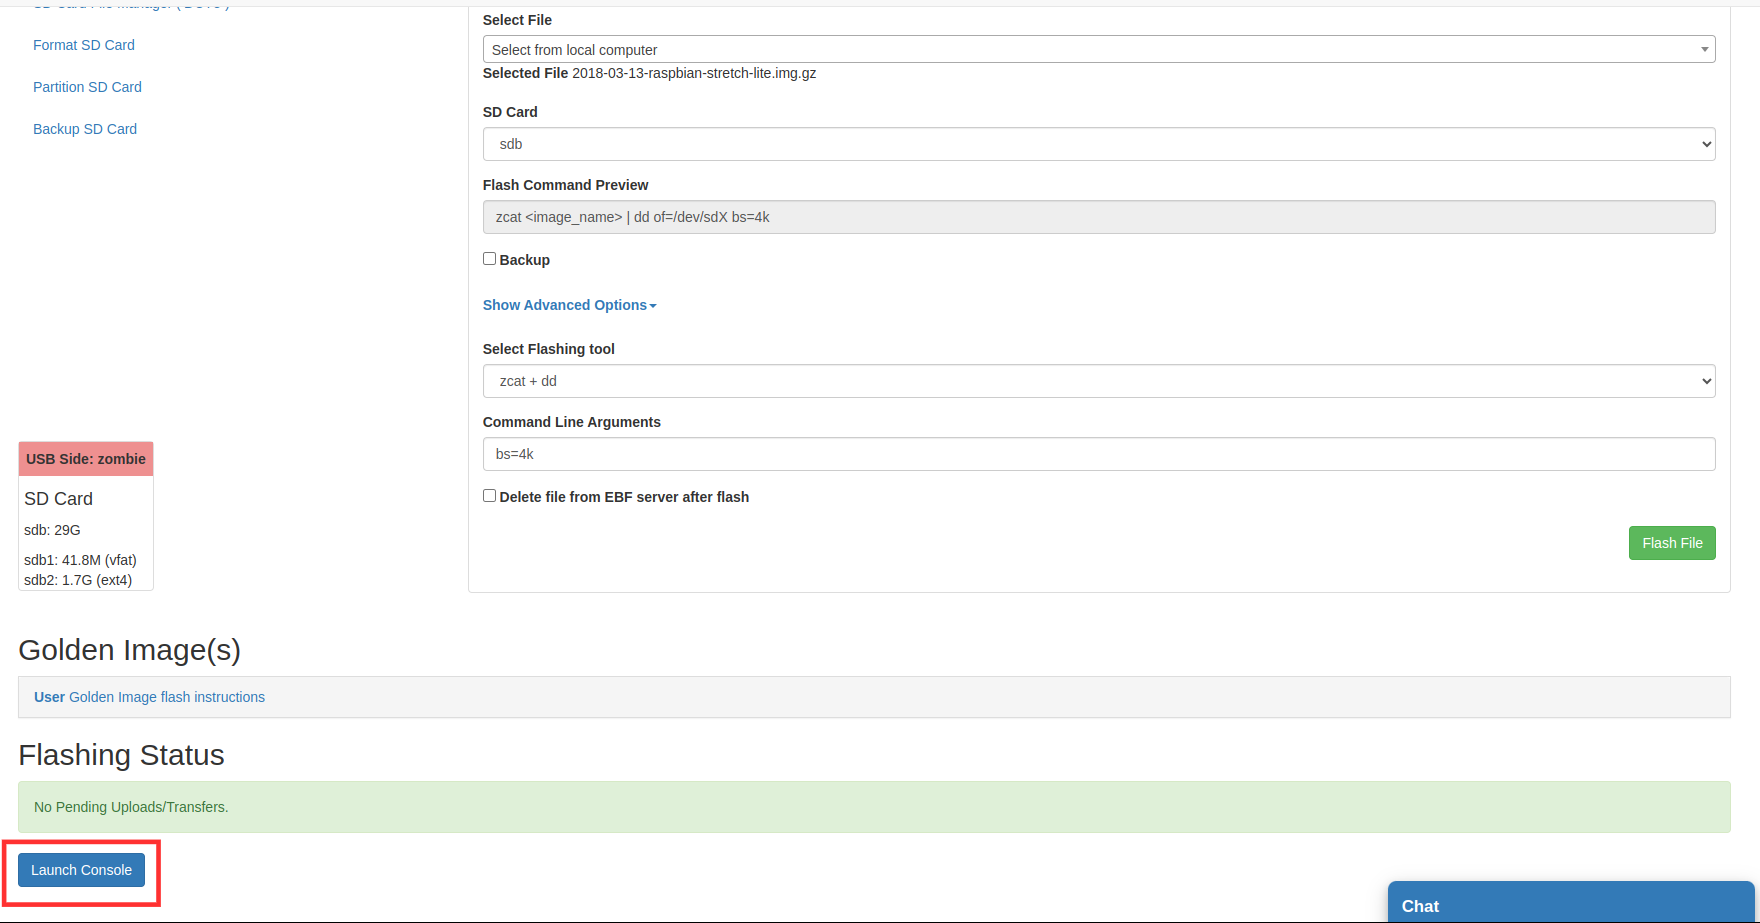
9 Now Go to SD card file manager and see the target partition where the file was flashed.
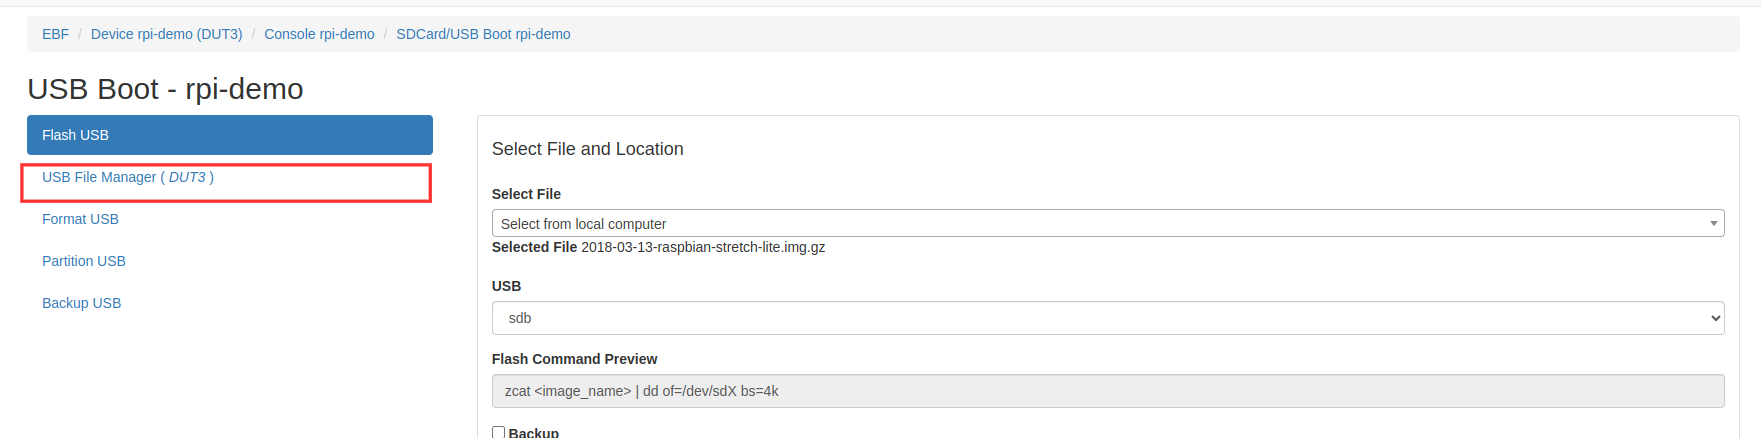
How to flash a new image to a USB
Following are the steps to flash a new image to USB with the help of USBMux:
1 Login to the EBF homepage/Dashboard through a web browser with credentials.
Username : <username>
Password : <password>
2 Select the ‘My Devices’ option from the ‘Devices’ drop down list.
3 Go to the ‘My Devices’ page and verify the MUX mode of the device.

4 Go to the Console page of the device. ‘USBMux’ option present on the page.
5 To Switch USBMux to the Zombie side, click on the “USBMux” option in the control panel and on the respective Hotplug port. (As shown in the image below, USBMux and Hotplug1 will turn RED, meaning they are now connected to the Zombie side.)
6 On the Console screen, click on the “Boot Media-USB” control in the control panel.
7 USB Boot page will appear on the screen showing details of the memory card connected to the target device.
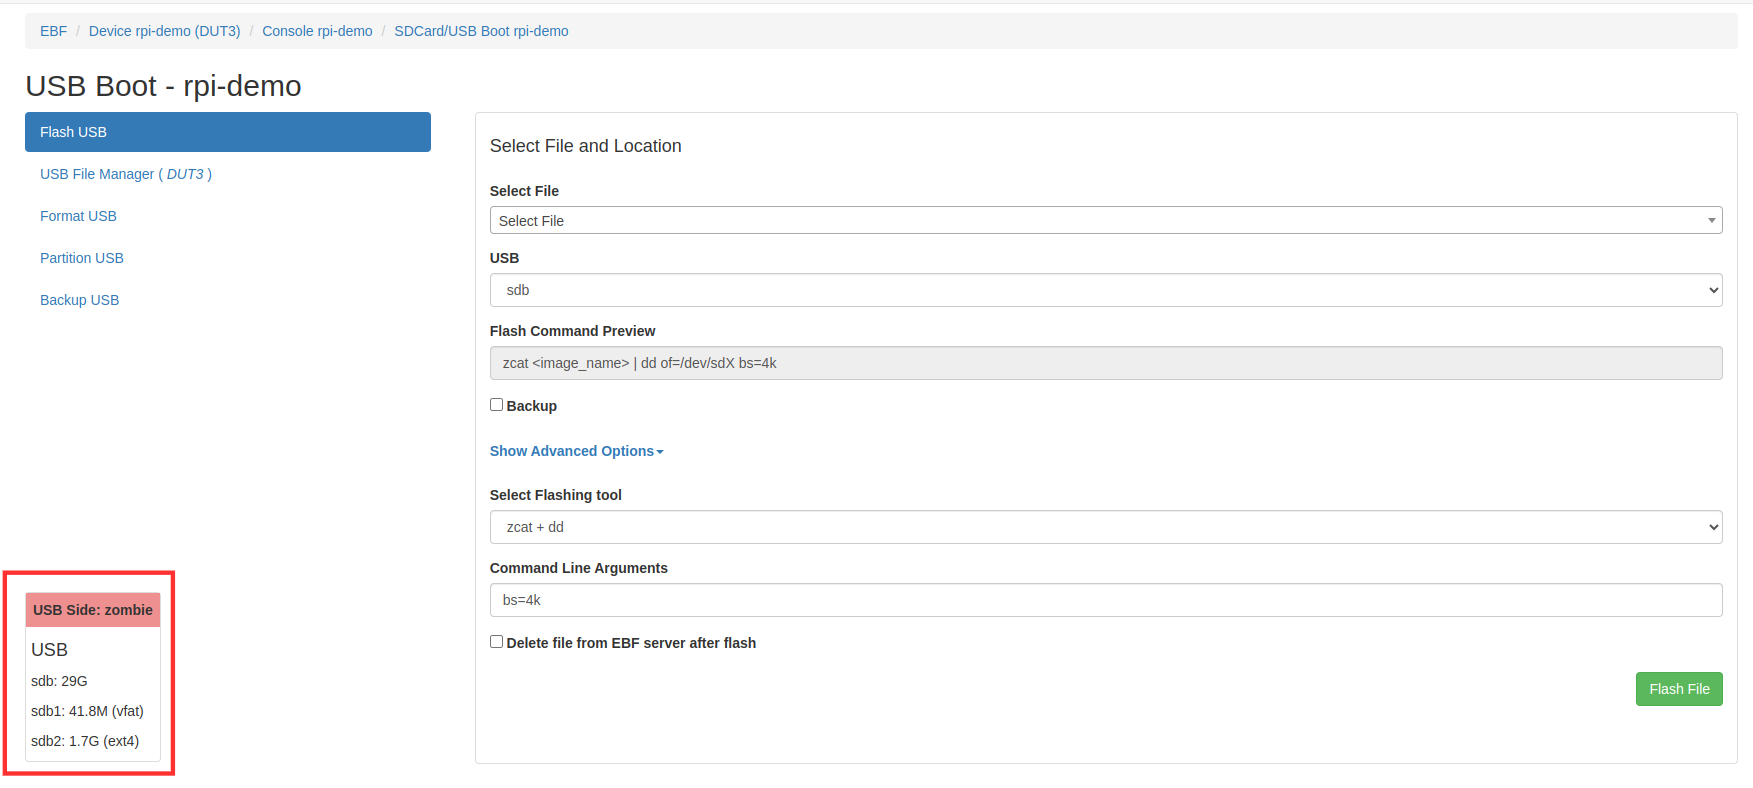
8 There are two ways to Flash Image.
Now flash an image from EBF Server.
From Select file drop-down and choose “select from EBF Server”.
Now select the desired file to flash into the USB.

From the USB drop-down menu choose the target partition.
Select flashing tool as per requirement(zcat + dd/gunzip + dd/zstdcat + dd/dd/bmaptool/tar/unzip/cp). If you don’t select, it will be auto-selected according to the file extension of the chosen file.
Give command-line argument if needed.
Check the “pre-format(mkfs)” checkbox if want to format the partition before flashing an image otherwise unchecked.
Check the “Delete file from EBF server after flash” check box if want to delete the file after flashing from the EBF server otherwise unchecked.
Now click on the flash file button to flash the image into USB.
During flash the flash status of the image should be visible on the screen.
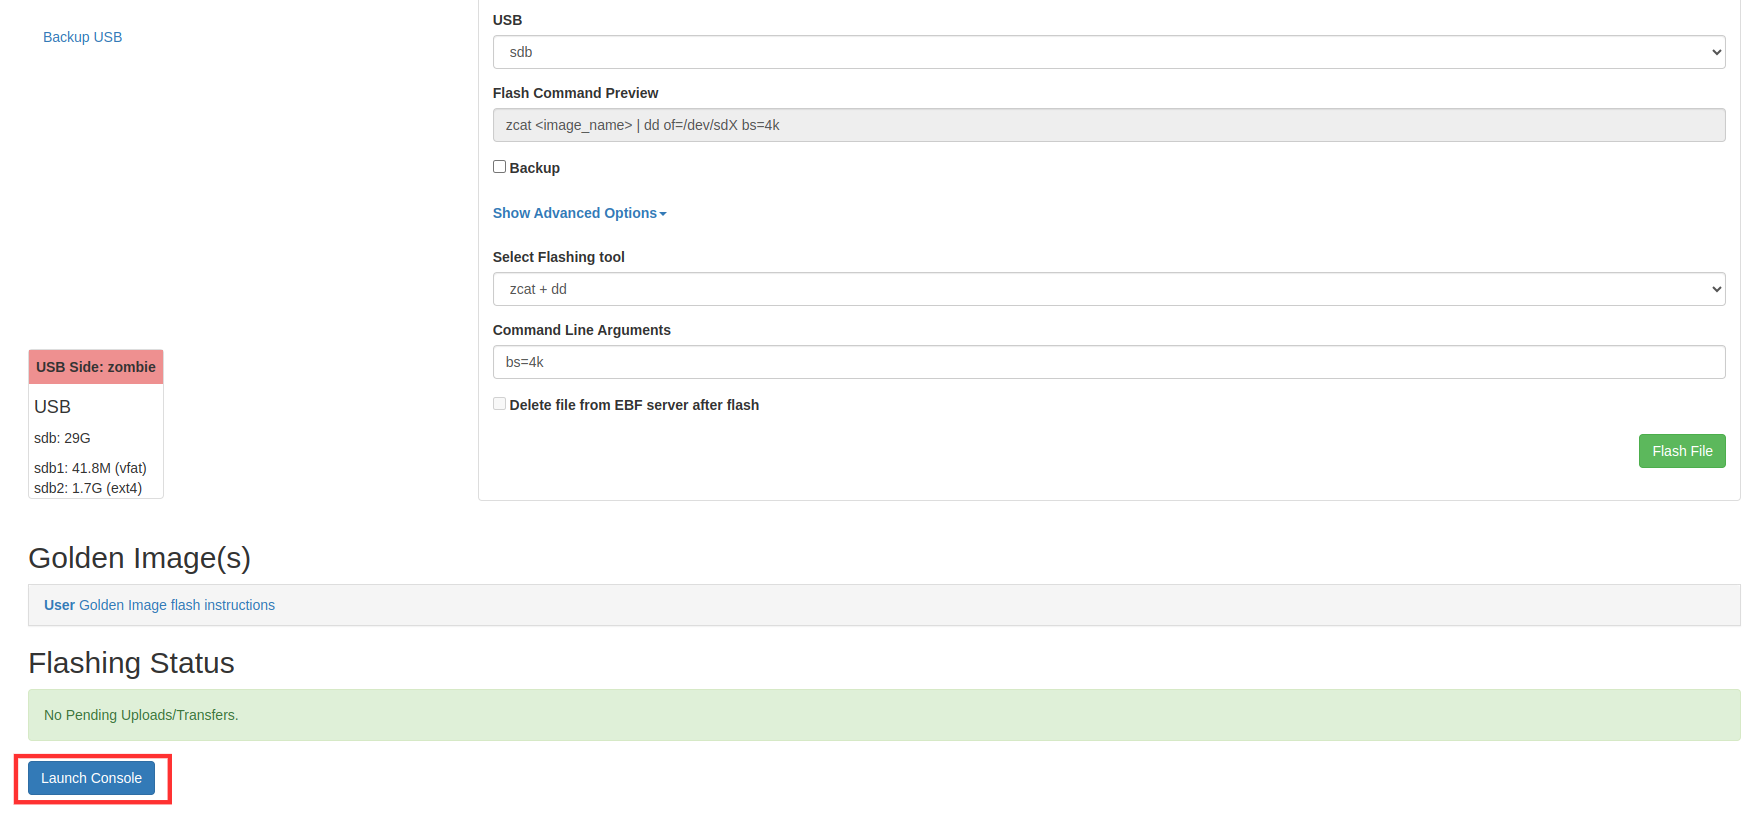
After successful image upload, select the Launch console button to start the Console session.
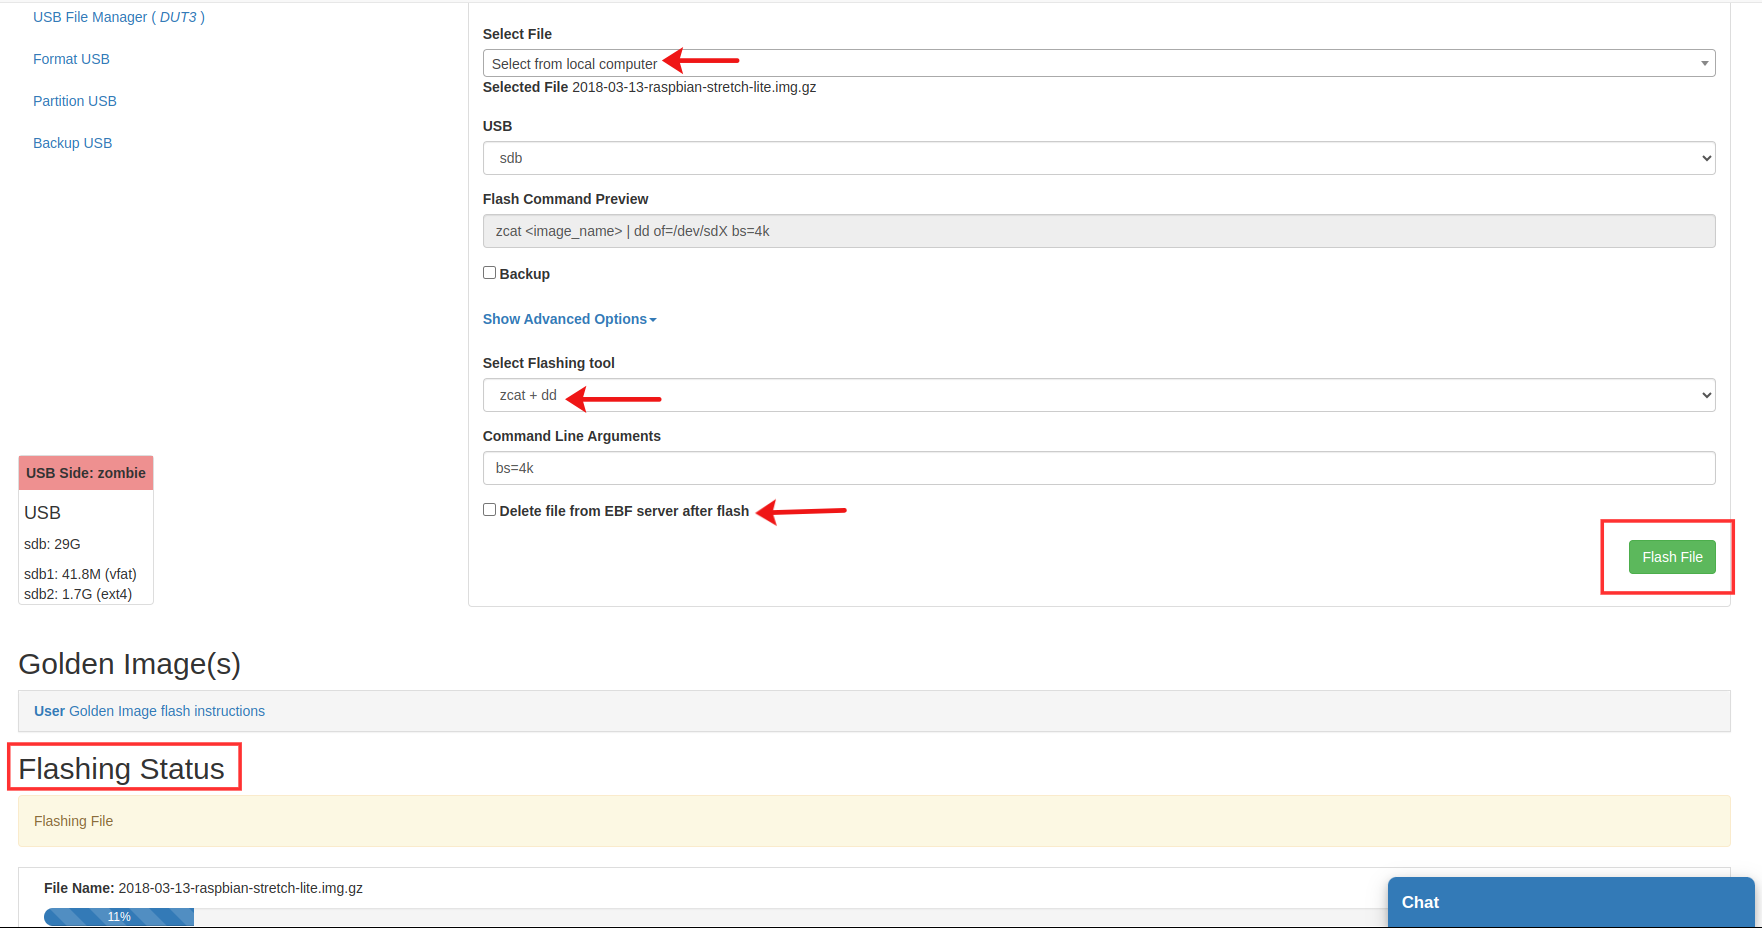
Now flash an image Selecting Image from Local Computer.
From Select file drop-down and choose “select from local computer”.
Now choose the desired file to flash into the USB.
From the USB drop-down menu choose the target partition.
Select flashing tool as per requirement(zcat + dd/gunzip + dd/zstdcat + dd/dd/bmaptool/tar/unzip/cp). If you don’t select, it will be auto-selected according to the file extension of the chosen file.
Give command-line argument if needed.
Check the “pre-format(mkfs)” checkbox if want to format the partition before flashing an image otherwise unchecked.
Check the “Delete file from EBF server after flash” checkbox if want to delete the file after flashing from ebf server otherwise unchecked.
Now click on the flash file button to flash the image into USB.
During flash the flash status of the image should be visible on the screen.
After successful image upload, select the Launch console button to start the Console session.
Now Go to USB file manager and see the target partition where the file was flashed.
How to flash a golden image to a USB
Following are the steps to flash a golden image to USB with the help of USBMux:
1 Login to the EBF homepage/Dashboard through a web browser with credentials.
Username : <username>
Password : <password>
2 Select the My Devices option from the Devices drop down list.
3 Go to the My Devices page and verify the MUX mode of the device.
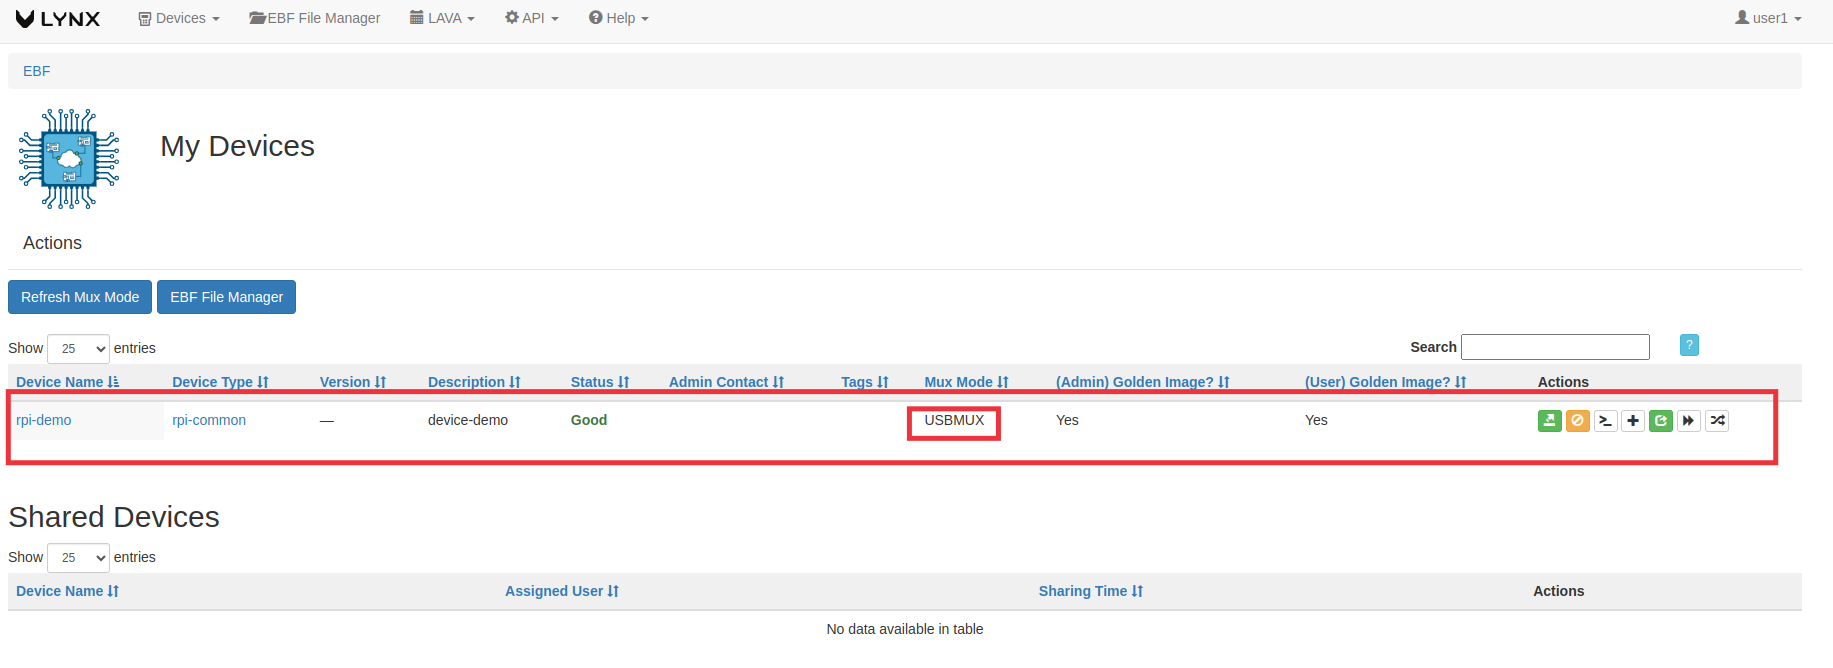
4 Go to the Console page of the device. USBMux option present on the page.
5 To Switch USBMux to the Zombie side, click on the USBMux option in the control panel and on the respective Hotplug port. (As shown in the image below, USBMux and Hotplug1 will turn RED, meaning they are now connected to the Zombie side.)
6 On the Console screen, click on the Boot Media-USB control in the control panel.
7 USB Boot page will appear on the screen showing details of the memory card connected to the target device.
Now flash an image from EBF Server.
From Select file drop-down and choose select from EBF Server.
Now select the desired golden image from the golden boot images to flash into the USB.
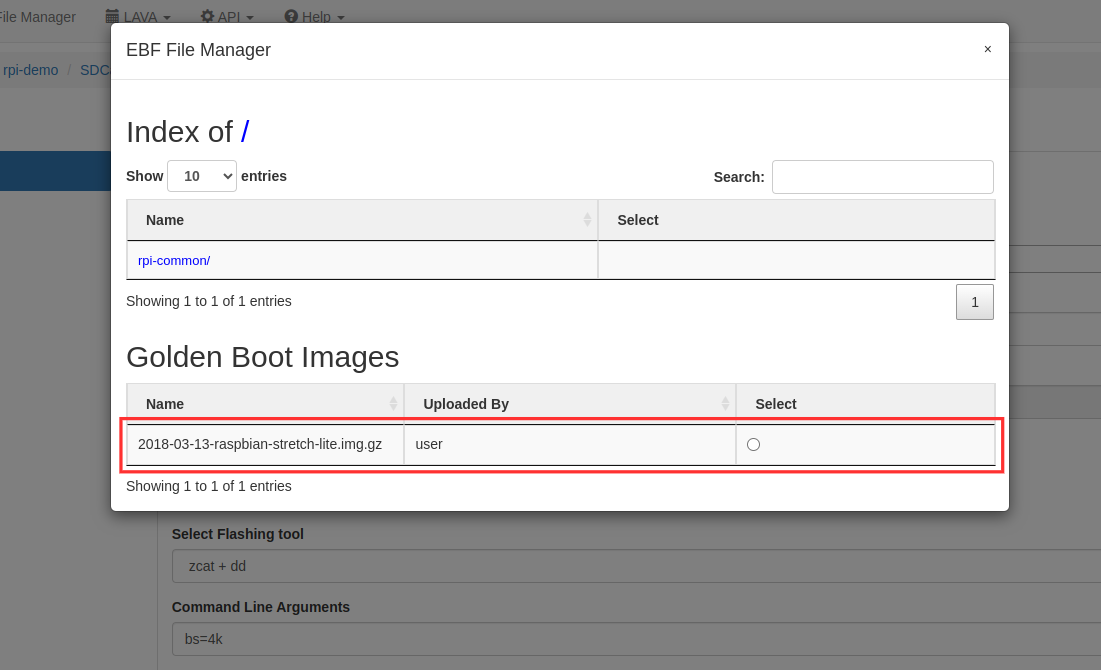
From the USB drop-down menu choose the target partition.
Select flashing tool as per requirement(zcat + dd/gunzip + dd/zstdcat + dd/dd/bmaptool/tar/unzip/cp). If you don’t select, it will be auto-selected according to the file extension of the chosen file.
Give command-line argument if needed.
Now click on the flash file button to flash the image into USB.
During flash the flash status of the image should be visible on the screen.
After successful image upload, select the Launch console button to start the Console session.
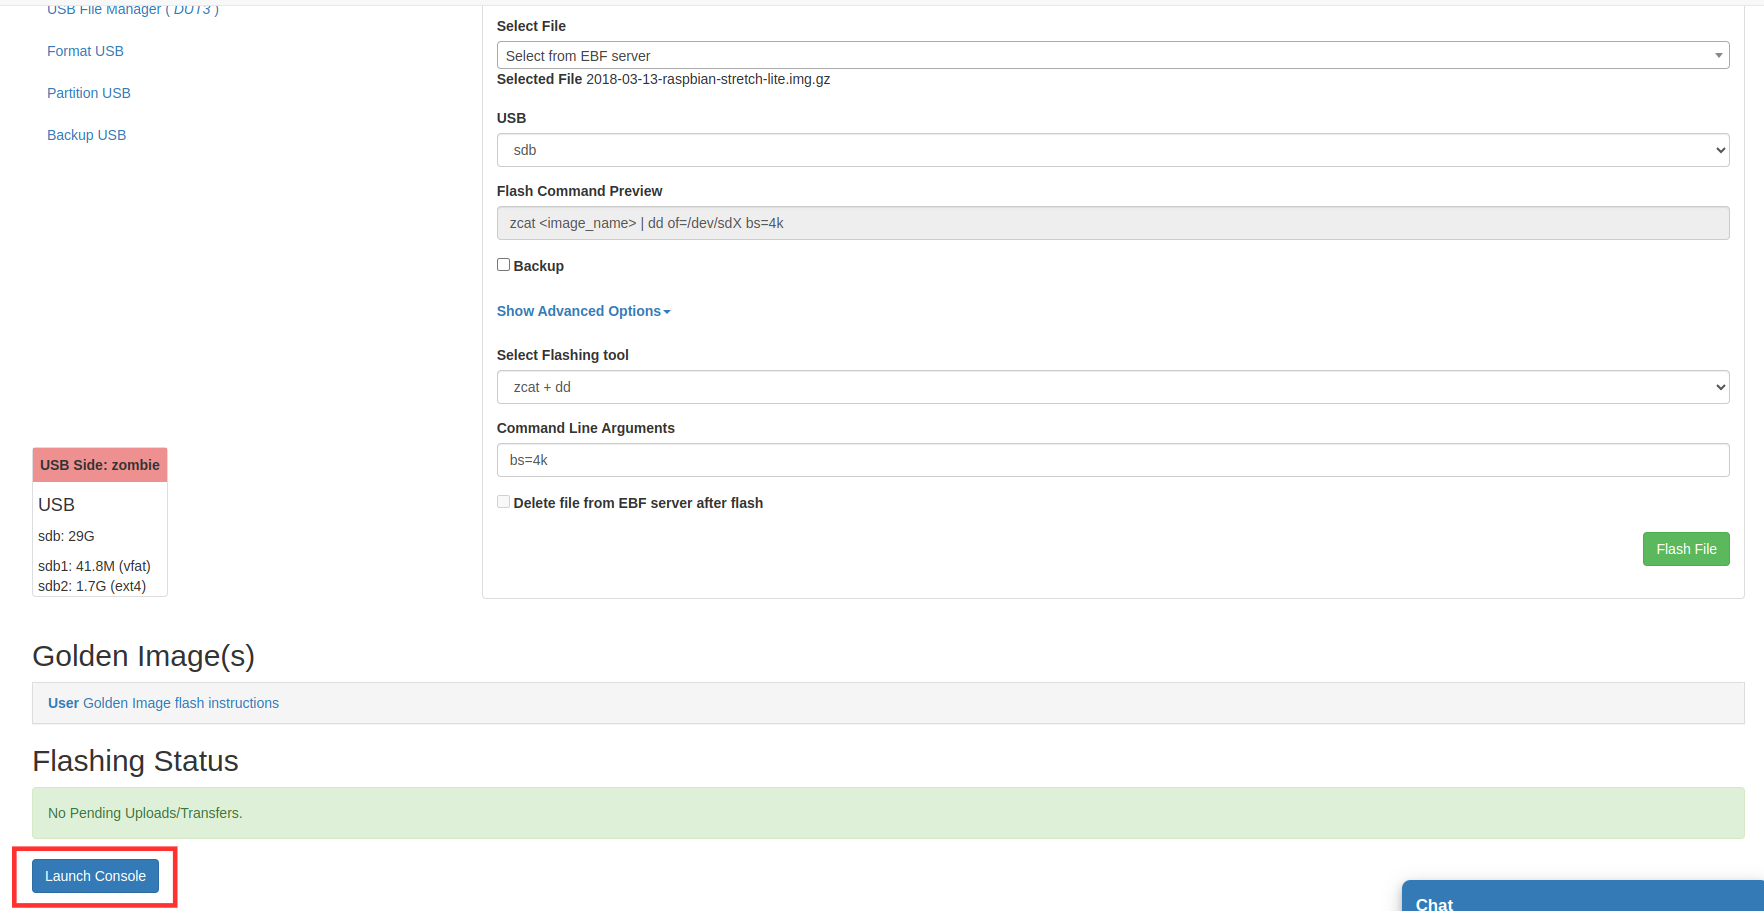
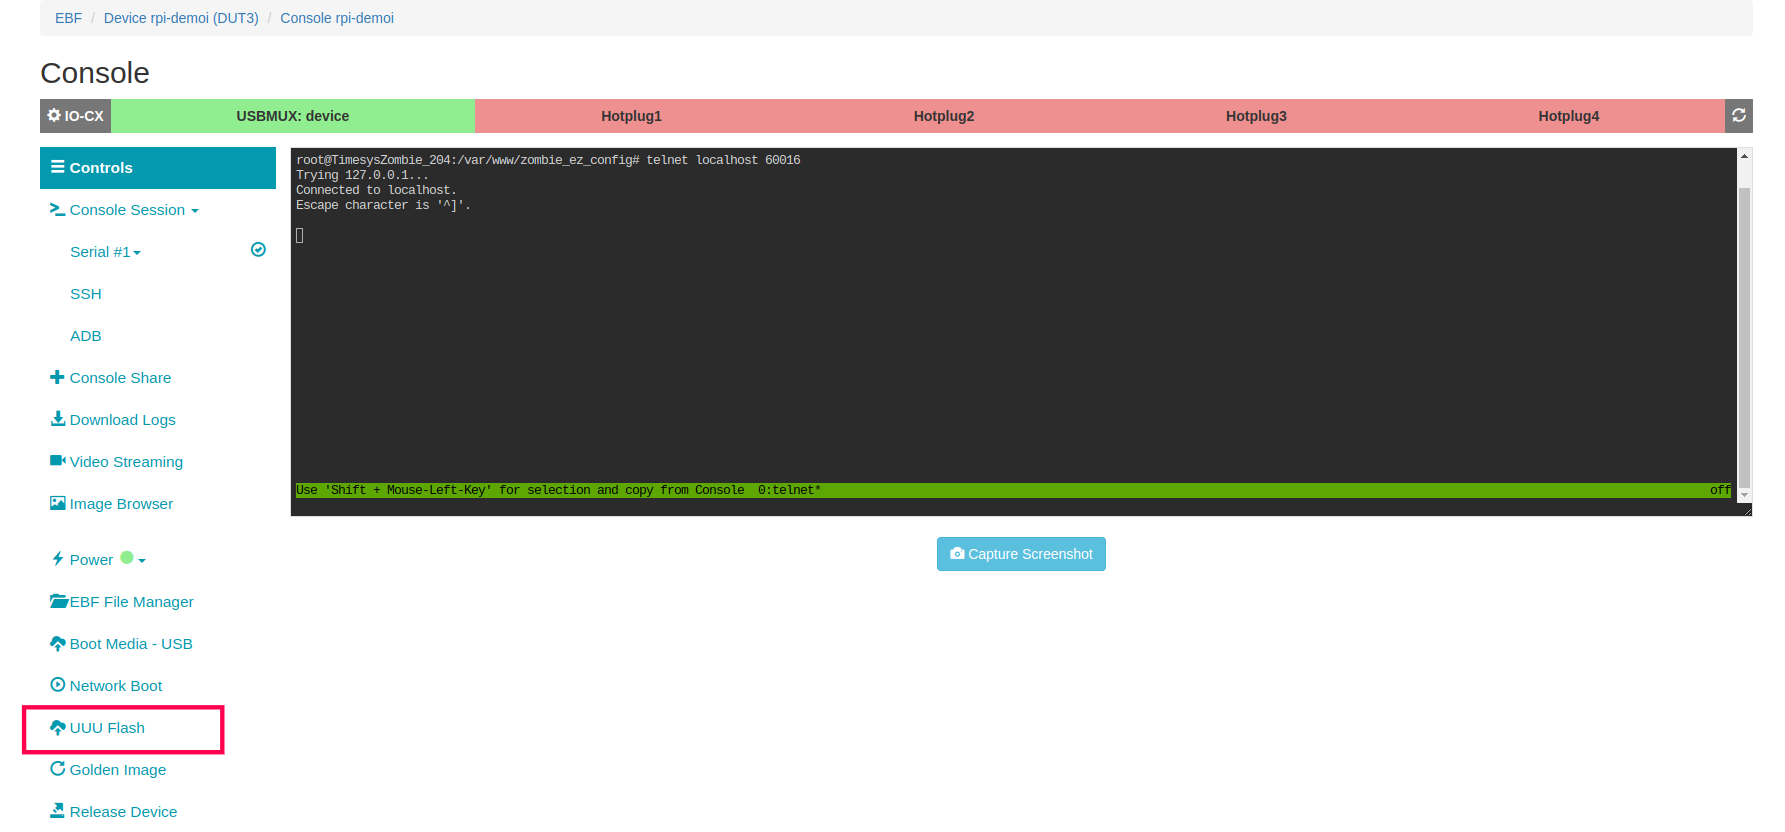
Image flashing using UUU
Following are the steps to flash Image using Uuu:
1 Login to the EBF homepage/Dashboard through a web browser with credentials.
Username : <username>
Password : <password>
2 Select the ‘My Devices’ option from the ‘Devices’ drop-down list.
3 Go to the ‘My Devices’ page and launch the console of the target device.
4 Device console page should be visible on the screen with the UUU Flash option.
5 Now click on the UUU flash option to redirect to the UUU flash page.
6 Select the files to flash.
7 Click on Flash File button to start flashing.
How To Access webcam Live Streaming
How to view USB Web Camera Streaming
1 Launch the console of the target device. user_guide.html#how-to-access-a-device-s-web-console

2 Click on the ‘Video Streaming’ option.
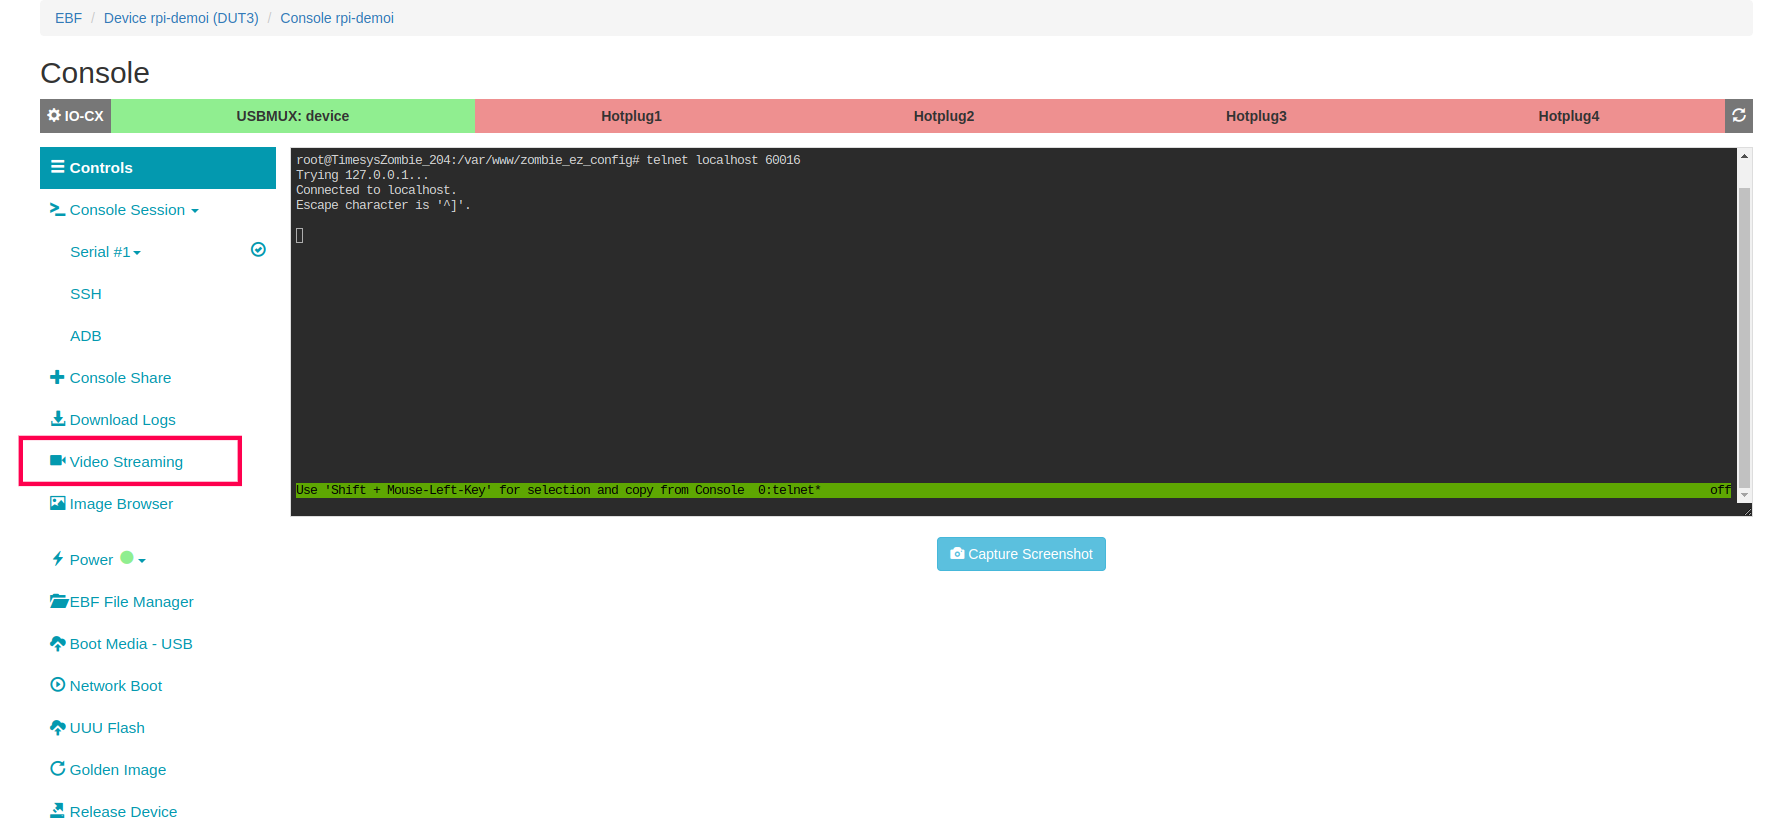
3 After selecting the option, Live Streaming will start on the same page.
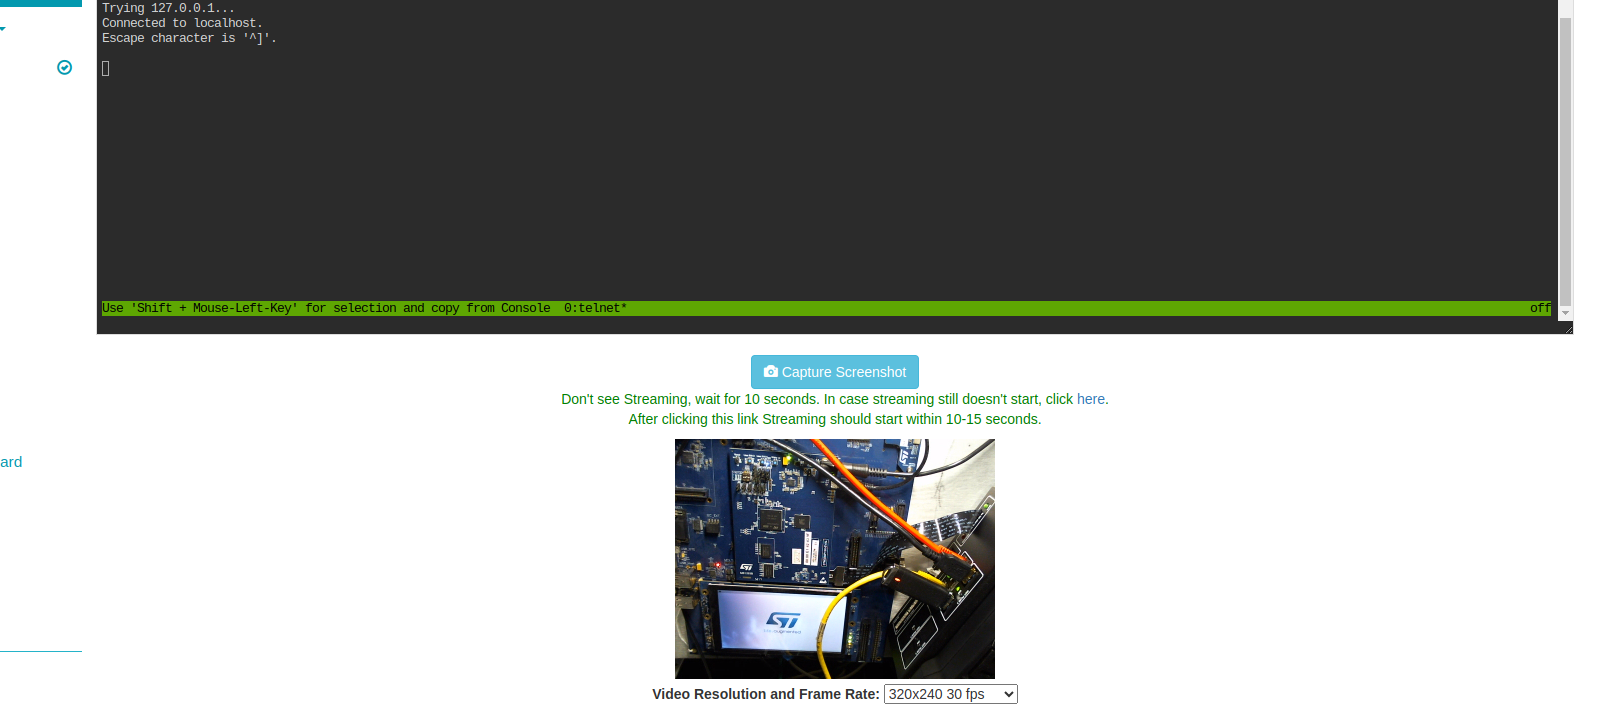
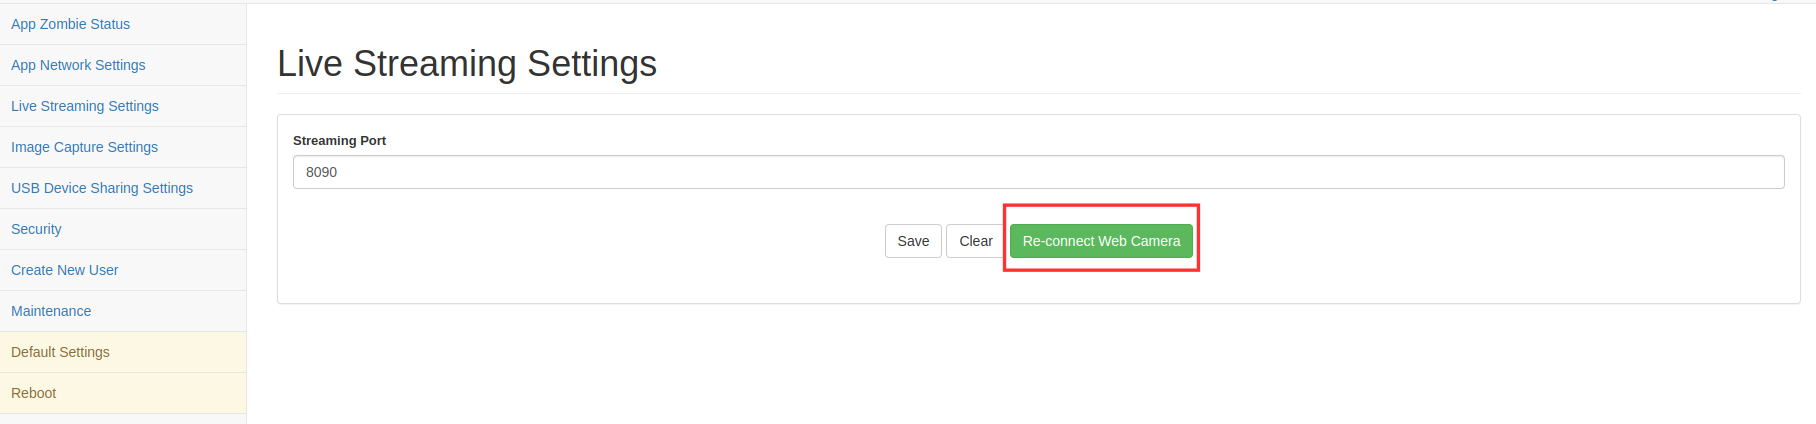
4 Sometimes the webcam couldn’t stream the video; in that case, access the APP Zombie Config and select the Re-connect Web Camera option.
How to Capture an Image from a Webcam
1 Launch the console of the target device. user_guide.html#how-to-access-a-device-s-web-console

2 Click on the Capture Screenshot button.
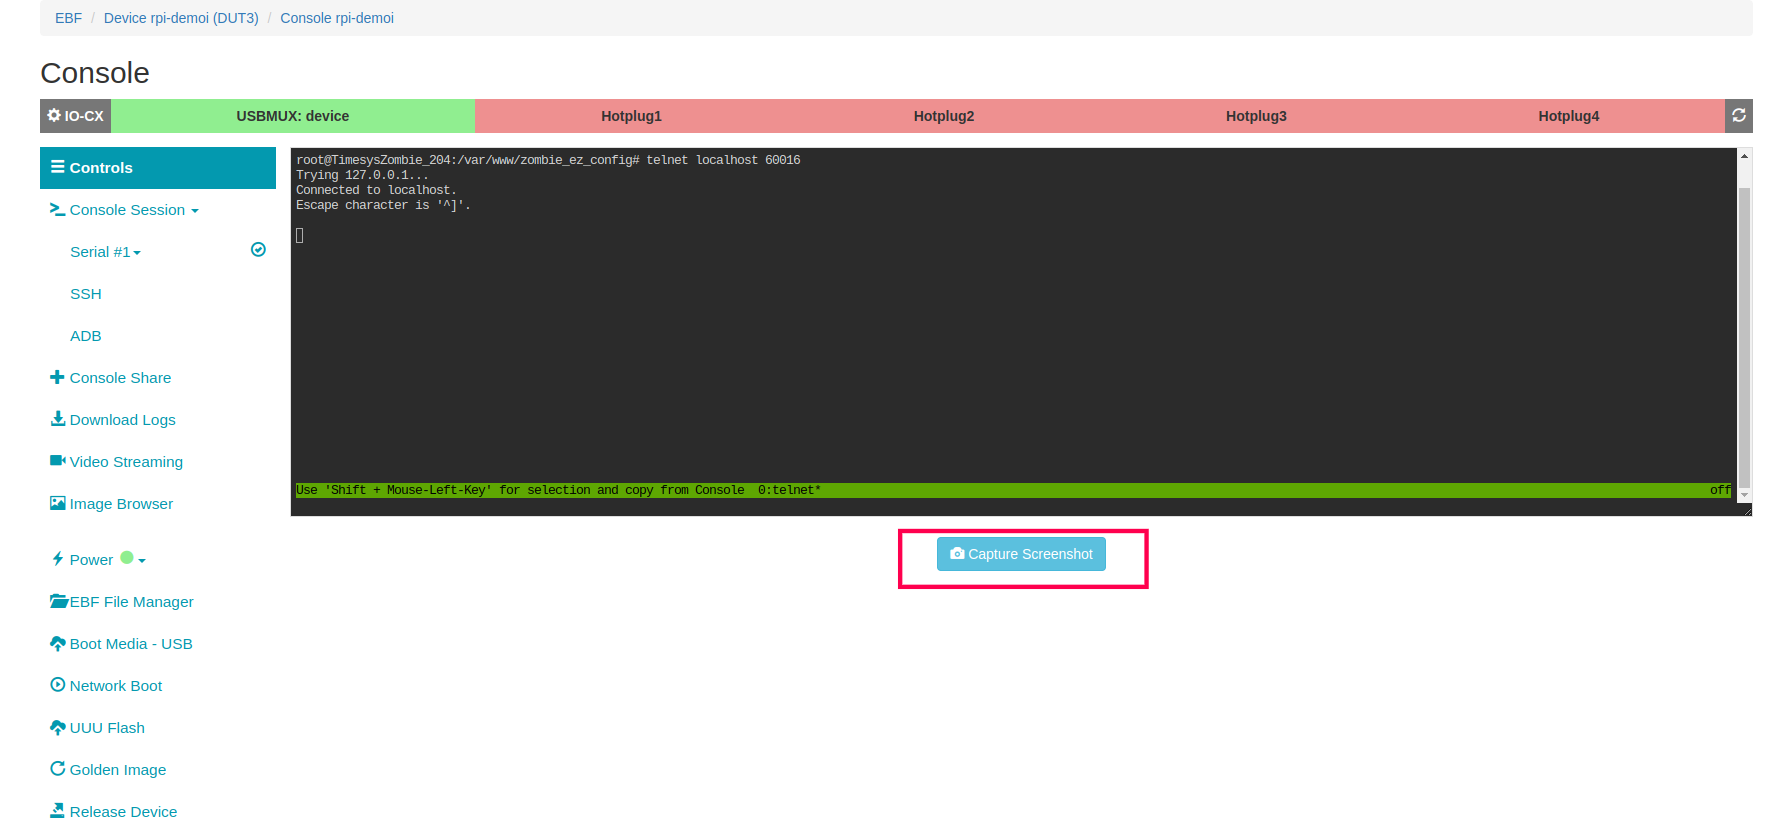
3 Details of the captured image will be shown on the screen. Click on the here link to view the last captured image.

4 To view the list of all captured images, click on the Image Browser option.

How to release Device available on EBF server
Following are the steps to release device access on the EBF server:
1 Login to the EBF homepage/Dashboard through a web browser with credentials.
Username : <username>
Password : <password>
2 EBF Dashboard will appear on the screen. Select the All Devices option from the Devices drop-down list.

3 All Devices page will appear on the screen with a list of all devices on the EBF server. Here both the devices are allocated to user admin and are unavailable for use.
4 Click on the Release icon corresponding to the device which you want to release.
5 Once clicked, the device is released from the last assigned user.
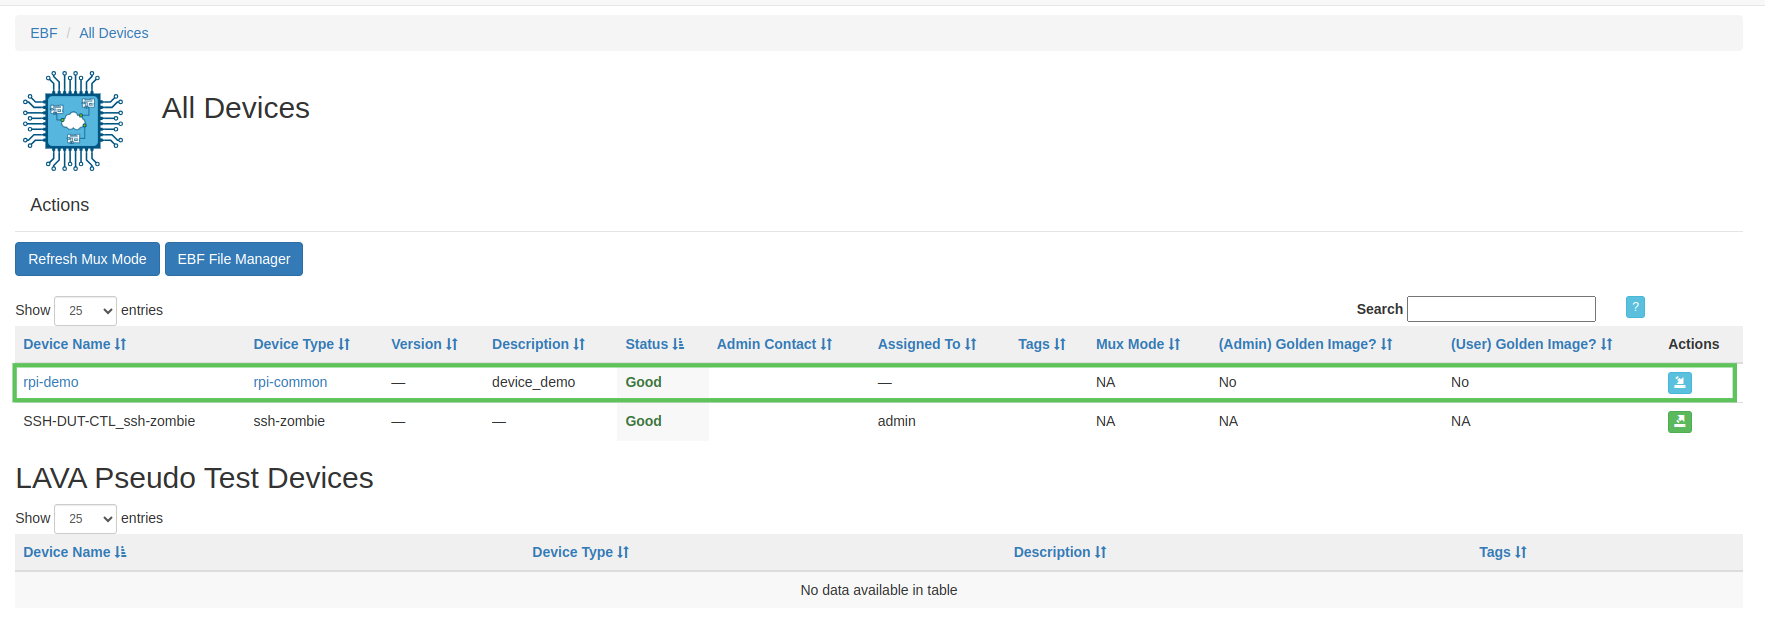
Example: Here admin is the user to whom device rpi-demo was initially allocated for use. Once the Actions tag was selected, the device was released from the admin.
6 Click on the device which was released from the use by the user and on the next page, the user is prohibited from the device’s web console access.
The above steps release the device from use.
OR
If the user is present on the Console page and the device is free from use, the user can release the device with the help of the Release Device button available on the Console page.
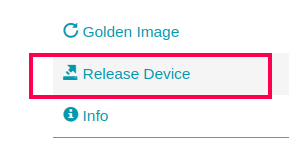
The device is released and free for use for any user. The user can verify for the released device on Devices -> All Devices
Advance Features
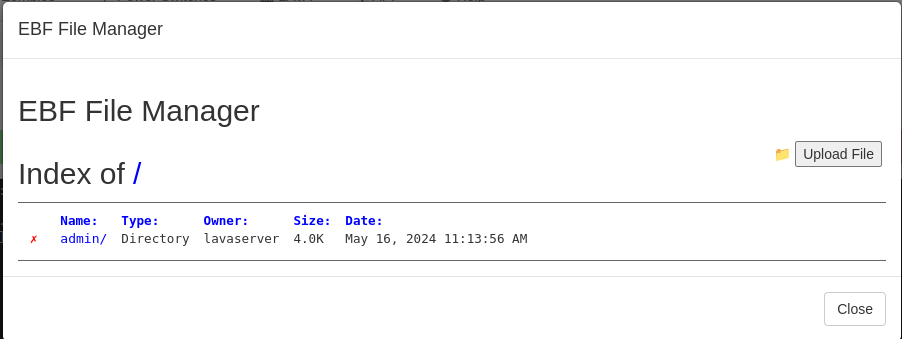
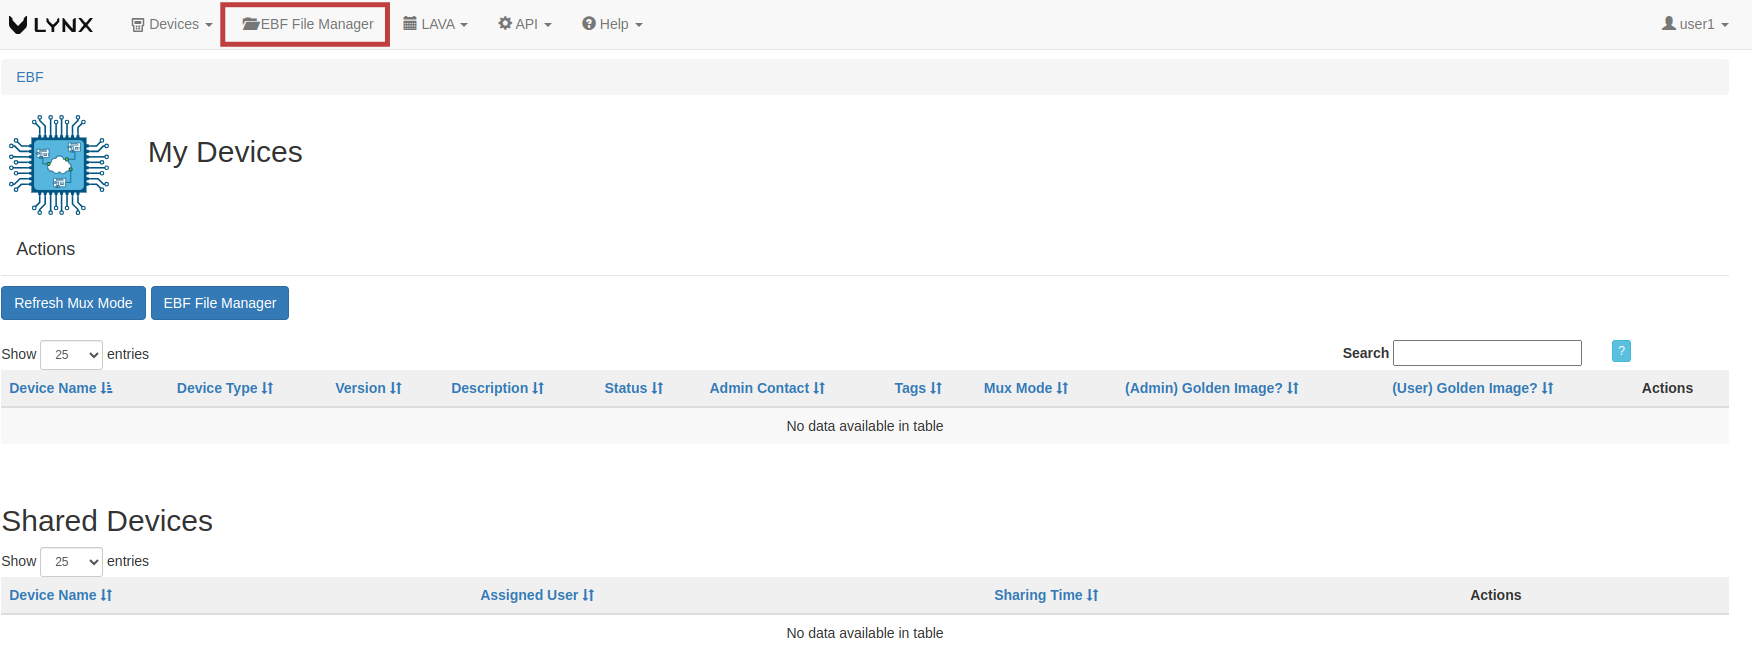
EBF File Manager
User can list all the files that are present on the EBF Server using this interface. Follow the steps below to view this page.
1 Login to the EBF homepage/Dashboard through a web browser with credentials.
Username : <username>
Password : <password>
2 EBF Dashboard will appear on the screen. Select ‘EBF File Manager’ from main menu.
3 EBF File Manager page will be shown on the screen. All the files uploaded on to EBF Server will also be visible on this page.

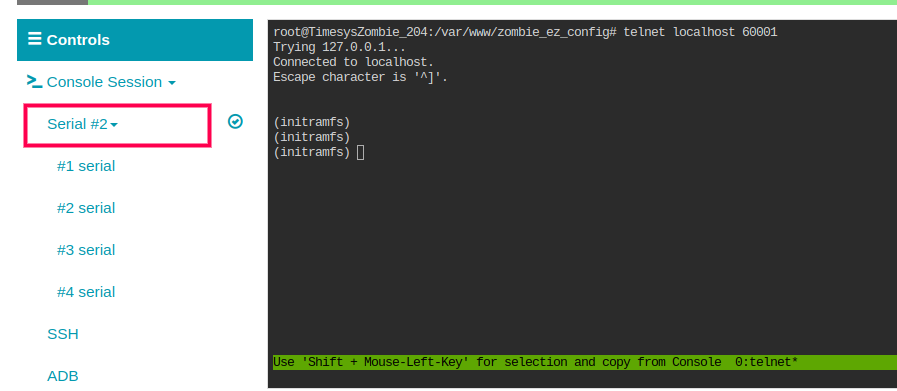
How to Access Multiple Consoles
Following are the steps to access multiple consoles
1 Login to the EBF homepage/Dashboard through a web browser with credentials.
Username : <username>
Password : <password>
2 Select the ‘My Devices’ option from the ‘Devices’ drop-down list.
3 Go to the ‘My Devices’ page and launch the console of the target device.
4 Device console page should be visible on the screen
5 Here we are getting the 1st console. Now click on the serial drop-down menu to get the list of other consoles connected with the device
6 Now select the any other console to get the console of the respective device
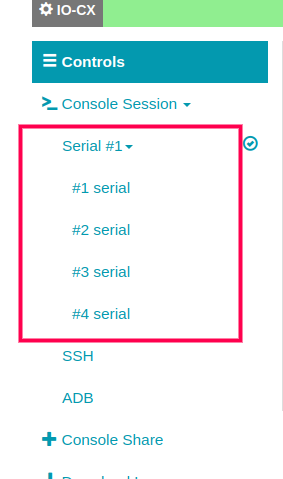
7 After selecting the console you will start getting the console of respective device
EBF APIs
Refer ebf_api_guide.html
EBF-CLI
Refer ebf_cli_guide.html
QNX OS Support
Refer qnx_guide.html
Appendix
How to change your login password
The following are the steps to change the password of the logged-in user:
1 Login to the EBF homepage/Dashboard through a web browser with credentials.
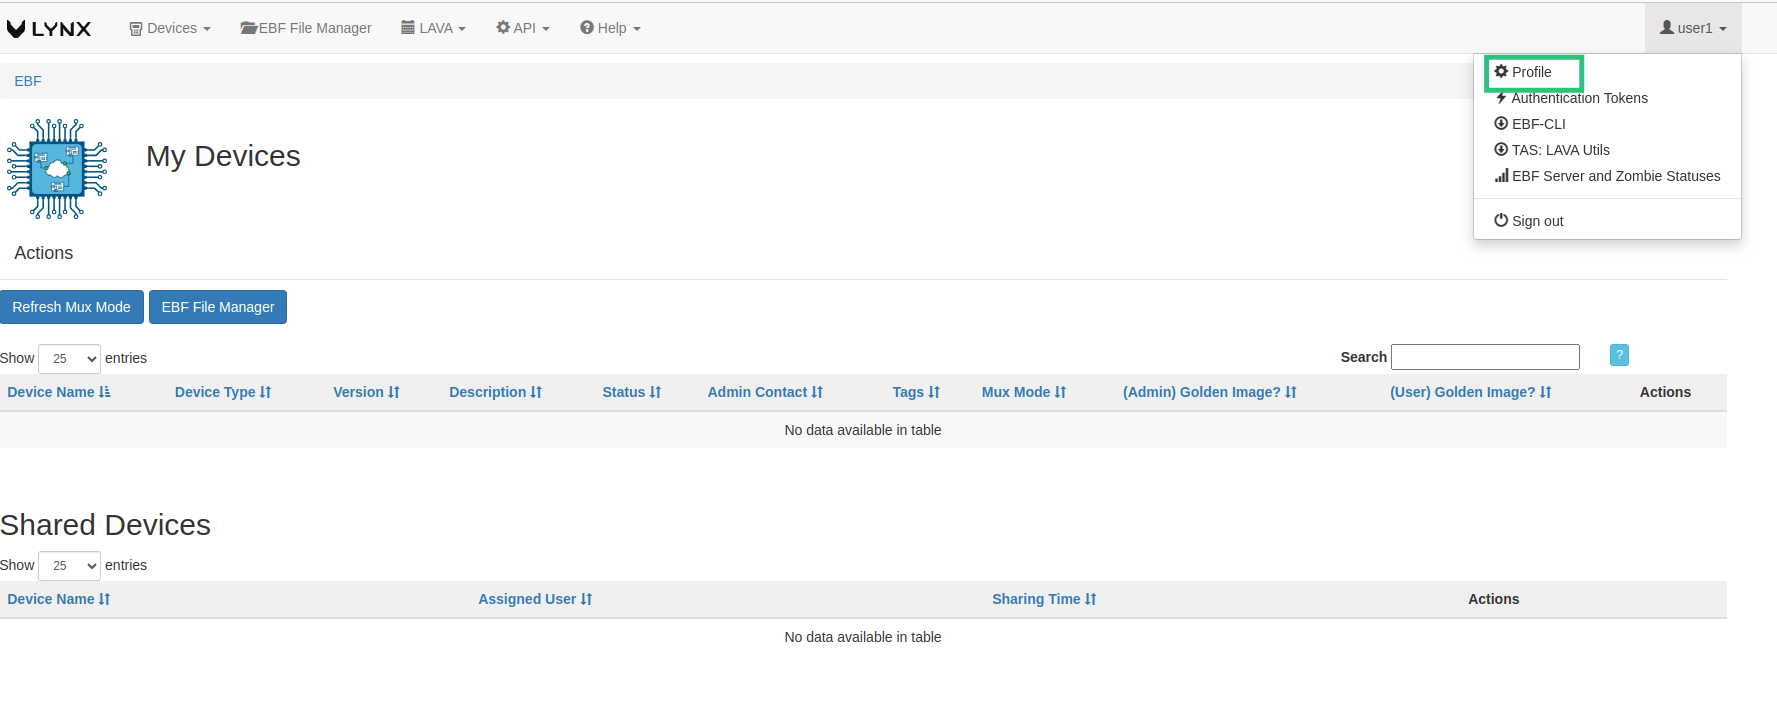
2 Click on your username at the top and click on the ‘Profile’ link.
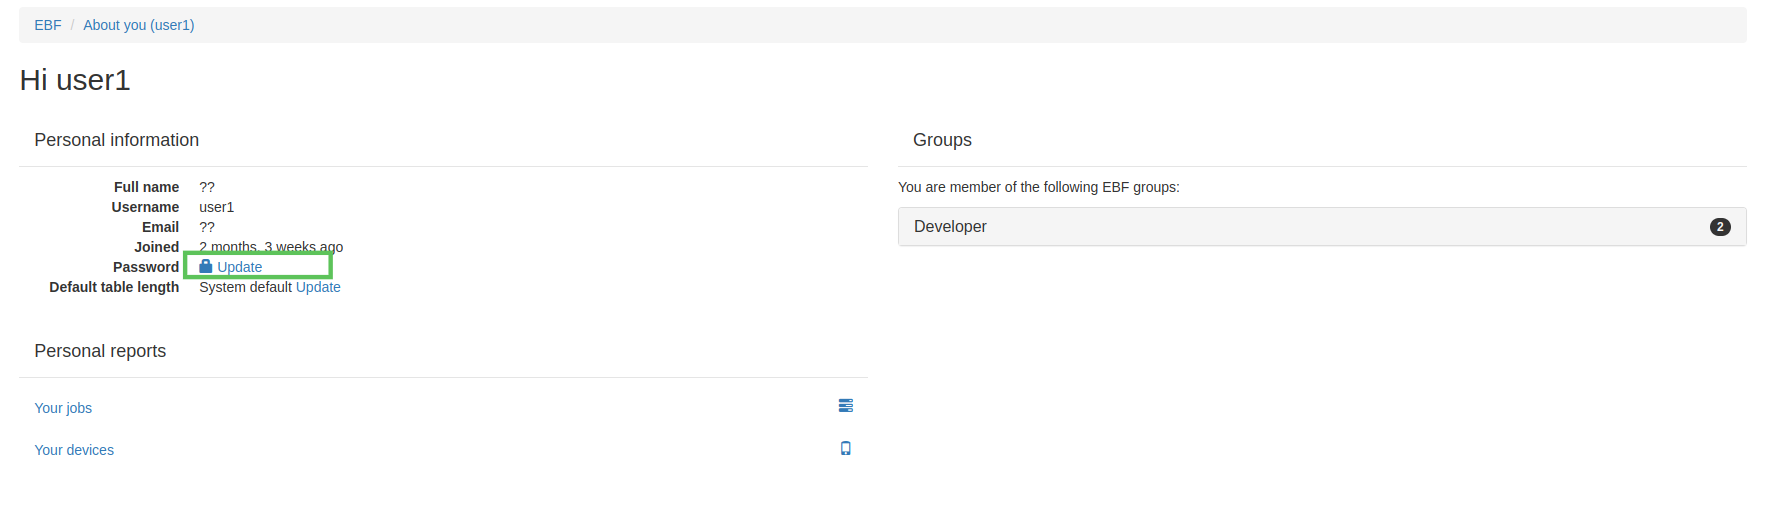
3 The user’s profile details will be shown on the screen. Now click on the ‘update’ link.
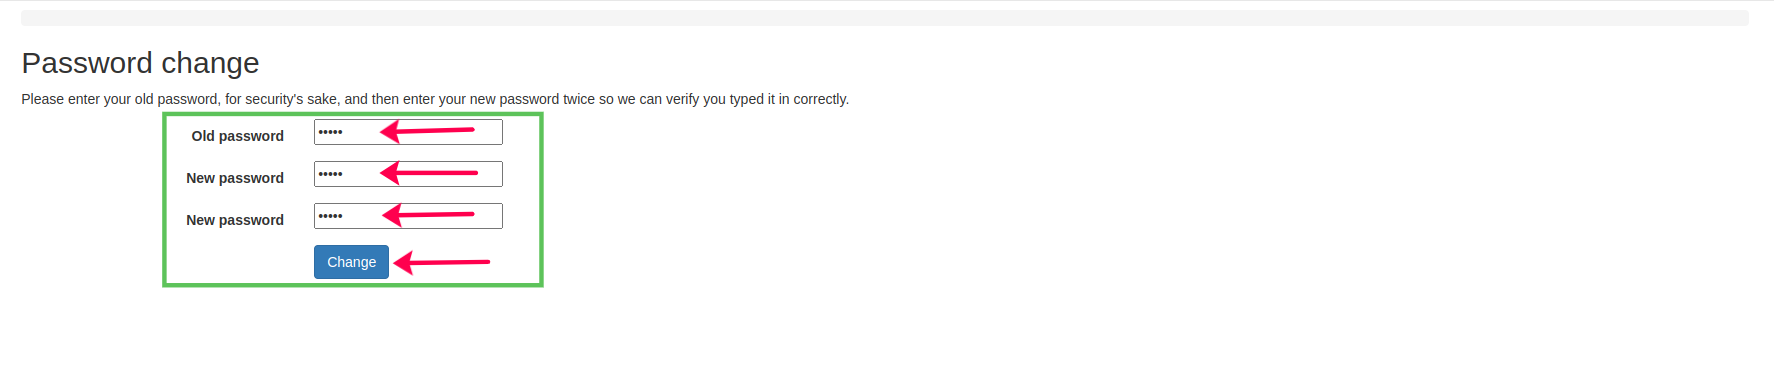
4 Enter the details and click on the ‘Change’ button to apply changes.
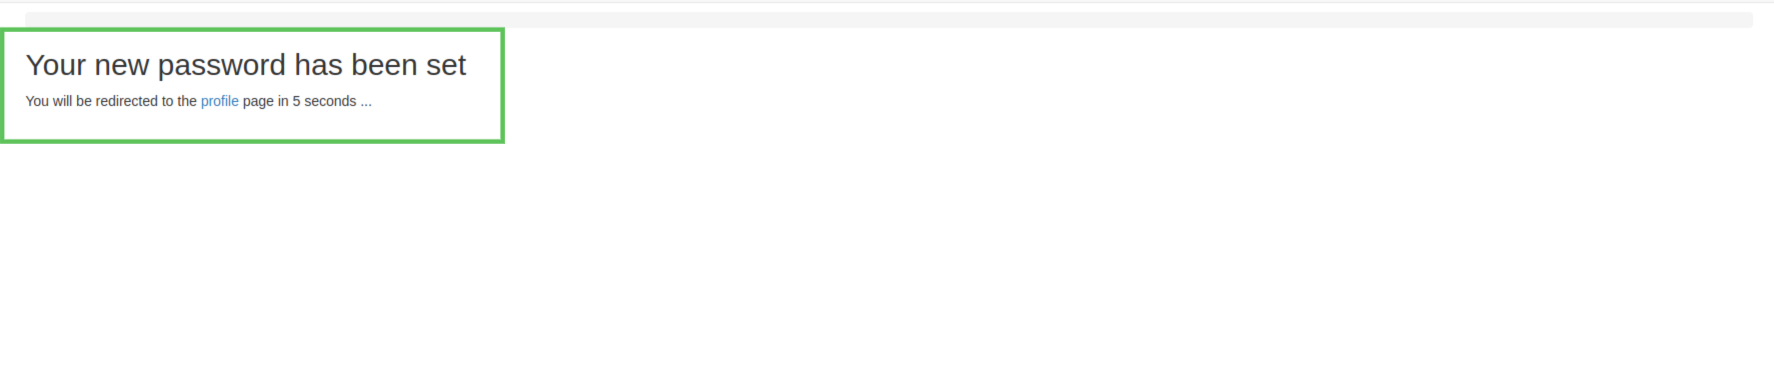
5 A confirmation message is shown on the screen regarding a successful password update.
Troubleshooting
Unable to Network Boot the device
Go to the device’s console and follow these steps to troubleshoot the Network boot issue.
1 Check if the device’s U-Boot supports Network mount (nfs-mount).
If yes, proceed to the next step.
If not, upgrade u-boot.
2 Check if nfs-utils is installed on the device. Run the following command and observe its output:
mount -t nfs ZombieIP:/directory /mnt
3 Follow the steps below for the observed outputs.
nfs-utils: command not found: It means that nfs-utils is not installed on the device.
There are 2 ways to install nfs-utils on the device:
If the device supports apt-get, go to the device’s console and run the following command:
apt-get install nfs-common
OR
Build a new BSP for the device containing nfs-utils.
No route to host: This can be caused by the RPC messages being filtered by either the host firewall, the client firewall, or a network switch. Verify if a firewall is active and if NFS traffic is allowed. As a quick test, one can switch the firewall off by:
service iptables stop
On both the client and the server. Try mounting the NFS directory again. Do not forget to switch it back on and configure it correctly to allow NFS traffic/
mount clntudp_create: RPC: Port mapper failure – RPC: Unable to receive: Make sure that both the NFS service and the portmapper (RPC) service are running on both the client and the server. Check it like this:
$ rpcinfo -p
$ service portmap status
$ portmap (pid 7428) is running...   [portmap service is started.]
If not, start it with the commands give below.
$ chkconfig portmap on
$ service portmap start