TAS User Guide
How to Create Test case
Following are the steps to create user defined test cases:
1 Login to EBF-TAS dashboard through web browser with your credentials.
Username : <username>
Password : <password>
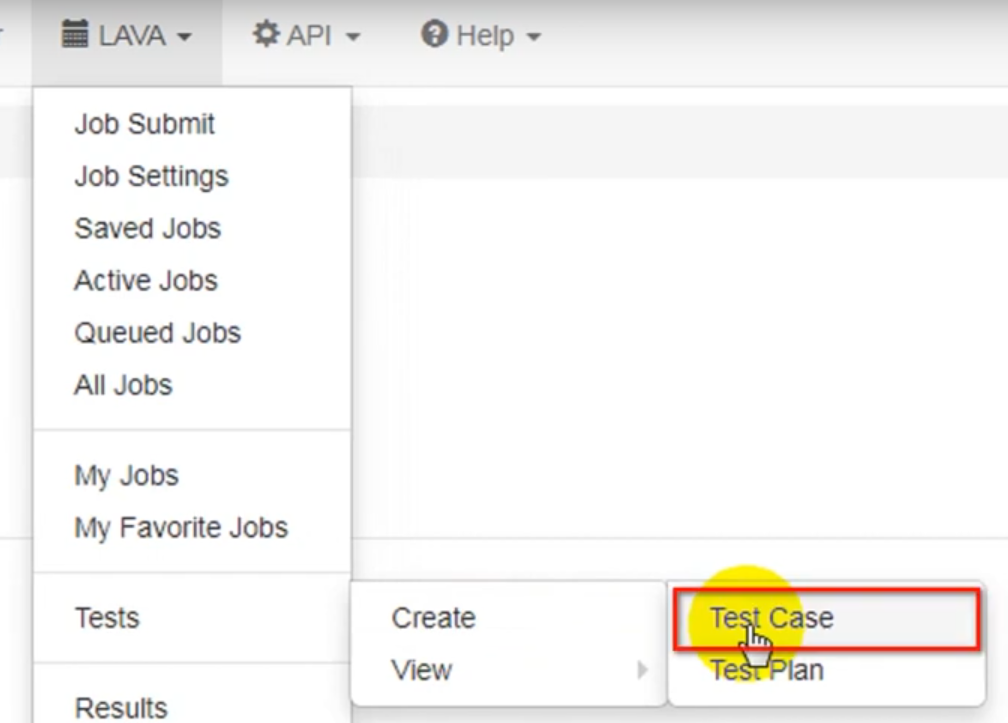
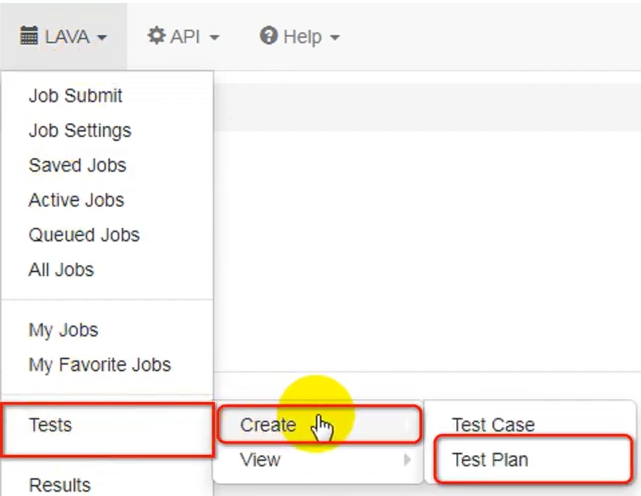
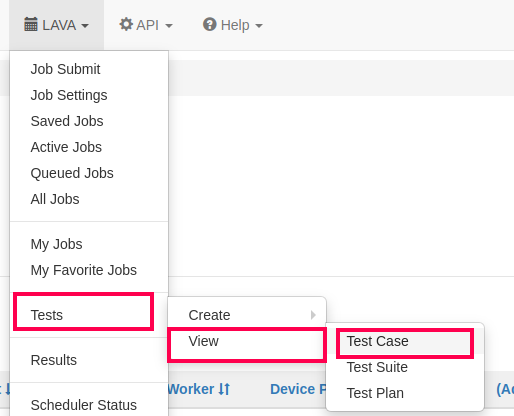
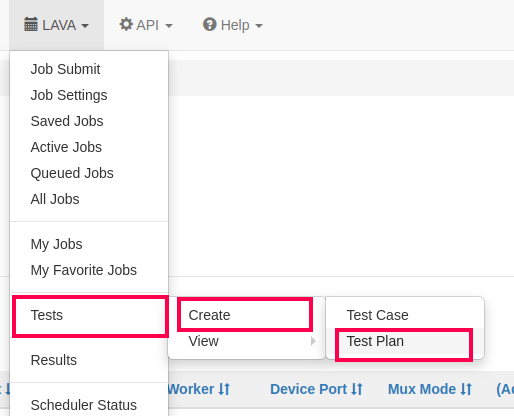
2 Go to Lava-> Tests -> Create -> Test Case.
3 Create Test Case page will appear on the screen.
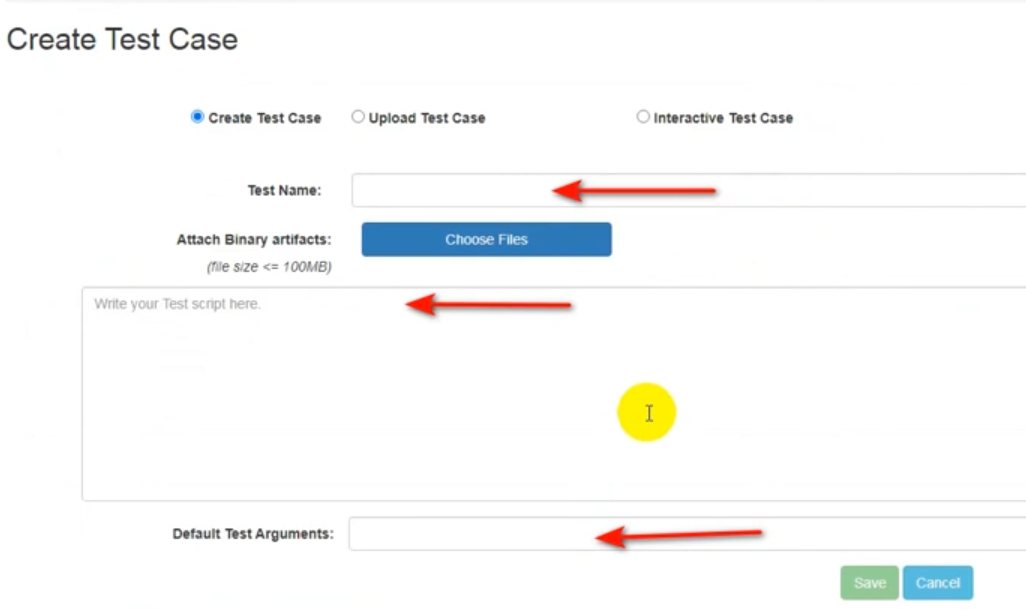
Fill the necessary fields
Test Name: <Suitable Test name for test case>.
Default Test arguments: Enter default test arguments for test case.
Test Case Types: Five types of test cases are created as follows.
After Creating Test case, click on Save button.

For Reference, Here is a Sample Shell Script that works:
#!/bin/sh

CPU=$1

if [ -z "$CPU" ]; then
    CPU=0
fi

CPUFREQDIR=/sys/bus/cpu/devices/cpu$CPU/cpufreq/

if ! [ -d "$CPUFREQDIR" ]; then
    echo "CPU Frequency Scaling is not available for this processor!"
    exit 1
fi

MINFREQ=$(cat ${CPUFREQDIR}/cpuinfo_min_freq)
MAXFREQ=$(cat ${CPUFREQDIR}/cpuinfo_max_freq)
GOVERNERS=$(cat ${CPUFREQDIR}/scaling_available_governors)
FREQUENCIES=$(cat ${CPUFREQDIR}/scaling_available_frequencies)

CURGOVFILE=${CPUFREQDIR}/scaling_governor
CURFREQFILE=${CPUFREQDIR}/scaling_cur_freq
SETFREQFILE=${CPUFREQDIR}/scaling_setspeed

TESTFILE=/tmp/testfile.dat
TESTFILESIZE=16

dd if=/dev/urandom of=$TESTFILE bs=1M count=$TESTFILESIZE > /dev/null 2>&1

echo "Testing CPU Frequency on CPU$CPU"
echo "  Available Governers: $GOVERNERS"
echo "  Available Frequencies: $FREQUENCIES"
echo ""

# Test manual frequency setting (if supported)
if [[ "$(cat $SETFREQFILE)" != "<unsupported>" ]]; then
    echo "Manual Set Speed Tests"
    echo "======================"
    for freq in $FREQUENCIES; do
        echo $freq > $SEThttp://dpal5.timesys.com/files//images/FREQFILE
        if [[ "$(cat $CURFREQFILE)" != "$freq" ]]; then
            echo "Set frequency to $freq failed"
            continue
        fi
        echo "Running at $freq Hz"
        time md5sum $TESTFILE
    done
else
    echo "Skipping Manual Set Speed Tests (unsupported feature)"
fi

echo ""
echo "Governer Tests"
echo "=============="

for gov in $GOVERNERS; do
    echo $gov > $CURGOVFILE
    if [[ "$(cat $CURGOVFILE)" != "$gov" ]]; then
        echo "Set Governer to $gov failed"
        continue
    fi
    echo "Governer: $gov"
    sleep 2 # Give system some time to adjust to new governer
    echo "    Unloaded speed: $(cat $CURFREQFILE)"
    (time md5sum $TESTFILE > /dev/null) &> /tmp/testspeed.txt
    echo "    Loaded speed: $(cat $CURFREQFILE)"
    cat /tmp/testspeed.txt
    rm /tmp/testspeed.txt
    echo ""
done

rm $TESTFILE
Save-As Test Case
Following are the steps to Create a copy of an existing User defined test case:
1 Login to EBF-TAS dashboard through web browser with your credentials
Username : <username>
Password : <password>
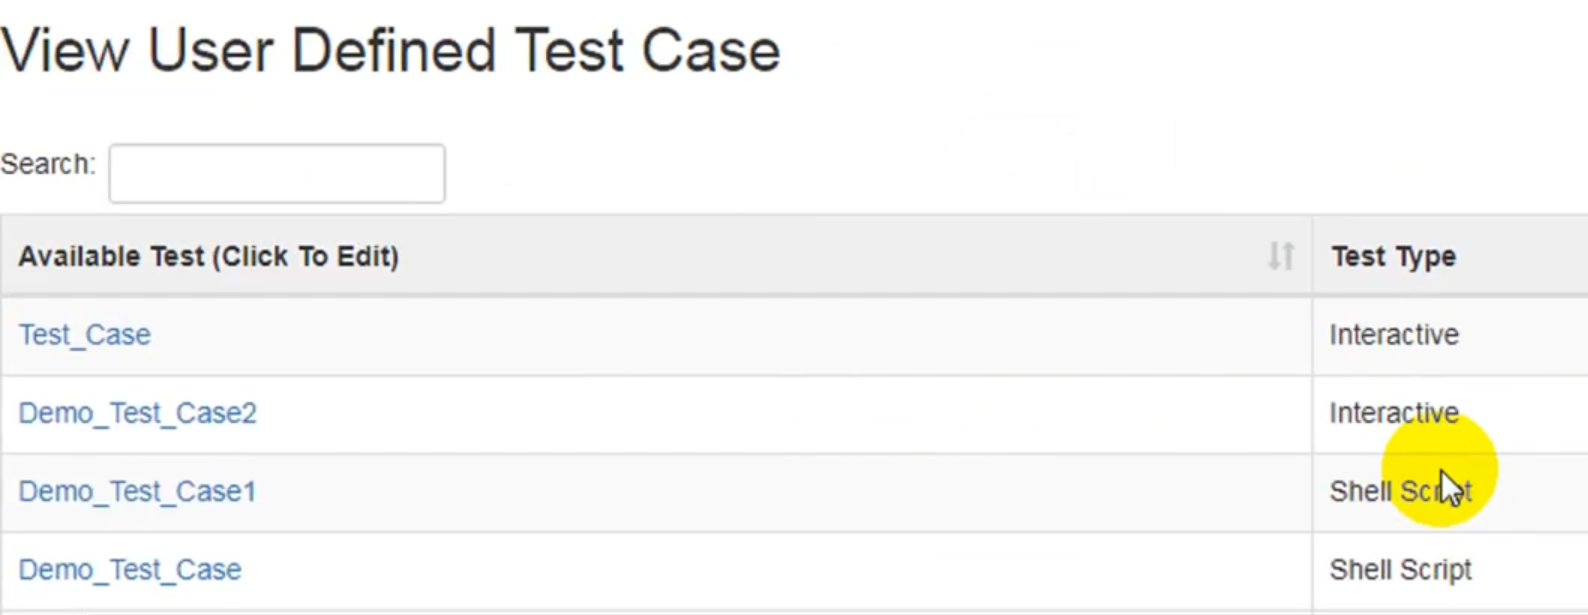
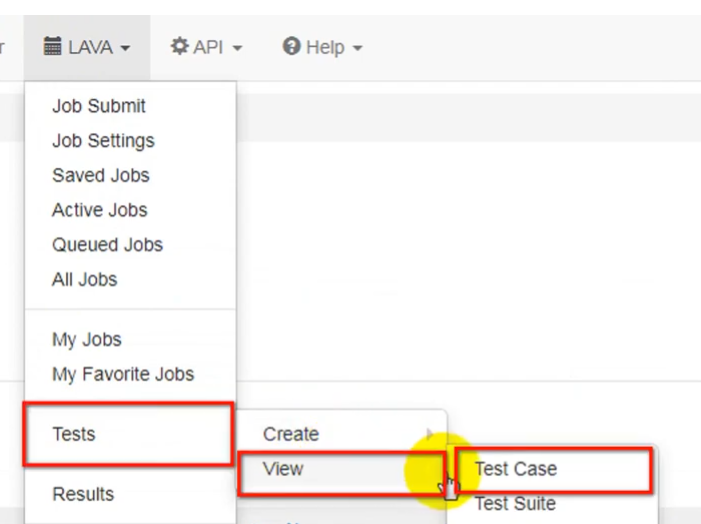
2 Go to Lava -> Select view -> Test Case option from ‘Tests’ drop down list as shown:
3 View Test Case page will appear on the screen.
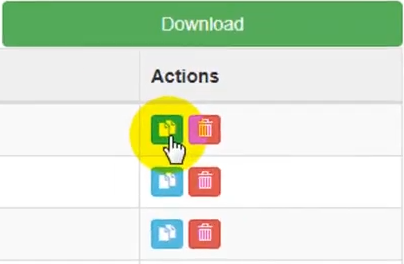
4 User can create a duplicate copy of any existing test case by clicking on ‘Copy As’ action.
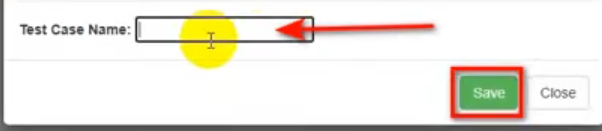
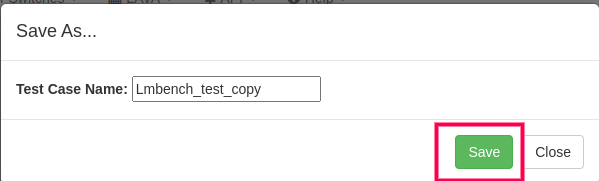
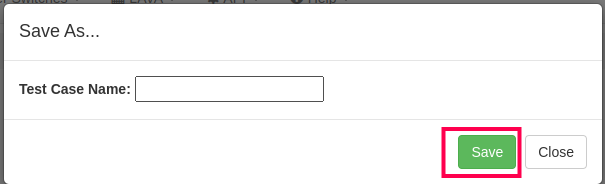
5 Input the name of the Test Case of your choice on the pop up window. And click on ‘Save’ button.
6 The newly copied Test Case is generated and saved with a new name.

How to Create Test Plan
Following are the steps to Create User defined test plan:
1 Login to EBF-TAS dashboard through web browser with your credentials
Username : <username>
Password : <password>
2 Go to Lava-> Select Create -> Test Plan option from ‘Tests’ drop down list as shown:
3 Create Test Plan page will appear on the screen.
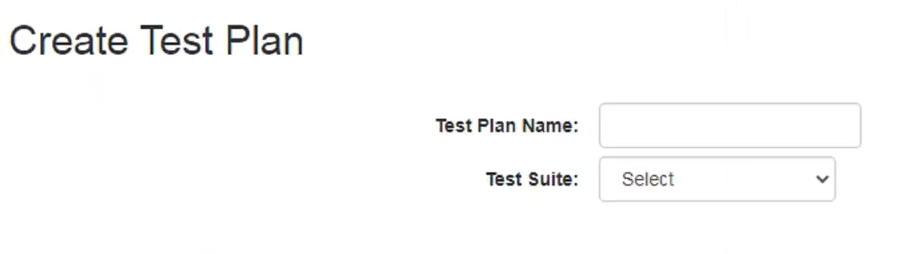
4 Fill the necessary fields:
Test Name: <Suitable name for test plan>
Select any Test Suite from the dropdown. Here, User Defined Tests have been selected from the dropdown for reference.

From the ‘Show Interactive Tests’ dropdown, chose option YES to get the list of all Interactive Tests
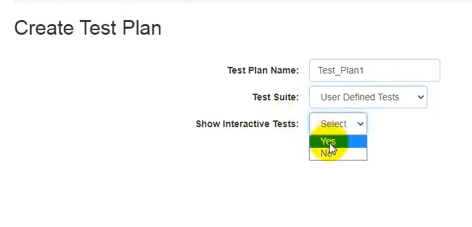
OR Chose option NO to view other Tests.
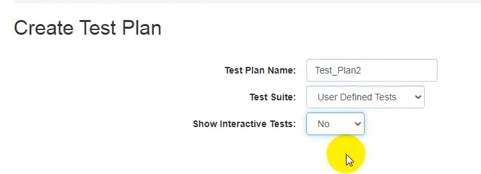
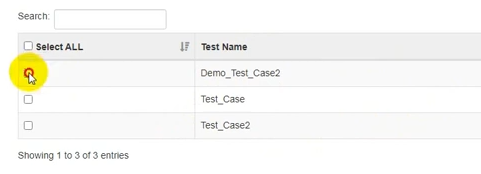
All tests available in the selected criteria will be displayed on the screen. Tick the checkbox in first column of the respective Test to include it in the test plan.
Edit the Arguments (optional) of any Test Suite.
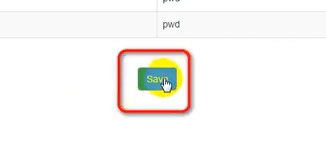
5 After selecting desired packages and arguments, click on ‘Save’ button.
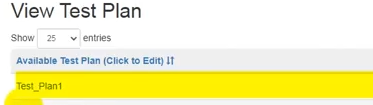
6 Newly created test plan name will be listed on the screen, as highlighted in image below:
7 User can create a duplicate copy of any existing test plan by clicking on ‘Copy As’ action.
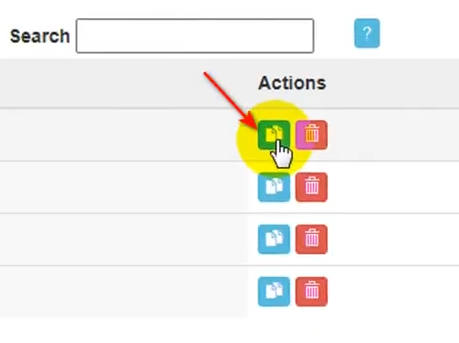
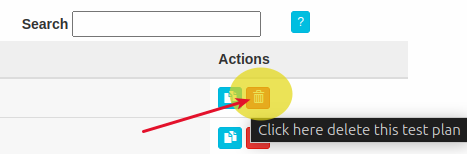
8 User may delete Test Plan by clicking on ‘Delete’ action.
Save-As Test Plan
Following are the steps to Create a copy of an existing User defined test plan:
1 Login to EBF-TAS dashboard through web browser with your credentials
Username : <username>
Password : <password>
2 Click on ‘Tests’ menu option, then on ‘View’, and then click on ‘Test Plan’.
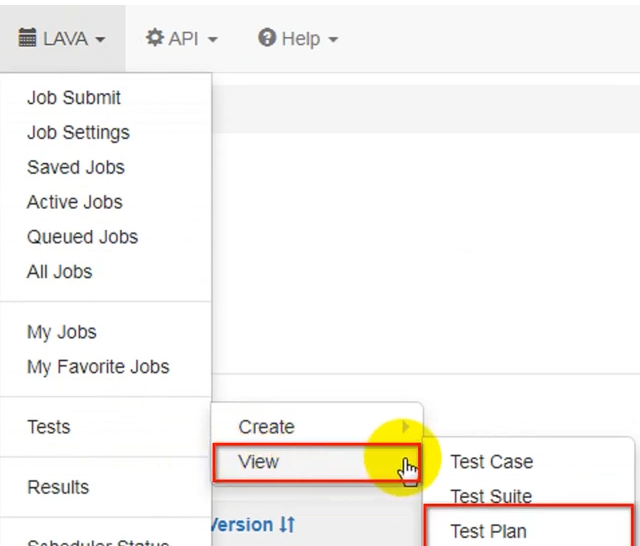
3 User can create a duplicate copy of any existing test plan by clicking on ‘Copy As’ action.
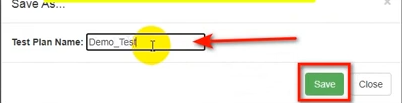
4 Input the name of the Test Plan of your choice on the pop up window. And click on ‘Save’ button.
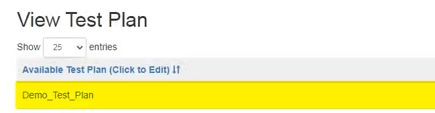
5 The newly copied Test Plan is generated and saved with a new name.
How to View Test case
Following are the steps to view user defined tests
1 Login to EBF-TAS dashboard through web browser with your credentials
Username : <username>
Password : <password>
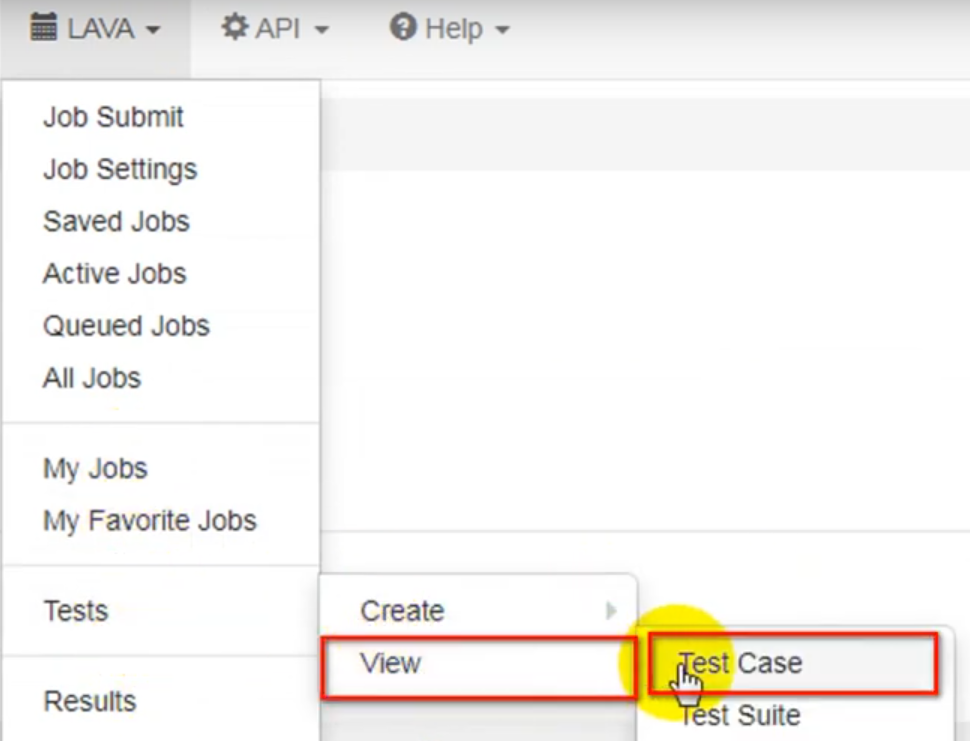
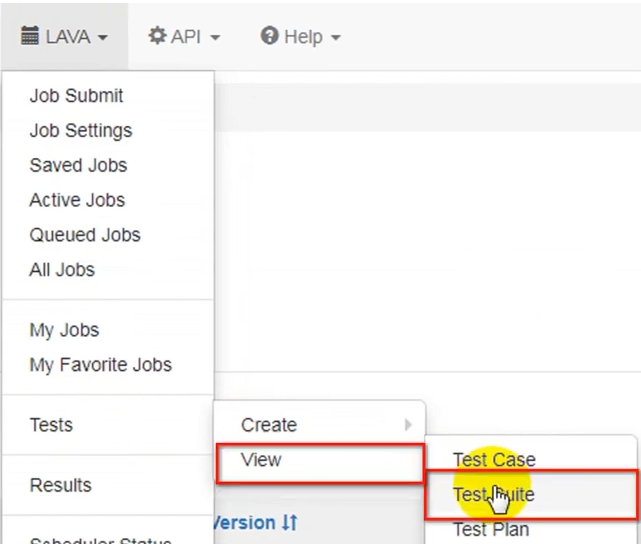
2 Select View -> Test Case option from ‘Tests’ drop down list as shown:
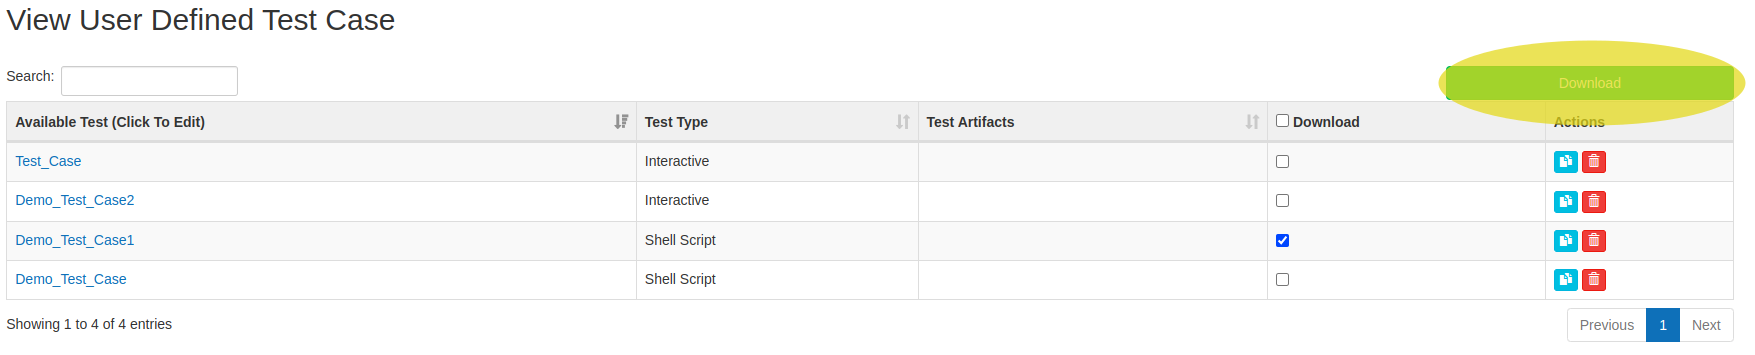
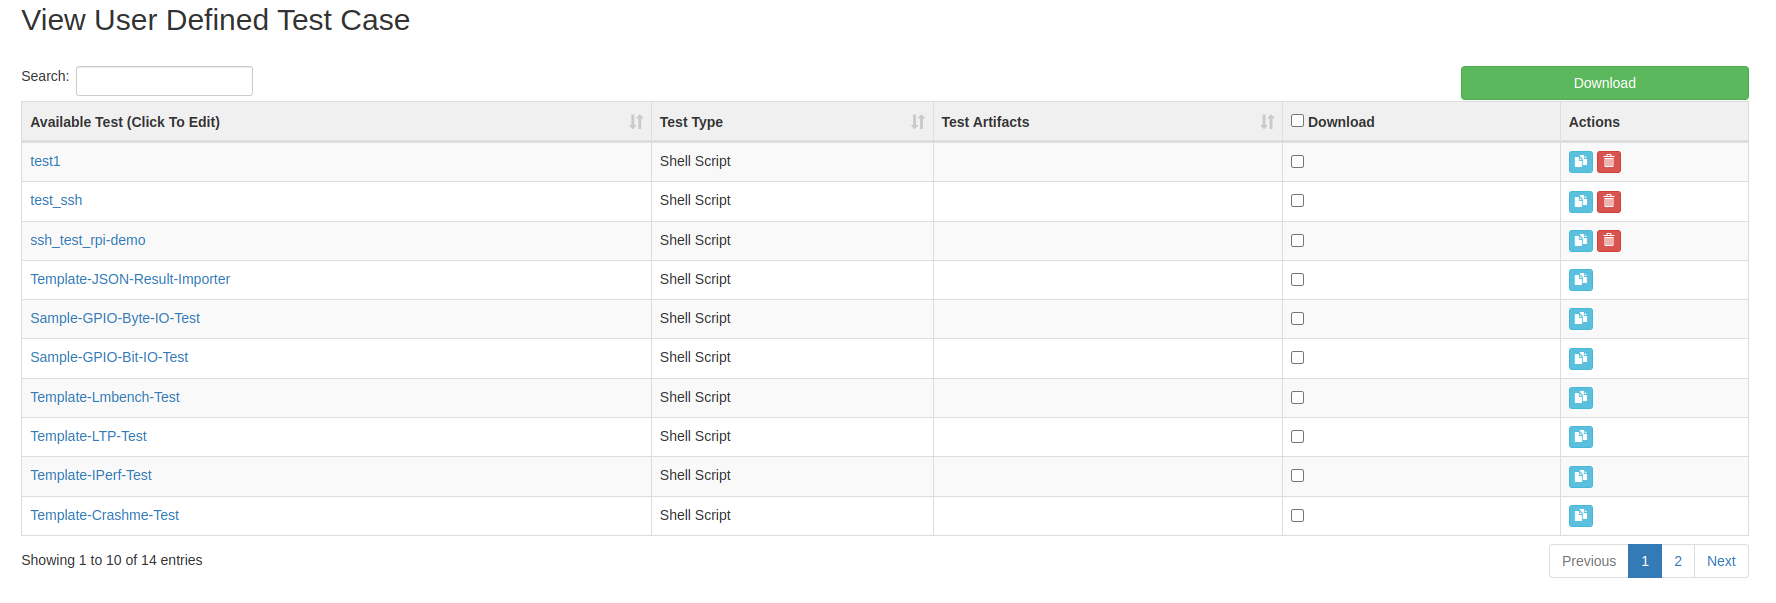
3 View Test Case page will appear on the screen.
4 Select Download checkbox corresponding to the test that you want to download. Then click on “Download” button as shown in image.
5 The user can edit the test case by clicking on the test case name available on the screen.
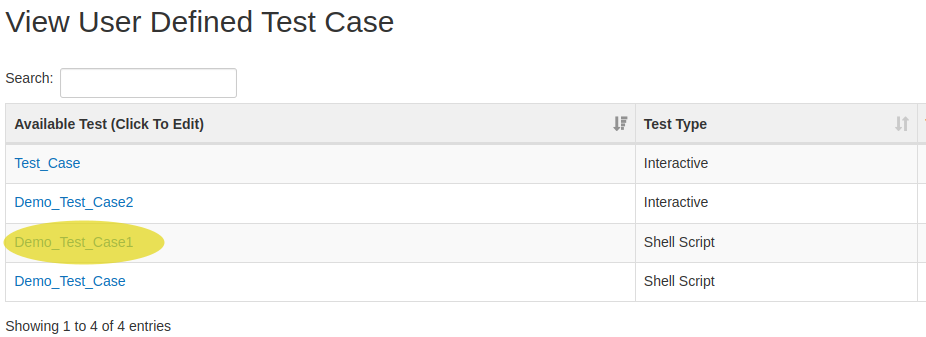
6 After selecting the test case, user is directed to Edit Test Case page. Edit the test case details and click on Update button.
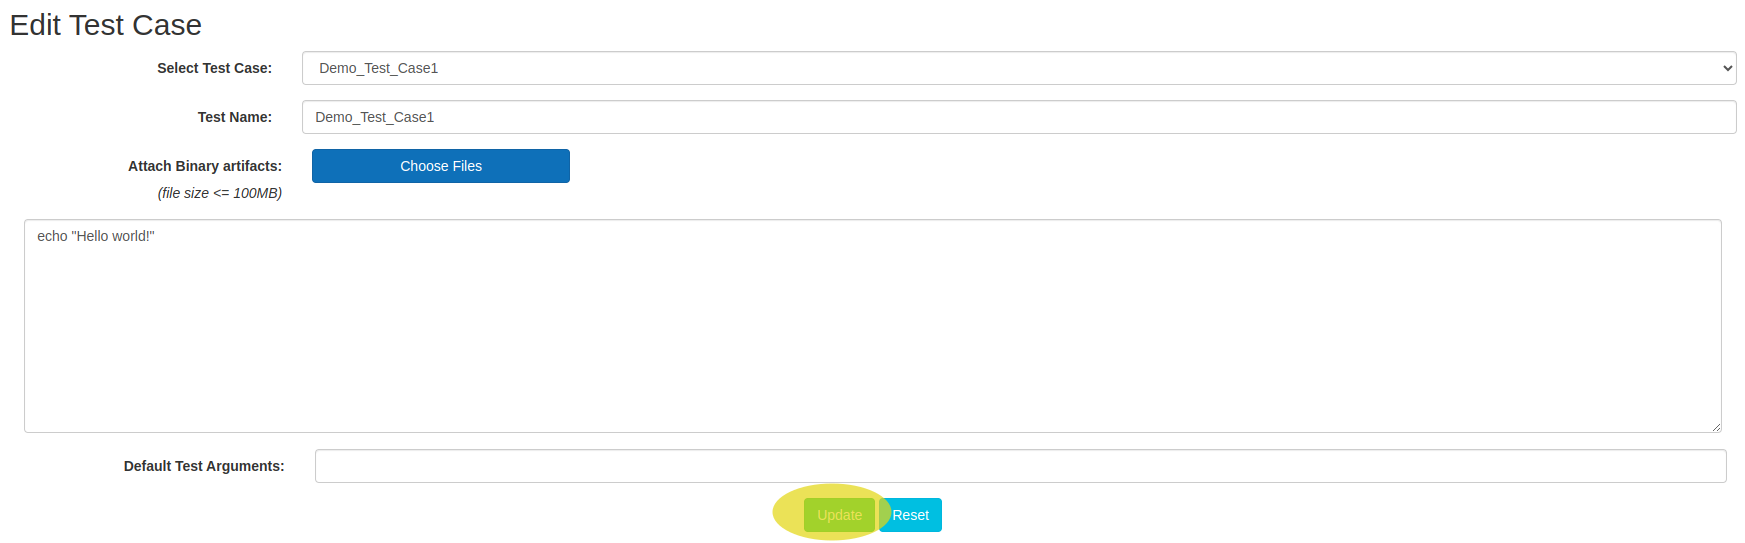
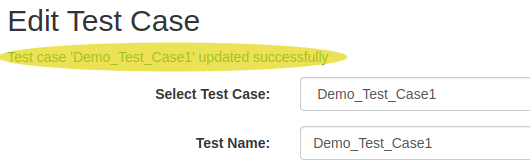
7 The test case is updated with the provided details.
How to View Test Suite
Following are the steps to view user defined tests
1 Login to EBF-TAS dashboard through web browser with your credentials
Username : <username>
Password : <password>
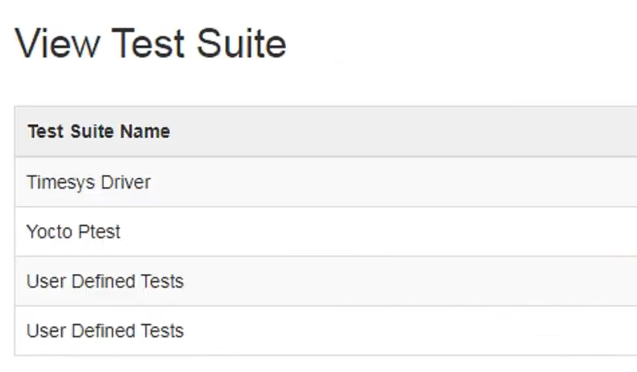
2 Go to Lava -> Select View -> Test Suite option from ‘Tests’ Drop down.
3 Test Suites will be displayed on the screen.
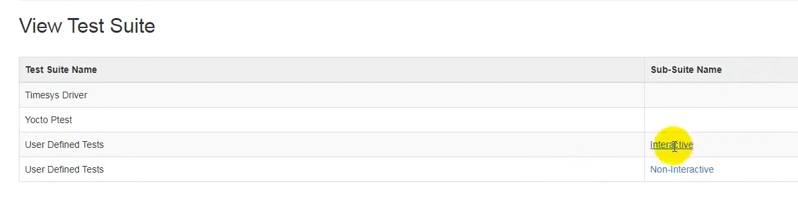
4 Click on ‘Interactive’ Sub-suite name in the table to show Interactive Tests.
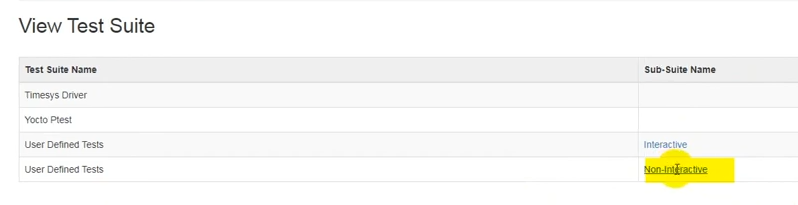
5 Click on ‘Non-Interactive’ Sub-suite name in the table to show Non-Interactive Tests.
6 Drill down of the selected Test Suite will show up on the screen.
How to View Test Plan
Following are the steps to view list of all test plans:
1 Login to EBF-TAS dashboard through web browser with your credentials
Username : <username>
Password : <password>
2 Go to lava -> Select View -> Test Plan option from ‘Tests’ drop down list as shown:
3 ‘View Test Plan’ page will be shown on the screen.
How to use Timesys Test Project with TAS
The Timesys Test Project (TTP) is a test suite for use in testing peripherals on devices undergoing BSP maintenance. It is provided alongside your BSP sources.
Configuring TAS for TTP
All sources for TTP are provided by the BSP’s build system and are not overlaid by the test harness. To configure TAS to use TTP you simply create a Test Plan that utilizes the Timesys Test Project “Test Suite” that is built into the EBF-TAS.
To create the test plan refer to the How to Create Test Plan Section and simply select the Timesys Test Project Test Suite option
Then create a job following the steps in the Job Submission Wizard Section and select the Test Plan with the name you just created that utilizes the Timesys Test Project.
After the job is run full test logs are viewable in the /usr/tstp/logs directory on the device, and a test summary report is available from the TAS web interface.
Customizing the Timesys Test Project
All customization of the Timesys Test Project is done so in the BSP build system, and thus you should refer to the documentation provided by the Timesys Test Project.
For documentation of the Timesys Test Project please refer to the README in the “timesys-test-project” repository supplied alongside your BSP sources.
If using Yocto Project please also refer to the “meta-timesys-test” meta-layer repository also provided in your BSP sources which provides TTP integration into Yocto.
Test Job Submission
How to Submit Tests
Following are the steps to submit tests:
1 Login to EBF-TAS dashboard through web browser with your credentials
Username : <username>
Password : <password>
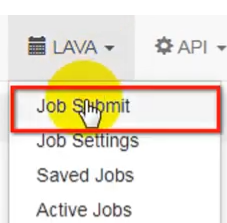
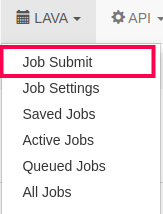
2 Go to lava-> Select ‘Job Submit’ from drop down.
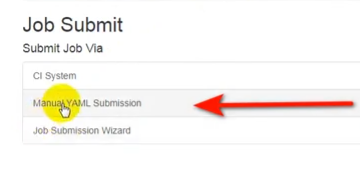
3 The Job Submit page will appear on the screen. There are two different ways to submit the test Job.
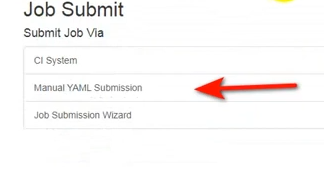
Manual Job Submission
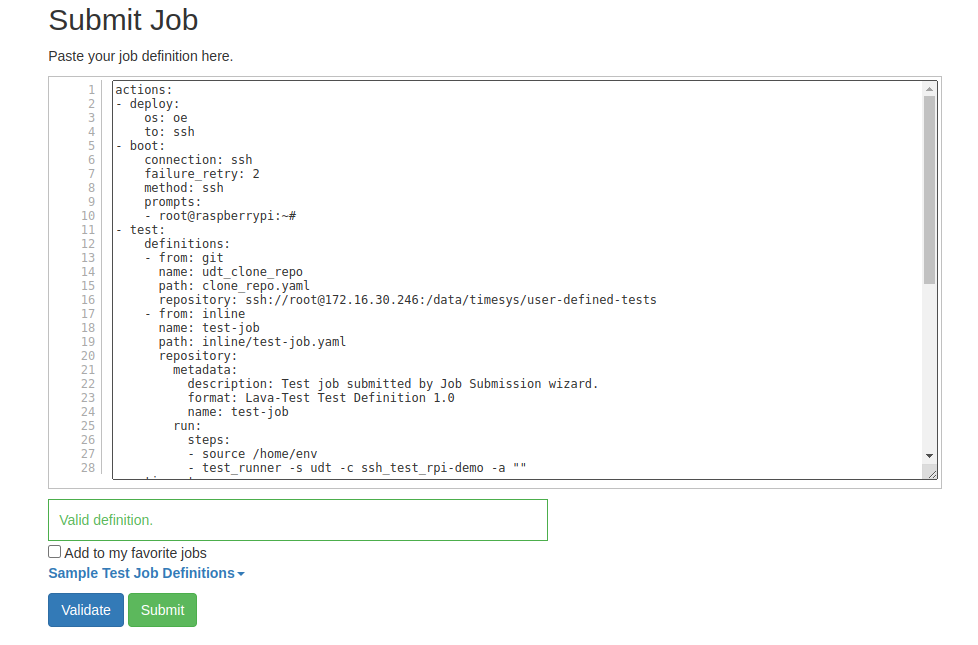
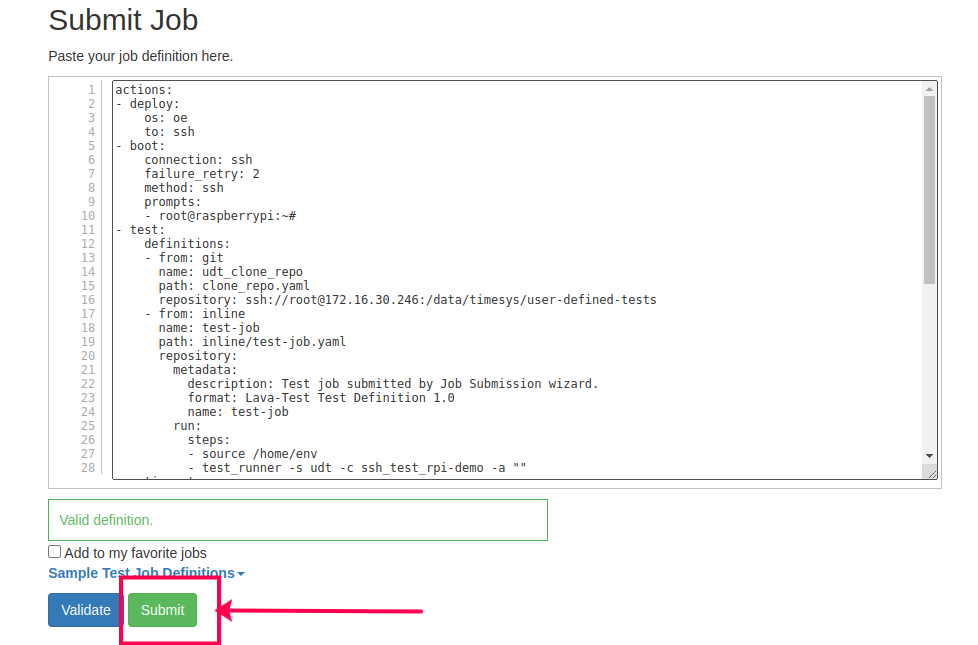
1 Select Manual YAML submission option from Job Submit page.
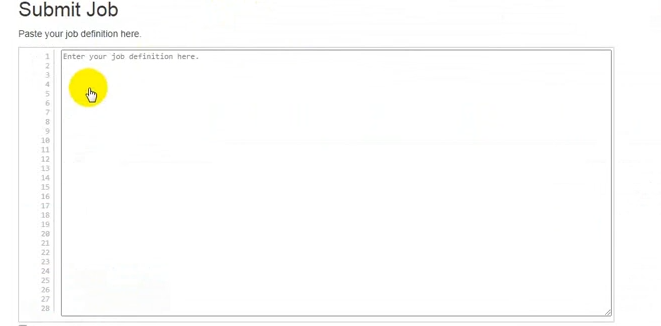
Submit Job page will appear on the screen.
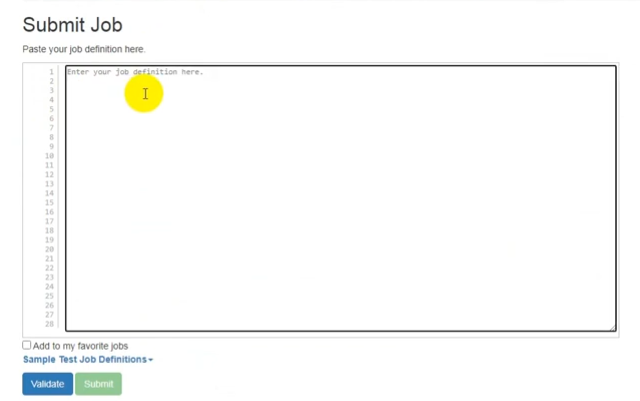
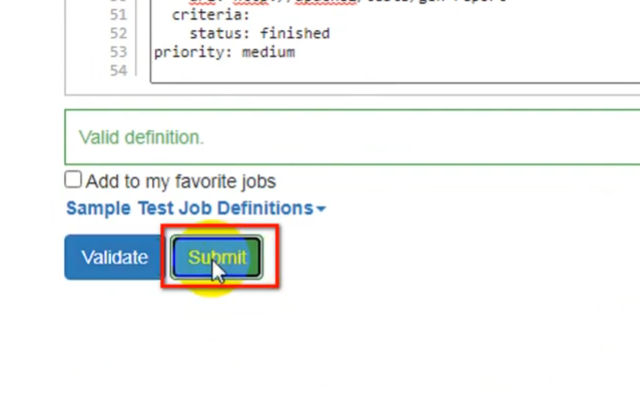
Write a YAML file for test job submission. Select Validate to verify Valid definition.
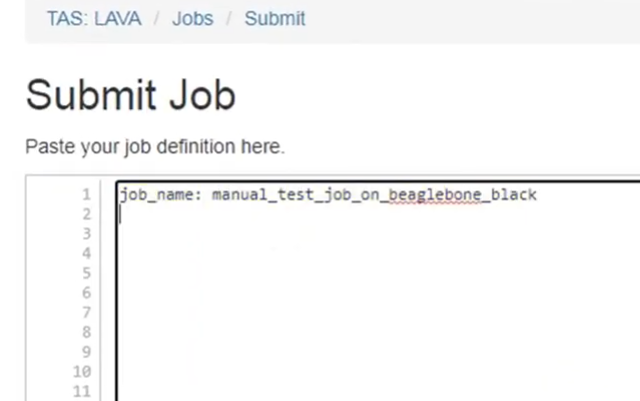
SAMPLE YAML FILE: Following is the sample TestJob yaml
device_type: beaglebone-black
job_name: bbb-udt
timeouts:
job:
    minutes: 600
action:
    minutes: 599
priority: medium
visibility: public
actions:
- deploy:
    dtb:
    url: http://<url for device artifacts>/<path>/beaglebone_black.dtb
    kernel:
    type: uimage
    url: http://<url for device artifacts>/<path>/uImage-4.4-ts-armv7l
    nfsrootfs:
    compression: gz
    url: http://<url for device artifacts>/<path>rootfs.tar.gz
    os: oe
    to: tftp
- boot:
    commands: nfs
    method: u-boot
    prompts:
    - '# '
- test:
    definitions:
    - from: git
    name: ts_clone_repo
    path: clone_repo.yaml
    repository: ssh://root@<EBF-TASIP>/data/timesys/timesys-test-definitions
    - from: git
    name: udt_clone_repo
    path: clone_repo.yaml
    repository: ssh://root@<EBF-TASIP>/data/timesys/user-defined-tests
    - from: inline
    name: test-job
    path: inline/test-job.yaml
    repository:
        metadata:
        format: Lava-Test Test Definition 1.0
        name: test-job
        run:
        steps:
        - source /home/env
        - cat /home/env
        - test_runner -s udt -c testing-a "0"
        - test_runner -s udt -c testfile
    timeout:
    minutes: 600
notify:
criteria:
    status: finished
callback:
    url: http://127.0.0.1/tests/gen-report
    method: POST
    content-type: urlencoded
    dataset: minimal
priority: medium
timeouts:
action:
    minutes: 600
actions:
    power-off:
    seconds: 60
job:
    minutes: 1800
visibility: public
Description
Device_type: It must have an entry in /data/timesys/device-types in form of {device-type}.jinja2
device_type: beaglebone-black
Kernel url: Url of “Kernel file” can be any url(either zImage,uImage or Image format) of the selected device accessible from Zombie machine.
Kernel:
url: http://<url for device artifacts>/<path>/uImage-4.4-ts-armv7l
For example:
url: http://192.168.12.105/lava/BBB/uImage-4.4-ts-armv7l
DTB url: Url of “DTB file” can be any url(dtb format) of the selected device accessible from Zombie machine.
dtb:
url: http://<url for device artifacts>/<path>/beaglebone_black.dtb
For example:
url: http://192.168.12.105/lava/BBB/beaglebone_black.dtb
Rootfs url: Url of “Rootfs url” can be any url (either gz,bz2 or xz format) for selected device accessible from Zombie worker.
Nfsrootfs:
url: http://<url for device artifacts>/<path>/rootfs.tar.gz
For example:
url: http://192.168.12.105/lava/BBB/rootfs.tar.gz
metadata: Metadata must contain format and name details:
repository:
Metadata:
format: Lava-Test Test Definition 1.0
name: test-job
repository: Location of test definitions repository needs to be provided along with EBF-TAS server url and username. This repository contains all the tests that run on DUT’s connected to zombies.
repository: ssh://root@<EBF-TASIP>/data/timesys/timesys-test-definitions
repository: ssh://root@<EBF-TASIP>/data/timesys/user-defined-tests
For example:
repository: ssh://root@192.168.12.81:/data/timesys/timesys-test-definitions
repository: ssh://root@192.168.12.81:/data/timesys/user-defined-tests*
Test Runner*:
One test case with command line argument
- test_runner -s udt -c testing -a "0"%
One test case with default argument
- test_runner -s udt -c testfile
Notify:
notify:
criteria:
status: finished
callback:
url: http://127.0.0.1/tests/gen-report
method: POST
content-type: urlencoded
dataset: minimal
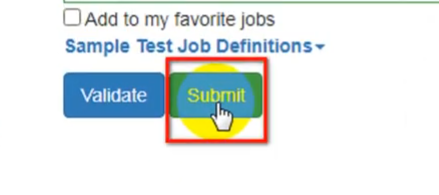
Click on Submit button to submit YAML file or TestJob submission.
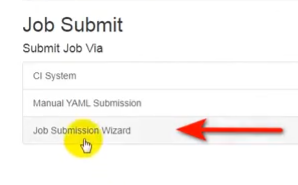
Job Submission Wizard
1 Select ‘Job Submission Wizard’ option from Job Submit page.
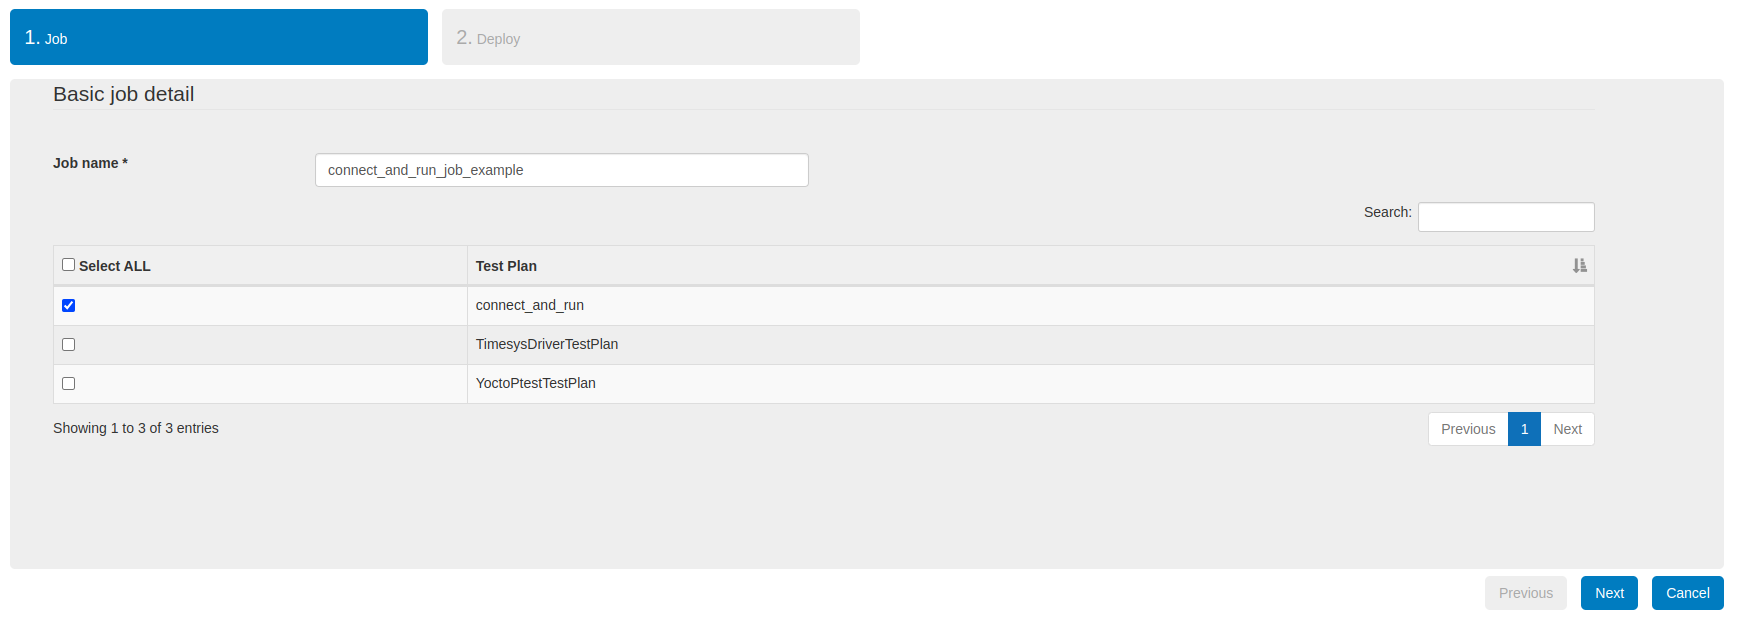
Job: Basic Job Details page will appear on the screen. Provide Job name in job name section.
For example: bbb-udt
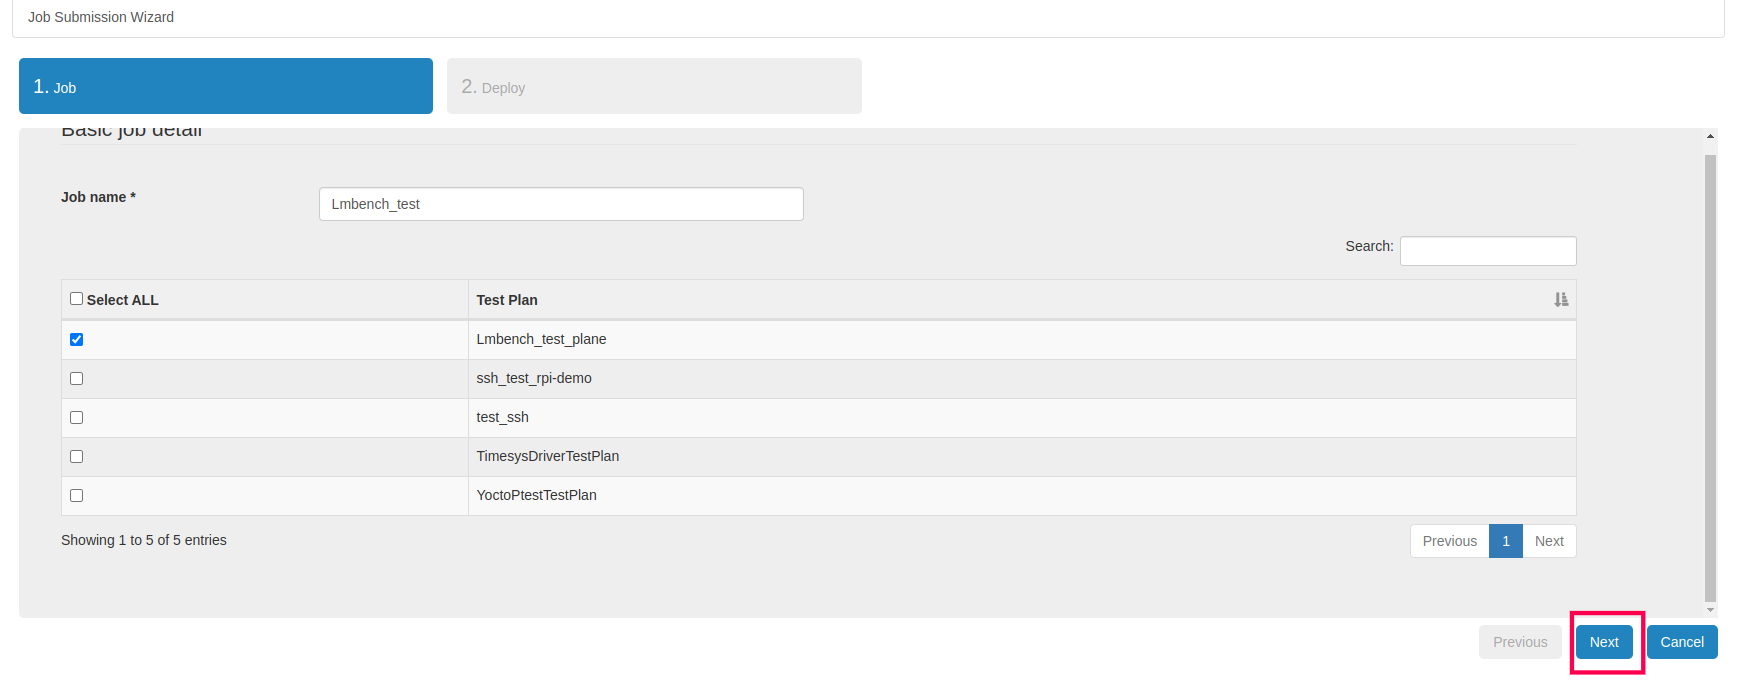
After providing name, Select ‘Test Plans’ that need to be run in this section.

All the available ‘Test Plans’ will be shown in the table.. After selecting desired ‘Test Plan(s)’, hit ‘Next’ button.
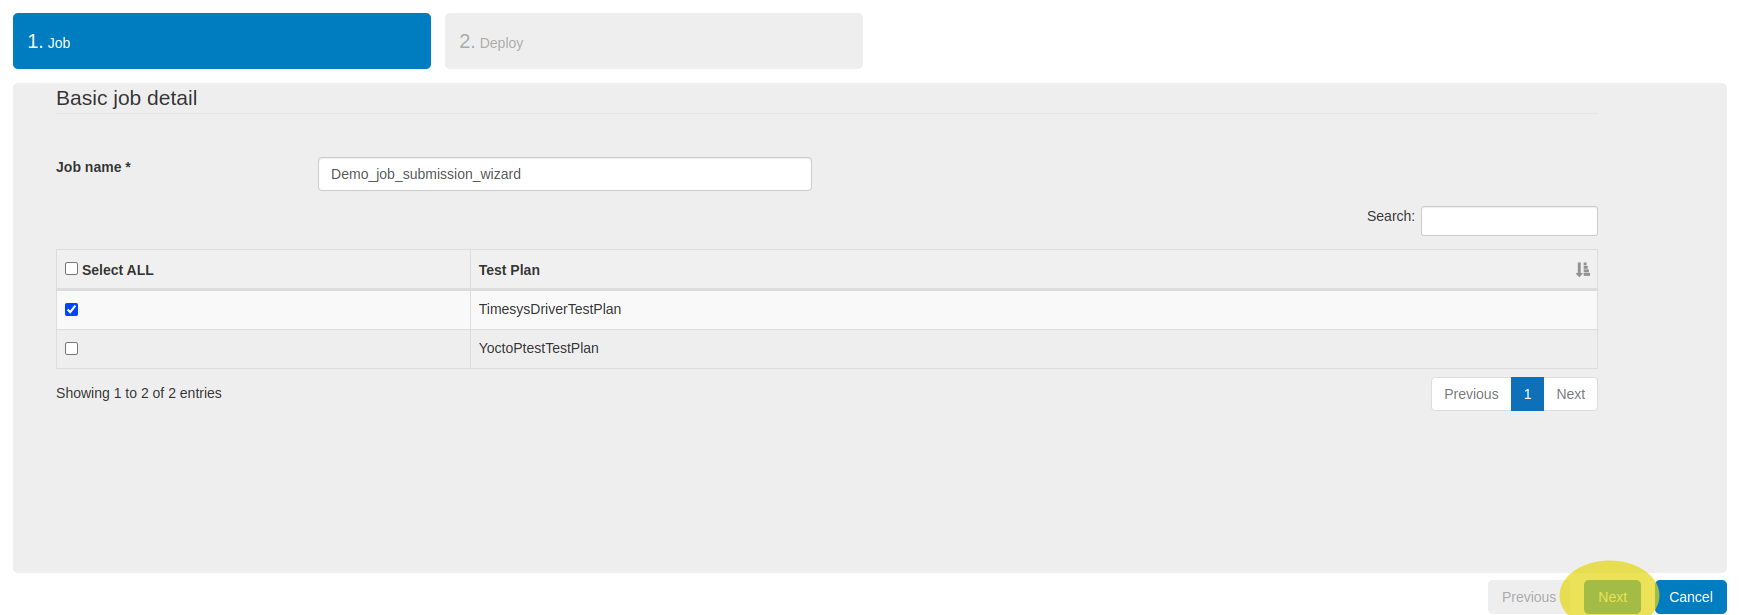
NOTE: Selecting Cancel button will cancel the Job Submission process and the user will be redirected to Job Submit page.
Tests to be Run: Select Test Plans that need to be run in this section.
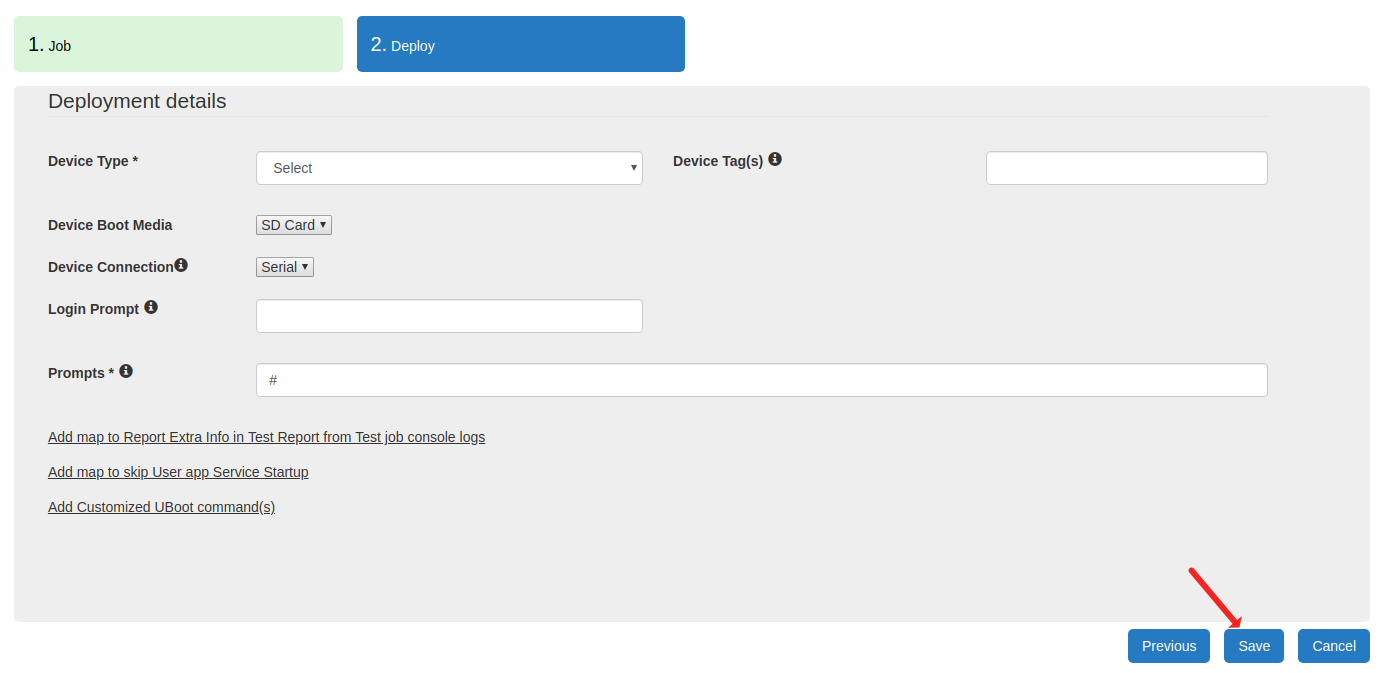
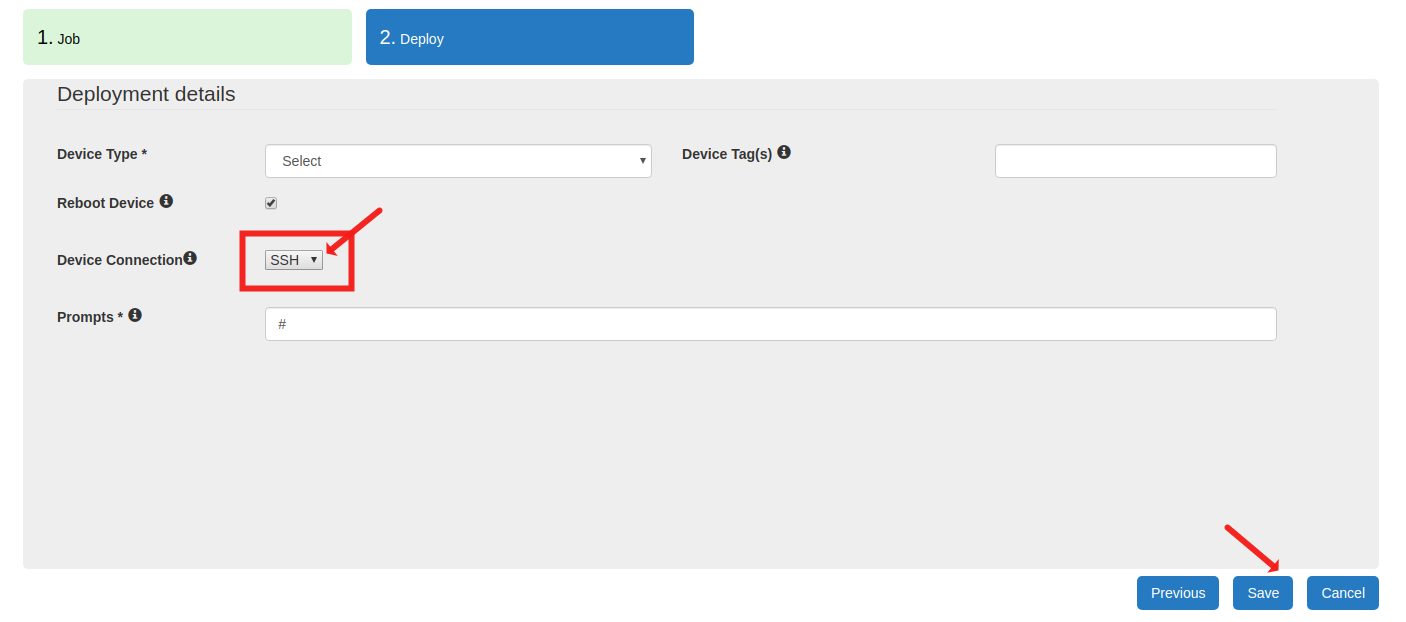
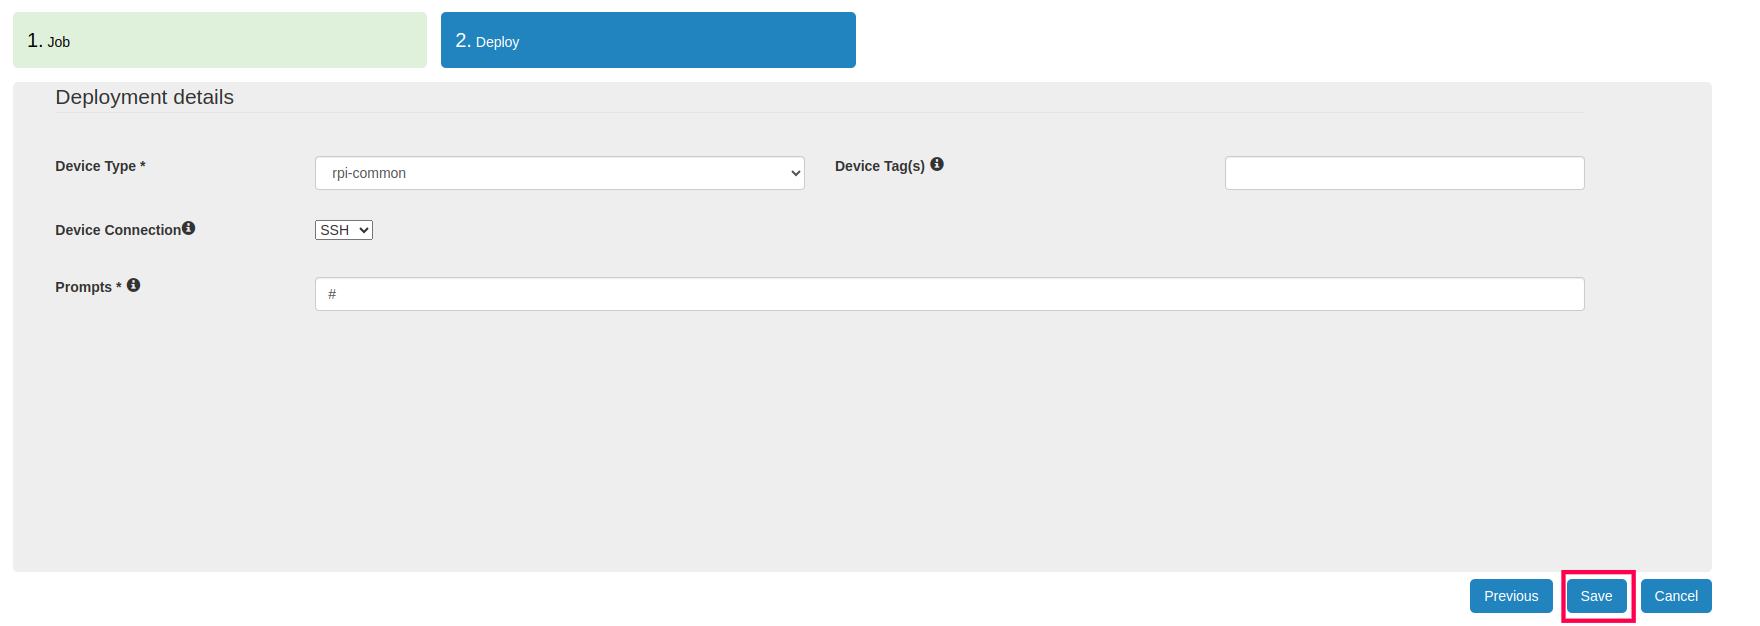
Deployment Details: Provide Image Deployment details in this section. The following explain details for deploy section
Cancel: Select Cancel button to reset Test job submission page.
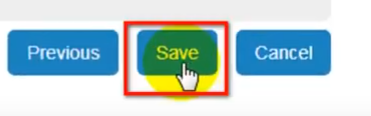
Save: Hit Save Button to preserve Test job details.
OR
If the Test Plan consists of any Interactive Test, following screen will be shown.
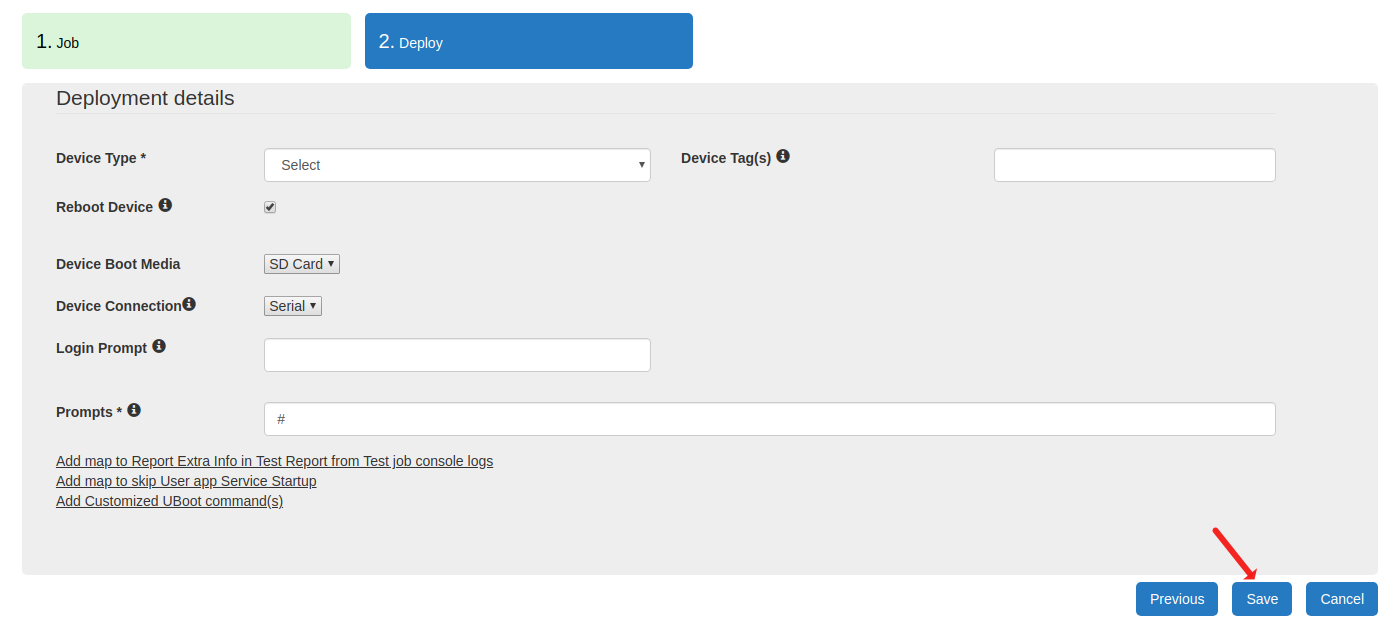
If you want to run the tests over SSH connection, select the option from ‘Device Connection’ drop-down, input all the mandatory details and hit on ‘Save’ button.
2 On successful save, User will be redirected to Scheduler –> Saved Jobs page.

3 User can view YAML for the job by clicking on ‘View YAML’ icon present on the screen.
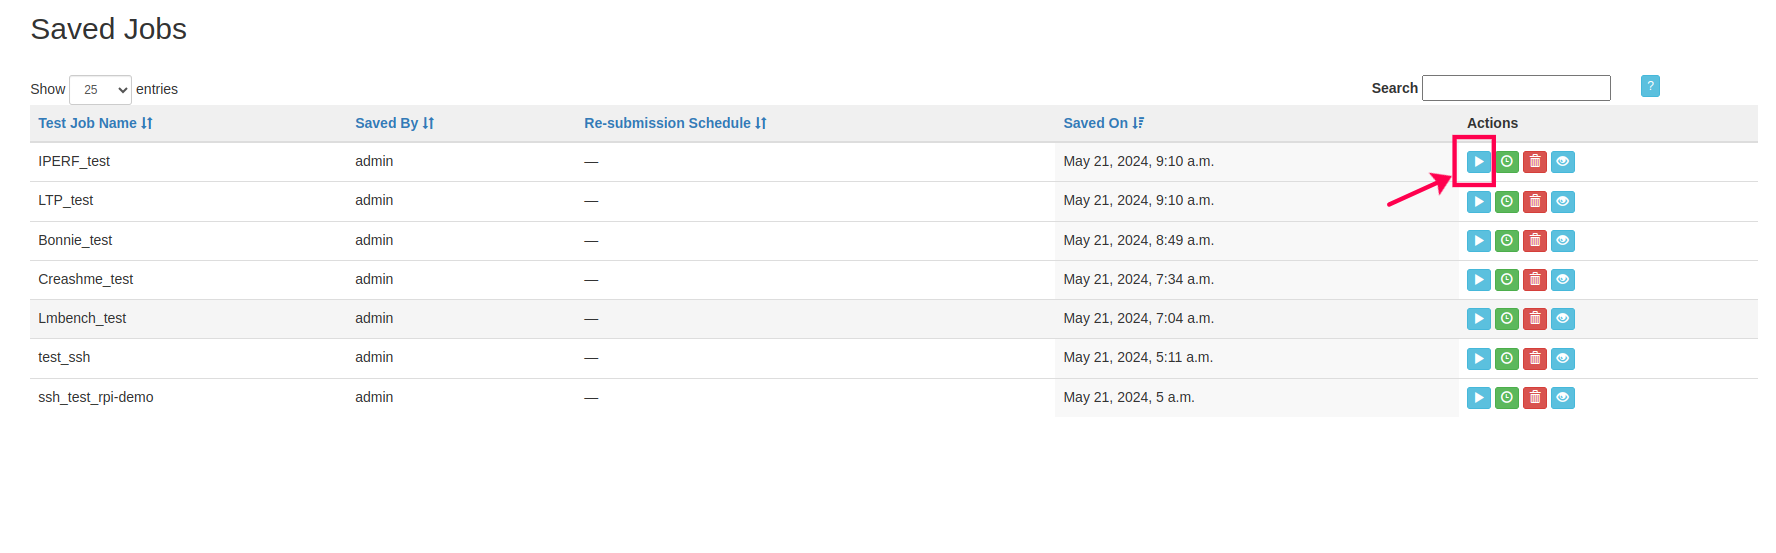
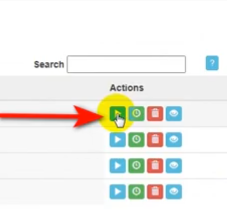
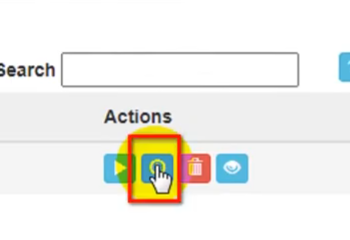
4 From this screen user can submit newly created test job by clicking on its “Run” action button.
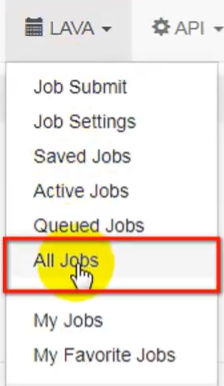
5 After submitting the job, user can view the status of the test job. Select ‘All Jobs’ option from ‘LAVA’ drop down list.
6 The list of all jobs will appear on the screen. The status of each submitted test job is shown under the ‘Status’ column.
Connect And Run Tests
These tests should contain Interactive Tests. Also, these tests allow the user to choose whether he/she wants to reboot the device or not at the time of running the job.
1 Refer this link to create an Interactive Test Case.
2 Login to EBF-TAS dashboard through web browser with your credentials
Username : <username>
Password : <password>
3 Go to Lava -> Job_submit.
4 The Job Submit page will appear on the screen. Select ‘Job Submission Wizard’ option.
Job: Basic Job Details page will appear on the screen. Provide Job name in job name section.
5 All the available ‘Test Plans’ will be shown in the table. After selecting desired ‘Test Plan(s)’, hit ‘Next’ button.
6 Hit Save Button to preserve Test job details.
7 On successful save, user will be redirected to the ‘Saved Jobs’ page. Newly created job will be listed on this page.

8 From this screen user can submit newly created test job by clicking on its “Run” action button.
Schedule a Test Job
Following are the steps to schedule a saved Test Job.
1 Login to EBF-TAS dashboard through web browser with your credentials
Username : <username>
Password : <password>
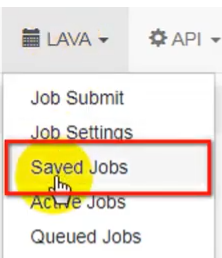
2 Go to Lava -> Saved Jobs.

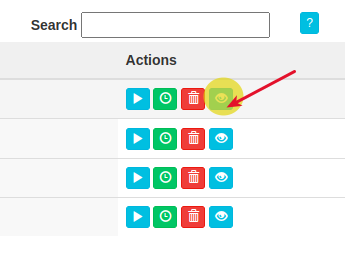
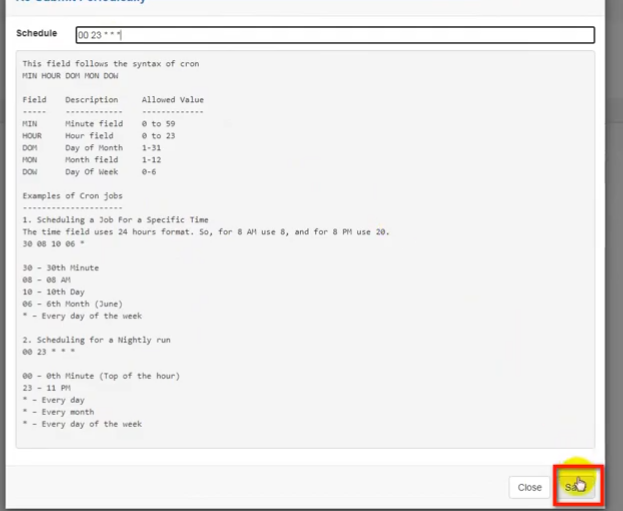
3 Click on ‘cron this job’ icon present in ‘Actions’ column of the target job.
4 On the popup, provide the schedule for job auto-submission and click on ‘Save’ button.
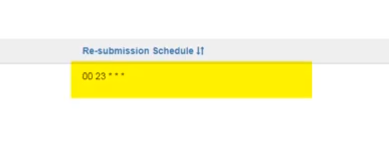
5 The updated schedule is shown in the ‘Re-submission Schedule’ column of the job.
View Test Job YAML
Following are the steps to schedule a saved Test Job.
1 Login to EBF-TAS dashboard through web browser with your credentials
Username : <username>
Password : <password>
2 Go to Lava -> Saved Jobs.
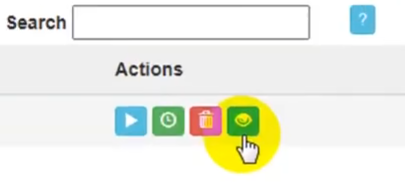
3 Click on ‘View YAML’ icon in the ‘Actions’ column of any saved job.
4 Selected job’s YAML will be shown on the screen.
Configure E-mail for Test Job
E-mail configuration is optional.
1 To configure E-mail for Test Job, Refer Link
2 To enter email address of user, follow the given steps:
Login to EBF-TAS dashboard through web browser with your credentials
Username : <username>
Password : <password>
Go to Lava -> Job Settings.
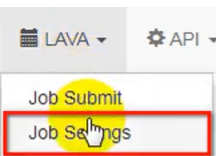
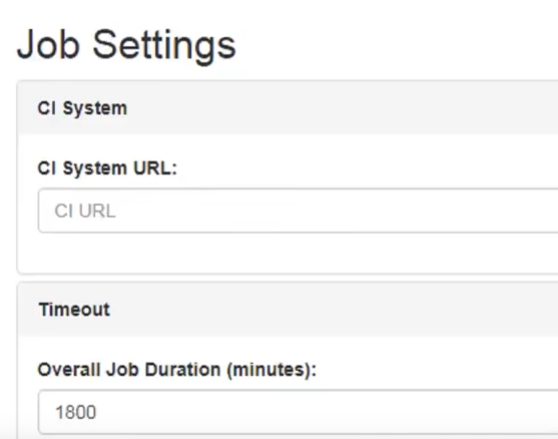
The Job settings page will open.
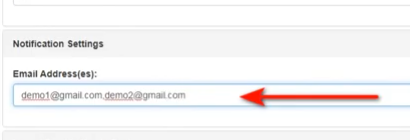
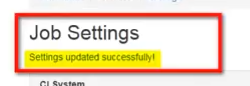
Provide the email address(es) and click on ‘Save’ button.
A confimration message is shown on the screen.
NOTE: The email is sent to each user added in ‘Job Settings’ page along with the user who Submitted the job.
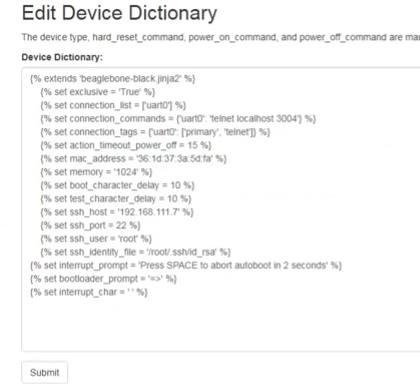
How to Edit Device Dictionary
Following are the steps to edit device dictionary for self assigned device.
1 Login to EBF server through web browser using user credentials.
Username: <Username>
Password: <Password>
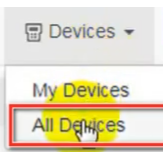
2 Go to Devices -> All Devices.
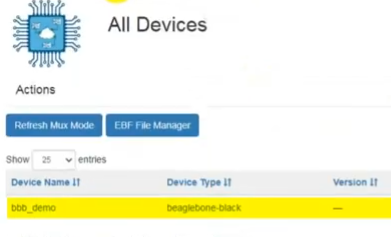
3 All Devices page will appear on the screen. Select the device name(here bbb_demo is taken as reference) to view the device dictionary.
4 Assign a device to your self from the list of the devices.

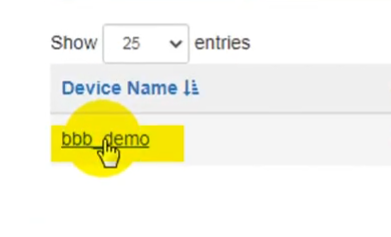
5 Select device name assigned to your self.
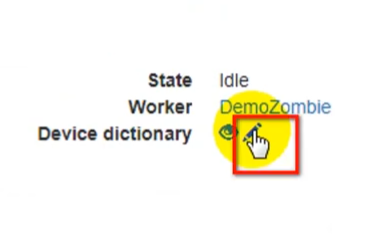
6 On the next page, select Device Dictionary edit icon to edit Device dictionary of the selected device.
7 Edit Device Dictionary page of the selected device will be displayed on the screen.
Download Test Job Logs
1 Login to EBF-TAS dashboard through web browser with your credentials
Username : <username>
Password : <password>
2 Click on the ‘Lava’ menu option and select ‘All Jobs’.
3 The list of all jobs will appear on the screen.
4 On the table shown on the screen, click on ‘View Job Details’ icon in the ‘Actions’ column of the target job.
5 Now click on the ‘Actions’ button on the page, and select option ‘Plain Log’.

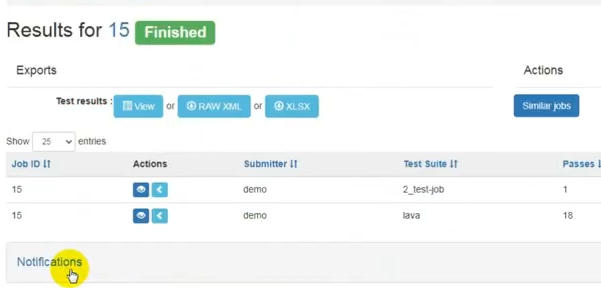
View Test Job Results
Following are the steps to view test results:
1 Login to EBF-TAS dashboard through web browser with your credentials
Username : <username>
Password : <password>
2 There are two ways to views test results:
Results Option available on EBF-TAS dashboard.
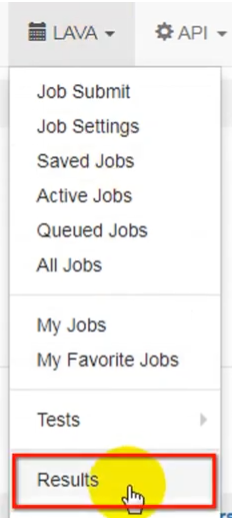
Select ‘Results’ option from ‘Lava’ drop down list available on EBF-TAS dashboard.
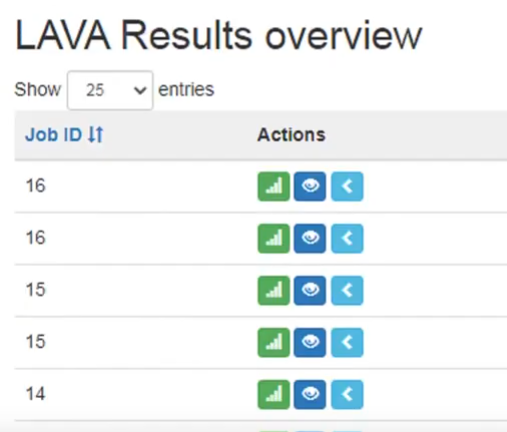
LAVA Results Overview page will appear on the screen.
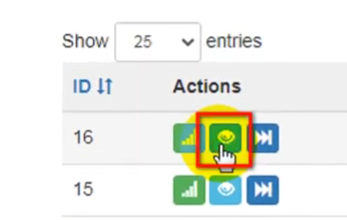
Select Results tag w.r.t test job id.

LAVA Results for selected test job id will appear on the screen.
Scheduler Option available on EBF-TAS dashboard.
Select ‘All Jobs’ options from Lava drop down list.
The list of all jobs will appear on the screen. Select the job id which user submitted for testing.
LAVA Results for selected test job id will appear on the screen.
How to Resubmit Test Job
Re-Submit Saved Job
1 Login to EBF-TAS dashboard through web browser with your credentials
Username : <username>
Password : <password>
2 Go to Scheduler -> Saved Jobs.
3 Here you will see the listing of all saved jobs.
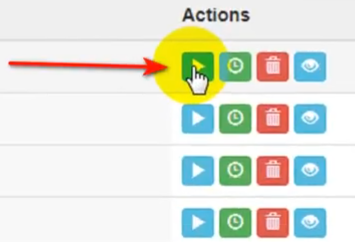
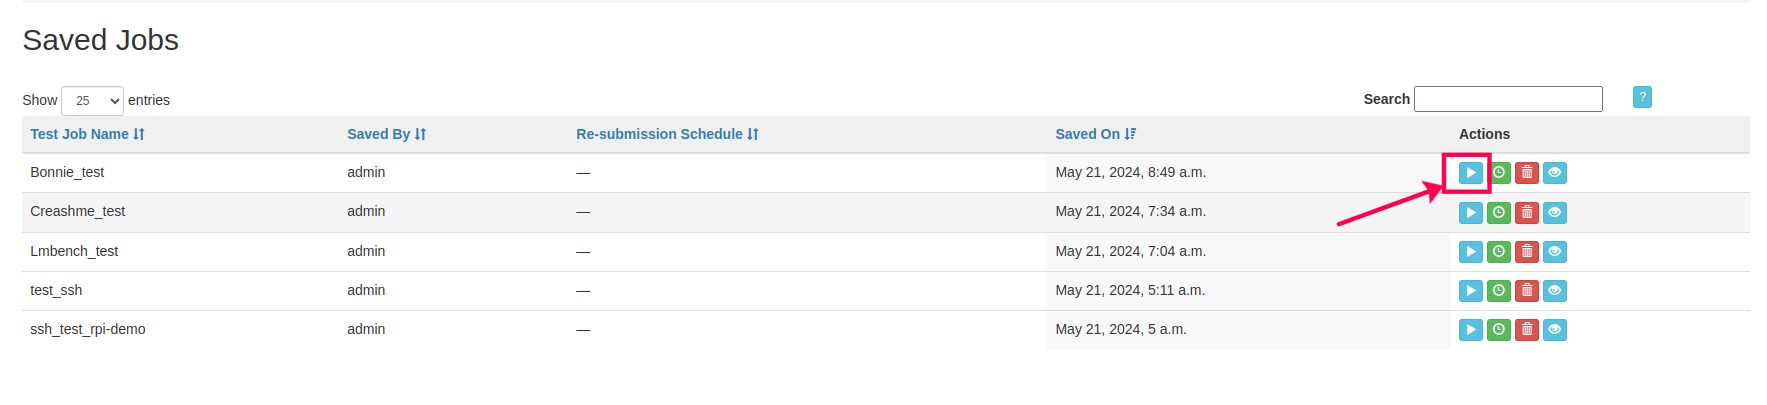
4 Click on the Run button corresponding to the saved job you would like to submit again as shown below.
5 Upon hitting the run button you will be redirected to test job execution page.

Re-Submit any executed Test job
1 Login to EBF-TAS dashboard through web browser with your credentials
Username : <username>
Password : <password>
2 Go to Scheduler -> All Jobs
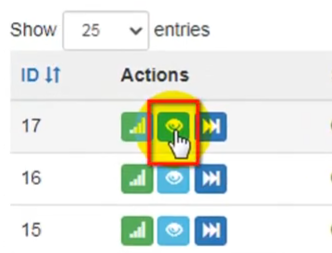
3 A list of All Jobs will appear on the screen. Select View Job details tag corresponding to Test Job id which users wants to re-execute.
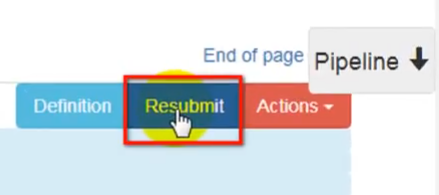
4 The selected Test Job id displays the detail of the Job run.
5 Select ‘Resubmit’ button on the screen to resubmit the Test job.
6 On the next page, select ‘Submit’ button to submit the Test Job.
7 After selecting Submit button, the Test Job is submitted under Scheduler -> All Jobs
How to Refresh/Update a Test Job
The user can update the existing Test Job if the included Test Plan is updated. If any Test Plan is updated, which is used in any Test Job, an ‘Update’ icon is visible in ‘Actions’ column of that Test Job (as shown in image below).
Go to Scheduler > Saved Jobs.
Click on the ‘Update’ icon. The Test Job will be updated and the ‘Update’ icon will be removed.
How to Cancel Test Job
The user can cancel the submitted & running Test Job by selecting the Cancel Button available on the Job details page of Test Job selected.
Following are the steps to cancel a Test Job:
1 Login to the EBF-TAS dashboard through a web browser with your credentials.
Username : <username>
Password : <password>
2 Go to Lava -> All Jobs
3 A list of All Jobs will appear on the screen. Select ‘View Job details’ tag corresponding to ‘submitted’ or ‘running’ Test Job id which user wants to cancel.
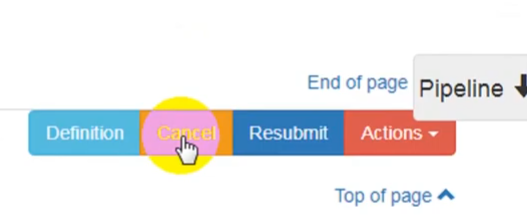
4 The ‘Test Job details’ page will appear on the screen. Select the ‘Cancel’ button.
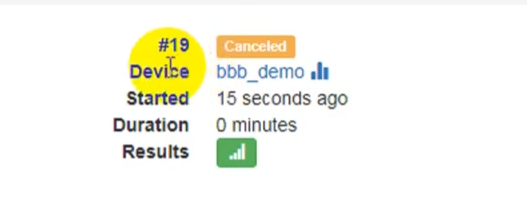
5 The selected Test Job is canceled from the submitted/running state with a confirming message on the screen.
How to delete a Saved Test Case
1 Login to EBF-TAS dashboard through web browser with your credentials
Username : <username>
Password : <password>
2 Select View -> Test Case option from ‘Tests’ drop down list as shown:
3 View Test Case page will appear on the screen.

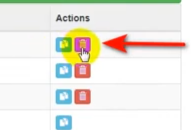
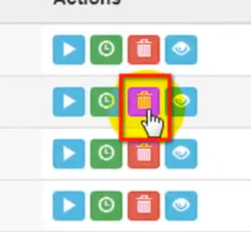
4 Click on the ‘Delete’ button corresponding to the saved Test Case that you want to delete.
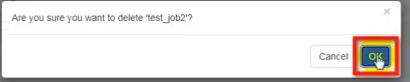
5 Confirmation message as shown below will pop up. Click on ‘OK’ button.
6 Page will refresh and you will no longer see the deleted Test Case.

How to delete a Saved Job
1 Login to EBF-TAS dashboard through web browser with your credentials
Username : <username>
Password : <password>
2 Go to Scheduler -> Saved Jobs.
3 Here you will the listing of all saved jobs.
4 Click on the ‘Delete’ button corresponding to the saved job that you want to delete.
5 Confirmation message as shown below will pop up. Click on ‘OK’ button.

6 Page will refresh and you will no longer see the removed saved job.

How to Generate Test Reports
Introduction
Click on the link below to download Timesys-TAS-1.2.jar to generate Raw Data:
Generation of Test Report from Raw format XML
Install XML filter
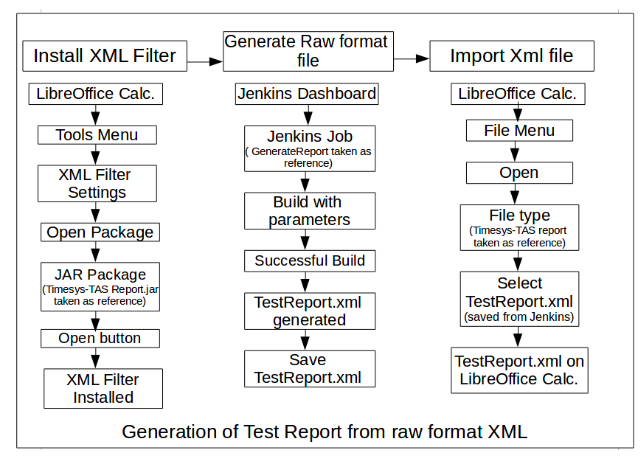
Install the jar package from the above link on local computer.
Following are the steps to install XML filter in LibreOffice Calc :
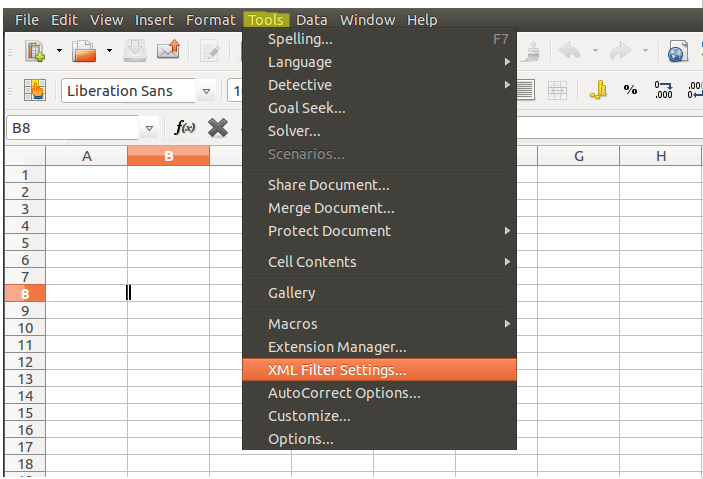
1 Open LibreOffice Calc on local computer, Select “XML Filter Settings..” from ‘Tools’ drop down list present on menu bar.
2 A popup window will appear on the screen, select “Open Package” from right side of XML Filter settings window.
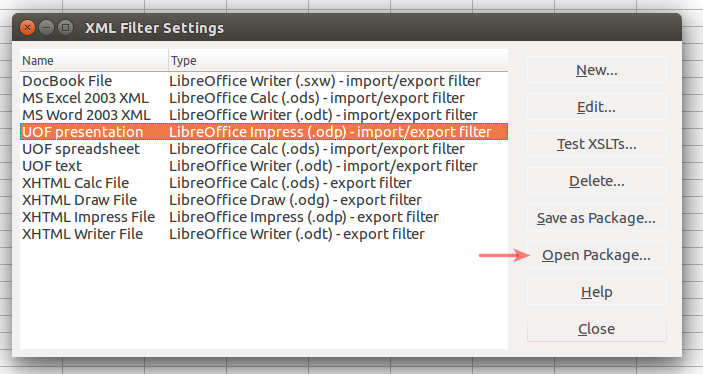
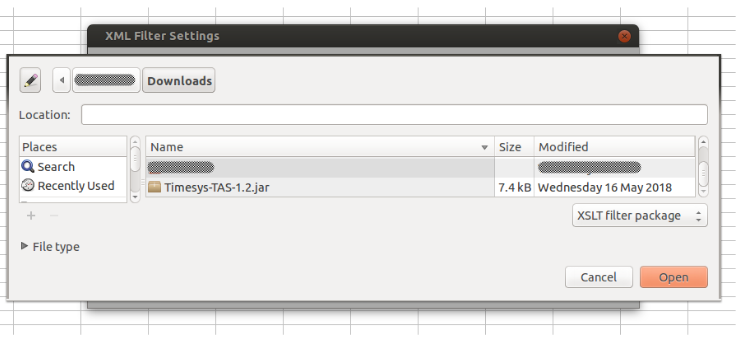
3 Select package (Timesys-TAS-report.jar is taken as reference ) from /home/<user>/<location of jar package (Timesys-TAS-report.jar)> as shown below:
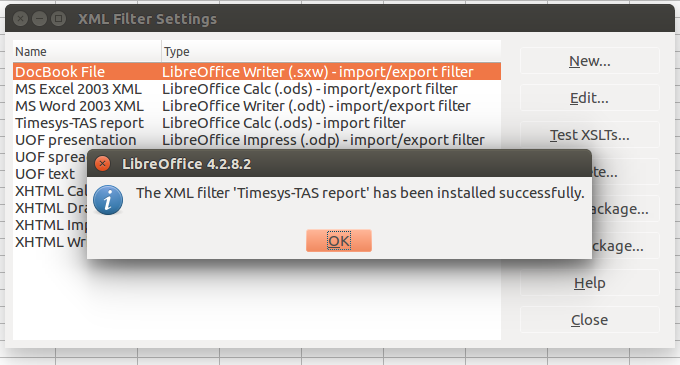
4 After clicking on open button, XML filter will be installed in Libreoffice calc with a confirmation message.
Download Generated RAW XML
Following are the steps to download RAW XML:
1 Login to EBF-TAS through web browser using user web credentials.
Username:<username>
Password:<password>
2 There are two ways to download RAW XML.
Go to Lava -> All Jobs . All Jobs list will be displayed on the screen.
Select ‘Results’ tag of completely executed TestJob.
Results page of the selected TestJob will be displayed on the screen.
Select ‘RAW XML’ button to download the RAW xml report.

Go to Lava -> Results.
Results page will appear on the screen with the list of all successfully executed TestJobs.

Results page of the selected TestJob will be displayed on the screen.
Select ‘RAW XML’ button to download the RAW xml report.
Import XML file in Libreoffice Calc
After downloading <TestJob>_Raw_Data.xml file, open <TestJob>_Raw_Data.xml in Libreoffice.
Following are the steps to Import XML file in LibreOffice Calc:
1 Go to ‘File’ menu and click on Open button.
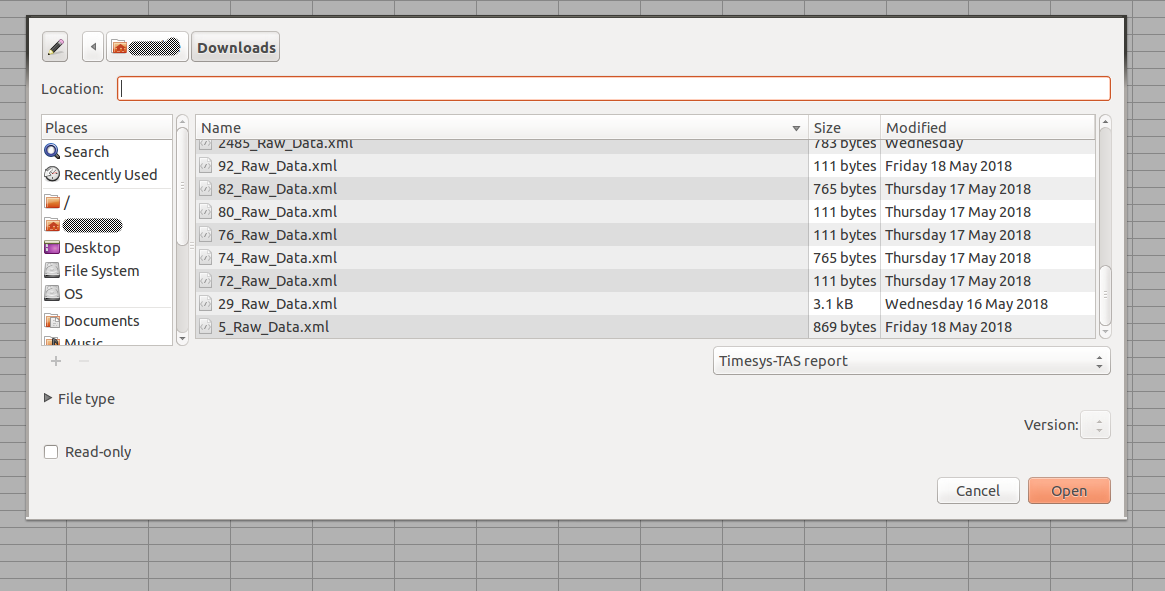
2 Select File Type as ‘Timesys-TAS report’ and select <TestJob>_RawData.xml file to open as shown below:
3 The Raw format file will import in Libreoffice Calc in Timesys Report Format as shown below.

XLSX Test Report
Download Generated XLSX Report
Following are the steps to download XLSX
1 Login to EBF-TAS through web browser using user web credentials.
Username:<username>
Password:<password>
2 There are two ways to download XLSX.
Go to Lava -> All Jobs . All Jobs list will be displayed on the screen.
Select ‘Results’ tag of completely executed TestJob.
Results page of the selected TestJob will be displayed on the screen.
Select XLSX button to download the xlsx report.

Go to Lava -> Results.
Results page will appear on the screen with the list of all successfully executed TestJobs.
Results page of the selected TestJob will be displayed on the screen.
Select XLSX button to download the xlsx test report.
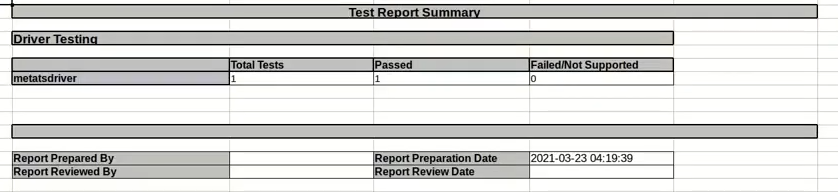
View XLSX Test Report
After downloading <TestJob>_Test_Report.xlsx file, open <TestJob>_Test_Report.xlsx in Libreoffice.Following are the steps to view downloaded Test Report file in LibreOffice Calc:
1 Go to ‘File’ menu and click on Open button.
2 Select downloaded <TestJob>_Test_Report.xlsx.
3 The Test Report in xlsx is displayed on the LIbreOffice Calc.
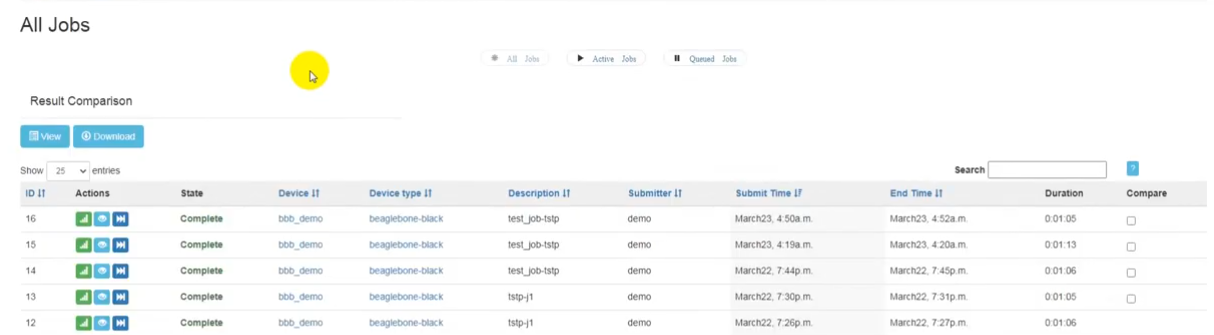
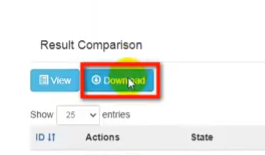
Result Comparison Report
Following are the steps for generating Result Comparison Report.
1 Login to EBF-TAS through web browser using user web credentials.
Username:<username>
Password:<password>
2 There are two ways to generate this report.
Go to Lava -> All Jobs . All Jobs list will be displayed on the screen.
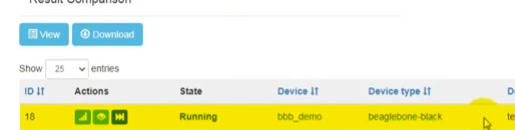
Select Test jobs for result comparison by checking corresponding ‘Compare’ check-boxes. User can select upto 5 Test jobs for result comparison.

Click on ‘Download’ button to download the report.
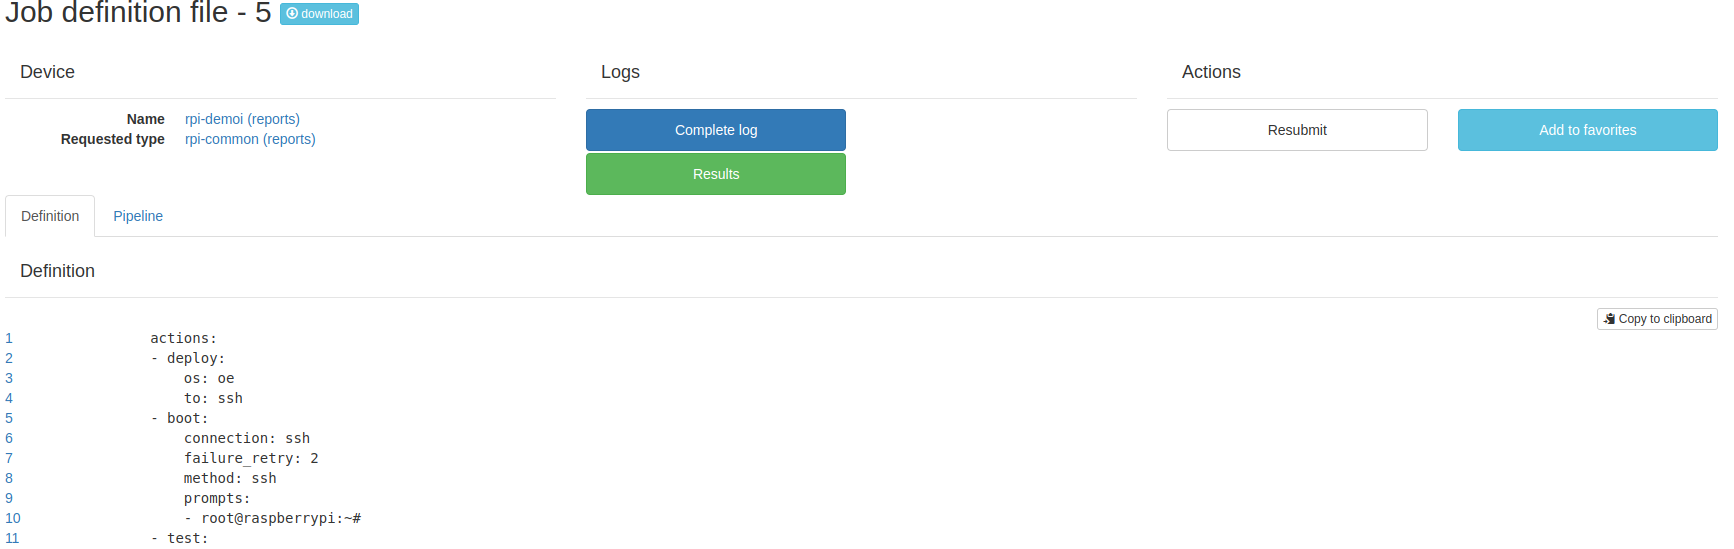
Definition of Test Job
To view the Test Job definition, follow the given steps:
The user can cancel the submitted & running Test Job by selecting ‘Cancel’ Button available on the Job details page of the selected Test Job.
Following are the steps to Resubmit Test Job:
1 Login to EBF-TAS dashboard through a web browser with your credentials.
Username : <username>
Password : <password>
2 Go to Scheduler -> All Jobs.
3 A list of All Jobs will appear on the screen. Select ‘View Job details’ tag corresponding to any Test Job ID.
4 On the Job details page, select the ‘Definition’ button.

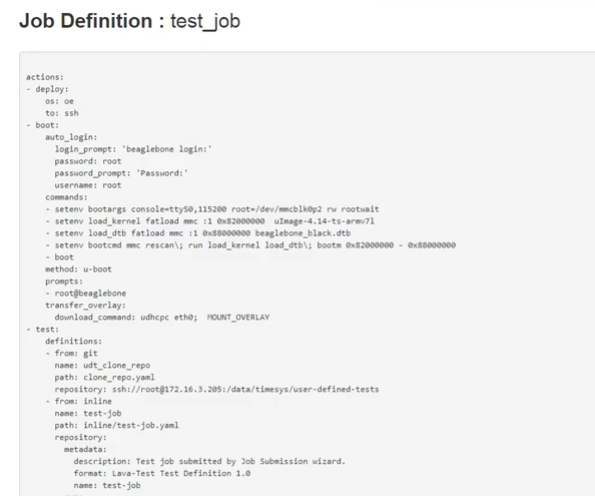
5 On the next page, Test Job definition will appear on the screen.
Example - Multiple Reboots Test-job
You can write and submit a test job that will reboot the DUT several times and execute the tests.
For Example: You want to execute some tests then reboot the DUT and after rebooting you want to execute some different tests, you can do that using multiple reboot feature.
Please follow the below steps for submitting a multiple reboots test job.
1 Go to LAVA-> Job Submit -> Manual YAML Submission, user will see the manual test job submission page.
By clicking on Sample Test Definition you can see the multiple reboots sample test job.
2 Here, you can write a test-job in which two separate test-job will execute in a separate namespace as shown in sample example.
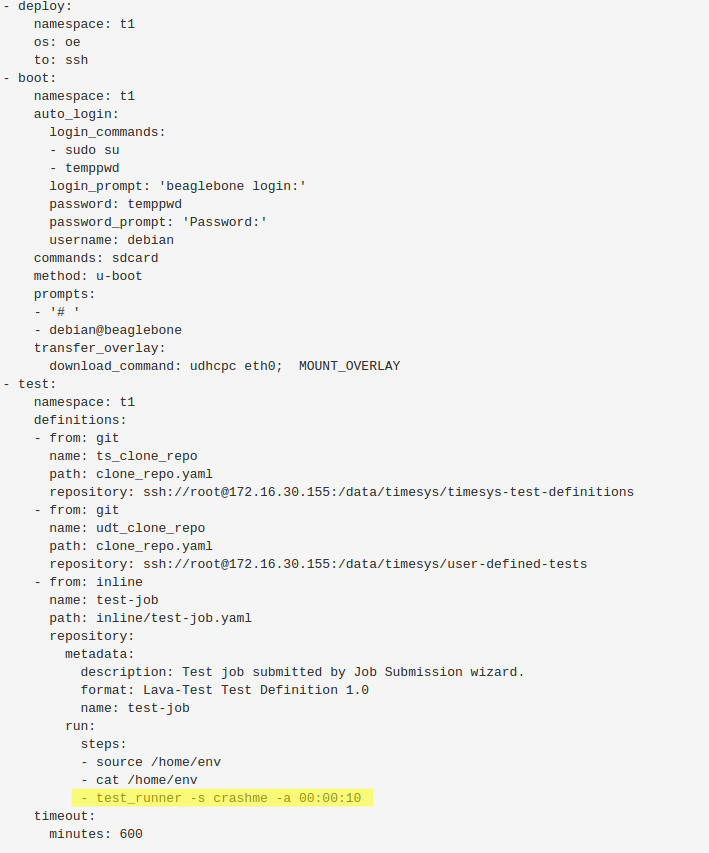
This test job is written for Beaglebone black device and it will execute two different tests job for the Crashme.
You can change the highlighted part with your tests.
First it will download and deploy the image for namespace t1 and execute the test.
After executing the namespace t1, it will do the same for namespace t2 reboot the device and execute the tests.
You can add as many separate namespaces you want.
Test Job execution using Pseudo Devices
To Execute Test Job on Pseudo/Docker device you need to add Pseudo device to your EBF. In order to add Pseudo device please refer to How to Add Pseudo Device Tutorial.
You can write and submit a test job that will execute a test job on pseudo/docker device.
Please follow the below steps for submitting a test job on Pseudo/Docker device.
1 Go to * Lava -> Submit Jobs -> Manual YAML Submission*, user will see the manual test job submission page.
By clicking on Sample Test Definition you can see the ‘Use of Pseudo Device (docker)’ yaml script.
2 Here, you can write a test-job where boot method given as docker will execute test on docker device as shown in sample example.
This test job is written for Pseudo/Docker device.
Replace the IP to your EBF-Server IP
Replace the “TS-1” to the test-case in your EBF-Server.
In the last report generation section, the sample job is configured for “http” change it to “https” if your EBF-Server is running on “https” otherwise it requires no change.
Example - MultiNode TestJob Running on Two Pseudo Devices
You can write and submit a test job that will execute test jobs on more than one devices in parallel at the same time, for example we considered two devices.
Please follow the below steps for submitting a multiple Node test job.
1 Go to LAVA-> SubmitJob -> Manual YAML Submission, user will see the manual test job submission page.
By clicking on Sample Test Definition you can see the multiple reboots sample test job.
2 Here, you can write a test-job in which two separate test-job will execute in a separate namespace as shown in sample example.
This test job is written for two different pseudo/docker device and it will execute two different tests jobs in parallel.
The jobs are categorised into two different roles Client and Server. You can provide the roles as per your requirement.
In the very first line define the name of the job.
The second block of code defines the time limit of the job.
Every test jobs have 3 important sections
deploy : In deploy section the roles are defined for client and server and “to:docker* which means that the type of device where the job is going to be executed.
boot : A boot section refers that the Hardware devices need to be instructed how to boot devices. In this yaml boot section method is defined as docker so the device will boot from docker.
test : There is two different test are written for client and server where client wait for the server initialisation once the server get initialised then client will receives the message ” [client] Received Server Started Message” and in the server test section the server sleep for 10 seconds after that it will send server_started message.
The client waits for the server-start and displays” [client] Received Server Started Message”.
The server-send server start configuration and display the “[Server] Server is started”.
Device booting precedence
The boot parameters are selected for booting the device as per the order described below:
Device Dictionary
Device Type
base-uboot.jinja2
base.jinja2
Device Dictionary: The boot parameters provided in device dictionary for booting the device are of highest precedence.For example, if the bootloader prompt is defined in Device dictionary, then the device tries to boot from the defined value of bootloader prompt in device dictionary.
{% set bootloader_prompt = '=>' %}
Device Type: If the bootloader prompt parameter provided in device dictionary doesn’t boot the device or if the parameter is not defined in device dictionary of the device then the value for the bootloader prompt mentioned in device type of the device boots the device.
{% set bootloader_prompt = bootloader_prompt|default('U-Boot') %}
base-uboot.jinja2: If the device doesn’t boot from the defined value of bootloader prompt in device dictionary and device type then the device takes the value of bootloader prompt from base-uboot.jinja2 file and tries to boot the device.
bootloader_prompt: {{ bootloader_prompt|default('=>') }}
base.jinja2: The boot parameters defined in base.jinja2 are of the lowest precedence. If the device is not booted from the above three values, then device tries to boot from the value of the bootloader prompt provided in base.jinja2 file.
{% set base_menu_bootloader_prompt = 'Start:' -%}
How to Flash SdCard Image using EBF-CLI
In this example, we create two Jenkins jobs one for flashing an image to a sdcard or any partition of sdcard and the second one for Submitting a user-defined test Job to that SDcard.
SDCard Image Flashing Job
In order to SDCard Image Flashing Job your machines need to be installed EBF-CLI.
Following are the steps to install setup EBF-CLI on your local Machine:
Installation Steps
Install the below dependencies on your Linux machine
$ sudo apt-get install jq curl sshpass (for Debian/Ubuntu)

$ sudo dnf install jq curl sshpass (for Rocky Linux)
Download EBF-CLI tool from “http(s)://<EBF-Server>/packages/ebf-cli/ebf.bin” and run below command
$ sudo cp {downloaded EBF-CLI path} /usr/local/bin/ebf
Give executable permission
$ sudo chmod a+x /usr/local/bin/ebf
After successfully installing EBF-CLI, you have to first configure it by providing the details of EBF-Server and user-credentials. You have to configure it only the first time unless there is no change in the user credentials. Please run the commands below to configure EBF-CLI.
$ ebf login
In order to login into EBF-CLI provide these following details.
EBF Server URL = http(s)://<EBF Server IP>
Username = <username>
Password = <password>
You can check the saved configuration for EBF using the command below.
$ ebf list config
For creating a sdcard image flashing job please follow the below steps.
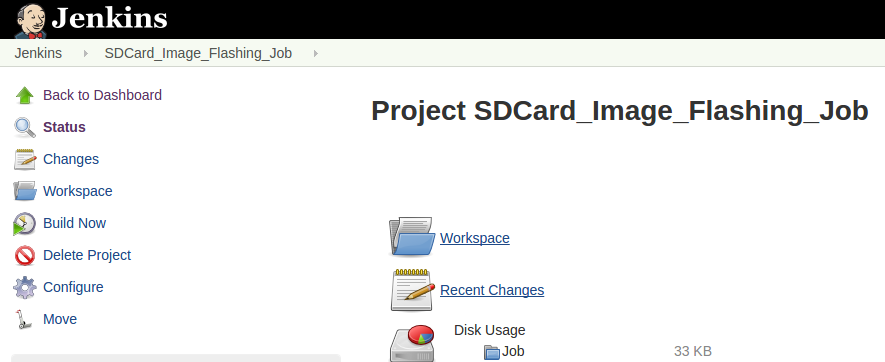
1 Go to Jenkins->new item, and provide the item name (CI Job Name). e.g. SDCard_Image_Flashing_Job in our case
2 Select Freestyle project and then click on ok to create a job.
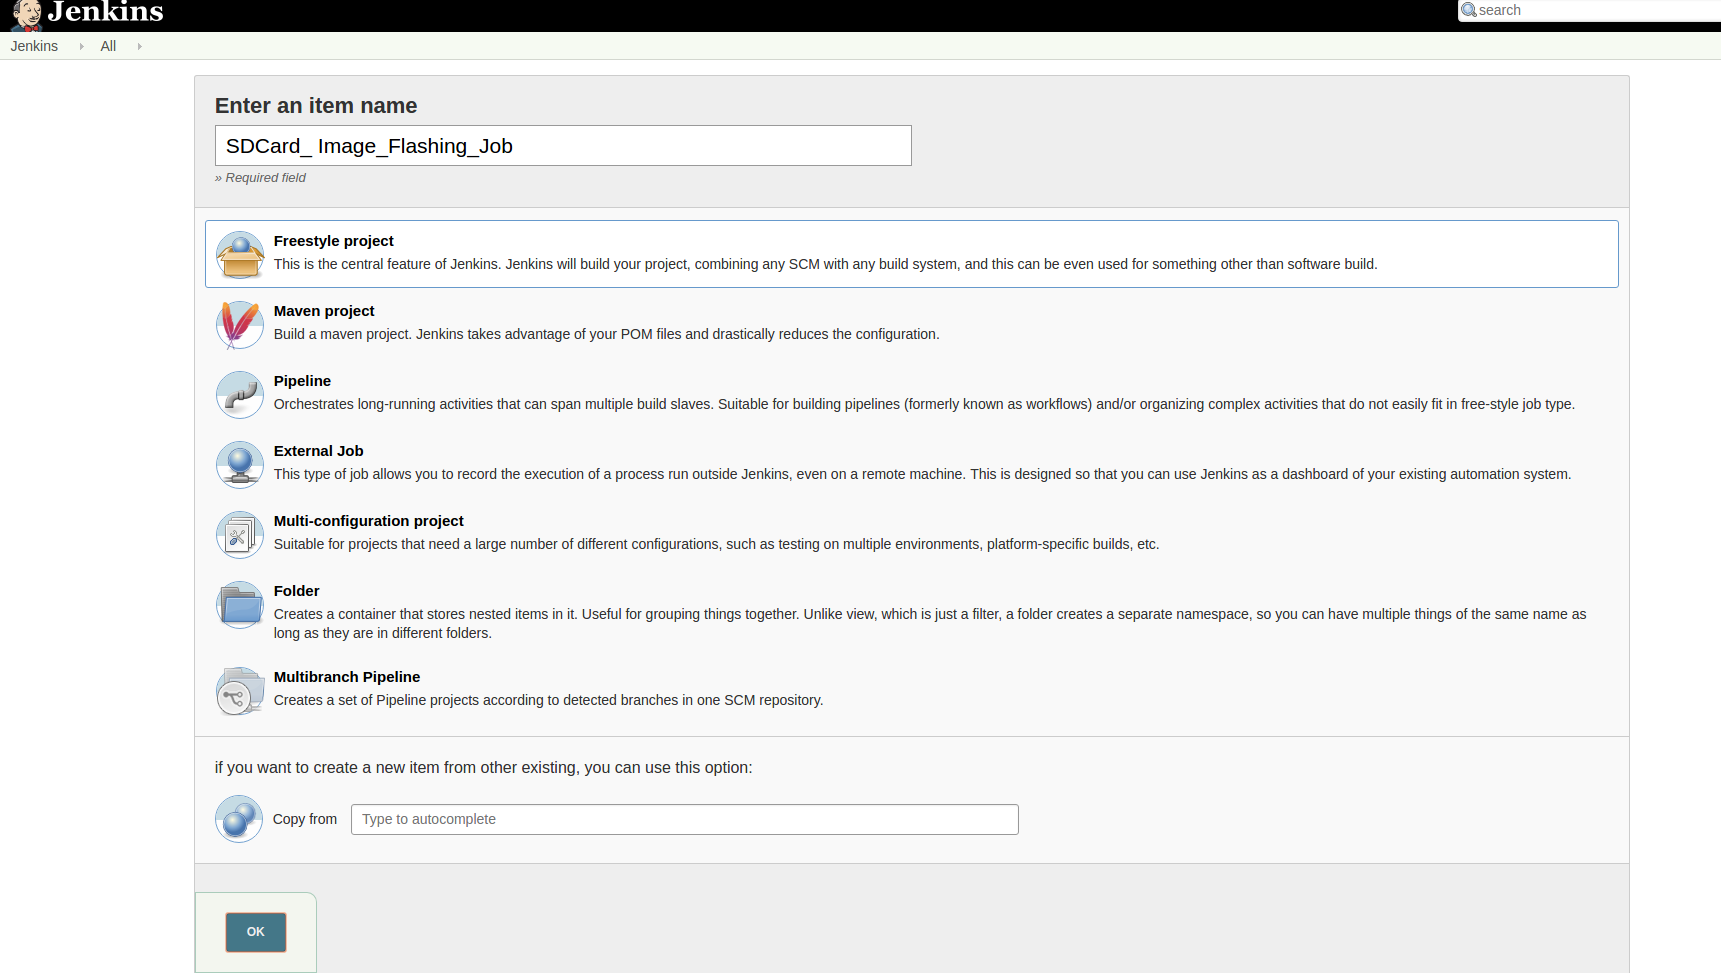
3 Click on the project you just have created and click on configure to configure the job. It has mainly five sections we have to configure to execute a job.
i General:- In this, we have to check the project name should be the same as provided.
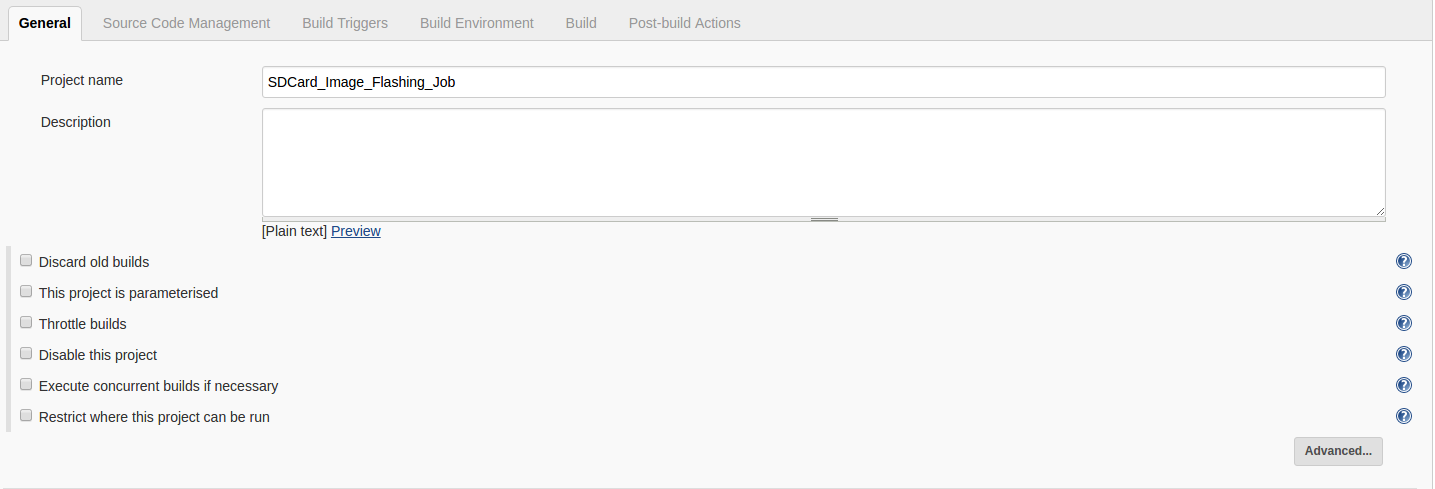
ii Source Code Management:- In this section select the none option.

iii Build Triggers:- in this section, you have to give when your job will execute. You can configure it to the nightly build, weekly, hourly etc. as per your requirement,
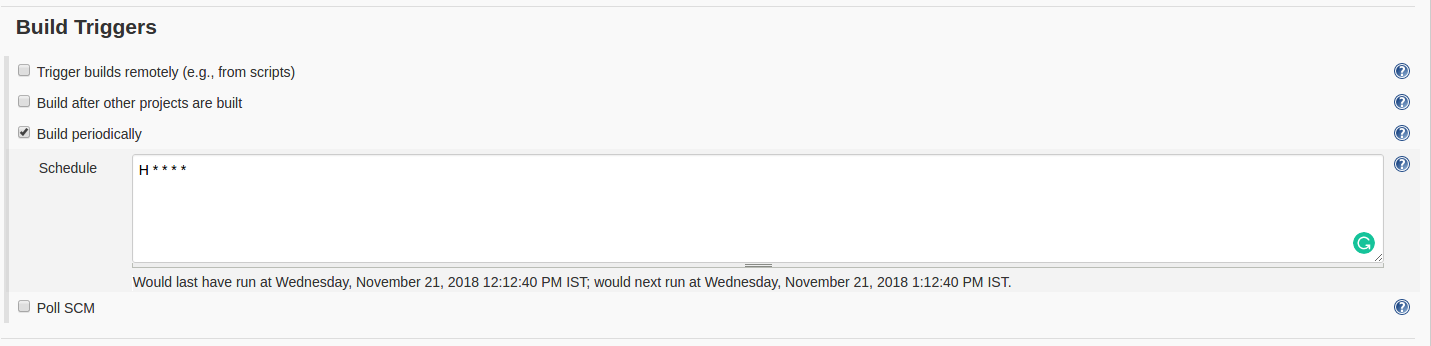
In this example, we configured the job to build every hour. You can Click on question mark link“?” highlighted in the above diagram to learn more about it.
iv Build:- In the build section we have to provide the build steps, it has various options like we can add batch command, ant scripts, use the shell to provide commands etc. Select execute shell option and provide the following commands in the text area.
DEVICE_NAME=<Device Name>
IMAGE_NAME=<Image Name>
PARTITION= <sdcard/partition>
TOOL=<Flashing Tool>
e.g. ebf $DEVICE_NAME sdcard flash server -f $IMAGE_NAME -p $PARTITION -t $TOOL -r on
v Post-build action:- In this section you can manage the post-build actions like archives build artifacts, Build other projects etc.
In our case, we used Build other projects and provided the test job name that will trigger a job on newly flashed sdcard.
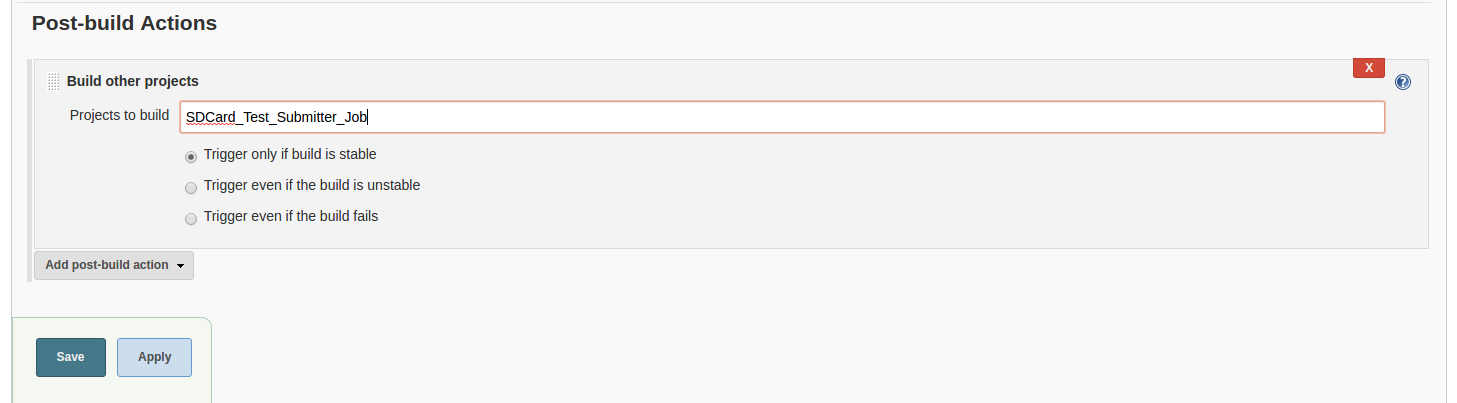
4 After providing all the details click on Save button to save the job configuration.
5 If you want to trigger build immediately then click on build now option.
SDCard Test Submitter Job
For creating a sdcard test submitter job please follow the below steps
1 Go to Jenkins->new item, and provide the item name (CI Job Name). e.g. SDCard_Test_Submitter_Job in our case
2 Select Freestyle project and then click on ok to create a job.
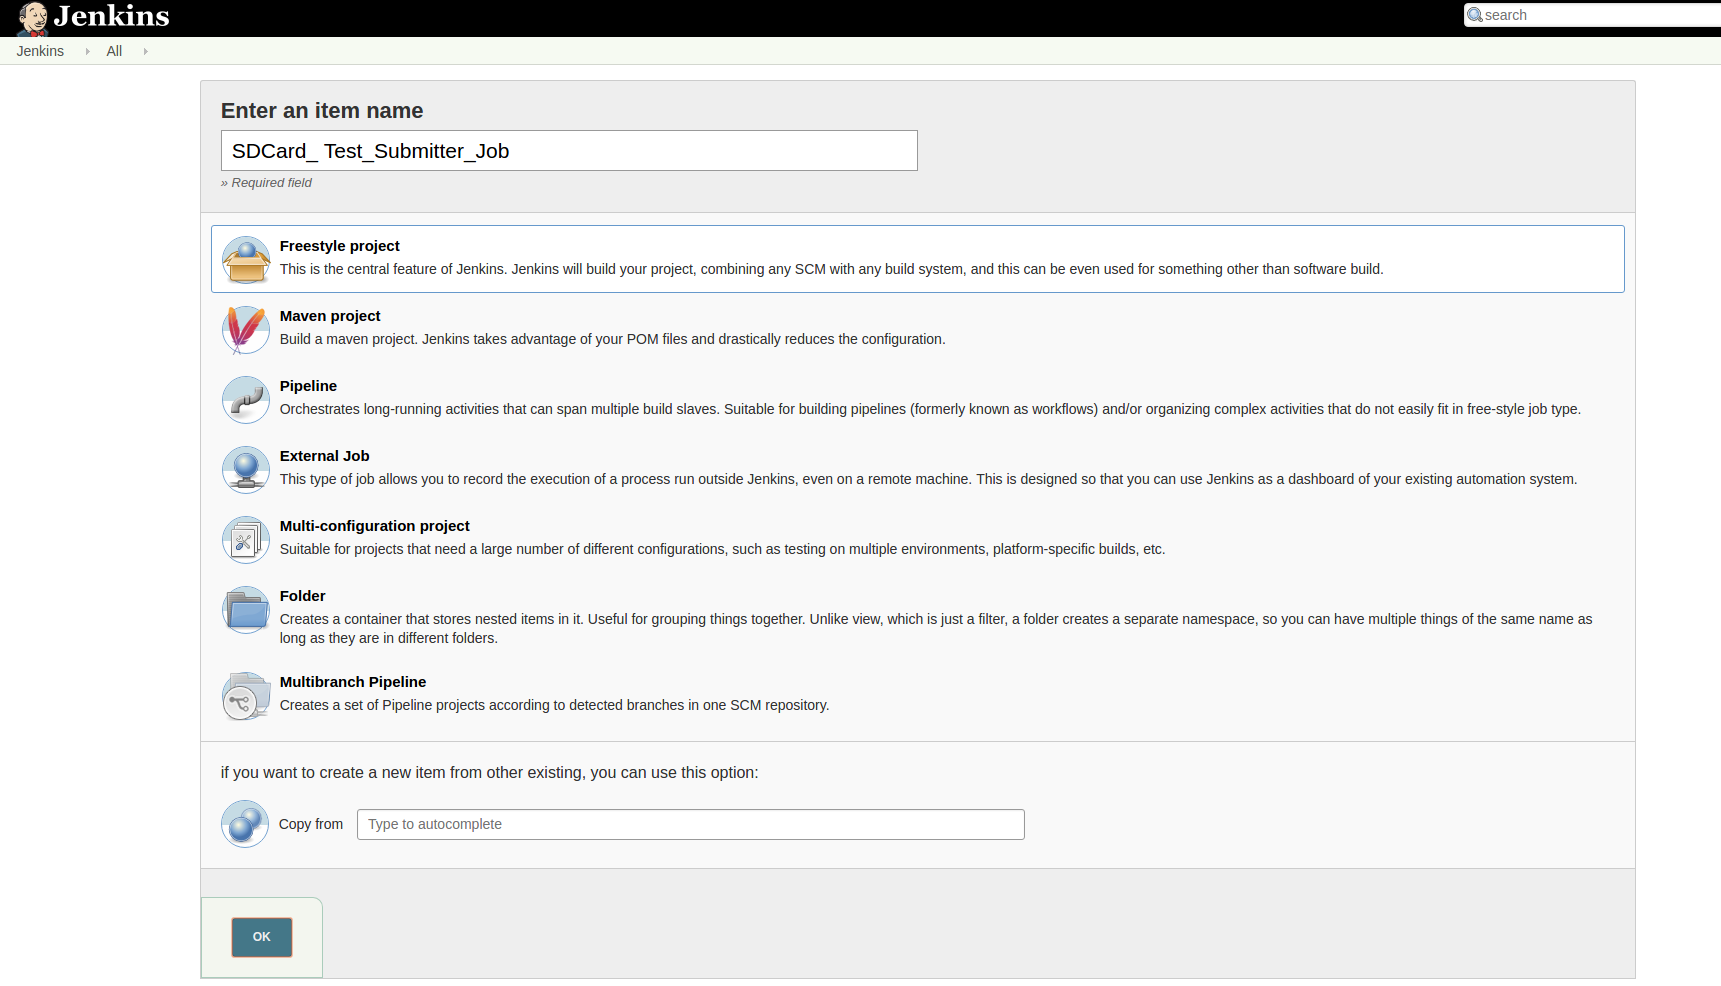
3 Click on the project you just have created and click on configure to configure the job. In this, we have to configure mainly four sections to execute a job.
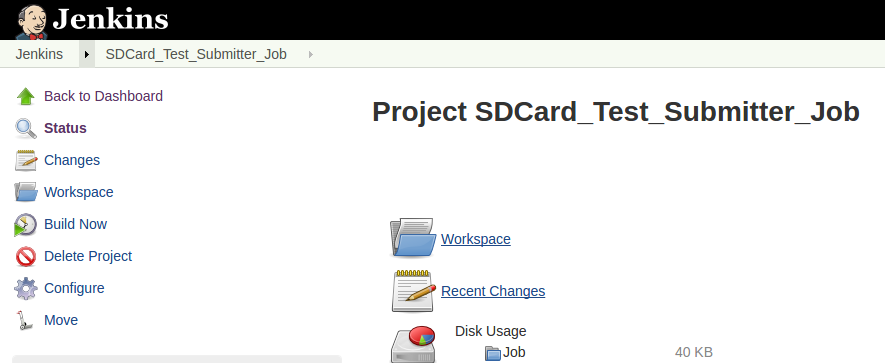
i General:- In this, we have to check the project name should be the same as provided.
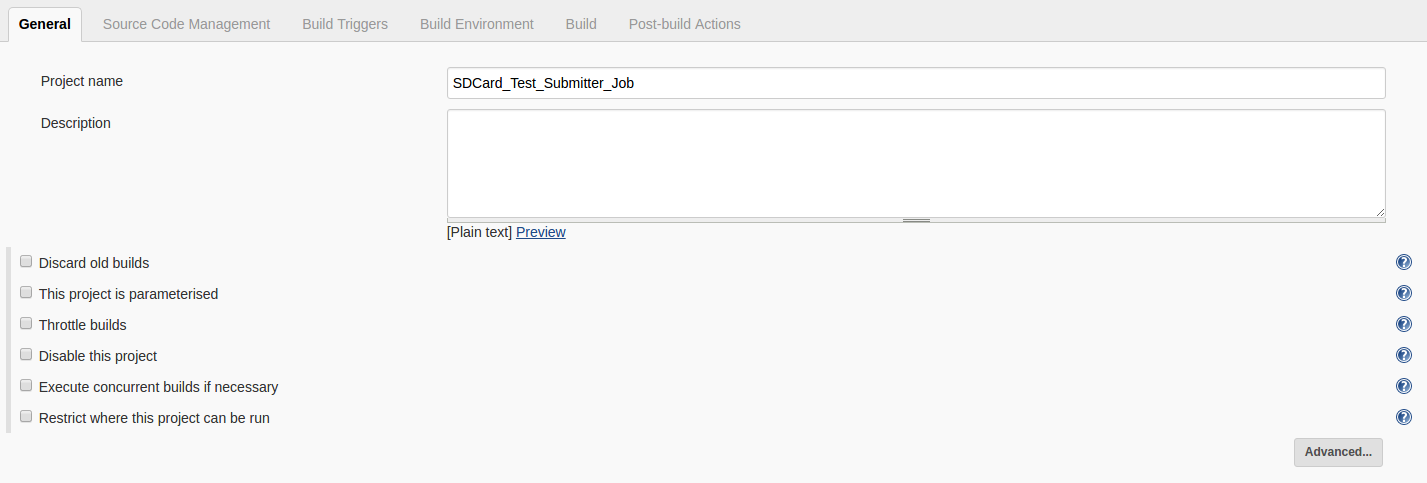
ii Source Code Management:- In this section select the none option.

iii Build Triggers:- in this section, you have to give when your job will execute. You can configure it to the nightly build, weekly, hourly etc. as per your requirement,
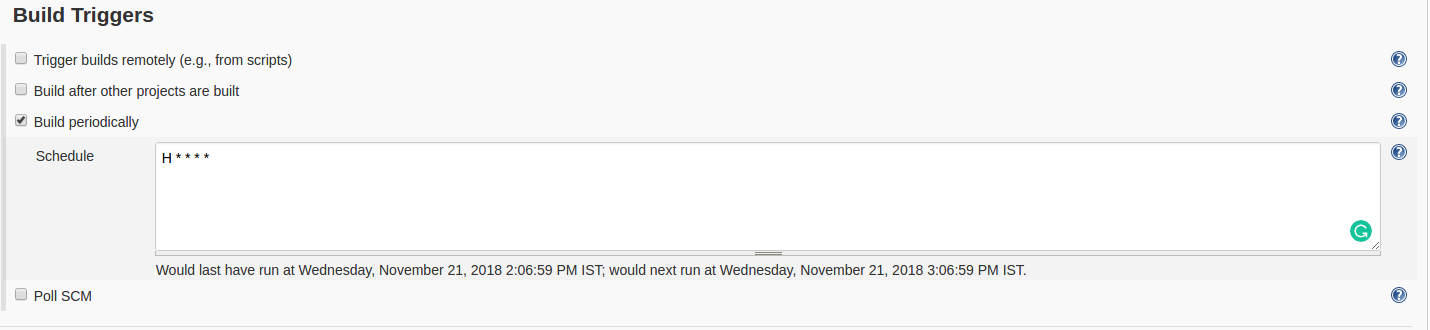
In this example, we configured the job to build every hour. You can Click on question mark link“?” highlighted in the above diagram to learn more about it.
iv Build:- In the build section we have to provide the build steps, it has various options like we can add batch command, ant scripts, use the shell to provide commands etc. Select execute shell option and provide the following commands in the text area.
EBF_TAS_IP=<Device IP>
USER=<EBF-TAS USer>
TEST_YAML=<PATH OF Yaml file on system where Jenkins is installed>
TOKEN=<Authentication Token of EBF-TAS for password less job submission>
ts-lava-submit.py -s $EBF_TAS_IP -u $USER -t $TEST_YAML -a $TOKEN
4 After providing all the details click on Save button to save the job configuration.
5 If you want to trigger build immediately then click on build now option.
Appendix
How to run YoctoPtest Package test
Prerequisite: Device shall already be added in the EBF. Follow these steps to add a device in EBF
Follow the steps below to run a Package Test.
1 Login to EBF-TAS dashboard through web browser with your credentials
Username : <username>
Password : <password>
2 Go to Lava -> Job Submit.
Select ‘Job Submission Wizard’ option from Job Submit page.
Job: Basic Job Details page will appear on the screen. Provide Job name in job name section.
For example: RunYoctoPackageTest
After providing job name, select ‘YoctoPtestTestPlan’ and hit ‘Next’ button.
NOTE: This test Plan will run all Yocto Ptest tests that are available on device’s image(BSP).
Deployment Details: Provide Image Deployment details on this page. Select the device on which you want to run the test job and hit ‘Save’ button. Follow this link for more information on Deploymment
Cancel: Select Cancel button to reset Test job submission page.
Save: Hit Save Button to preserve Test job details.
3 On successful save, new test job will be visible on ‘Saved Jobs’ page.
4 From this screen, click “Run” action button to submit the test job.
5 Job will be submitted to EBF for execution.
Customize YoctoPTest Test Plan
Follow the steps below to run a Package Test.
1 Login to EBF-TAS dashboard through web browser with your credentials
Username : <username>
Password : <password>
2 Go to Lava -> Job Submit.
Select ‘Job Submission Wizard’ option from Job Submit page.
Job: Basic Job Details page will appear on the screen. Provide Job name in job name section.
For example: RunYoctoPackageTest
After providing job name, select ‘YoctoPtestTestPlan’ and hit ‘Next’ button.
NOTE: This test Plan will run all Yocto Ptest tests that are available on device’s image(BSP).
Deployment Details: Provide Image Deployment details on this page. Select the device on which you want to run the test job and hit ‘Save’ button. Follow this link for more information on Deploymment
Cancel: Select Cancel button to reset Test job submission page.
Save: Hit Save Button to preserve Test job details.
3 On successful save, new test job will be visible on ‘Saved Jobs’ page.
4 From this screen, click “Run” action button to submit the test job.
5 On the job details page shown on screen, click on ‘Resubmit’ button.
6 In the shown job YAML, edit the package list following “-b” keyword in the test_runner argument to include or exclude any packages in the test plan. The package names can be entered in comma separated format as shown in the image below:
7 Click on ‘Submit’ button to submit the job.
How to run Lmbench Test
1 Login to EBF-TAS dashboard through web browser with your credentials
Username : <username>
Password : <password>
2 Go to lava -> Select View -> Test Case option from ‘Tests’ drop down list as shown:
3 View Test Case page will appear on the screen.
4 Make a duplicate copy of the TestCase ‘Template-Lmbench-Test’.
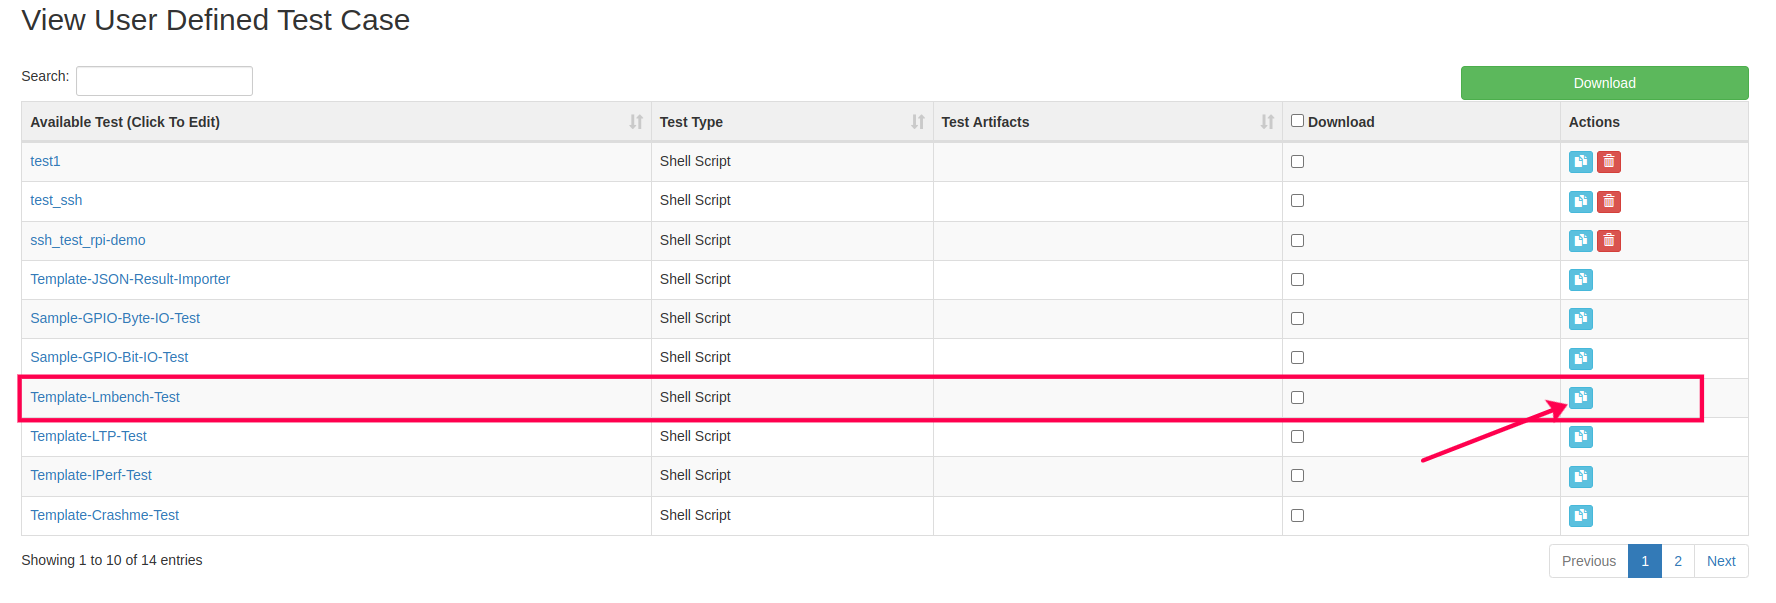
5 Enter the name of the new Test Case and hit ‘Save’ button.
6 New Test Case will be shown on the screen.

7 Now select Create -> Test Plan option from ‘Tests’ drop down list as shown:
8 Create Test Plan page will appear on the screen.

9 Fill the necessary fields:
Test Name: <Suitable name for test plan>
From the ‘Test Suite’ dropdown shown, select option ‘User Defined Tests’.
From ‘Show Interactive Tests’ dropdown, select option ‘NO’.
From the shown Test Cases list, tick the checkbox corresponding to Test Case ‘Custom-Lmbench-Test’.
Then hit the ‘Save’ button.
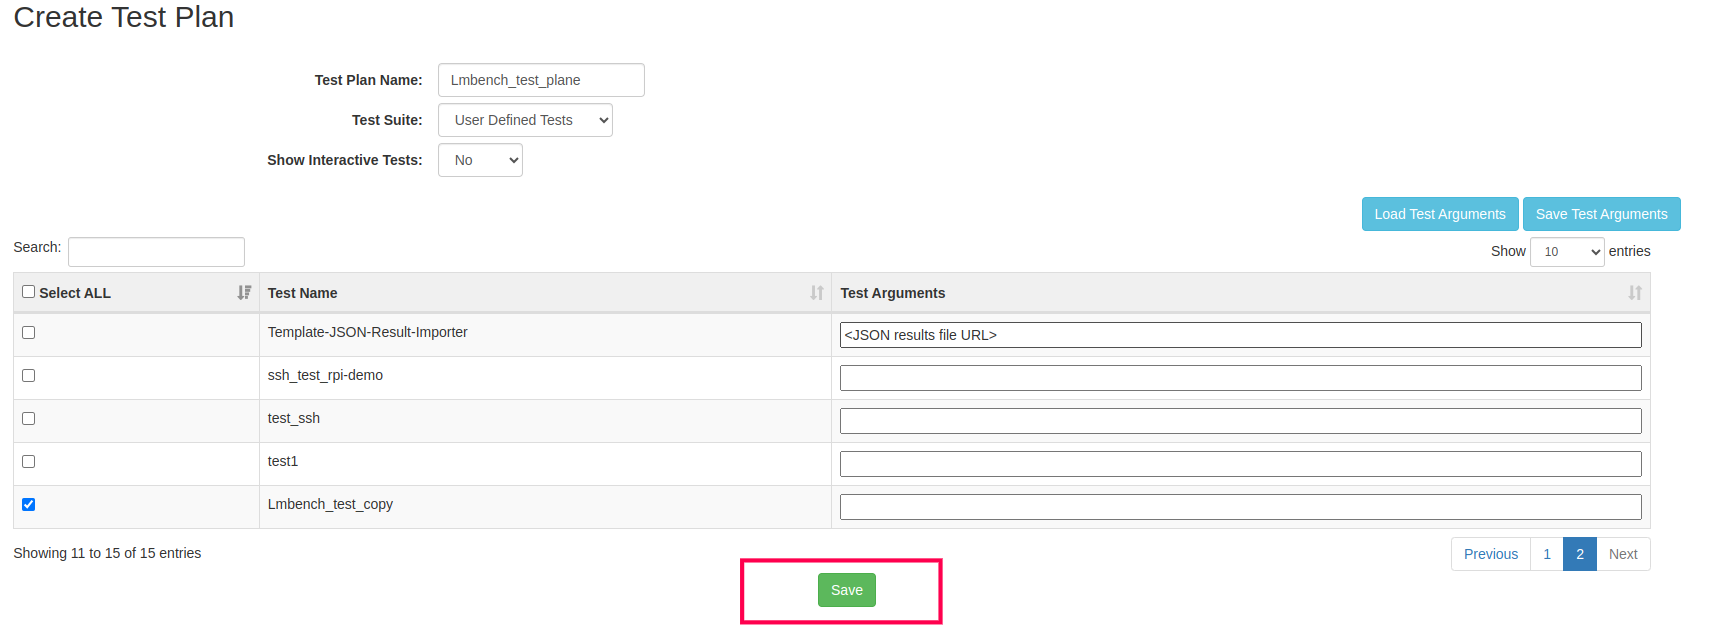
10 Newly created test plan name will be listed on the screen, as highlighted in image below:

11 Now go to the ‘Job Submit’ page under ‘Lava’ menu option.
12 The Job Submit page will appear on the screen. Select ‘Job Submission Wizard’ option from Job Submit page.
13 Here, provide Job name and select the TestPlan. Then click on ‘Next’ Button.
14 Provide all the deployment details on this page and click on ‘Save’ button.
15 On successful save, newly created job will be shown on the ‘Saved Jobs’ page.

16 From this screen user can submit newly created test job by clicking on its “Run” action button.

How to run Crashme Test
1 Login to EBF-TAS dashboard through web browser with your credentials
Username : <username>
Password : <password>
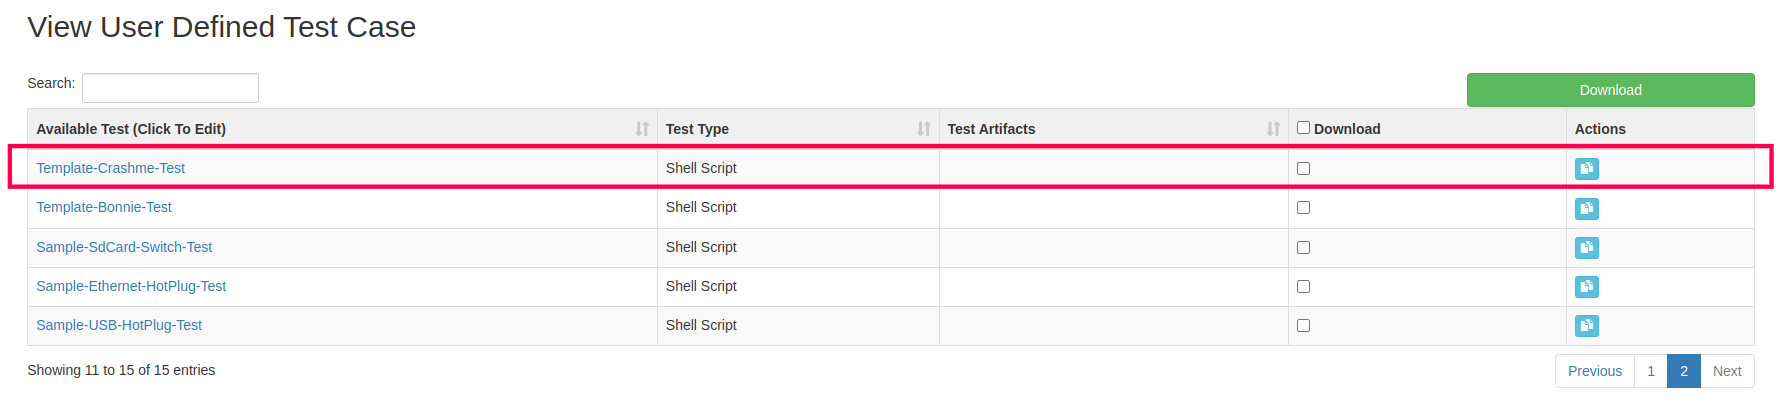
2 Go to Lava -> Select View -> Test Case option from ‘Tests’ drop down list as shown:
3 View Test Case page will appear on the screen.
4 Make a duplicate copy of the TestCase ‘Template-Crashme-Test’.
5 Enter the name of the new Test Case and hit ‘Save’ button.
6 New Test Case will be shown on the screen.

7 Go to Lava -> Now select Create -> Test Plan option from ‘Tests’ drop down list as shown:
8 Create Test Plan page will appear on the screen.
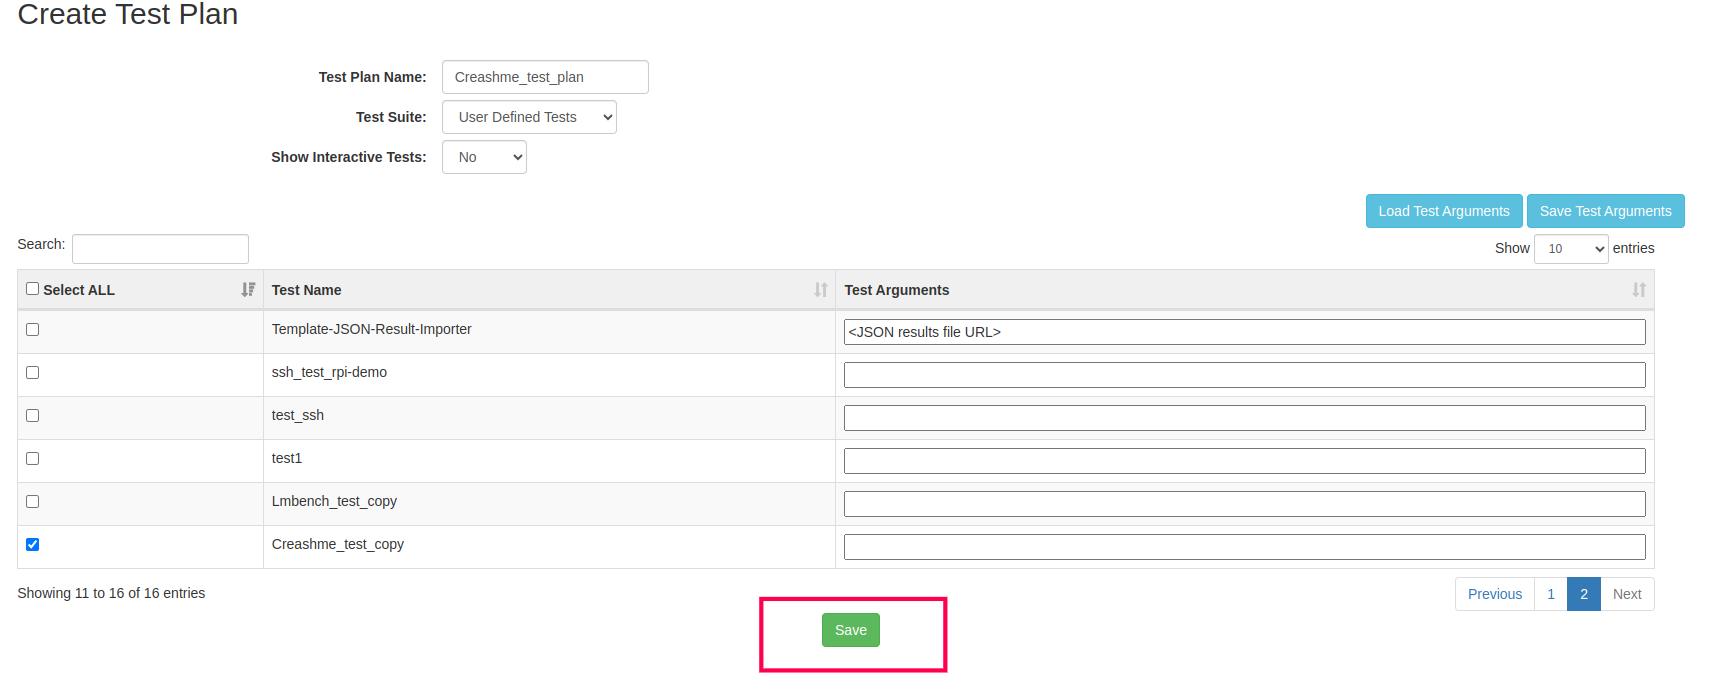
9 Fill the necessary fields:
Test Name: <Suitable name for test plan>
From the ‘Test Suite’ dropdown shown, select option ‘User Defined Tests’.
From ‘Show Interactive Tests’ dropdown, select option ‘NO’.
From the shown Test Cases list, tick the checkbox corresponding to Test Case ‘Custom-Crashme-Test’.
Then hit the ‘Save’ button.
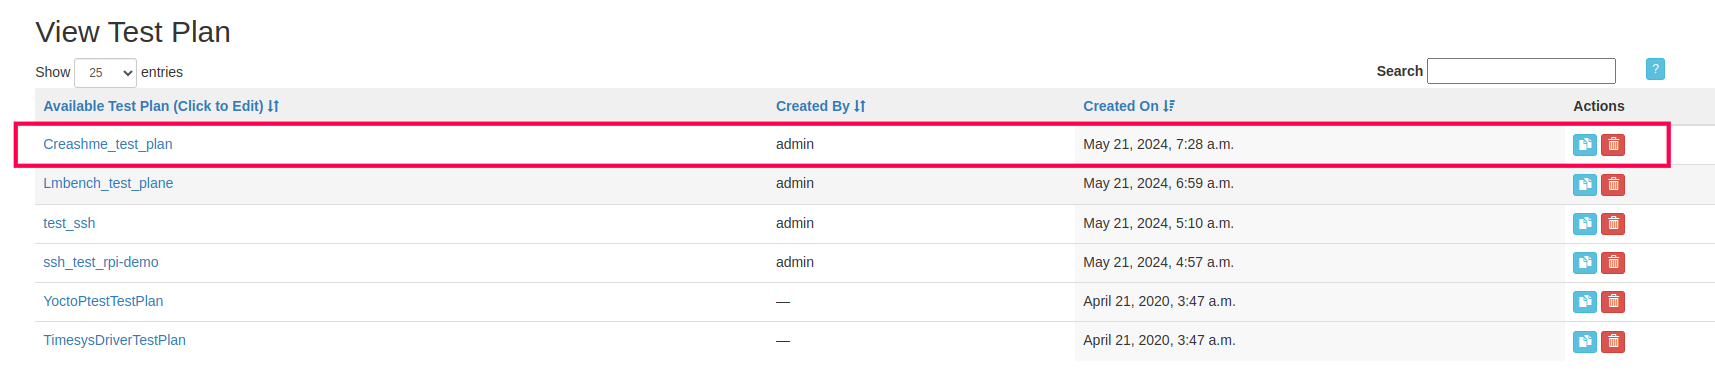
10 Newly created test plan name will be listed on the screen, as highlighted in image below:
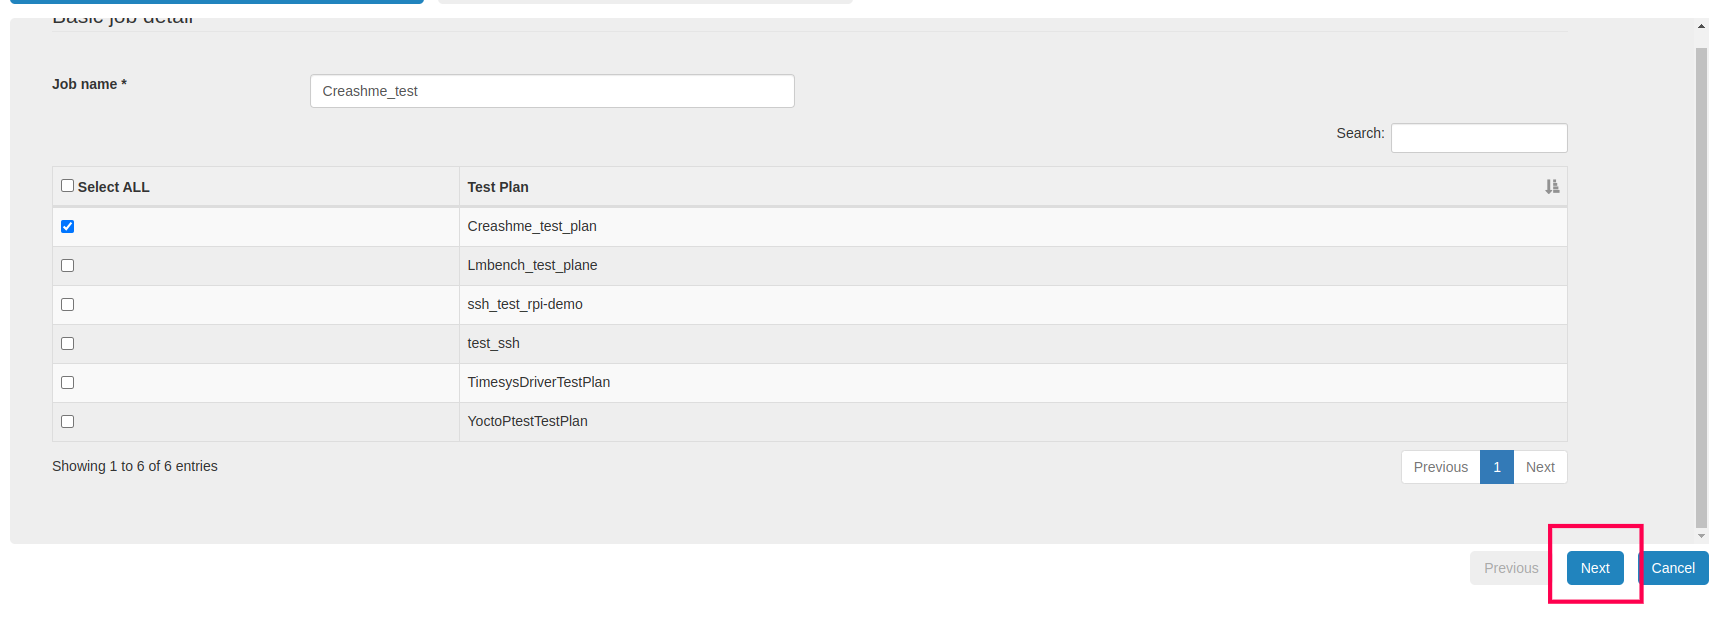
11 Now go to the ‘Job Submit’ page under ‘Lava’ menu option.
12 The Job Submit page will appear on the screen. Select ‘Job Submission Wizard’ option from Job Submit page.
13 Here, provide Job name and select the TestPlan. Then click on ‘Next’ Button.
14 Provide all the deployment details on this page and click on ‘Save’ button.
15 On successful save, newly created job will be shown on the ‘Saved Jobs’ page.

16 From this screen user can submit newly created test job by clicking on its “Run” action button.

How to run Bonnie Test
1 Login to EBF-TAS dashboard through web browser with your credentials
Username : <username>
Password : <password>
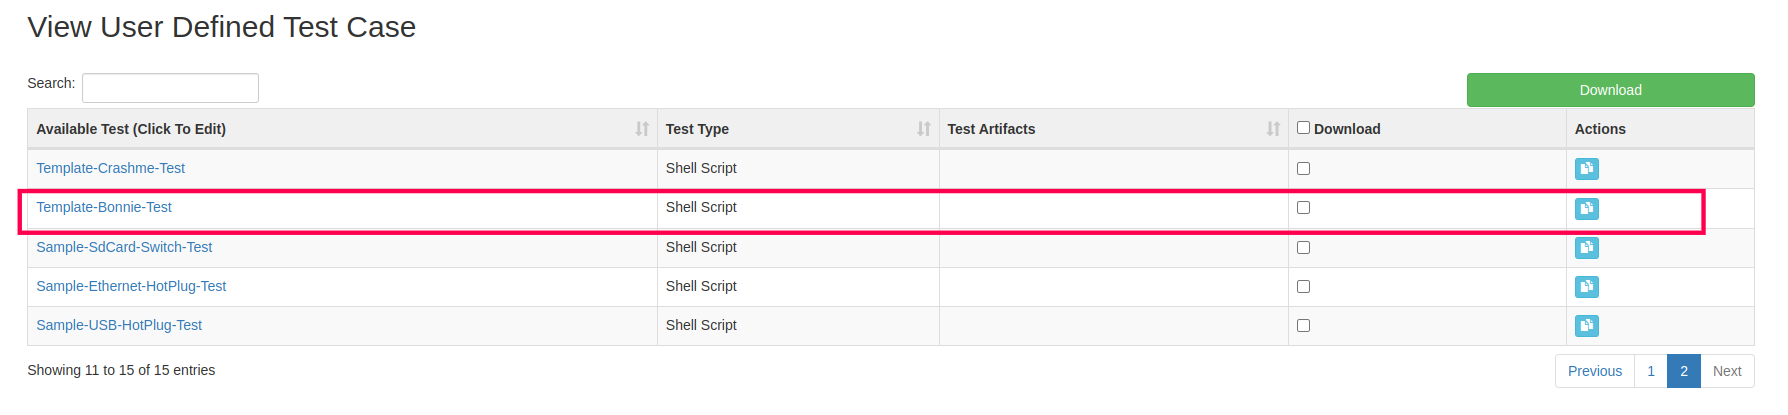
2 Select View -> Test Case option from ‘Tests’ drop down list as shown:
3 View Test Case page will appear on the screen.
4 Make a duplicate copy of the TestCase ‘Template-Bonnie-Test’.
5 Enter the name of the new Test Case and hit ‘Save’ button.
6 New Test Case will be shown on the screen.

7 Now select Create -> Test Plan option from ‘Tests’ drop down list as shown:
8 Create Test Plan page will appear on the screen.
9 Fill the necessary fields:
Test Name: <Suitable name for test plan>
From the ‘Test Suite’ dropdown shown, select option ‘User Defined Tests’.
From ‘Show Interactive Tests’ dropdown, select option ‘NO’.
From the shown Test Cases list, tick the checkbox corresponding to Test Case ‘Custom-Bonnie-Test’.
Then hit the ‘Save’ button.
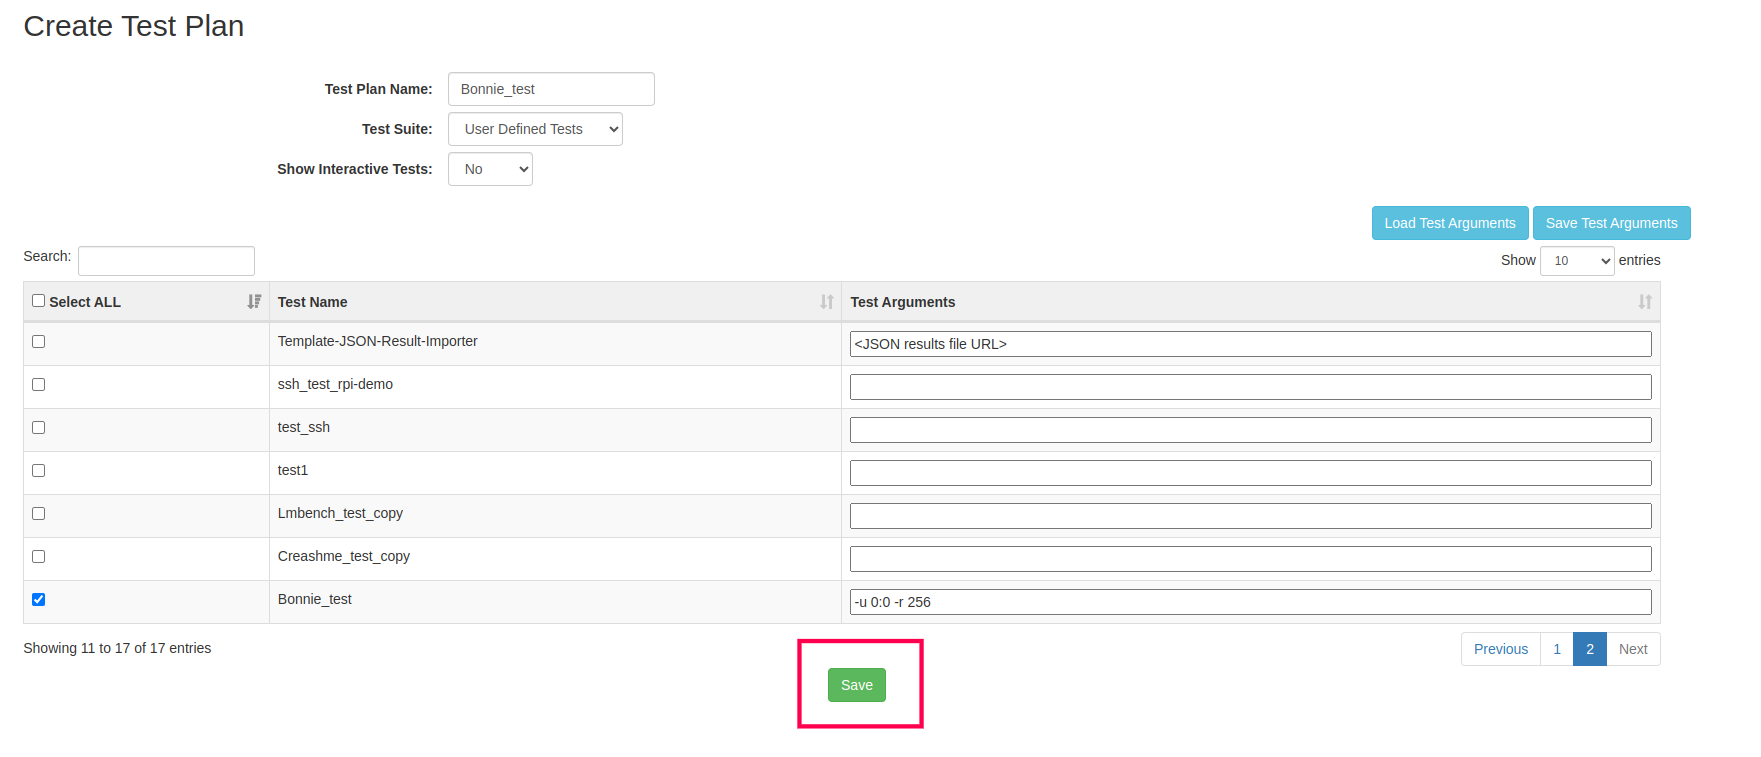
10 Newly created test plan name will be listed on the screen, as highlighted in image below:

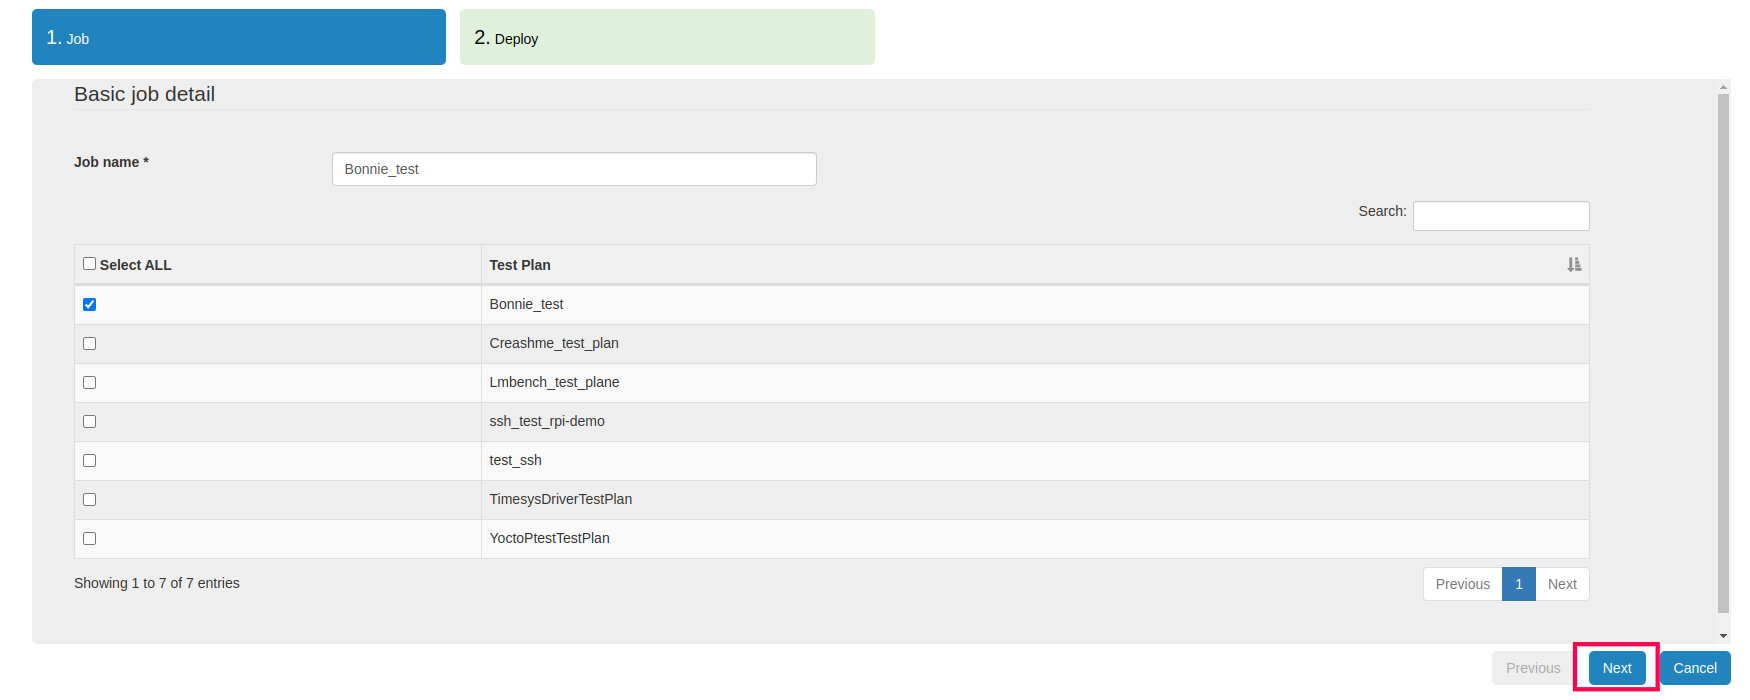
11 Now go to the ‘Job Submit’ page under ‘Scheduler’ menu option.
12 The Job Submit page will appear on the screen. Select ‘Job Submission Wizard’ option from Job Submit page.
13 Here, provide Job name and select the TestPlan. Then click on ‘Next’ Button.
14 Provide all the deployment details on this page and click on ‘Save’ button.
15 On successful save, newly created job will be shown on the ‘Saved Jobs’ page.
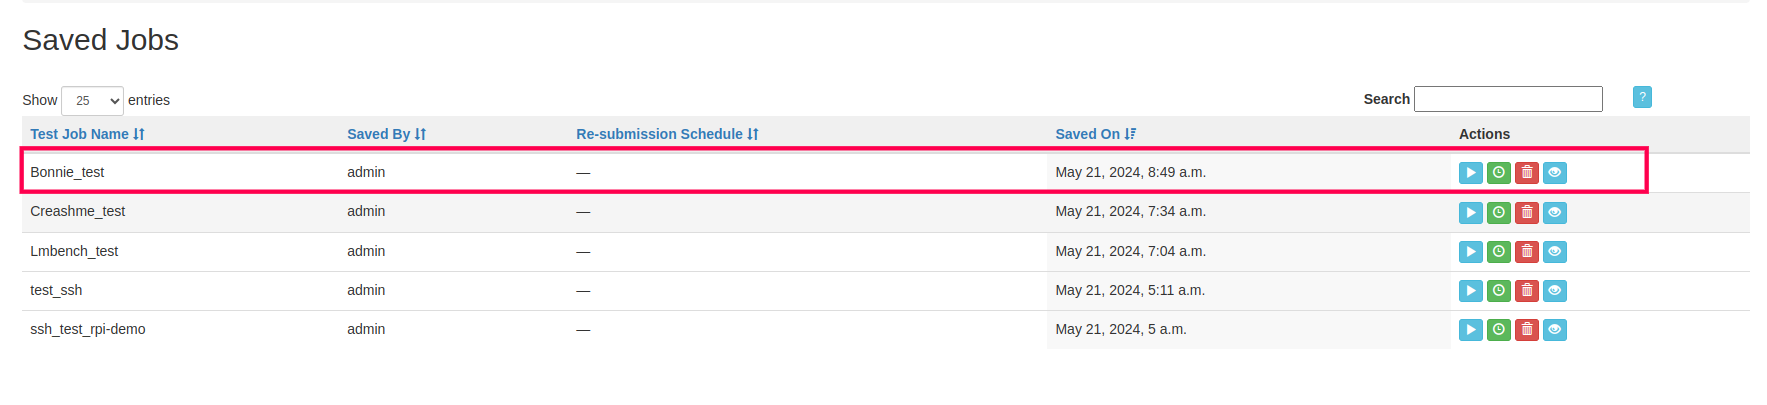
16 From this screen user can submit newly created test job by clicking on its “Run” action button.
How to run LTP Test
1 Login to EBF-TAS dashboard through web browser with your credentials
Username : <username>
Password : <password>
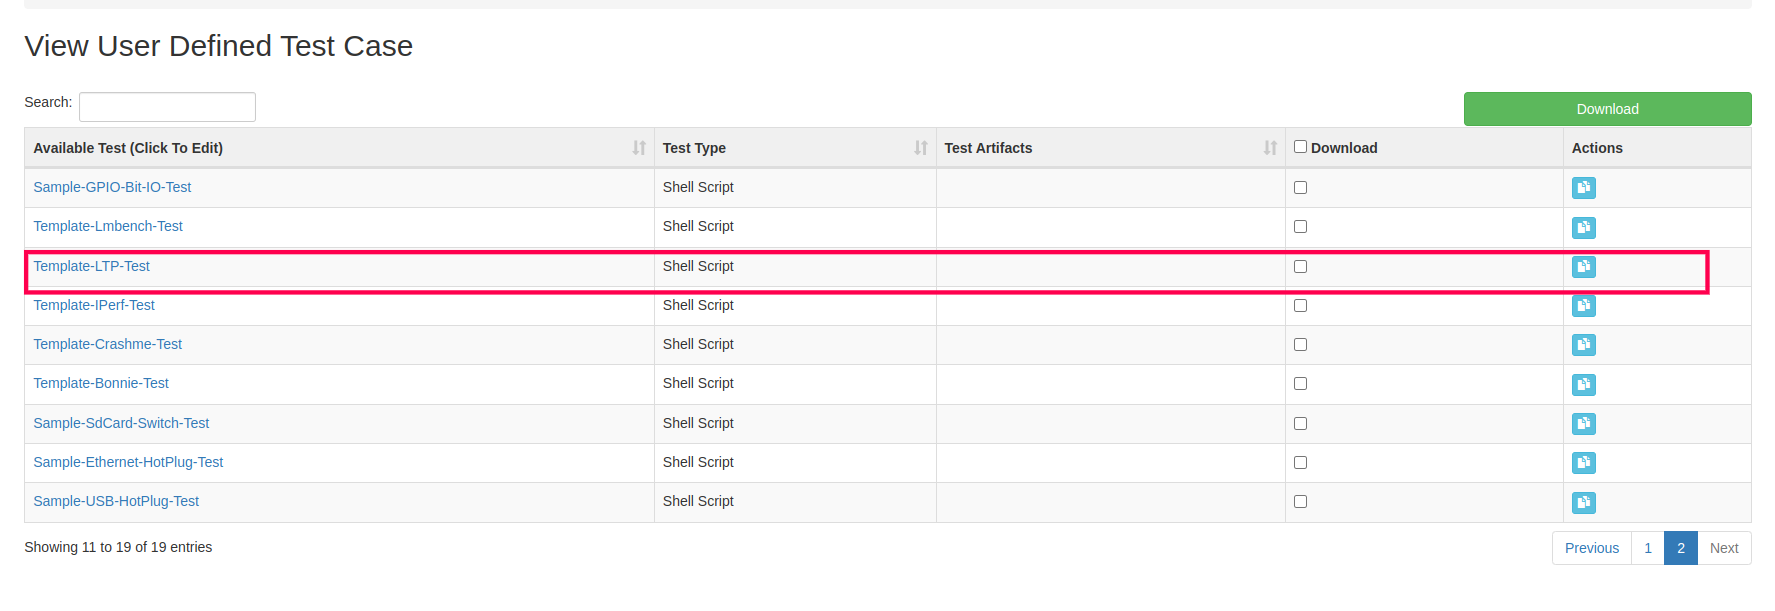
2 Select View -> Test Case option from ‘Tests’ drop down list as shown:
3 View Test Case page will appear on the screen.
4 Make a duplicate copy of the TestCase ‘Template-LTP-Test’.
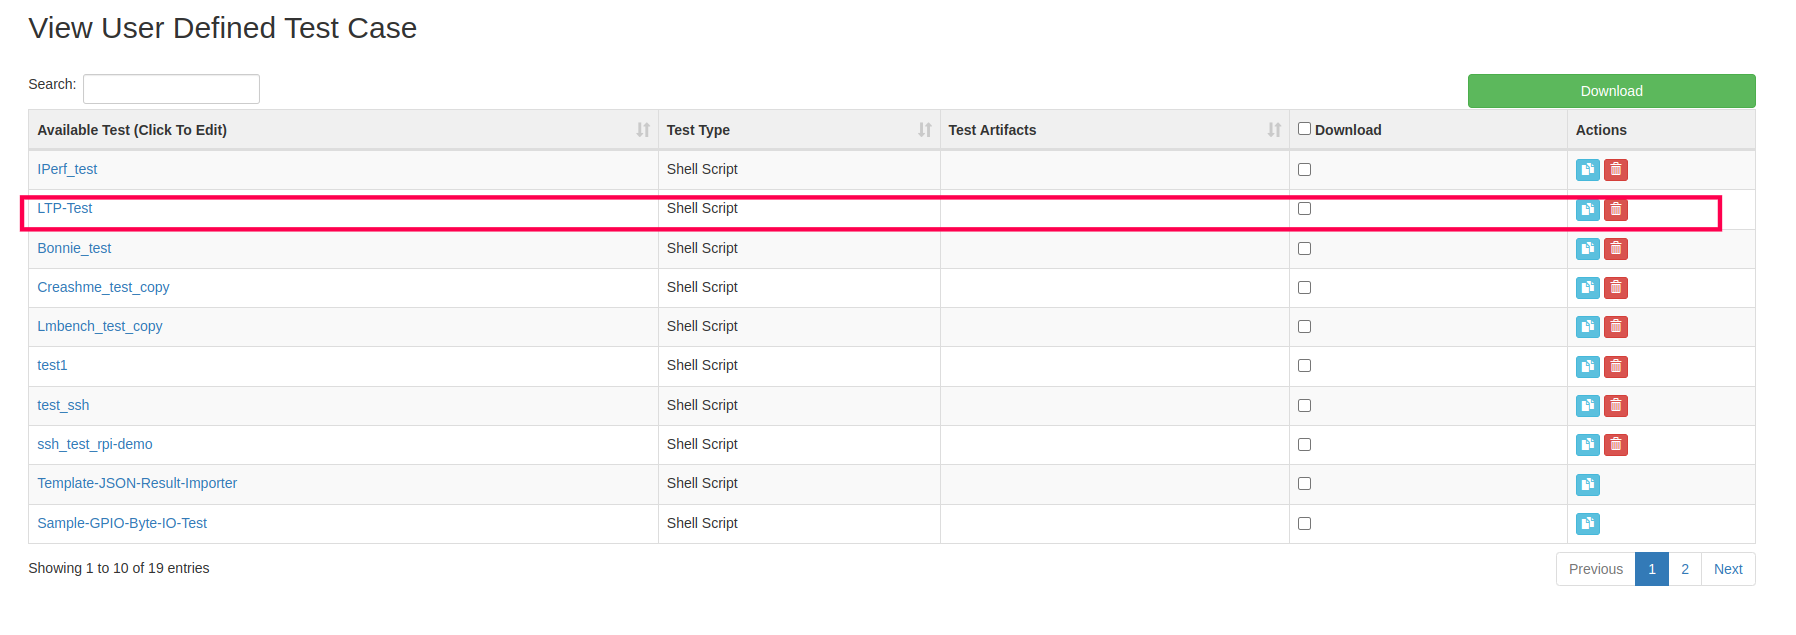
5 Enter the name of the new Test Case and hit ‘Save’ button.
6 New Test Case will be shown on the screen.
7 Now select Create -> Test Plan option from ‘Tests’ drop down list as shown:
8 Create Test Plan page will appear on the screen.
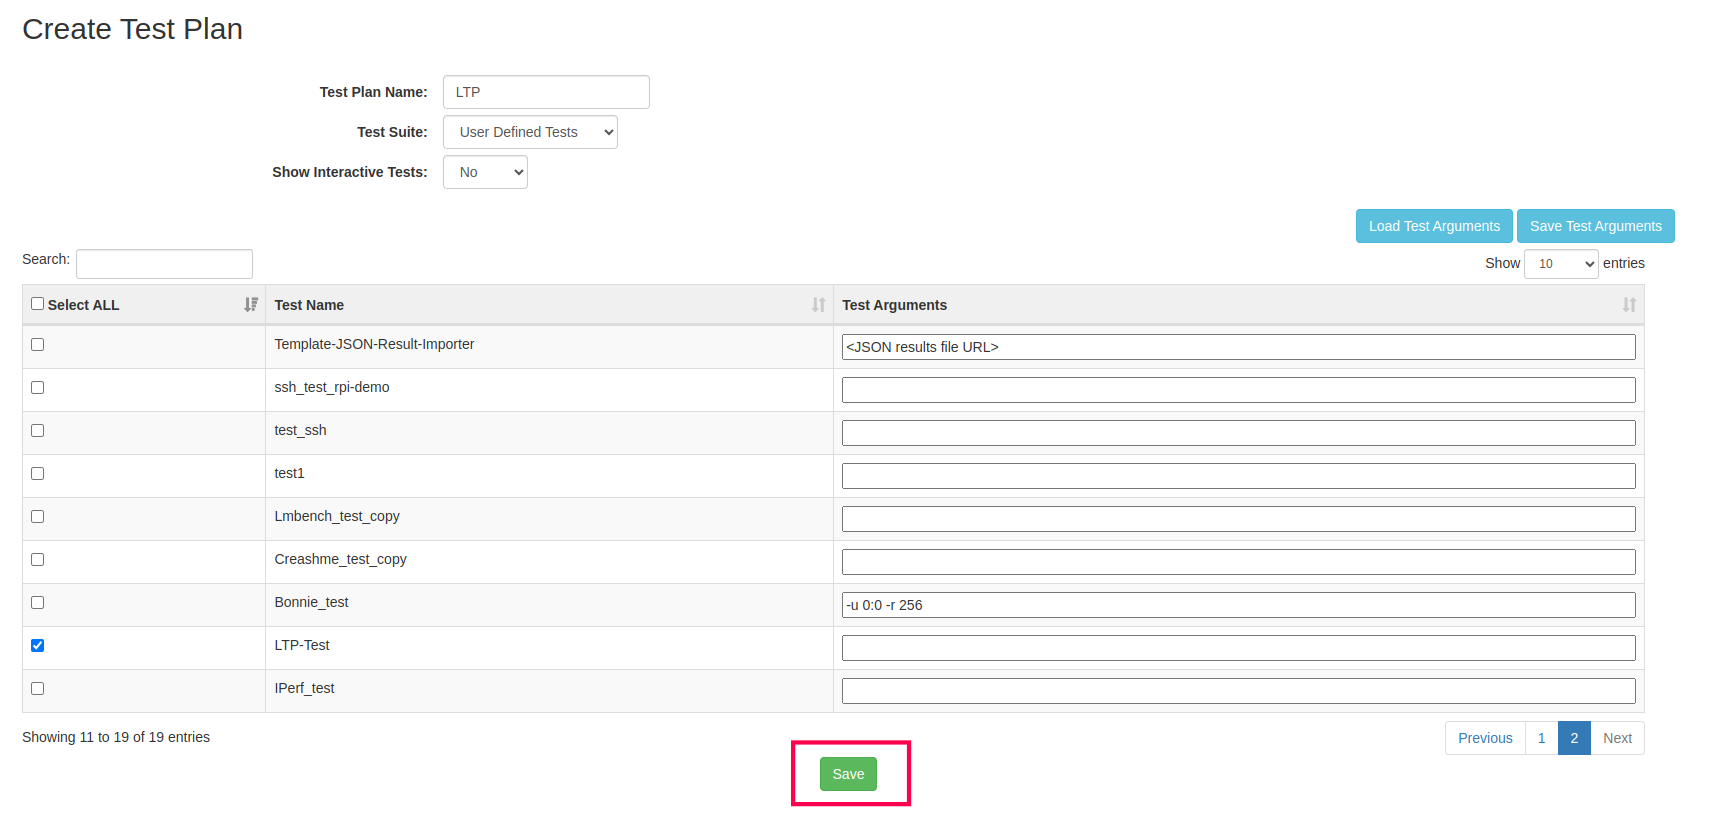
9 Fill the necessary fields:
Test Name: <Suitable name for test plan>
From the ‘Test Suite’ dropdown shown, select option ‘User Defined Tests’.
From ‘Show Interactive Tests’ dropdown, select option ‘NO’.
From the shown Test Cases list, tick the checkbox corresponding to Test Case ‘Custom-LTP-Test’.
Then hit the ‘Save’ button.
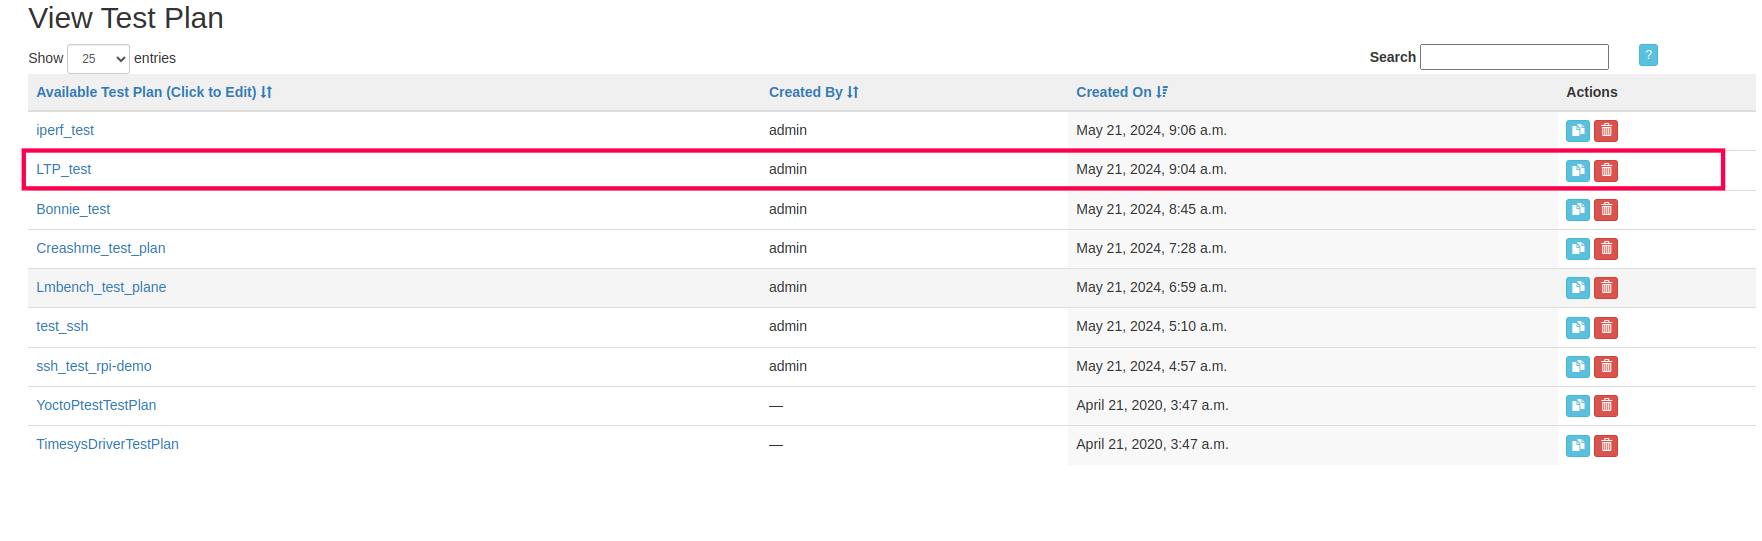
10 Newly created test plan name will be listed on the screen, as highlighted in image below:
11 Now go to the ‘Job Submit’ page under ‘Scheduler’ menu option.
12 The Job Submit page will appear on the screen. Select ‘Job Submission Wizard’ option from Job Submit page.
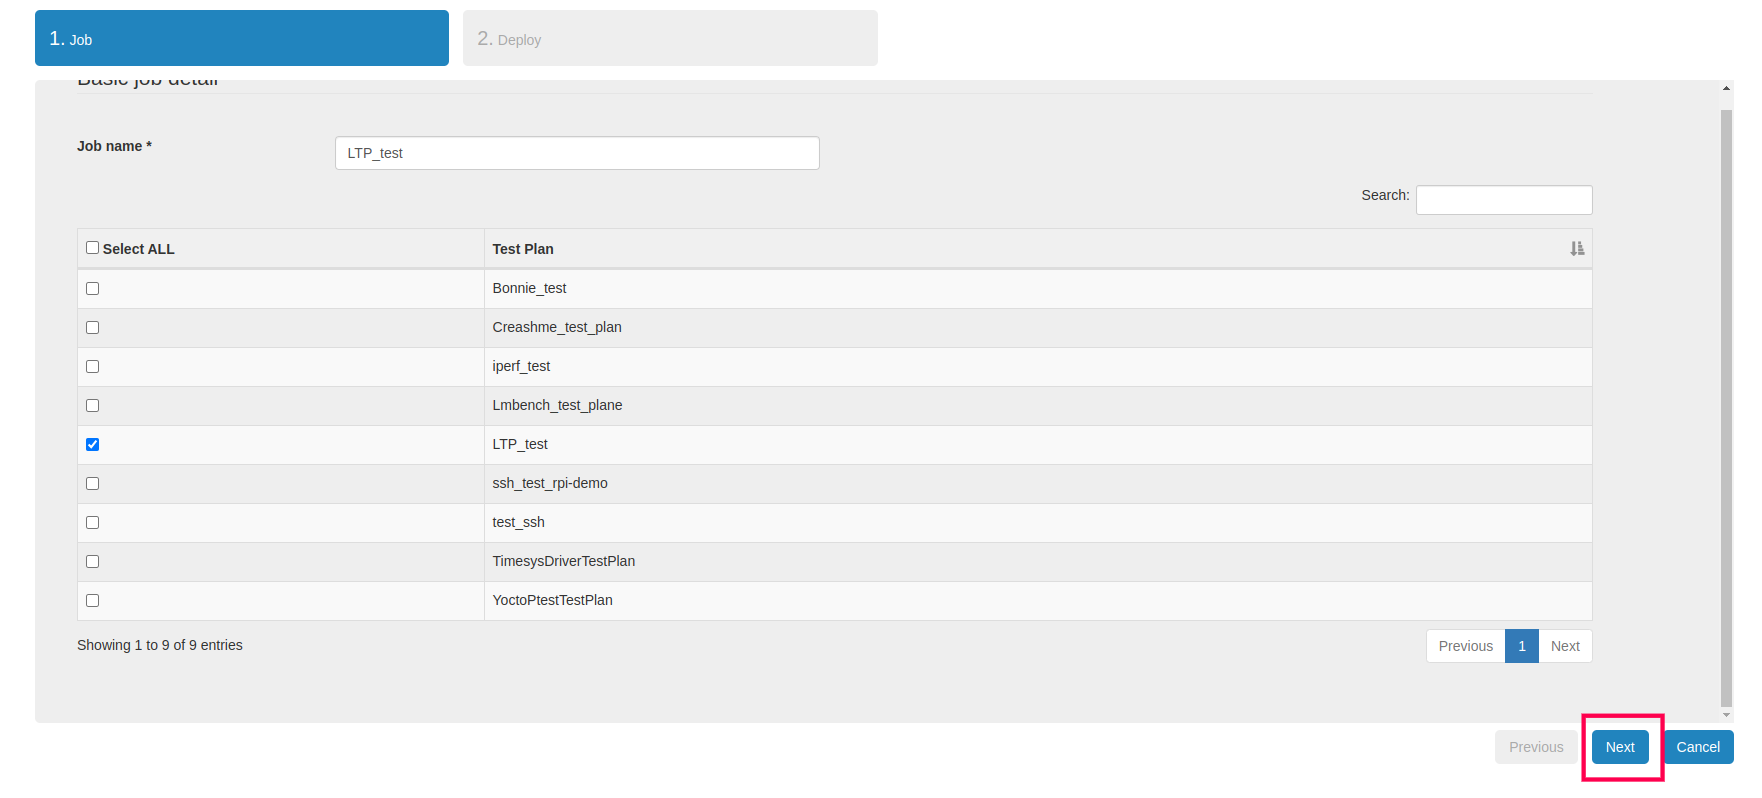
13 Here, provide Job name and select the TestPlan. Then click on ‘Next’ Button.
14 Provide all the deployment details on this page and click on ‘Save’ button.
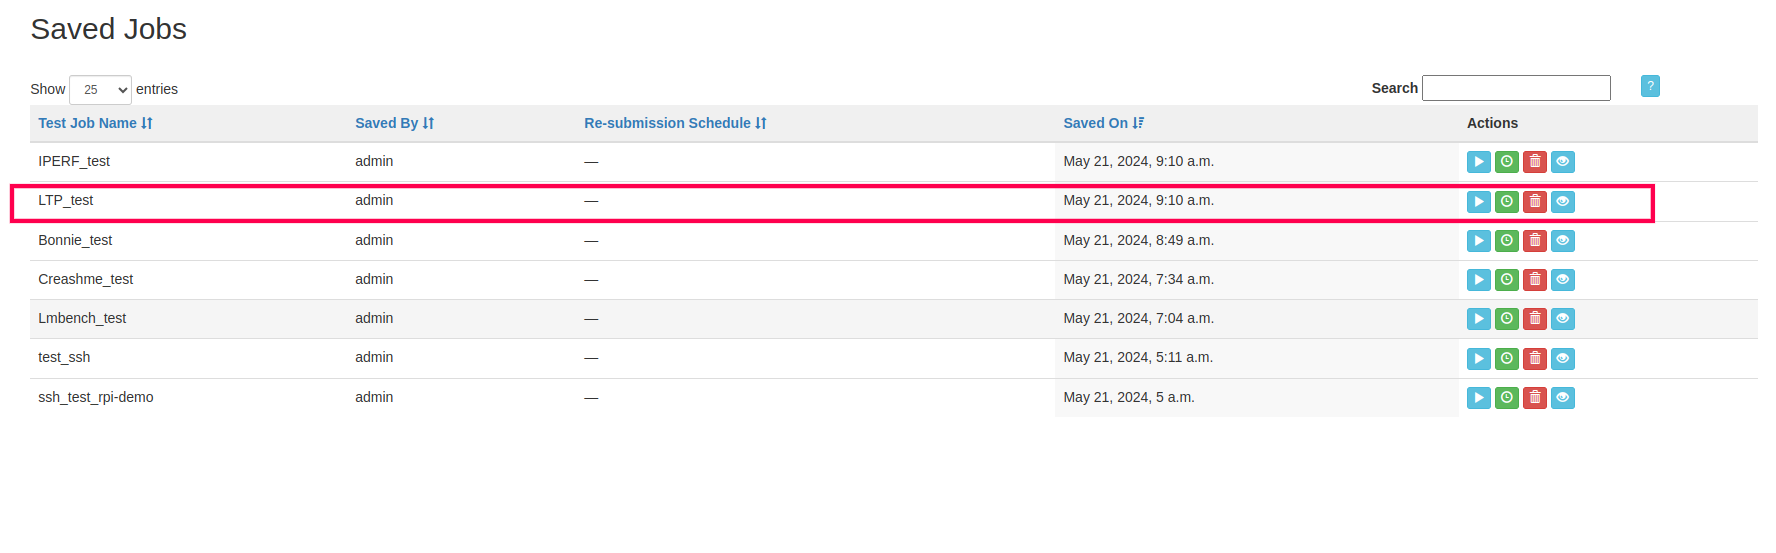
15 On successful save, newly created job will be shown on the ‘Saved Jobs’ page.
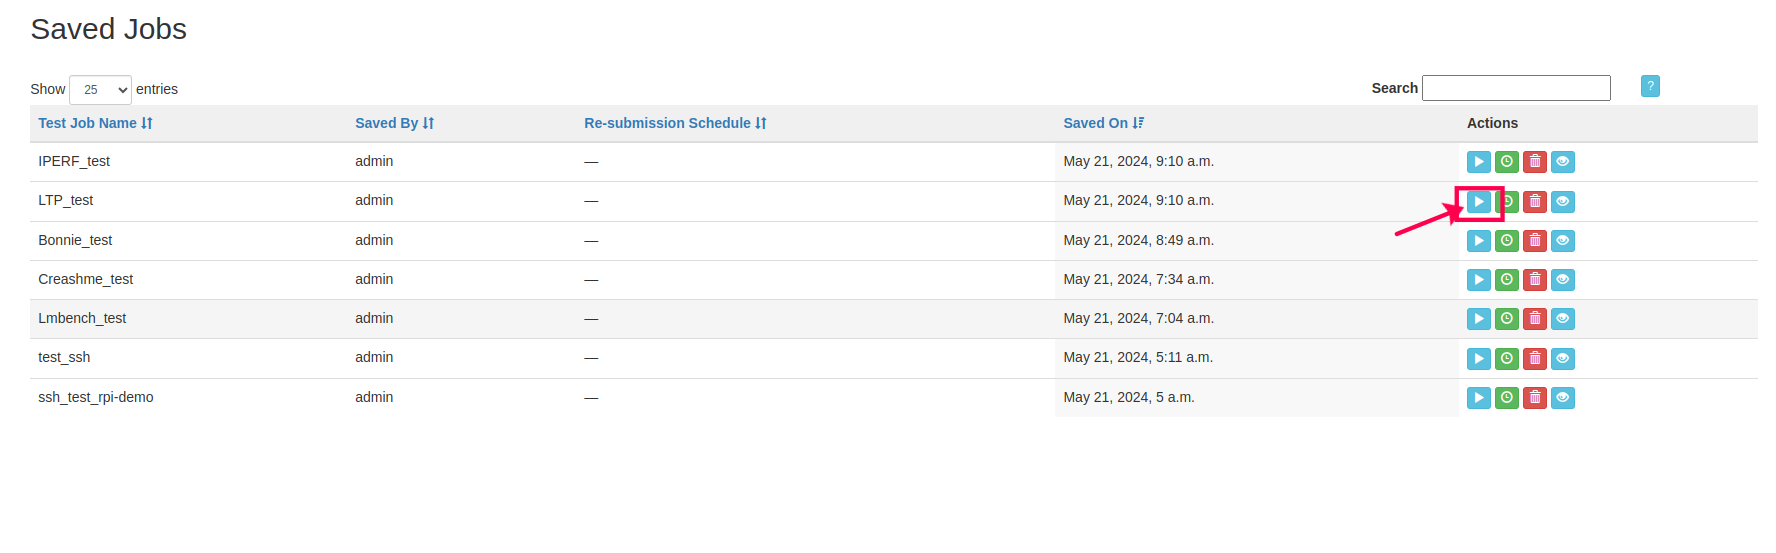
16 From this screen user can submit newly created test job by clicking on its “Run” action button.
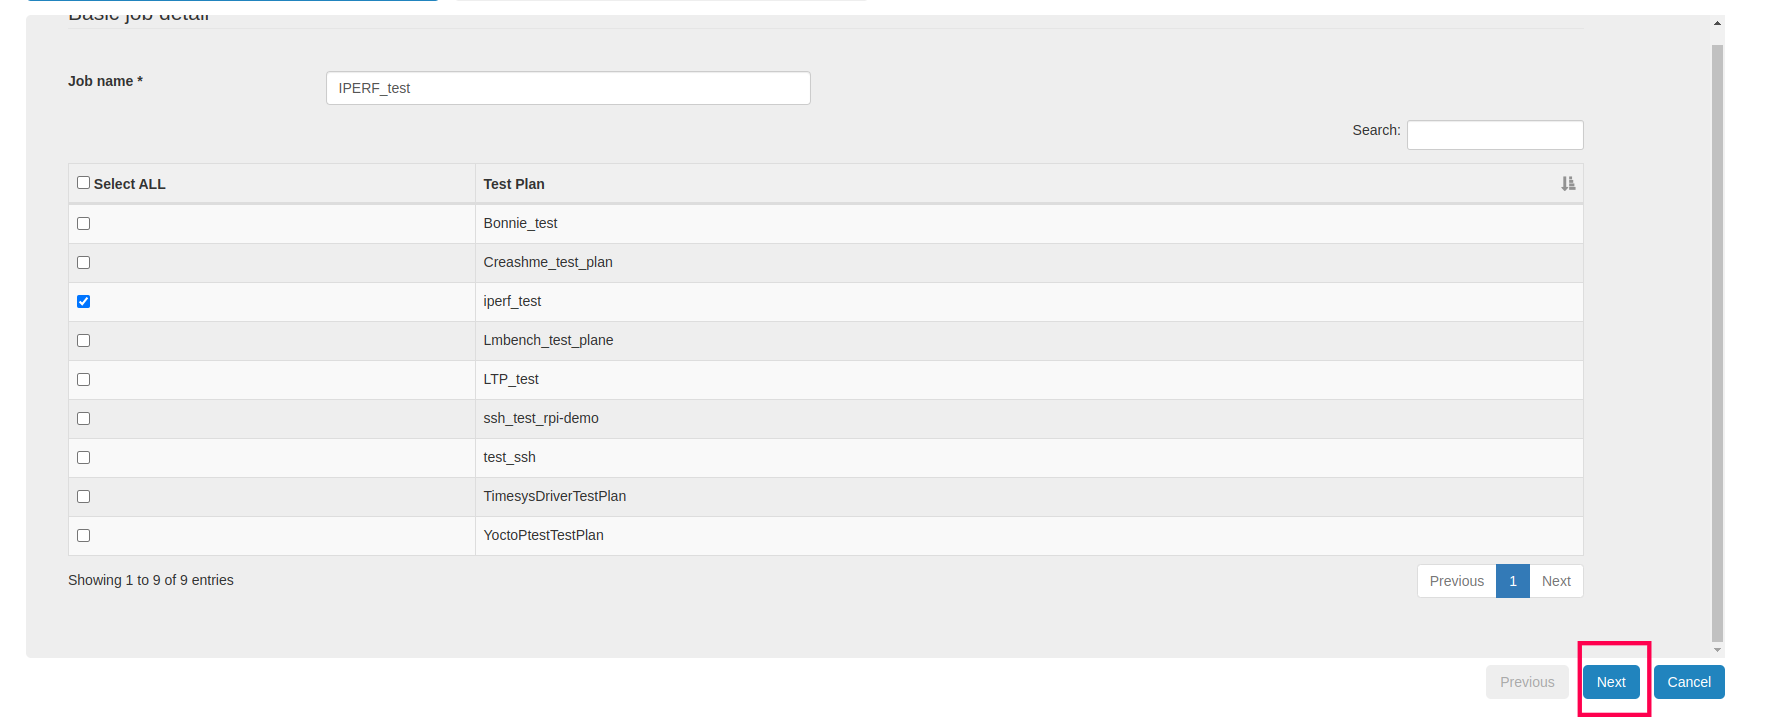
How to run IPerf Test
1 Login to EBF-TAS dashboard through web browser with your credentials
Username : <username>
Password : <password>
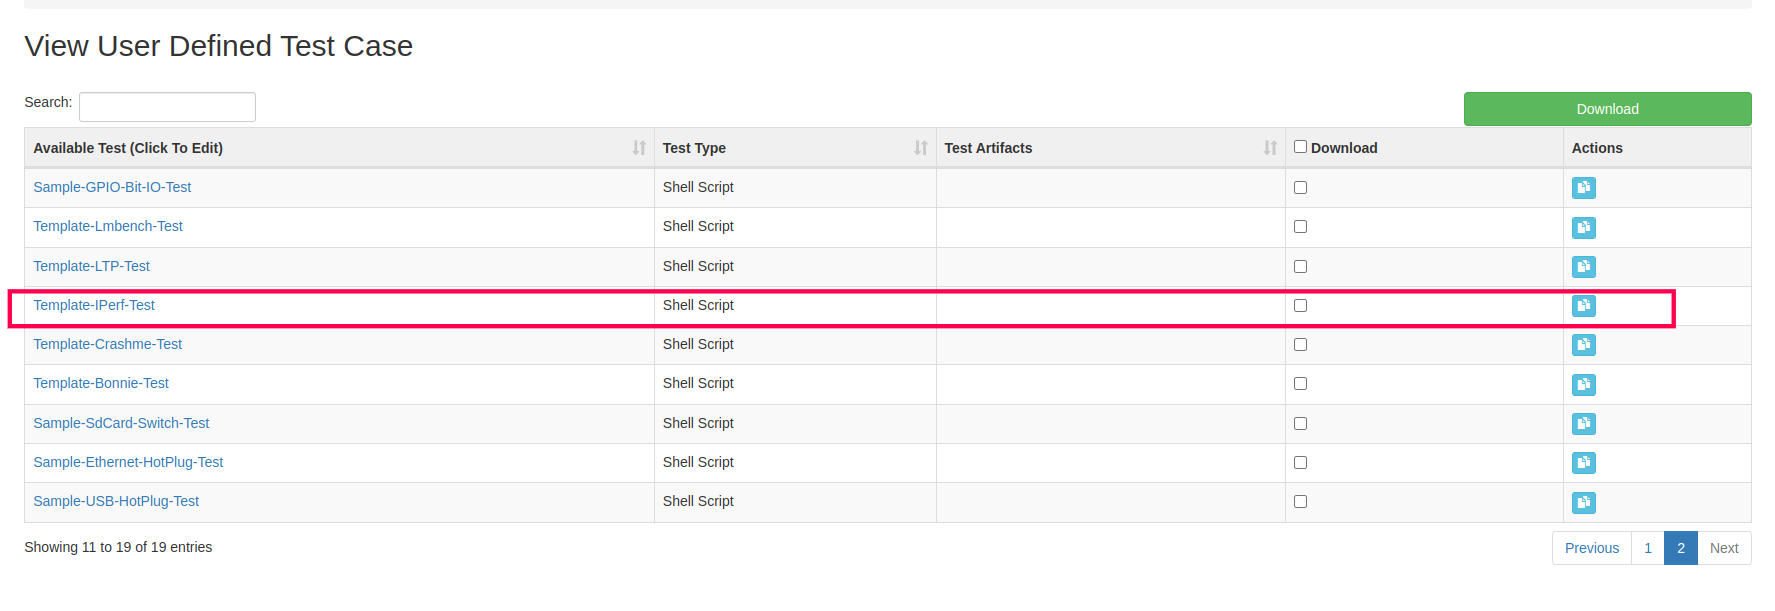
2 Select View -> Test Case option from ‘Tests’ drop down list as shown:
3 View Test Case page will appear on the screen.
4 Make a duplicate copy of the TestCase ‘Template-IPerf-Test’.
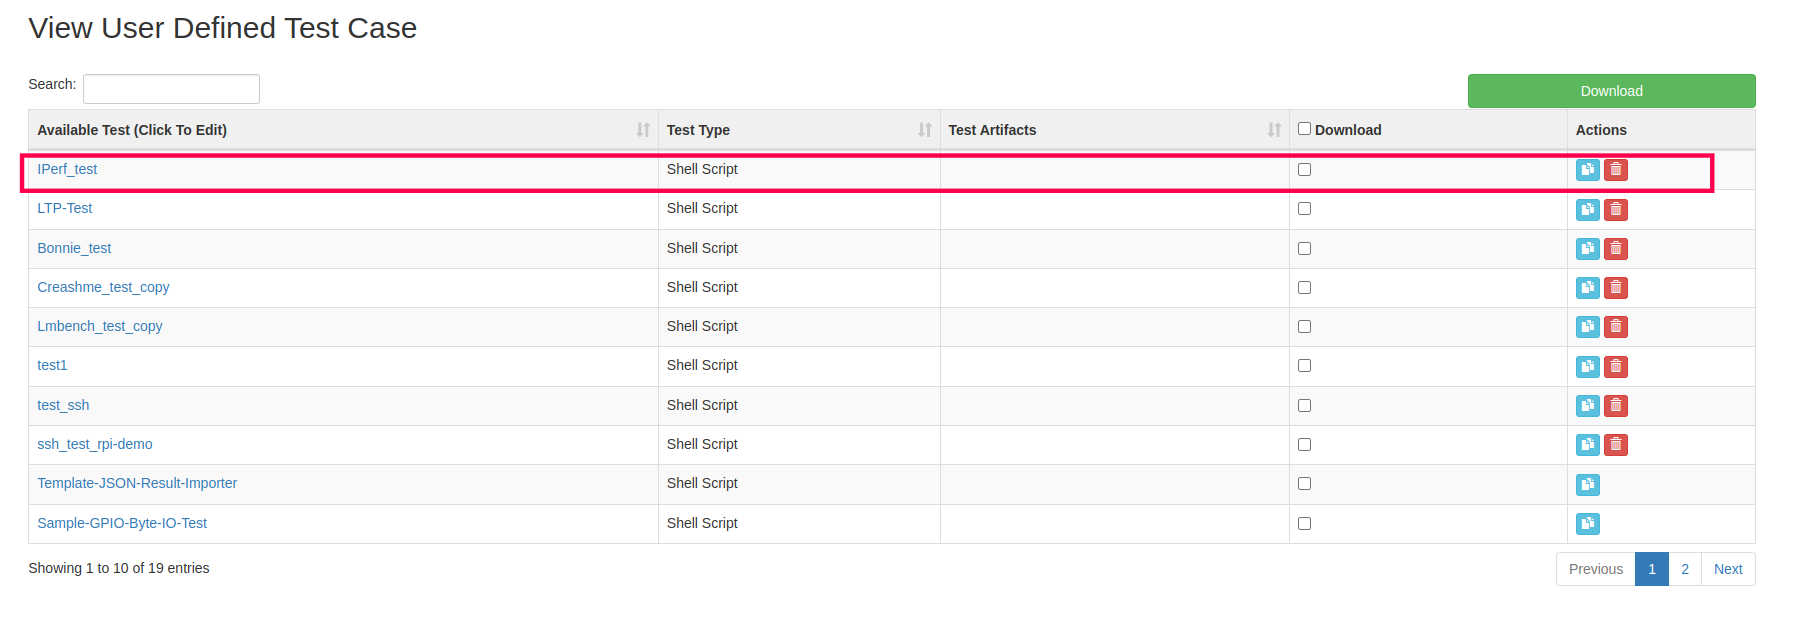
5 Enter the name of the new Test Case and hit ‘Save’ button.
6 New Test Case will be shown on the screen.
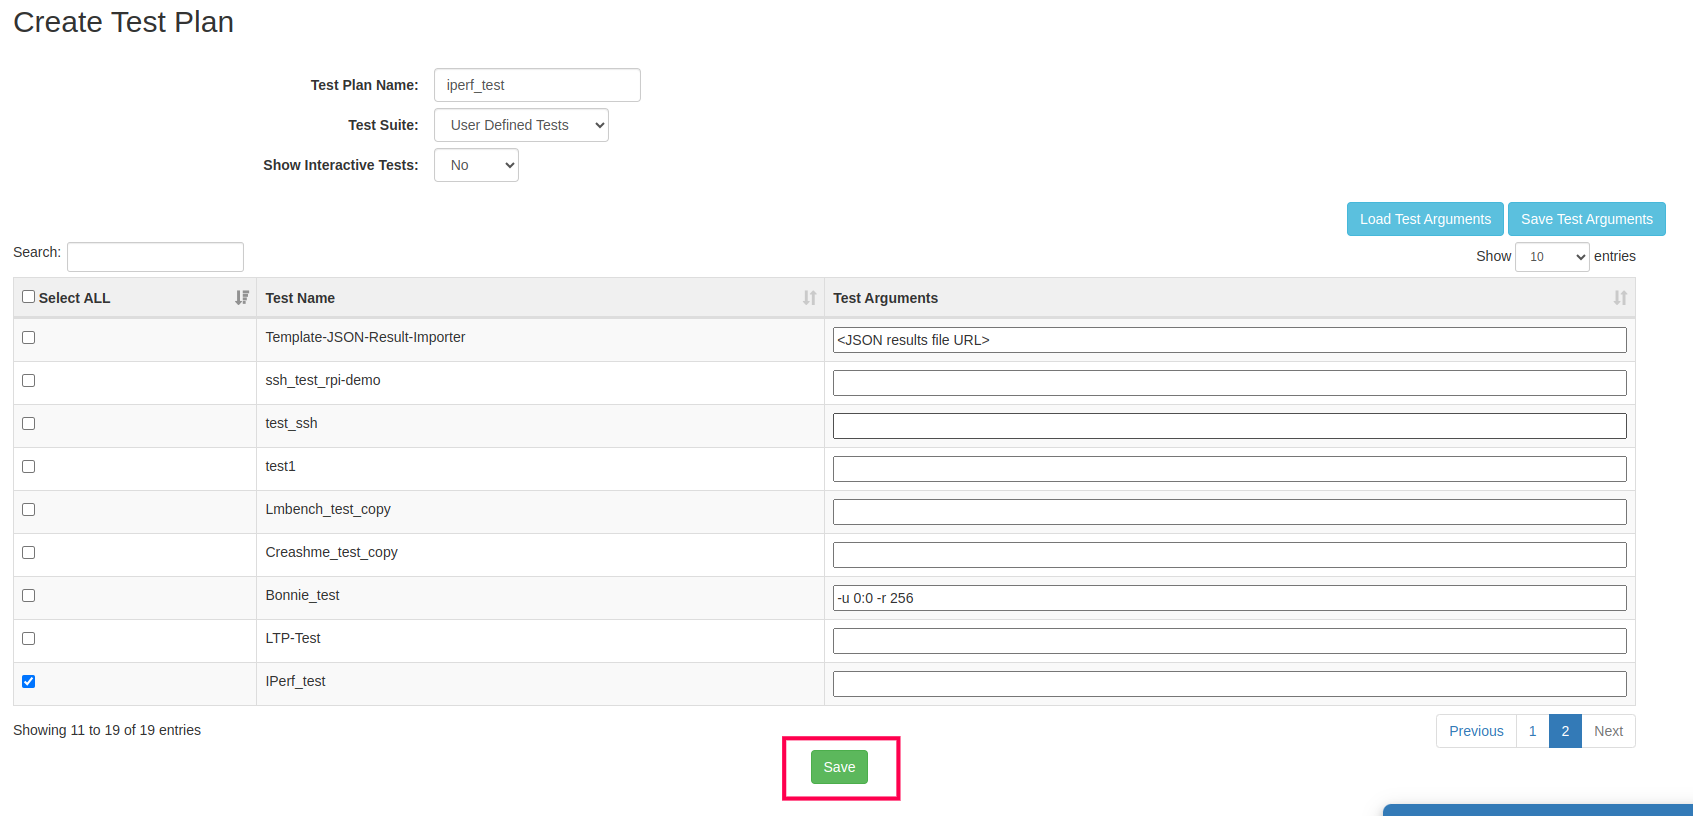
7 Now select Create -> Test Plan option from ‘Tests’ drop down list as shown:
8 Create Test Plan page will appear on the screen.
9 Fill the necessary fields:
Test Name: <Suitable name for test plan>
From the ‘Test Suite’ dropdown shown, select option ‘User Defined Tests’.
From ‘Show Interactive Tests’ dropdown, select option ‘NO’.
From the shown Test Cases list, tick the checkbox corresponding to Test Case ‘Custom-Iperf-Test’.
Then hit the ‘Save’ button.
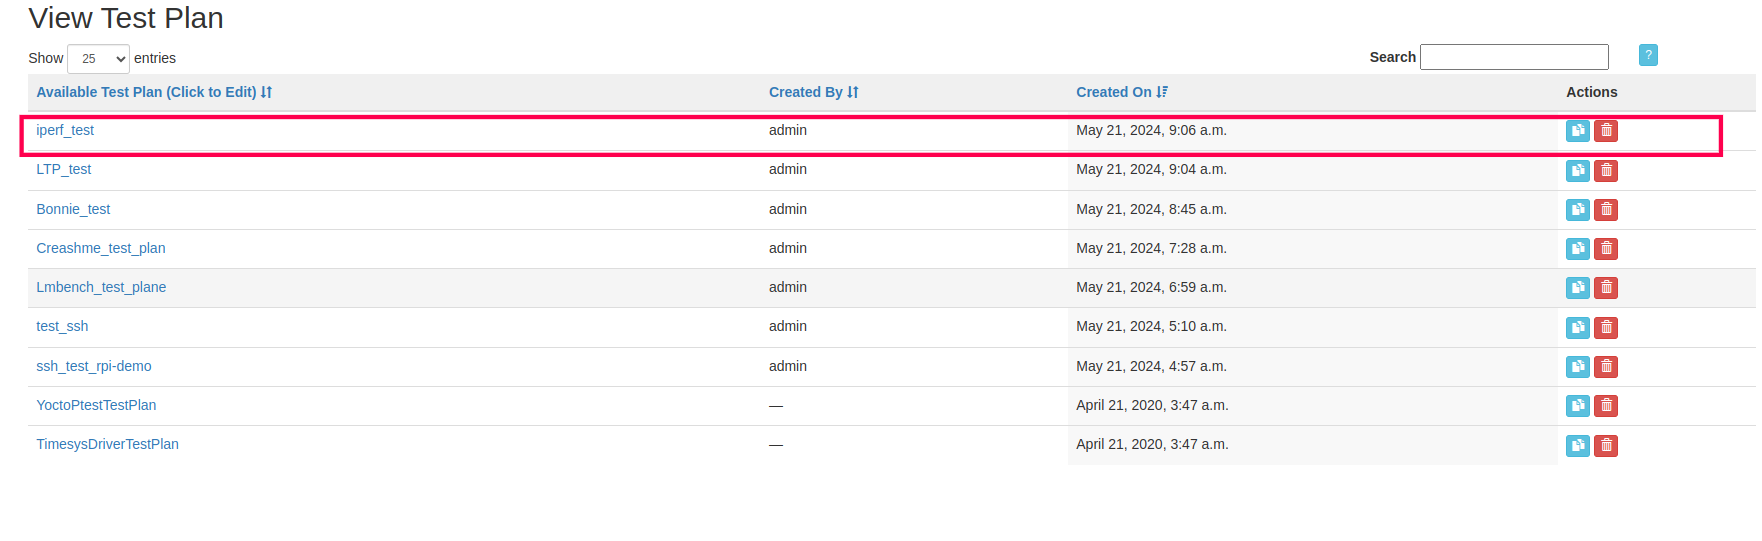
10 Newly created test plan name will be listed on the screen, as highlighted in image below:
11 Now go to the ‘Job Submit’ page under ‘Scheduler’ menu option.
12 The Job Submit page will appear on the screen. Select ‘Job Submission Wizard’ option from Job Submit page.
13 Here, provide Job name and select the TestPlan. Then click on ‘Next’ Button.
14 Provide all the deployment details on this page and click on ‘Save’ button.
15 On successful save, newly created job will be shown on the ‘Saved Jobs’ page.
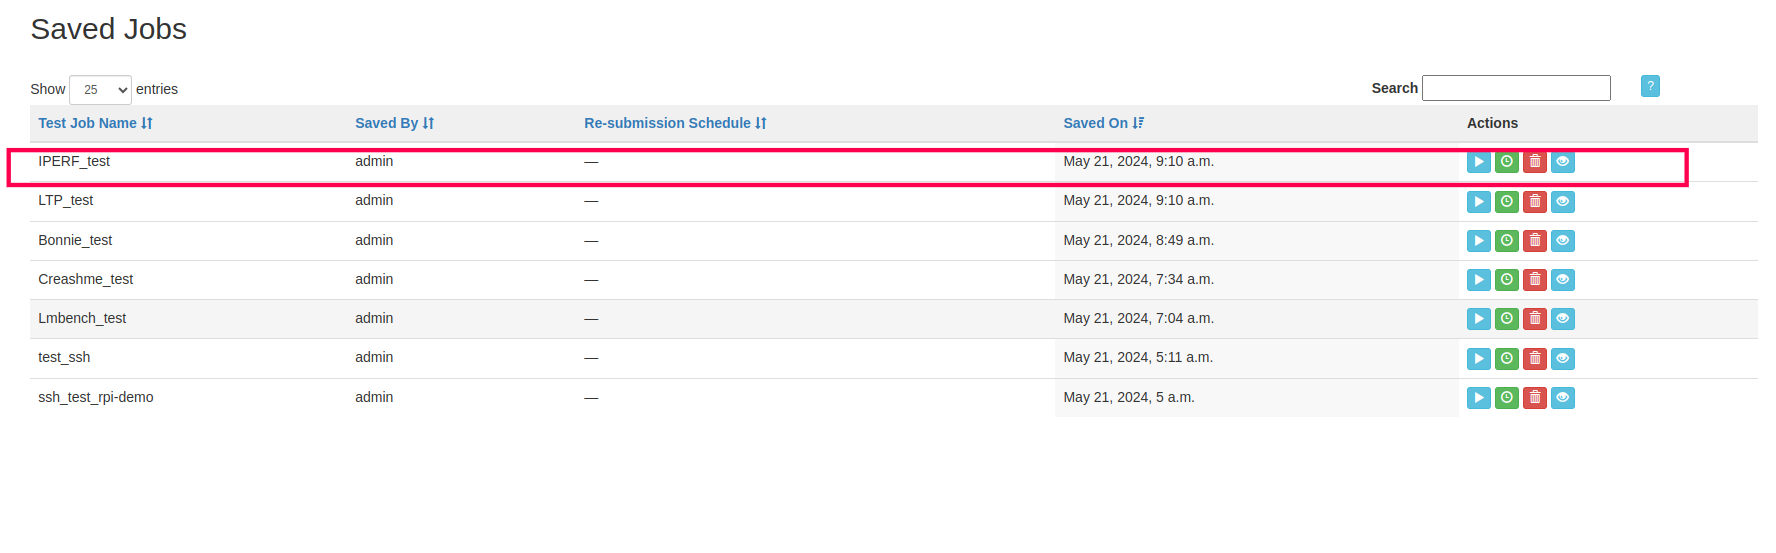
16 From this screen user can submit newly created test job by clicking on its “Run” action button