EBF CLI Guide
This Command-Line Tool enables you to run shell scripts to perform EBF-CLI functions.
Installation Steps
Install the below dependencies on your Linux machine
sudo apt-get install jq curl sshpass (for Debian/Ubuntu)

sudo dnf install jq curl sshpass (for Rocky Linux)
Download EBF-CLI tool from “http(s)://<EBF-Server>/packages/ebf-cli/ebf.bin” and run below command
sudo cp {downloaded EBF-CLI path} /usr/local/bin/ebf
Give executable permission
sudo chmod a+x /usr/local/bin/ebf
After successfully installing EBF-CLI, you have to first configure it by providing the details of EBF-Server and user-credentials. You have to configure it only the first time unless there is no change in the user credentials. Please run the commands below to configure EBF-CLI.
ebf login
You can check the saved configuration for EBF using the command below.
ebf list config
For help with other options and commands, you can refer to the EBF help tool by running the command shown below.
ebf help
Quick Start Guide
To Login
ebf login
To see Configured User and EBF Server
ebf list config
To List All Active Devices
ebf list devices
To List the resources
ebf list resources
To List My Devices
ebf mydevices
To see Device Allocation Details
ebf {device-name} status

Example:
ebf bbb01 status
To Release a Device Assigned to the Current User
ebf {device-name} release

Example:
ebf bbb01 release
To Release a Device Assigned to Another User
ebf {device-name} release force

Example:
ebf bbb01 release force
To Allocate a Device
ebf {device-name} allocate

Example:
ebf bbb01 allocate
To see Device Information
ebf {device-name} info

Example:
ebf bbb01 info
To control the Current Power Status of a Device
ebf {device-name} power {on/off/reboot/user-defined-command}

Example:
ebf bbb01 power on
To control Hotplug
ebf {device-name} hotplug {1-4} {on/off/switch}

Example:
ebf bbb01 hotplug 1 on
To Access the Serial Console of a Device
ebf {device-name} console

Example:
ebf bbb01 console
To Execute a Command on a Device Using SSH
ebf {device-name} ssh run  "{command}"

Example:
ebf bbb01 ssh run "ls -la /"
To Upload a File to a Device
ebf {device name} ssh upload {file-soure-path} {destination-path}

Example:
ebf bbb01 ssh upload /file.txt /home/
To Download a File from a Device
ebf {device name} ssh download {source} {destination}

Example:
ebf bbb01 ssh download /home/file.txt /home/
EBF-CLI Commands
login
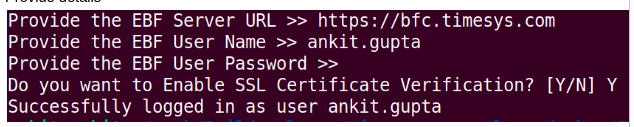
For login into EBF Server, required only first time. If you want to change EBF-server or change the User-credentials then use the “ebf login” command and follow the instructions.
From Command line terminal:
ebf login
Example:
ebf login
Provide the EBF-Server IP and Credentials.
list
config
Provide the details about the EBF-Server and User configured for EBF-CLI.
From Command line terminal:
ebf list config
Example:
ebf list config

UserName:       admin
EBF-SERVER:     https://172.16.30.143
SSL Enabled:    no
EBF AUTH-Token: rst33j46n50iusq06t3bj9w0mhq0uph8kadup3dybsunm8r54inqptbxror
devices
Provide the list of all the active devices in EBF-server.
From Command line terminal:
ebf list devices
Example:
ebf list devices

TestServer_AppZombie-93
android-rpi001
bbb02
mydevices
Provide the list of devices assigned to the current User.
From Command line terminal:
ebf mydevices
Example:
ebf mydevices

android-rpi001
bbb02
fmanager
ls
List the content of the EBF-FileManager Directory or sub-directory.
From Command line terminal:
ebf fmanager ls <Directory PATH [Optional]>
Example:
ebf fmanager ls

admin                          Directory  lavaserver   4.0K     Dec 10, 2020 05:44:15 AM
ankit                          Directory  lavaserver   4.0K     Dec 15, 2020 05:03:03 PM
ankit.gupta                    Directory  lavaserver   4.0K     Dec 14, 2020 05:16:03 PM
mkdir
Create a directory inside the EBF-FileManager directory or sub-directory.
From Command line terminal:
ebf fmanager mkdir <directory-name>
Example:
ebf fmanager mkdir tmp

Successfully Folder Created
rm
Delete a directory inside the EBF-FileManager directory or sub-directory.
From Command line terminal:
ebf fmanager rm <Directory PATH>
Example:
ebf fmanager rm tmp

Successfully Content deleted
upload
Copy files to EBF-FileManager directory or sub-directory.
From Command line terminal:
ebf fmanager upload [SRC_FILE_PATH] [DST_FILE_PATH]
Example:
ebf fmanager upload /home/tmp/file1.txt tmp/

Successfully File Uploaded.
download
Download a file from EBF-FileManager Directory to a local machine.
From Command line terminal:
$ebf fmanager upload [SRC_FILE_PATH] [DST_FILE_PATH]
Example:
ebf fmanager download tmp/file1.txt /home/tmp/

Successfully Downloaded "tmp/file1.txt" into "/home/tmp/file1.txt"
version
To see the Current version of EBF-CLI installed.
From Command line terminal:
ebf version
Example:
ebf version

1.0.1
Device-Management
status
Provide device allocation details, currently assigned to someone or free.
From Command line terminal:
ebf <device-name> status
Example:
ebf bbb02 status

Device "bbb02" is assigned to user "admin"
allocate
Allocate a device to the current User.
From Command line terminal:
ebf <device-name> allocate
Example:
ebf bbb02 allocate

Device is assigned to user "admin"
release
Release a device assigned to the current User.
From Command line terminal:
ebf <device-name> release
Example:
ebf bbb02 release

Device "bbb02" is released and available to use.
force
Release a device assigned to Other Users.
From Command line terminal:
ebf <device-name> release force
Example:
ebf bbb02 release force

Device "bbb02" is Released and available to Use.
device force release permissions
Description: To set the device force release permissions
From Command line terminal:
$ebf <device name> config force-release [true/false]
Example:
$ebf bbb01 config force-release true
$ebf bbb01 config force-release false
delete
Delete a device, currently assigned to someone or free. Only admin can delete the device.
From Command line terminal:
ebf <device-name> delete
Example:
ebf bbb02 delete

It will delete device "bbb02" permanently
Would you like to proceed [Y/N] ? [N] >>> Y
Device "bbb02" deleted successfully
info
Provides information of a Device like Zombie’s, Power port, Power commands, TFTP, NFS dir, etc.
From Command line terminal:
ebf <device-name> info
Example:
ebf bbb02 info

            ************************
            *  Device Information  *
            ************************

 Hostname:                 bbb02
 Device Status:            Good
 Device Port:              1
 Number Of Consoles        1
 IOCX Status:              false
 Force Release Allowed:    false
 Console Sharing           Enabled
 Tags:                     tag1 tag2
 Zombie Name:              Zombie1
 Zombie IP:                172.16.30.93
 ZOMBIE_URL:               http://172.16.30.93/
 Powe Switch:              Ankit-Home-Power-Switch
 Power Switch Port:        4
 Power Switch Commands:    on off reboot My-CMD
 TFTP DIR:                 upload/DUT1
 NFS DIR:                  /var/lib/lava/dispatcher/tmp/nfs/DUT1/tmp
 NETBoot Type:
 GUID:
 Image:
power
status
Provides the current power status of a device.
From Command line terminal:
ebf <device-name> power status
Example:
ebf bbb02 power status

Device "bbb02" is Powered "ON"
on
Power ON the device
From Command line terminal:
ebf <device-name> power on
Example:
ebf bbb02 power on

Device "bbb02" is Powered "on"
off
Power OFF the device
From Command line terminal:
ebf <device-name> power off
Example:
ebf bbb02 power off

Device "bbb02" is Powered "off"
reboot
Power REBOOT the device
From Command line terminal:
ebf <device-name> power reboot
Example:
ebf bbb02 power reboot

Device "bbb02" is Powered "reboot"
user-defined-command
Any other Power supported user-defined command
From Command line terminal:
ebf <device-name> power <user-deined-command>
Example:
ebf bbb02 power my-cmd
hotplug
status
Provides the current Hotplug status whether it is connected to the device side or Not.
From Command line terminal:
ebf <device name> hotplug [1-4] status
Example:
ebf bbb02 hotplug 1 status

Device "bbb02" Hotplug port "1" is currently "off"
on
Connect hotplug to the Device side.
From Command line terminal:
ebf <device name> hotplug [1-4] on
Example:
ebf bbb02 hotplug 1 on

Device "bbb02" Hotplug port "1" is switched "on"
off
Disconnect hotplug from Device.
From Command line terminal:
ebf <device name> hotplug [1-4] off
Example:
ebf bbb02 hotplug 1 off

Device "bbb02" Hotplug port "1" is currently "off"
switch
Toggle the current state of a particular hotplug.
From Command line terminal:
ebf <device name> hotplug [1-4] switch
Example:
ebf bbb02 hotplug 1 switch

Device "bbb02" Hotplug port "1" is currently "on"
portfw
list
Provides a list of all the IP rules forwarded on a Zombie.
From Command line terminal:
ebf <device name> portfw list
Example:
ebf bbb02 portfw list


Rule 1
 Device IP: 192.168.111.10
 Zombie Protocol: tcp
 Zombie Port: 8022  -->  Device Port: 22
 IsActive: true

Rule 2
 Device IP: 192.168.111.10
 Zombie Protocol: tcp
 Zombie Port: 8023  -->  Device Port: 23
 IsActive: true

Rule 3
 Device IP: 192.168.111.10
 Zombie Protocol: tcp
 Zombie Port: 8024  -->  Device Port: 24
 IsActive: true
add
To add a new port forward rule.
From Command line terminal:
ebf <device name> portfw add <device-ip> <dut-port> <zombie-port> <protocol>
Example:
ebf bbb02 portfw add 192.168.111.10 22 8022 tcp

Successfully Forwarded the port
remove
To Delete a new port forward rule.
From Command line terminal:
ebf <device name> portfw remove <device-ip> <dut-port> <zombie-port> <protocol>
Example:
ebf bbb02 portfw remove 192.168.111.10 22 8022 tcp

Successfully Deleted the port forwarded rule
reconnect
To reestablish an inactive rule. Port forwarding rules could go into the inactive state under the following scenarios-
Old user and group level port forwarding rules post upgrade to EBF 2025.04 or later release from 2025.03 or older releases
EBF administrator missed to restore old zombie settings during Zombie upgrade via SDCard reflash.
From Command line terminal:
ebf <device name> portfw reconnect <device-ip> <dut-port> <zombie-port> <protocol>
Example:
ebf bbb02 portfw reconnect 192.168.111.10 22 8022 tcp

Successfully Forwarded the port
staticip
list
Provides a list of all the Static IP address set for a device.
From Command line terminal:
ebf <device name> staticip list
Example:
ebf bbb02 staticip list


Rule 1
 Device IP: 192.168.111.90
 Device MAC: b8:27:eb:70:fa:a6

Rule 2
 Device IP: 192.168.111.91
 Device MAC: b8:27:eb:70:fa:a8
add
To set a new static IP address for a device.
From Command line terminal:
ebf <device name> staticip add <device-mac> <device-ip>
Example:
ebf bbb02 staticip add b8:27:eb:70:fa:a6 192.168.111.90

Successfully added the static IP address.
remove
To delete a static IP address for a device.
From Command line terminal:
ebf <device name> staticip remove <device-mac> <device-ip>
Example:
ebf bbb02 staticip remove b8:27:eb:70:fa:a6 192.168.111.90

Successfully deleted the static IP address.
serial
run
Run a command on a device and Display its OUTPUT using the serial console.
From Command line terminal:
ebf <device name> serial run [COMMAND]
Example:
ebf bbb02 serial run "ls -la /"
download
Download a file to a local system from a device using the serial console.
From Command line terminal:
ebf <device name> serial download "<file-or-dir-path-at-device>" "<destination-path>"
Example:
ebf bbb02 serial download /tmp/test.txt ./
upload
Upload a local file to a device using the serial console.
From Command line terminal:
ebf <device name> serial upload "<src-file-or-dir>" "<upload-path-at-device>"
Example:
ebf bbb02 serial upload test.txt /tmp/
multiple serial command
From Command line terminal:
ebf <device name> serial run [OPTIONS] "<command>"
Options:
   --prompts         Provides the comma separated list of prompts
   --timeout         Provide the timeout of a command in seconds
   --single          Use this flag if you want to run a command as a single entity

  By default it capture the serial console prompt before command execution and after sending the serial command
  it continuously compares the current serial console prompt with the captured prompt and if it matches the serial prompt then it return the results,
  By default it compares the console prompts for 5 seconds and if your command is taking more time then you can increase the timeout.

  Serial command execution also supports Interactive command execution, let's suppose you execute some command and wait for a different prompt
  Then you can use --prompts option, the example of each use case is given below
Example:
Example-1: ebf bbb01 serial run "date" (Execute the command and wait for console prompts for 5 seconds)
Example-2: ebf bbb01 serial run --timeout 100 "date" (Execute the date command and wait for the same prompt captured before command execution)
Example-3: ebf bbb01 serial run "date,ls,ifconfig" (Support multiple command run using comma separated list)
Example-4: ebf bbb01 serial run --single "date,ls,ifconfig" (Will run as a single command and bypass coma seperated list)
Example-5: ebf rpi-board serial run --prompts "Password:" "pi" (First executes "pi" and wait for "Password:")
Example-6: ebf rpi-board serial run --prompts "Password:,pi@raspberrypi:~$" "pi,raspberry" (Also supported multiple comma separated prompts and commands)
list consoles
From Command line terminal:
ebf <device name> serial list
Example:
ebf dev1 serial list

Number of Consoles: 4
serial0:   172.16.30.204:60000
serial1:   172.16.30.204:60001
serial2:   172.16.30.204:60002
serial3:   172.16.30.204:60003
ssh
run
Run a command on a device and Display its OUTPUT using ssh.
From Command line terminal:
ebf <device name> ssh run [COMMAND]
Example:
ebf bbb02 ssh run "date"


Thu Jan 1 00:18:17 UTC 1970
download
Download a file to a local system from a device using SSH.
From Command line terminal:
ebf <device name> ssh download "<file-or-dir-path-at-device>" "<destination-path>"
Example:
ebf bbb02 ssh download /tmp/test.txt ./


Successfully Downloaded "/tmp/test.txt" into "./"
upload
Upload a local file to a device using SSH.
From Command line terminal:
ebf <device name> ssh upload "<src-file-or-dir>" "<upload-path-at-device>"
Example:
ebf bbb02 ssh upload test.txt /tmp/

Successfully File Uploaded.
import-key
To import Zombie ssh-key into Zombie for password-less operations.
From Command line terminal:
ebf <device name> ssh import-key <device-ip> <username> <password>
Example:
ebf bbb02 ssh import-key 192.168.111.10 root root

Successfully Zombie SSH-KEY Imported to "bbb02"
console
Terminal Access
Provides access to device serial console.
From Command line terminal:
ebf <device name> console <console name OPTIONAL>
Example:
connect to first console
ebf bbb02 console

Press 'Ctrl + ]' to Escape from Serial Console Session  0:telnet*
connect to Nth console
ebf bbb02 console serial0

Press 'Ctrl + ]' to Escape from Serial Console Session  4:telnet*
Start
Start a device serial session if sharing enabled.
From Command line terminal:
ebf <device name> console start <console name OPTIONAL>
Example:
start all available serial sessions for a device
ebf bbb02 console start
start serial device session for Nth console port
ebf bbb02 console start serial0
Stop
Stop a device serial session if sharing enabled.
From Command line terminal:
ebf <device name> console stop <console name OPTIONAL>
Example:
stop all available serial sessions for a device
ebf bbb02 console stop
stop serial device session for Nth console port
ebf bbb02 console stop serial0
Status
Provide a device serial session status if sharing enabled.
From Command line terminal:
ebf <device name> console status <console name OPTIONAL>
Example:
provide status of all available serial sessions for a device
ebf bbb02 console status
provide status of Nth serial device session
ebf bbb02 console status serial0
gpio
read_mask
From Command line terminal:
ebf <device name> gpio [COMMANDS] [GPIO PIN PATTERN] [GPIO_PIN_DATA/OPTIONAL]


Commands             GPIO Pin Pattern       GPIO Pin Data
  set_mode_mask          1-255                  0-255
  get_mode_mask          1-255
  write_mask             1-255                  0-255
  read_mask              1-255
  set_mode               1-8                    {read,write}
  get_mode               1-8
  read                   1-8
  write                  1-8                    0-1
get_mode
From Command line terminal:
ebf <device name> gpio [COMMANDS] [GPIO PIN PATTERN] [GPIO_PIN_DATA/OPTIONAL]


Commands             GPIO Pin Pattern       GPIO Pin Data
  set_mode_mask          1-255                  0-255
  get_mode_mask          1-255
  write_mask             1-255                  0-255
  read_mask              1-255
  set_mode               1-8                    {read,write}
  get_mode               1-8
  read                   1-8
  write                  1-8                    0-1
get_mode_mask
From Command line terminal:
ebf <device name> gpio [COMMANDS] [GPIO PIN PATTERN] [GPIO_PIN_DATA/OPTIONAL]


Commands             GPIO Pin Pattern       GPIO Pin Data
  set_mode_mask          1-255                  0-255
  get_mode_mask          1-255
  write_mask             1-255                  0-255
  read_mask              1-255
  set_mode               1-8                    {read,write}
  get_mode               1-8
  read                   1-8
  write                  1-8                    0-1
read
From Command line terminal:
ebf <device name> gpio [COMMANDS] [GPIO PIN PATTERN] [GPIO_PIN_DATA/OPTIONAL]


Commands             GPIO Pin Pattern       GPIO Pin Data
  set_mode_mask          1-255                  0-255
  get_mode_mask          1-255
  write_mask             1-255                  0-255
  read_mask              1-255
  set_mode               1-8                    {read,write}
  get_mode               1-8
  read                   1-8
  write                  1-8                    0-1
set_mode_mask
From Command line terminal:
ebf <device name> gpio [COMMANDS] [GPIO PIN PATTERN] [GPIO_PIN_DATA/OPTIONAL]


Commands             GPIO Pin Pattern       GPIO Pin Data
  set_mode_mask          1-255                  0-255
  get_mode_mask          1-255
  write_mask             1-255                  0-255
  read_mask              1-255
  set_mode               1-8                    {read,write}
  get_mode               1-8
  read                   1-8
  write                  1-8                    0-1
write_mask
From Command line terminal:
ebf <device name> gpio [COMMANDS] [GPIO PIN PATTERN] [GPIO_PIN_DATA/OPTIONAL]


Commands             GPIO Pin Pattern       GPIO Pin Data
  set_mode_mask          1-255                  0-255
  get_mode_mask          1-255
  write_mask             1-255                  0-255
  read_mask              1-255
  set_mode               1-8                    {read,write}
  get_mode               1-8
  read                   1-8
  write                  1-8                    0-1
set_mode
From Command line terminal:
ebf <device name> gpio [COMMANDS] [GPIO PIN PATTERN] [GPIO_PIN_DATA/OPTIONAL]


Commands             GPIO Pin Pattern       GPIO Pin Data
  set_mode_mask          1-255                  0-255
  get_mode_mask          1-255
  write_mask             1-255                  0-255
  read_mask              1-255
  set_mode               1-8                    {read,write}
  get_mode               1-8
  read                   1-8
  write                  1-8                    0-1
write
From Command line terminal:
ebf <device name> gpio [COMMANDS] [GPIO PIN PATTERN] [GPIO_PIN_DATA/OPTIONAL]


Commands             GPIO Pin Pattern       GPIO Pin Data
  set_mode_mask          1-255                  0-255
  get_mode_mask          1-255
  write_mask             1-255                  0-255
  read_mask              1-255
  set_mode               1-8                    {read,write}
  get_mode               1-8
  read                   1-8
  write                  1-8                    0-1
list
labcontrollers
List all the lab controllers assigned to a device.
From Command line terminal:
ebf <device name> list labcontrollers
Example:
ebf bbb02 list labcontrollers


Controller : 1
ID              : Zombie1
Controller Type : gpio_controller
netboot
ls
List the content of Network Boot Directory, by default it shows the content of Network-boot directory assigned to that device e.g. if the device is connected to port-1 then it will show the content of NFS-directory “DUT1”. You can also provide a directory or sub-directory inside the DUT1 folder.
From Command line terminal:
ebf <device name> netboot ls [DIR_NAME_OPTIONAL]
Example:
ebf bbb02 netboot ls

mrootfs                        Directory  root         4.0K     Nov 24, 2020 08:43:26 PM
mkdir
Create a directory inside Network Boot Directory, by default it will create a directory inside the Network-boot directory assigned to that device e.g. if the device is connected to port-1 then it will create a directory inside the NFS-directory “DUT1”. You can also create a directory or sub-directory inside a folder.
From Command line terminal:
ebf <device name> netboot mkdir [DIR_NAME]
Example:
ebf bbb02 netboot mkdir tmp

Successfully Directory tmp created
rm
Delete a directory inside Network Boot Directory, by default it will delete the directory inside the Network-boot directory assigned to that device e.g. if the device is connected to port-1 then it will delete the directory inside the NFS-directory “DUT1”. You can also delete a directory or sub-directory inside a folder.
From Command line terminal:
ebf <device name> netboot rm [DIR_NAME]
Example:
ebf bbb02 netboot rm tmp

Successfully Directory tmp deleted
transfer
From Command line terminal:
ebf <device name> netboot transfer [local|server|status|remove] [OPTIONS]

Description
   local|server     Extract or copy a File/Dir from local system or EBF-Server
                    into a Network-Boot Directory or sub-directory.
   status [JOB-ID]  it will provide the status off all the transfer jobs in running or queue state
                    You can also check the status of a single job using transfer Job-ID.
   remove [Job-ID]  It will cancel the jobs and remove it from the list

Option Includes:
  *   -f | --file          - path of a local file or EBF-Server
      -t | --tool          - provide tool from [tar, cp, unzip] to transfer a file
      -d | --dir           - Name of a directory in which you want to extract rootfs default is "fsroot"
      -a | --cmd-args      - any arguments you want to provide with transfer tool selected
      -r | --remove-after  - This will delete file from EBF-Server after transferring value should be "on/off"

  *  Indicates Mandatory Arguments
Example:
1. ebf bbb01 netboot transfer local -f /tmp/hello.txt
2. ebf bbb01 netboot transfer local -f /tmp/hello.txt -d fsroot
3. ebf bbb01 netboot transfer local -f /tmp/rootfs.tar.gz -d my-rootfs -t tar -a xz -r on
4. ebf bbb01 netboot transfer server -f rootfs.tar.gz -d my-rootfs -t tar -a xz -r on
5. ebf bbb01 netboot transfer status
6. ebf bbb01 netboot transfer status 04366c6a-fde2-424d-9aea-1174cb24650d
7. ebf bbb01 netboot upload remove 04366c6a-fde2-424d-9aea-1174cb24650d
download
Download a file from Network Boot Directory to the local machine.
From Command line terminal:
ebf <device name> netboot download <src-file-path> <dst-file-path>
Example:
ebf bbb02 netboot download tmp/file1.txt /home/tmp/

Successfully Downloaded "tmp/file1.txt" into "/home/tmp/file1.txt"
upload
Upload a file from Local Machine to Network Boot Directory.
From Command line terminal:
ebf <device-name> netboot upload [SRC_FILE_PATH] [DST_FILE_PATH]
Example:
ebf bbb02 netboot upload /tmp/file1.txt fsroot/

Successfully 100% upload completed.
symlink
To get the status of the current symlink directory or to create a symlink to a new directory.
From Command line terminal:
ebf <device name> netboot symlink [DIR Name]
Example-1:
ebf bbb02 netboot symlink

Current SYMLINK_DIR : fsroot
Example-2:
ebf bbb02 netboot symlink mrootfs

Successfully created symlink to directory mrootfs
sdcard
info
Provides the SDCard information on its size, partition, etc.
From Command line terminal:
ebf <device name> sdcard info
Example:
ebf bbb02 sdcard info

SD CRAD Information

sdb: 59.5G
sdb1: 2G (vfat)
sdb2: 57.5G (ext4)
side
Provides whether the SDCard is connected to the Zombie side or the Device side.
From Command line terminal:
ebf <device name> sdcard side
Example:
ebf bbb02 sdcard side

SDCard is connected to "device" side
switch
It will connect the sdcard to the Device side or Zombie side or Switch from the current side.
From Command line terminal:
ebf <device name> sdcard switch [device|zombie|side]
Example:
ebf bbb02 sdcard switch zombie


SDCard is switched to "zombie" side
ls
List the content of SDCard, by default it shows the partitions of SDCard and you can provide that partition or directory inside that partition It will show the content of that directory.
From Command line terminal:
ebf <device name> sdcard ls [DIR_NAME_OPTIONAL]
Example:
ebf bbb02 sdcard ls sdb1

beaglebone_black.dtb           File       root         36K      Dec 17, 2020 08:20:14 PM
MLO                            File       root         108K     Dec 16, 2020 10:43:48 AM
powernet426.mib                File       root         2.5M     Dec 24, 2020 10:38:04 AM
uboot.env                      File       root         128K     Jan 01, 1980 05:30:00 AM
u-boot.img                     File       root         633K     Dec 16, 2020 05:21:22 PM
uImage-4.14-ts-armv7l          File       root         5.0M     Dec 17, 2020 08:20:08 PM
mkdir
Create a directory inside an SDCard partition, directory name is mandatory.
From Command line terminal:
ebf <device name> sdcard mkdir [DIR_NAME]
Example:
ebf bbb02 sdcard mkdir sdb1/tmp
Successfully Directory sdb1/tmp created
rm
Delete a directory/file inside a sdcard partition, directory, or file name is mandatory.
From Command line terminal:
ebf <device name> sdcard rm [DIR_NAME/FileName]
Example:
ebf bbb02 sdcard rm sdb1/tmp
Successfully Directory sdb1/tmp deleted
format
Format an SDcard partition. The format partition information should be provided in the form of “,” separated of “PARTITION, PARTITION_TYPE”. The below example will format Partition sda1 into vfat and sda2 into ext4.
From Command line terminal:
ebf <device name> sdcard format partition,partition-type
Example:
ebf bbb02 sdcard format sda1,vfat sda2,ext4

Successfully format the partitions
partition
Create and format an SDcard partition. The partition information should be provided “,” separated in the form of LABEL, SIZE(MB), PARTITION_TYPE, BOOTABLE(True/FALSE). The below example will create Partition A of size 1000 MB and type Vfat and the bootable flag is set to “True” and Partition B of size 8000 MB and type ext4
From Command line terminal:
ebf <device name> sdcard partiion label,size,partition-type,bootable(optional)
Example:
ebf bbb01 sdcard partition A,1000,vfat,True B,8000,ext4
Successfully created the partitions
backup
Create a backup of SDCard, you can also check the progress status of a backup job and also delete a backup job.
From Command line terminal:
ebf <device name> sdcard backup [status|remove] [ARGS]

Description
   status [JOB-ID]  it will provide the status off all the backup jobs in running or queue state
                    You can also check the status of a single job using backup Job-ID.
   remove [Job-ID]  It will cancel the backup jobs and remove them from the list
Example:
1. ebf bbb01 sdcard backup (To start a SDcard Backup)
2. ebf bbb01 sdcard backup status (To see the Backup Job Queue)
3. ebf bbb01 sdcard backup status 04366c6a-fde2-424d-9aea-1174cb24650d (To check the progress status of a backup job)
4. ebf bbb01 sdcard backup remove 04366c6a-fde2-424d-9aea-1174cb24650d (To remove a backup job from the queue)
flash
Upload/Extract/Copy/Flash a rootfs/file/image to a sdcard or it’s partition.
From Command line terminal:
ebf <device name> sdcard flash [local|server|status|remove] [OPTIONS]

Description
   local|server     Extract or copy a File/Dir from the local system or EBF-Server
                    into an SDCrad Partition or Directory.
   status [JOB-ID]  it will provide the status off all the flashing jobs in running or queue state
                    You can also check the status of a single job using upload Job-ID.
   remove [Job-ID]  It will cancel the jobs and remove them from the list

Option Includes:
  *   -f | --file            - path of a local file or EBF-Server
  *   -p | --partition       - partition in which you want to copy/flash image
      -t | --tool            - provide tool from [tar, cp, unzip, dd, zcat_dd, bmaptool] to upload/flash a file/image
      -b | --backup          - Backup SDCard befor flashing an image, valid options are [on/off]
      -m | --mkfs            - Format sdcard before flashing an image, valid options are [on/off]
      -a | --cmd-args        - any arguments you want to provide with upload tool selected
      -r | --remove-after    - This will delete file from EBF-Server after image flashing, valid options are [on/off]
   -bmap | --bmap-file       - Path of any bmap file

  *  Indicates Mandatory Arguments
Example:
1. ebf bbb01 sdcard flash local -f /tmp/hello.txt -p sda1
2. ebf bbb01 sdcard flash local -f /tmp/rootfs.tar.gz -p sda2 -t tar -a xz -m on
3. ebf bbb01 sdcard flash server -f rootfs.tar.gz -p sda2 -t tar -a xz -m on -r on
4. ebf bbb01 sdcard flash server -f rootfs.tar.gz -p sda2 -t tar -a xz -m on -r on -b on
5. ebf bbb01 sdcard flash status
6. ebf bbb01 sdcard flash status 04366c6a-fde2-424d-9aea-1174cb24650d
7. ebf bbb01 sdcard flash remove 04366c6a-fde2-424d-9aea-1174cb24650d
download
Download a file from an SDCard Partition to a local machine.
From Command line terminal:
ebf <device name> sdcard download <src-file-path> <dst-file-path>
Example:
ebf bbb02 sdcard download tmp/file1.txt /home/tmp/

Successfully Downloaded "tmp/file1.txt" into "/home/tmp/file1.txt"
upload
Upload a file from Local Machine to an SDCard Partition.
From Command line terminal:
ebf <device-name> sdcard upload [SRC_FILE_PATH] [DST_FILE_PATH]
Example:
ebf bbb02 netboot sdcard /tmp/file1.txt fsroot/

Successfully Uploaded file "/tmp/file1.txt" into "fsroot/file1.txt"
usb
info
Provides the USB information on its size, partition, etc.
From Command line terminal:
ebf <device name> usb info
Example:
ebf bbb02 usb info

USB Information

sdb: 59.5G
sdb1: 2G (vfat)
sdb2: 57.5G (ext4)
side
Provides whether the USB is connected to the Zombie side or the Device side.
From Command line terminal:
ebf <device name> usb side
Example:
ebf bbb02 usb side

USB is connected to "device" side
switch
It will connect the USB to the Device side or Zombie side or Switch from the current side.
From Command line terminal:
ebf <device name> usb switch [device|zombie|side]
Example:
ebf bbb02 usb switch zombie

USB is switched to "zombie" side
ls
List the content of USB, by default it shows the partitions of USB and you can provide that partition or directory inside that partition, and It will show you the content of that directory.
From Command line terminal:
ebf <device name> usb ls [DIR_NAME_OPTIONAL]
Example:
ebf bbb02 usb ls sdb1

beaglebone_black.dtb           File       root         36K      Dec 17, 2020 08:20:14 PM
MLO                            File       root         108K     Dec 16, 2020 10:43:48 AM
powernet426.mib                File       root         2.5M     Dec 24, 2020 10:38:04 AM
uboot.env                      File       root         128K     Jan 01, 1980 05:30:00 AM
u-boot.img                     File       root         633K     Dec 16, 2020 05:21:22 PM
uImage-4.14-ts-armv7l          File       root         5.0M     Dec 17, 2020 08:20:08 PM
mkdir
Create a directory inside a USB partition, directory name is mandatory.
From Command line terminal:
ebf <device name> usb mkdir [DIR_NAME]
Example:
ebf bbb02 usb mkdir sdb1/tmp

Successfully Directory sdb1/tmp created
rm
Delete a directory/file inside a USB partition, directory, or file name is mandatory.
From Command line terminal:
ebf <device name> usb rm [DIR_NAME/FileName]
Example:
$ebf bbb02 usb rm sdb1/tmp

Successfully Directory sdb1/tmp deleted
format
Format a USB partition. The format partition information should be provided in the form of “,” separated of “PARTITION, PARTITION_TYPE”. The below example will format Partition sda1 into vfat and sda2 into ext4.
From Command line terminal:
ebf <device name> usb format partition,partition-type
Example:
ebf bbb02 usb format sda1,vfat sda2,ext4

Successfully format the partitions
partition
Create and format USB partition. The partition information should be provided “,” separated in the form of LABEL, SIZE(MB), PARTITION_TYPE, BOOTABLE(True/FALSE). The below example will create Partition A of size 1000 MB and type Vfat and the bootable flag is set to “True” and Partition B of size 8000 MB and type ext4
From Command line terminal:
ebf <device name> usb partiion label,size,partition-type,bootable(optional)
Example:
ebf bbb01 usb partition A,1000,vfat,True B,8000,ext4

Successfully created the partitions
backup
Create a backup of USB, you can also check the progress status of a backup job and also delete a backup job.
From Command line terminal:
ebf <device name> usb backup [status|remove] [ARGS]

Description
   status [JOB-ID]  it will provide the status off all the backup jobs in running or queue state
                    You can also check the status of a single job using backup Job-ID.
   remove [Job-ID]  It will cancel the backup jobs and remove them from the list
Example:
1. ebf bbb01 usb backup (To start a USB Backup)
2. ebf bbb01 usb backup status (To see the Backup Job Queue)
3. ebf bbb01 usb backup status 04366c6a-fde2-424d-9aea-1174cb24650d (To check the progress status of a backup job)
4. ebf bbb01 usb backup remove 04366c6a-fde2-424d-9aea-1174cb24650d (To remove a backup job from the queue)
flash
Upload/Extract/Copy/Flash a rootfs/file/image to a USB or it’s partition From Command line terminal:
ebf <device name> usb flash [local|server|status|remove] [OPTIONS]

Description
   local|server     Extract or copy a File/Dir from local system or EBF-Server
                    into a USB Partition or Directory.
   status [JOB-ID]  it will provide the status off all the flashing jobs in running or queue state
                    You can also check the status of a single job using upload Job-ID.
   remove [Job-ID]  It will cancel the jobs and remove it from the list

Option Includes:
  *   -f | --file            - path of a local file or EBF-Server
  *   -p | --partition       - partition in which you want to copy/flash image
      -t | --tool            - provide tool from [tar, cp, unzip, dd, zcat_dd, bmaptool] to upload/flash a file/image
      -b | --backup          - Backup USB befor flashing an image, valid options are [on/off]
      -m | --mkfs            - Format USB before flashing an image, valid options are [on/off]
      -a | --cmd-args        - any arguments you want to provide with upload tool selected
      -r | --remove-after    - This will delete file from EBF-Server after image flashing, valid options are [on/off]
   -bmap | --bmap-file       - Path of any bmap file

  *  Indicates Mandatory Arguments
Example:
1. ebf bbb01 usb flash local -f /tmp/hello.txt -p sda1
2. ebf bbb01 usb flash local -f /tmp/rootfs.tar.gz -p sda2 -t tar -a xz -m on
3. ebf bbb01 usb flash server -f rootfs.tar.gz -p sda2 -t tar -a xz -m on -r on
4. ebf bbb01 usb flash server -f rootfs.tar.gz -p sda2 -t tar -a xz -m on -r on -b on
5. ebf bbb01 usb flash status
6. ebf bbb01 usb flash status 04366c6a-fde2-424d-9aea-1174cb24650d
7. ebf bbb01 usb flash remove 04366c6a-fde2-424d-9aea-1174cb24650d
download
Download a file from a USB Partition to a local machine.
From Command line terminal:
ebf <device name> usb download <src-file-path> <dst-file-path>
Example:
ebf bbb02 usb download tmp/file1.txt /home/tmp/

Successfully Downloaded "tmp/file1.txt" into "/home/tmp/file1.txt"
upload
ad a file from Local Machine to a USB Partition.
From Command line terminal:
ebf <device-name> usb upload [SRC_FILE_PATH] [DST_FILE_PATH]
Example:
ebf bbb02 netboot usb /tmp/file1.txt fsroot/

Successfully Uploaded file "/tmp/file1.txt" into "fsroot/file1.txt"
u-boot flash using serial
For flashing u-bbot into a device using serial connection through Xmodem/Ymodem/Zmodem
From Command line terminal:
ebf <device name> uboot flash -f [uboot file path] -p [xmodem/ymodem/zmodem]
Example:
ebf bbb01 uboot flash -f /tmp/uboot.bin -p xmodem
ebf bbb01 uboot flash -f /tmp/uboot.bin -p ymodem
ebf bbb01 uboot flash -f /tmp/uboot.bin -p zmodem
Delete Zombie
Delete the Zombie and all the devices connected to it. Only admin can delete the Zombie.
From Command line terminal:
ebf zombie <zombie name> delete
Example:
ebf zombie Zombie01 delete

It will delete Zombie "Zombie01" as well as all the devices connected to it
Would you like to proceed [Y/N] ? [N] >>> Y
Zombie Zombie01 deleted successfully
Zombie Power
To Power on/off/reboot Zombie
From Command line terminal:
ebf zombie <zombie-name>
Example:
ebf zombie Zombie01 power on

Zombie Zombie01 is successfully power on
Example:
ebf zombie Zombie01 power off

Zombie Zombie01 is successfully power off
Example:
ebf zombie Zombie01 power reboot

Zombie Zombie01 is successfully power reboot
IOCX Power
To Power on/off/reboot IOCX
From Command line terminal:
ebf <device name> iocx power [on/off/reboot]
Example:
ebf bbb01 iocx power on

IOCX connected to "bbb01" is successfully power on
ebf bbb01 iocx power off

IOCX connected to "bbb01" is successfully power off
ebf bbb01 iocx power reboot

IOCX connected to "bbb01" is successfully power reboot
Search/Allocate devices
Description: Search for devices in EBF and allocate the first available device based on search options.
From Command line terminal:
ebf allocate device [--field=hostname|description|device_version|device_type|tags|lab_controller] [SEARCH OPTIONS]

Field selection and interpretation:
   hostname          search based on device name
   description       search based on device description
   device_version    search based on device version
   device_type       search based on device type
   tags              search based on device tag
   lab_controller    search based on device associated with a Zombie

Search Option:
   --search-exact=<name of device you want to search>
   --search-in=<list of devices separated by comma>
   --starts-with=<search the devices if it starts with text provided>
   --ends-with=<search the devices if it ends with text provided>
   --search-contains=<case-sensitive search if the provided text present>
   --search-icontains=<ignore-case based search if the provided text present>
Example:
1. ebf allocate device --field=hostname --search-exact=bbb1
2. ebf allocate device --field=device_type --starts-with=Test --ends-with=App
3. ebf allocate device --field=tags --search-contains=test
4. ebf allocate device --field=lab_controller --search-in=Zombie1,Zombie2,Zombie3
5. ebf allocate device --field=hostname --search-icontains=bbb --field=tags --search-contains=test
Submit LAVA Jobs
Description: To submit testjob on EBF and see results
From Command line terminal:
ebf lava jobs [OPTION] <job-id> <arguments>

Options:

 submit     To sumbit testjob YAML or Saved jobs to EBF
 resubmit   To resumbit already running testjob
 results    To see the test results in junit/tap13 format
 logs       To get the testjob logs
 status     To get the status of a testjob
Example:
Example 1: ebf lava jobs submit -f ./testjob.yaml
Example 2: ebf lava jobs submit -s saved-job-name
Example 3: ebf lava jobs resubmit 44
Example 4: ebf lava jobs status 44
Example 5: ebf lava jobs logs 44
Example 6: ebf lava jobs results 44 (default format tap13)
Example 7: ebf lava jobs results 44 --format junit
uuu flash
Description:
local|server|golden_image Select a File from local system, EBF-Server or a golden image
From Command line terminal:
ebf <device name> ebf <device name> uuu [flash|status|cancel] [zombie|appzombie] --file1 [local|server|golden_image] <file1-path> [OPTIONS]


Option Includes:
  *   --file1                    - path of a local file or EBF-Server
      --file2                    - comma separated path of files on local machine or EBF-Server
      --cmd-args                 - any arguments you want to provide with upload tool selected
      --uuu-script               - use this if file1 is uuu script
      -r                         - This will delete file from EBF-Server after image flashing, valid options are [on/off]

  *  Indicates Mandatory Arguments
Example:
Usage Examples:
   1. ebf imx6ull_1vk uuu flash zombie --file1 server u-boot-imx6ul14x14evk_sd.imx -r on
   2. ebf imx6ull_1vk uuu flash zombie --file1 local /home/u-boot-imx6ul14x14evk_sd.imx -r off
   3. ebf imx6ull_1vk uuu flash zombie --file1 golden_image u-boot-imx6ul14x14evk_sd.imx -r on --cmd-args "-b sd"
   4. ebf imx6ull_1vk uuu flash appzombie --file1 golden_image u-boot-imx6ul14x14evk_sd.imx --uuu-script
   5. ebf imx6ull_1vk uuu flash appzombie --file1 local /home/uuu.auto --file2 local /home/u-boot-imx6ul14x14evk_sd.imx,/home/ankit/imx-image-multimedia-imx6ul7d.wic --uuu_script
   5. ebf imx6ull_1vk uuu status appzombie
   6. ebf imx6ull_1vk uuu status appzombie 04366c6a-fde2-424d-9aea-1174cb24650d
   7. ebf imx6ull_1vk uuu cancel zombie 04366c6a-fde2-424d-9aea-1174cb24650d
Download Console Logs
Description: Download the console logs of a device
From Command line terminal:
Usage: ebf <device name> console logs [download] <save-logs-name>
Example:
Example1: ebf bbb01 console logs (show the console logs)
Example2: ebf bbb01 console logs serial0 download (download and save logs in current directory for console serial0)
Example3: ebf bbb01 console logs download /tmp/logs (download and save logs in /tmp/logs)
Resource
Get Resource
ebf <DeviceName> get-resource <ResourceType>
Example:
ebf rpi3-2 get-resource power-measurement
ACME1
Power Management
Start Capture
ebf <ResourceName> power-measurement start
Example:
ebf ACME1 power-measurement start

1639551980
Stop Capture
ebf <ResourceName> power-measurement stop <token>
ebf ACME1 power-measurement stop 1639551980
success
Get Data
ebf <ResourceName> power-measurement get-data <token>
ebf ACME1 power-measurement get-data 1639551980

timestamp,voltage,current 1572708765,5136.289,350.707 1572708766,5136.238,351.026 1572708767,5136.247,350.910 1572708768,5136.248,350.862 1572708769,5136.207,350.965 1572708770,5136.216,350.918 1572708771,5136.238,350.876 1572708772,5136.225,350.931 1572708773,5136.243,350.907 1572708774,5136.250,350.895 1572708775,5136.239,350.944 1572708776,5136.248,350.924 1572708777,5136.252,350.912 1572708778,5136.246,350.947 1572708779,5136.246,350.938 1572708780,5136.248,350.921 1572708781,5136.245,350.951
Delete Data
ebf <ResourceName> power-measurement delete <token>
ebf ACME1 power-measurement delete 1639551980

success
Camera
In order to execute below command you need to do add device resource map and resource config.
Refer “How to add camera Device Resource Map and Resource Config”:https://linuxlink.timesys.com/docs/bfc/admin_guide#How-to-Add-Camera-Device-Resource-Map-and-Resource-Config
Capture Still Image
ebf <ResourceName> camera capture
ebf CAM1 camera capture

http://172.16.30.246/camera/raspbian-2021-12-15_071208.jpg
ebf <ResourceName> camera capture -o <Filename>
ebf CAM1 camera capture -o myImage.jpg

Successfully Downloaded the file myImage.jpg
ebf CAM1 camera start-capture

17561152147
ebf CAM1 camera start-capture -d 20

1756115057
ebf CAM1 camera capture get-ref 1756115057

http://172.16.30.20/camera/rpi-demo-1756115057.mp4
Audio
In order to execute below command you need to do add device resource map and resource config.
Refer “How to Add Audio Device Resource Map and Resource Config
Start
$ebf <ResourceName> audio start
ebf AUDIO1 audio start

b8ea9ad2d6454d9caa10c1138bf25c89
Stop
$ebf <ResourceName> audio stop <Audio-Id>
ebf AUDIO1 audio stop b8ea9ad2d6454d9caa10c1138bf25c89

success
Get Reference
ebf <ResourceName> audio get-ref <Audio-Id>
ebf AUDIO1 audio get-ref b8ea9ad2d6454d9caa10c1138bf25c89

https://172.16.30.245/audio/test-b8ea9ad2d6454d9caa10c1138bf25c89.wmv
Download Audio File
ebf <ResourceName> audio get-ref <Audio-Id> -o <Filename>.wmv
ebf AUDIO1 audio get-ref b8ea9ad2d6454d9caa10c1138bf25c89 -o test_audio.wmv

Successfully Downloaded the file test_audio.wmv
Delete
ebf <ResourceName> audio get-ref <Audio-Id>
ebf AUDIO1 audio delete b8ea9ad2d6454d9caa10c1138bf25c89

success
Console Sharing
Status
ebf <device-name> console sharing status
ebf dev1 console sharing status

Console sharing is disabled for this device.
Enable
ebf <device-name> console sharing enable
ebf dev1 console sharing enable

Successfully enabled console sharing for this device.
Disable
ebf <device-name> console sharing disable
ebf dev1 console sharing disable

Successfully disabled console sharing for this device.
Appendix
How to setup SSL certificate for EBF-CLI
This section will provide you the information regarding how we can use EBF-CLI in secure mode using a valid SSL client certificate.
How To Download SSL Certificate
One can download an SSL certificate using a web browser or from a command line. In this section, We will explain the download procedure for Ubuntu with google-chrome as a web browser and it might be different for other distributions. If you are using some other distributions then you have to first install an SSL certificate and then you can use EBF-CLI.
Using Web Browser
Following are the steps to download an ssl certificate using a web browser.
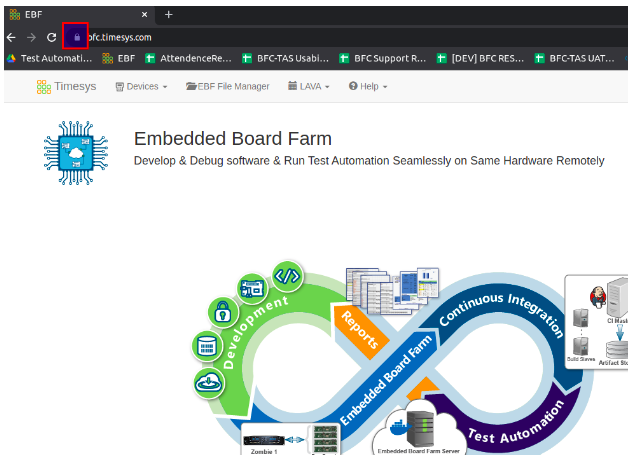
1 Access the EBF server URL and click on the “View Site Information” icon as shown below.
2 Then Click “Connection is Secure” -> “Certificate is Valid” -> Details
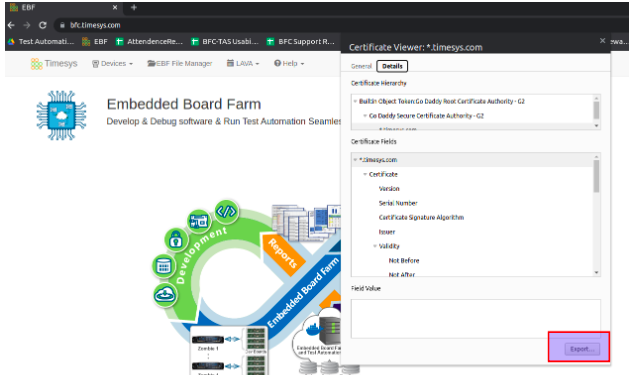
3 Then Click on “Export” and save the certificate with .crt extension e.g. ebf_client_cert.crt

Using Command Line
Following are the steps to install an ssl certificate using the command line.
1 In order to download a certificate from the command line, you need OpenSSL and a ca-certificates package installed on your system, if not already installed then install using below commands. Install open ssl package by using this command sudo apt-get install -y openssl. Install open ca-certificate package by using this command sudo apt-get install -y ca-certificates
2 From the command line type the below command.
openssl s_client -connect <EBF URL>:443|tee ebf_ssl_cert.crt
E.g openssl s_client -connect 172.16.30.246:443| tee ebf_ssl_cert.crt
3 After successfully executing the above command the ssl certificate will be saved as ebf_ssl_cert.crt
How to Install SSL Certificate
Following are the steps to install an ssl certificate.
1 Copy the downloaded certificate in /usr/local/share/ca-certificates/ directory
sudo cp ebf_ssl_cert.crt /usr/local/share/ca-certificates/
2 Run the below command in order to update the ssl certificate list
sudo update-ca-certificates
How To Configure EBF-CLI for SSL certificate
Following are the steps to configure ssl certificate for EBF-CLI.
1 Download and install the latest EBF-CLI. Click Here
2 Login to EBF using EBF-CLI
ebf login
3 Provide details to configure EBF-CLI on ssl.